VAZ 2108, 2109, 21099 cars with a carburetor engine are equipped with a fuel tank ventilation system.
It is part of the power supply system. The ventilation system of the gas tank is necessary to prevent the occurrence of excess pressure in it, which is created by the fuel vapors generated here (especially at high temperatures in the summer or when the car is strongly rocked while driving).
Operating principle of the gas tank ventilation system
Through two drainage tubes located in the fuel tank, fuel vapors, which create excess pressure in the tank, enter the separator through a hose. They condense in it, and the resulting gasoline flows back into the fuel tank. Fuel vapor is removed through a two-way valve connected by a hose to the separator.
Installation of the fuel tank ventilation system for VAZ 2108, 2109, 21099
Elements of the fuel tank ventilation system for VAZ 2108, 2109, 21099 cars
— Drainage tubes inside the tank
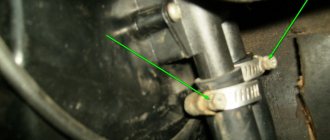
Two drain tubes are inserted into one another, their ends are located at the edges of the fuel tank to prevent fuel from leaking out when the car turns. They have a common outlet to the drain hose to the separator.
— Gasoline vapor separator
A sealed plastic tank installed in the rear right side of the car on a bracket. Connected by hoses to the fuel tank and a two-way check valve. Serves to condense fuel vapors entering it from the tank. Capacity 7 liters. The gasoline condensate from the separator is drained back into the fuel tank, and the vapors are released into the atmosphere through a two-way valve.
— Two-way check valve
Located near the fuel tank filler neck. Connected by a hose to the separator. Double-acting check valve: it introduces atmospheric air into the gas tank and, when the pressure of fuel vapors in it increases, releases them into the atmosphere.
Malfunctions of the gas tank ventilation system
— Breakdown of the two-way check valve
The result of a valve failure or clogged hoses will be that the pressure in the tank exceeds the norm, which can lead to its deformation, damage to the hoses and separator. As a result, a fuel leak may occur and a persistent smell of gasoline may appear both in and around the car.
Notes and additions
— On the injection engine 2111 of VAZ 21083, 21093, 21099 cars, instead of a fuel tank ventilation system, there is a fuel vapor recovery system. It is similar to the ventilation system, but in addition it has an adsorber with a valve that absorbs fuel vapors and, at the command of the control unit (purge of the adsorber), sends them back to the engine for afterburning. This allows you not to release toxic fumes into the atmosphere and comply with certain toxicity standards.
VAZ 2114 replacement of fuel hoses. It is necessary to replace the fuel pipe of the VAZ 2115 in the figure
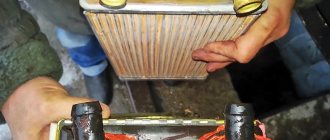
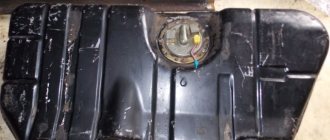
After washing the gas tank from dirt, we also wash the dirty filter. Gas tank of the VAZ 2109 (bottom front view). “1” the fuel tank itself, “2” the fuel drain line, “3” the fuel supply line.
VAZ 21093, 1.5, 1995. Hello everyone! I removed the gas tank, washed it with plain water, and finally doused it with boiling water. Are there any recommendations? and how to dry the gas tank?2109. My grandfather from the car depot taught me how to rinse. You pour water and sand into the tank, then it’s all a chore and a chore. Find out how to rinse the gas tank. Several ways to clean a gas tank from rust and Instructions for removing a gas tank using the example of a VAZ 2106. High-quality flushing of a gas tank: methods - Then remove the fuel tank of the VAZ 2109 by unscrewing the nuts and holding the gas tank with your hand.4. Rinse the gas tank, or at least remove and blow out the gas inlet. 5. If there is absolutely nothing and nothing to do, remove the inlet in the carburetor and blow it out. Community forum “VAZ: Repair and Improvement” on DRIVE2. I want to wash the tank. I’m tired of changing the fuel filter every week. Tell me who has already encountered this, how to do it correctly and what is the best way to wash it? To flush the gas tank, use Lobomid, MS or ML detergents. Then, to remove any remaining detergent, rinse and steam the gas tank. HELPFUL ADVICE It is recommended to remove the gas tank on VAZ 2108, VAZ 2109, VAZ 21099 cars with an assistant. On domestic VAZ 2110, 2109 it is installed at the bottom, on the VAZ 2106 or 2107 on the side, and on foreign cars again at the bottom. We must not lose sight of the change of seasons, when during the transitional spring-autumn period the tank needs to be cleaned and washed. There are several ways to flush the fuel tank. Flushing with electrolyte. The Nissan gas tank flap lock can be installed on a VAZ. To completely remove their residues from the surface, it is necessary to rinse the tank with a stream of very hot water. Removing and replacing the gas tank. We carried out the procedure for this procedure on a VAZ 2110 car; on other cars (2107, 2109-2114) the procedure was not - Before cleaning, you should drain the fuel from the tank.
The fuel tank of VAZ 2108, 2109, 21099 cars does not have a drain hole, so to do this, remove it from the fuel intake and thoroughly clean it with a toothbrush soaked in acetone. Wash with gasoline. Cleaning and flushing the gas tank. The gas tank can be cleaned and washed only after it has been completely dismantled. Replacing the gas tank is thus carried out in two planes - under the car and in the cabin. The design of the VAZ 2108, 2109, 2114 and 2115 does not allow the work to be done. Repair manual for the VAZ 2108, 2109, 2114, 2115. Remove fuel level sensor 9 from the tank. To remove dirt and deposits, wash the tank with detergents (Lobomid, ML, MS). After studying the repair manual and this algorithm, there should be no questions left about how to flush the carburetor of a VAZ 2109. Repeat the procedure after 5-7 thousand km. After first use, clean the gas tank as a preventative measure. The fuel tank on the VAZ 2109-2108 is located under the bottom of the car, and is located across the body at the rear. It is not necessary to replace the gas tank very often, since it is quite problematic to damage it, even though it is not protected by anything. After removing the gas tank to wash it, you will need to drain all the sediment from it and then fill it and thereby wash it with clean gasoline. Replacing the gas tank is thus carried out in two planes - under the car and in the cabin. Design of VAZ 2108, 2109, 2114 To flush the gas tank, use Lobomid, MS or ML detergents. Then, to remove any remaining detergent, rinse and steam the gas tank. HELPFUL ADVICE It is recommended to remove the gas tank on VAZ 2108, VAZ 2109, VAZ 21099 cars with an assistant.
Possible malfunctions in the operation of the device
The VAZ 2114 absorber, due to its intended purpose, is susceptible to clogging and at some point may become faulty. Problems are not easily determined and often only by secondary symptoms, for example, increased pressure in the fuel tank. It’s just that gasoline vapors, due to wear of the separator, remain locked in the space of the tank and begin to put pressure on its walls. An increase in pressure can be detected when the tank cap is unscrewed and a characteristic hissing sound is heard.
Sometimes the gas tank cap simply shoots out of the neck, which means that the pressure has reached a critical level and the adsorber must be urgently changed. If there is a problem with the adsorber, the engine speed begins to jump up and down. Many car owners write on forums that you can remove the VAZ absorber and not suffer. But everything is not so simple, and there are never unnecessary parts in cars.
Removing the absorber alone is not enough; you need to think about what to do with gasoline vapors that have nowhere to be discharged, and that the ECU may also have to be reconfigured. After all, some types of on-board engine processors find a malfunction in the purging of the fuel system and put the engine into emergency mode, in which it will not be possible to drive normally.
As for malfunctions, the problem area of this adsorbent system is the purge valve. You can repair it yourself
All you need is a flathead screwdriver, but be careful when removing it. The point is in the valve fastening, it is often not metal, but plastic, it is not difficult to break it
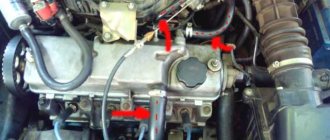
The mount is located on the engine cover. There are also clamps on the valve itself, which also require a careful approach. We remove them and take out the problematic part.
https://youtube.com/watch?v=RfKNQGlqaEQ
https://youtube.com/watch?v=RfKNQGlqaEQ
Rare malfunction.
If you blow into the valve and air comes out of it, this means a 100% malfunction. A normal part will not allow air to pass through. If there is a problem with the valve, the car experiences problems when starting the engine hot, and gasoline consumption increases. If the problem is not corrected, there will be a Check Engine and loss of normal driving dynamics. Failure of the adsorber seal and failure of the purge valve can cause unstable engine operation at idle until it stops.
So, let's move on to valve repair. In its upper part there is an adjusting screw fixed with epoxy resin. Screw the screw in until it stops, counting the turns so that if something happens, you can return the canister valve to its original position. You can drop a little carburetor flushing fluid into the valve fittings. Then we blow it in the open position with compressed air. The repairs are done.
The valve can also wear out due to heat near the radiator, and there is nothing you can do to help it. The quality of the material from which the adsorber valve is made is not the best. The only solution can be to replace or change the location to a cooler one, for example, closer to the adsorber itself.
Fuel tank design
The main function of a fuel tank is to store a certain amount of fuel. At the same time, everything must be organized so that the likelihood of a fire hazard is minimized.
On VAZ cars the fuel tank is located under the rear seats. Due to this placement, in the event of serious accidents and car overturns, the tank in most cases remains undamaged. VAZ fuel tanks are made of leaded steel sheets. Thanks to a thin layer of lead that protects against corrosion, the service life of the tank is significantly increased. The outside of the fuel tank is covered with dark enamel.
The fuel tank, covered with dark enamel, is reliably protected from corrosion
The fuel storage volume of the VAZ 2108 and other similar models is 43 liters. This takes into account the reserve, but it is not recommended to fill the tank to the brim. You should always leave a free volume of about four liters. It is especially important to do this in the summer, since the fuel expands as the temperature rises. If the tank is filled to the brim, then after swelling it may simply burst. The volume of the VAZ gas tank is designed in such a way that the autonomous mileage is enough for 500 kilometers, and this is considered a normal road segment in modern conditions.
The tank is securely fixed to the car body using flexible and durable plate-type clamps. Rubber gaskets must be placed under the clamps to ensure a tighter connection.
The tank mounting plates are very flexible and durable
Gasoline is poured through the neck on the right (in the direction of travel) rear side of the body. It is closed with a screw cap.
The neck of the VAZ 2115 tank is closed with a tight lid
Main elements of the fuel tank
The neck is connected to the tank cavity through the filler hose. The other two tubes are integrated with a seven-liter separator installed outside the tank and designed to capture gasoline vapors. As a result of wear, the separator may split along the seam and gasoline will begin to leak out. It can be replaced without dismantling the tank. Moreover, you can temporarily cover the separator seam with a gasoline-resistant sealant.
The separator tank holds seven liters of fuel
In order not to remove the separator (it is necessary to dismantle the bumper and filler pipe), experienced car owners simply disconnect the hoses of the element and cut it out with metal scissors. In place of the separator, a fine fuel injection filter is installed, which performs similar functions.
Instead of a separator, you can install a fine fuel filter
Some separators are equipped with a double-acting valve to minimize fuel leakage. The valve admits and releases gasoline vapor. Once in the tank, the vapors condense and thereby reduce fuel consumption.
Canister valve. How to check it
The principle of checking on most cars is the same, but we will look at the example of the Chevrolet Lacetti.
Problems with the canister purge valve can be divided into several main points:
- impulses do not arrive to the valve
- Valve coil failure
- valve stuck open
- valve jamming in closed position
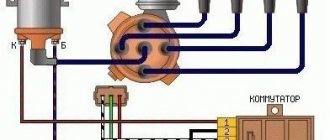
It is very easy to check the pulses, wiring and valve winding with the Chevrolet Explorer program, in the “mechanism control - canister purge valve test” tab. When you click on the “ON” button in the program diagram, we will see the following signals
This means that the ECU is giving a command to the valve. At the same time, the sound of clicks will emanate from the valve in time with these signals, which, in turn, means that the pulses reach the valve and the winding is intact, since the valve is activated.
By the way, if you don’t have a diagnostic adapter yet, then I advise you to definitely read the diagnostics section and purchase an adapter.
The electrical part is OK. We checked this. But to be sure that the valve is not physically jammed, it can be removed and checked. It is very easy to dismantle and it takes me no more than 30 seconds.
Two tubes and a block with two wires are connected to the valve. The valve itself is not even screwed on, but simply inserted into its working place.
In the photo one tube has already been removed.
To remove the valve, just pull off the two tubes marked with a green and a red arrow (the red one has already been removed, and the green one is hard to see from this angle). The tubes are removed simply and easily without any clamps.
Then press the metal lock and unfasten the wire block (shown by the yellow arrow)
After this, press on the fitting shown by the red arrow and the valve will come out of its seat.
The valve is normally closed, that is, without voltage applied it does not allow air to pass through. You need to check this in any available way - with a rubber bulb, an inflatable ball, etc.
I had on hand a syringe and a piece of vacuum tube left over after replacing the absolute pressure sensor tubes.
When moving the syringe piston, resistance should be felt, and the piston itself tends to return to its original position, which means sealing the valve. When removing the tube from the syringe, a characteristic puff should be heard. This means that the adsorber valve is closed hermetically.
All that remains is to check the opening of the valve. To do this, we take two wires with such mini-mothers
And connect it to the adsorber valve connector. You can carefully and simply use a wire without a tip.
Move the syringe plunger and connect the wires to the battery. When connected, you should hear that same zilch sound, which means that the valve has opened and released pressure.
It happens that the valve does not open. Then just replace it with a good one.
That's all the simple methods on how to check the adsorber valve.
Peace and smooth roads to everyone!!!
I like 41+
Members who liked this post:
Method 2. Using a fuel pump.
You can drain fuel from a VAZ 2114 (injector) without removing the gas tank using the car’s fuel pump. This method is much simpler, but more dangerous. There is a high probability of damage to the fuel pump. Work algorithm:
- Select a hose of such diameter that it can be put on the fuel rail.
- Unscrew the nipple installed in the fitting and put on the hose.
- Ensure that the fuel pump receives 12 V.
- Pour the liquid into a container prepared in advance.
This method should be used as a last resort, as it is unsafe for the car’s fuel system. In addition, it will not allow all the fuel to be completely drained from the tank.
Removal Features
The VAZ absorber is sometimes removed completely. To do this, you need:
- replace the gas tank cap with a leaky one;
- plug the supply and discharge pipes;
- often change the ECU firmware.
As mentioned above, you should not approach the adsorber as an unnecessary thing, and if you decide to remove it, remove it correctly so that the gas tank remains ventilated and not tightly sealed, as if there is an adsorber. Those who convert a carburetor engine to an injection engine have an advantage. If they do not touch the tank pipes, they do not disturb the carburetor ventilation system of the tank, so they do not need an adsorber.
Causes of adsorber malfunctions on a VAZ
But in the case of the VAZ 2114, which has an injection engine, everything is more complicated. However, there is no point in removing the absorber. The advantages that the VAZ absorber has are in reducing harmful emissions into the atmosphere, but that’s where they end. And the high cost and the fact that it can interfere with more important parts in the engine compartment become the main reason for removing the device. Why do some drivers make this difficult decision?
Basically, they just don’t like the device, but that’s not an argument. Experienced car enthusiasts remove it when malfunctions occur, so as not to spend money on a new one. It cleans up easily. A fine filter (usually from a VAZ 2108 carburetor) is put on the hose from the separator; in this case, gasoline vapors escape into the atmosphere. The hose from the valve is closed. The engine control program is adjusted so that the ECU does not turn on the Check Engine.
It is better to drill a 2 mm hole in the tank lid to make ventilation, like on a carburetor engine. Otherwise, the tank may not withstand either external or internal pressure. Most often, a vacuum develops in the tank and it crushes like an empty tin can. Many car enthusiasts talk about this for the edification of beginners. What is needed to remove the adsorbent device for replacement?
First you need to free it from its fastenings. We disconnect the block along with the wires, as well as the hose for supplying gasoline to the throttle assembly. We remove the purge valve and remove the fuel vapor outlet hose from the separator. The adsorber bracket is installed on 3 bolts, which must be unscrewed and the bracket carefully removed. The new device is installed on the same special mount, and the fuel vapor supply hose is connected to the purge valve. Remember: when changing the adsorber, you need to change all the pipes from it.
Take care of nature and do not throw away the adsorber. As a last resort, it is better to install a new one, since this is an ordinary filter that works for a very long time and does not require constant monitoring. Environmental standards were not invented to harm, but so that our children and grandchildren could live after us.
Don’t forget that the traffic police inspector and the inspection station personnel may catch you interfering with the design of the car, then you will not be able to pass the technical control. Listen to the advice of experienced car enthusiasts, take care of your car, be polite on the road, then any trip will only bring you a good mood.
How to remove the gas tank on a Lada X Ray
Dismantling the unit is necessary for washing or repairing it. The process does not require deep knowledge or the presence of a highly specialized instrument, which makes it possible to perform the operation independently. The sequence of actions is as follows:
- Put the car on the lift.
- Release the pressure inside the pressure lines. To do this, you need to turn off the power to the fuel pump and start the engine until the fuel runs out (stops).
- Fold down the rear seats to access the pump.
- Disconnect the power supply from the battery and loosen the mounting bolts. Then you can remove the unit from the cylinder.
- Open the filler flap and unscrew the mounting flange screws (2 pieces in total).
- Remove the rear wheel.
- At the top under the arch, near the filler pipe, there is a body weight mount. You need to unscrew it with head No. 10 and disconnect the wire from the stud.
- Next we go down. 5 nuts and 1 bolt of the pipeline protective casing are unscrewed and the part is removed.
- Using a flat-head screwdriver and pliers, disconnect the fastening clips of the TB thermal protection fasteners.
- Remove the foil screen from the seat.
- Remove the exhaust system from the brackets and move it to the left side in the direction of travel of the car.
- Next, you need to disconnect the fuel supply and steam return pipes from the absorber. To do this, the latches are pressed in and the tubes are pulled off the fittings.
- The next step is to remove the handbrake line clamps (you can simply move the lines apart).
- The suspension bolts are unscrewed with a wrench and the tank is removed from the car.
The assembly of the structure is performed in the reverse order.
Lada Kalina
Removing the hatch from the gas tank on this model is quite problematic. It is fixed quite cleverly:
- First, unscrew the nut securing the tank lid leash. To do this you will need a key for 7;
- Next, the lid itself is pulled out;
- Using a Phillips screwdriver, unscrew a pair of screws securing the hinge platform;
- The platform is sealed. Before removing it, you will have to cut off the excess. After this, use a screwdriver to tear off the loop from the sealant. To avoid damaging the paint, wrap the screwdriver blade with electrical tape;
- The next step is to raise the hatch slightly;
- Before removal, you need to cover the end of the hatch and the body around it with masking tape. This will prevent damage to the paintwork. To remove it, you need to position the hatch at an angle of 30-40° and move the structure towards the rear bumper. This way, you can remove the hatch without any problems.
The hatch on Priora and Grant is removed in the same way.
BMW e34
. On this model, the hatch is secured with a hinge. The fastener is made in the form of a plastic frame with reed fasteners. In this case, 2 fastenings are located at the top and 1 at the bottom. First, use a screwdriver to press out the upper fasteners. After which the loop is removed from the car along with the hatch.
Skoda Octavia. On this car, the hatch can be removed extremely easily. First, unscrew the tank cap. To prevent any objects from getting into it, the filler neck is plugged with something. Next, use a screwdriver to press the seal away from the neck. Having freed it from the seal, simply pull out the entire hatch structure. Installation is performed in reverse order.
Kia Spectra. To carry out the work you will need a minimum number of tools, only 2 screwdrivers. One is spline and the other is cross. First, use a slotted screwdriver to remove the plug cable clamp. After that, use a Phillips screwdriver to unscrew the loop; it is secured with 2 screws.
Daewoo Lanos
. On this model, the hatch is secured with two screws. There shouldn't be any problems dismantling it. When reinstalling, the most difficult thing is to tighten the first screw.
Installation location of the fuel tank VAZ 2114
On cars of the Lada line, the fuel location element is installed under the bottom of the car.
The location is not accidental; first of all, it is due to safety reasons (preventing deformation and ignition of fuel). The volume of the VAZ 2114 gas tank is 43 liters, which corresponds to approximately 550 - 560 kilometers with a normal, smooth driving style (without fast acceleration). The filler neck is located on the rear wing of the VAZ on the passenger side.
Common problems and their solutions
If we talk about the most important problems, “sores” that are inherent in fuel storage devices, the most common are the following: - fuel leaks; - the appearance of excess pressure inside.
Loss of gasoline can be caused by the following reasons:
- Formation of a crack due to corrosion or deformation of the metal.
- One of the fuel hoses is bent or damaged.
- Leakage of hoses as a result of weak tightening of clamps at the joints.
Excessive, excessive pressure in the gas tank can be caused by a combination of the following reasons:
- high external temperatures;
- situations when the plastic cap of the VAZ 2114 gas tank does not have a hole for the release of gasoline vapors;
- poor functioning of the adsorber or its gas lines;
- lack of normal removal of excess fuel vapors.
Gasoline vapor recovery system operating principle.
The engine is switched off.
Car gas tank device and principle of operation
When the car engine is turned off, pressure is created in the fuel tank due to the evaporation of fuel. Fuel vapor enters the separator. Fuel can also get there under pressure when the tank is fully filled. If gasoline enters the two-way valve pipeline due to excessive pressure, the blocking and safety valves will operate. In this case, an emergency release of pressure to the outside occurs.
The separator is used to separate vapors from gasoline. Under the influence of pressure, a two-way valve opens and vapors enter the adsorber through the pipeline, where they are absorbed by activated carbon.
Work after starting the engine.
After starting and idling the engine, due to fuel consumption and a decrease in its volume, the pressure in the gas tank decreases and the two-way valve closes. This leads to disconnection of the adsorber and the gas tank. Subsequently, when the engine is idling for a long time, an even greater vacuum is created in the tank and, under the influence of vapor pressure from the adsorber, the two-way valve opens and the adsorber is partially purged, that is, part of the vapor is returned to the tank. When the car speed is above 20 km/h, the engine temperature is not lower than 80 degrees. C, the calculation of the fuel supply to the cylinders will be carried out in a closed cycle, that is, with the participation of the oxygen sensor readings and the engine will not operate at idle speed (the throttle valve is open more than 2%), the process of purging the adsorber will begin. In this case, the controller will briefly begin to supply power to the adsorber purge valve.
The pulse frequency depends on the engine operating mode and is within 16 Hz. When the purge valve is activated, the adsorber filter element communicates with the atmosphere, from where outside air comes, and with the intake manifold, where gasoline vapors evaporated from the filter element enter. When the vehicle speed decreases below 2 km/h or the throttle valve is opened more than 98%, the controller stops supplying power to the canister purge valve.
admin02/10/2011
A comment
Name *
Website
This site uses Akismet to reduce spam. Find out how your comment data is processed.
“Oxygen sensor design, purpose, operation.
Ignition distribution »
Tags
VAZ, VAZ malfunctions Sensors Ignition Injector Devices Starter Circuits Electric cars Power supply VAZ 2110 gazelle gazelle business recorders car repair
Recent Entries
- Laser headlights.
- Advantages and disadvantages of halogen lamps
- Design and principle of operation of parking sensors
- Multifunctional device Roadgid X7 Hybrid GT
- Malfunction of the GAS ignition system
Archives
Archives Select month September 2022 August 2022 July 2019 December 2022 August 2022 July 2022 June 2022 May 2022 April 2017 March 2022 December 2016 November 2016 October 2016 September 2016 August 2016 July 201 6 June 2016 May 2016 April 2016 March 2016 February 2016 November 2015 October 2015 August 2015 July 2015 June 2015 May 2015 April 2015 March 2015 February 2015 January 2015 December 2014 November 2014 October 2014 September 2014 August 2014 July 2014 June 2014 May 2014 April 201 4 February 2014 January 2014 December 2013 November 2013 October 2013 August 2013 June 2013 May 2013 March 2013 February 2013 January 2013 November 2012 October 2012 September 2012 August 2012 July 2012 June 2012 May 2012 April 2012 March 2012 February 2012 January 2012 December 2011 November 2011 October November 2011 September 2011 August 2011 July 2011 June 2011 May 2011 April 2011
Categories
- Accumulator battery
- Video
- Generator
- Sensors
- Diagnostics
- Ignition
- News
- Equipment
- Devices
- Repair
- Spark plug
- Starter
- Scheme
- Devices
- Electric cars
- Electricity supply
We are in social networks
Autoelectrics@ All rights reserved. When copying site materials, you must provide a link to the site.
Common FLS malfunctions
Often, the driver can observe the following situation: while driving on a flat road, the instrument panel displays information about a full tank, and after driving off-road, about an empty one. The readings jump, which is clear evidence of a malfunction of the VAZ-2114 FLS. This disease often manifests itself due to wear on the contact tracks.
In some cases, the situation can be corrected quite easily - bend the slider so that it is located above the worn-out place in the diagram. But such a solution to the problem is not always appropriate. Sometimes you have to replace the entire regulator.
see also
Other malfunctions of the mechanism include:
- The pointer is at zero - most likely the problem is related to the limited travel of the float.
- The low fuel light does not light up - there may be a problem with the potentiometer.
- When starting the engine, the indicator does not light up - there is a problem with the electronics.
- Incorrectness of the data displayed on the instrument panel - you should check the tightness of the float.
If such symptoms of a device malfunction appear, experts also recommend checking all the wires securing the nut sensor. The fastening elements clamp the mass, so if they are not tightened well, the contact will appear and disappear. If the sensor does not show the fuel level of the VAZ-2114, then the contacts need to be cleaned, and if this cannot be done, then they can be completely replaced.
Operating principle of the adsorber
Many people mistakenly believe that when the engine starts, voltage is immediately applied to the canister valve and it opens, purging the canister. I even saw “manuals” and “training videos” about this. In fact, the purge valve is controlled by the ECU using special algorithms based on readings from temperature, air flow, etc. sensors.
The greater the engine air consumption, the longer the duration of the ECU control pulses and the more intense the purging.
It is impulses, and not just the supply of voltage! Therefore, there is such a thing as “adsorber purge duty cycle,” which ranges from 0% to 100%. Here is the duty cycle of the canister purge in the Chevrolet Explorer diagnostic program
During the entire trip, this is only the first signal from the ECU to purge, equal to only 6%. So this is a complex and important process in engine operation.
Here is the duty cycle of the canister purge in the Chevrolet Explorer diagnostic program. During the entire trip, this is only the first signal from the ECU to purge, equal to only 6%
So this is a complex and important process in the operation of the engine.
Draining gasoline from a VAZ-2114 gas tank: all methods
Open the hatch, unscrew the lid and let's go!
Draining fuel from the tank of domestic cars is much easier than from a foreign-made vehicle. But draining gasoline from a VAZ-2114 car is also not an easy task. One way is to remove the tank from the car , but this will take more time and effort. But you can do it in an easy way.
Method without removing the tank
Draining gasoline from the gas tank
The process takes a little time, but you need some skill and the necessary tools. First you need to get a hose , the length of which will correspond, as well as a special container for gasoline. Next, you need a pump or some analogue or a regular home vacuum cleaner.
Once all the tools are at hand, you need to unscrew the tank cap and insert the hose there. It is recommended to check the fuel level in the tank. This can be done either with a regular stick, or by inserting the hose into the tank and then removing it, thereby checking what level the gasoline is at. We lower the hose as low as possible to remove all the fuel from the tank .
No. 17. Simplification of the tank ventilation system - logbook Lada 2115 2005 on DRIVE2
Good day to all. Ever since I replaced the tank, one of the reasons for which was a cracked fuel gas separator, I have had a bad ventilation system using a fuel filter from a classic. That is, the ventilation pipe went to the filter left under the bumper and that was all. Recently, the problem of a small spill of gasoline on the bumper when fully refueling began to plague me, and, as it turned out, gasoline was flowing out of this pipe. I then decided to study the tank ventilation schemes according to the new and old (without adsorber) scheme, since the always dirty bumper from gasoline was very annoying for me, and I don’t like refueling 10 liters at a time, it’s better to have a full tank at a time. In addition, a long time ago comrade Maniak665 suggested completely removing the adsorber from the system. After searching the Internet, I found the following two diagrams.
Basic gas tank malfunctions
The gas tank is made of strong, durable material and lasts for the entire life of the vehicle. However, in some situations it may require repair. These situations are as follows.
Fuel line clogged.
Hole in the tank.
Leak on the welding line of the tank body.
The cause of clogged hoses can be dirt getting into the fuel mesh in the tank itself. The solution in this case is quite simple - periodically wash or change this mesh.
If a hole is formed in the tank as a result of a mechanical shock, then it can no longer be repaired. In this case, the tank will need to be replaced.
If gasoline leaks from the welding line of the tank halves, you can try to seal this place. However, this procedure is very complex and requires appropriate experience.
A gas tank with extensive corrosion cannot be repaired.
Changing the device yourself
To change the adsorber, it is enough to perform a number of simple manipulations. In this case, there are two solutions - do the work yourself or go to a service station and entrust the problem to specialists.
The advantages of the first option are cost savings and high speed of work. The sequence of actions is as follows:
The work time is 15-20 minutes.
As soon as the faulty unit is dismantled, proceed with the installation of a new device.
Here the sequence is as follows:
- Connect a long piece of rubber tube to the hose through which fuel vapors flow into the purge channel.
- Connect the short part of the tube to the intake tube from the separator.
- Put the adsorber in place.
- Connect the vapor supply pipe to the purge channel, which is installed on the motor cover.
- Connect the block with wires.
- Install a tube between the purge channel and the adsorber. Make sure that the material from which the pipe is made is resistant to oil and gasoline.
How to drain gasoline from a VAZ 2114 tank, some tips
Motorists whose cars have been damaged by low-quality gasoline need to do everything possible to get their car back into working condition. How to drain gasoline from a VAZ 2114? What do you need to know about this difficult process?
Why drain gasoline?
It is necessary to drain gasoline if the car owner previously filled the tank with low-quality fuel. To eliminate any negative consequences associated with the destructive influence of such gasoline, it is necessary to drain all the remaining fuel in the tank.
Poor fuel quality is far from the only reason why motorists waste gasoline. It happens that at gas stations there are cases of topping up diesel fuel. It’s good if the car owner finds out about this quickly enough. Otherwise, he will have to flush not only the tank, but also the fuel pump.
Some car enthusiasts dump fuel in order to make big money from it. For example, a driver can refuel a car in another country at a low price, and then return to Russia and sell the fuel, making a profit. Naturally, we are not considering this option, but are talking only about those cases when it is necessary to drain gasoline in order for your car to continue to serve you faithfully.
Is it possible to drain gasoline from a VAZ 2114 with your own hands?
You can drain gasoline without involving specialists. Every car enthusiast can do this. All you need is to strictly follow the instructions presented below.
Particular care should be taken because gasoline is highly flammable and can cause serious damage not only to your car, but also to your health. It is advisable to carry out all gas tank cleaning procedures outdoors.
You will also need the help of another person. This is due to safety precautions. If a fire occurs, his help may prove invaluable.
How to drain gasoline from a VAZ 2114 tank
On the 2114 model, pumping out fuel is not as easy as it might seem at first glance. The VAZ 2114 is a modern car, so it has a special design for the tank filler neck.
It will not be possible to pump out gasoline even with the help of a dropper tube. It is for this reason that many ways have been invented to drain gasoline from this model. We will consider those that are suitable for ordinary car enthusiasts.
Ways to drain gasoline
In some situations it is necessary to completely dry the tank. The reason for this is that condensation may form in the tank. It is able to settle on the walls, and then mix with gasoline and settle to the very bottom.
This can pose a serious threat to the fuel system, so if too much sediment accumulates, the sediment must be removed somehow. To do this, you can remove the tank. This will not be easy to do. Some car enthusiasts who have never removed the tank will have to spend a couple of hours. In addition, to remove the tank you will need a lift or at least an inspection hole.
If you think that you can cope with this difficult procedure, then first of all you should remove the filler pipe from the tank. In this case, there will be very little mixture of gasoline and condensate left in it. It should only be drained when the gas tank is completely removed.
- Once the tank is removed, you will need to give it a good flush with clean gasoline. Instead of gasoline, you can use a mixture of alcohol and gasoline.
- Once this is done, all you have to do is dry out the gas tank and reinstall it on the car. This method guarantees complete removal of any traces of fuel.
Draining gasoline without having to remove the tank
If you do not have the time and energy to dismantle the gas tank, a standard fuel pump can help you. In the 2114 model it can be found in the tank itself.
- To do this, you will need to find a hose that has a suitable diameter so that it can be placed on a special fuel rail fixture.
- After this, you will need to unscrew the nipple from the fitting, and then put on the hose and apply 12 V to the fuel pump.
- Now you can start draining the fuel into a previously prepared container.
Important information! One of the undesirable consequences of using this method is clogging of the fuel line, as well as the cleaning filter and fuel pump.
Removing gasoline from the car interior
This method cannot guarantee complete removal of fuel, but it is quite effective.
Original and analog auto parts for VAZ
In our Ivanovo auto parts catalog you can familiarize yourself with the entire range of products available. All Ivanovo auto parts are original and designed for VAZ cars. For your convenience, the catalog is divided into categories of auto parts, depending on their functional and intended purpose:
- Parts and components for the body;
- Motor elements;
- Suspension parts;
- Steering;
- Components of the exhaust system;
- Parts for the brake system;
- Electrician;
- Interior accessories;
- Wide range of automotive fluids and filters;
- Fastening elements;
- Other materials and auto parts.
In addition, our VAZ auto parts store in Ivanovo offers you unique solutions for tuning your favorite car, and only here you will find the necessary accessories and elements for tuning and restyling of any complexity - from ordinary LED lighting to a complete engine rework and updating the external design of the car .
If you are tired of seeing your car in its usual gray and boring appearance, then choose interesting accessories and restyled elements that are intended not only for beauty and decoration, but also have a practical function. In the new format, your car will be able to compete even with leading imported brands.
Repairing your car is a delicate matter, but necessary and important. And without the availability of branded VAZ Ivanovo auto parts, it will be difficult to cope with the assigned tasks. Whether you do the repairs yourself or want to contact a service center, in any case, to guarantee the safety and reliable restoration of the full functionality of your car, you will need original high-quality spare parts that would ideally fit your car model and fully meet your goals.
We will help you solve any repair problems, because in our VAZ Ivanovo auto parts store you will find everything you may need for repairs.
As for spare parts directly for repairing a VAZ car, all products meet the highest standards of quality and manufacturability, and are produced by the automaker itself, which guarantees its originality.
All VAZ auto parts that are presented in the catalog are available, and placing a purchase order will take you a minimum of time.
How to remove the gas tank on a VAZ 2114
"Note! Before carrying out work related to dismantling the fuel tank, be sure to use up or manually drain all gasoline from the system.”
After the preparations, follow these 10 simple steps:
- The first thing you need to do is disconnect the negative terminal from the battery.
- The second important step is to relieve pressure in the fuel system.
- Now is the time to disconnect all hoses, fittings that are connected and fed directly from the gas tank. To do this, do the following: - remove the rear seat in the car. Open the protective flap of the tank; if a large amount of dust has accumulated under the lid, remove it. Press the special plastic clips and disconnect the fuel lines from the fuel pump fittings; — disconnect the contact chip and carefully remove the fuel pump from the tank without damaging the pump float.
- Move under the bottom of the car. Locate the connection between the tank and the filler pipe hose. The elements are fastened using clamps that need to be loosened. We do the same with the gravity valve hose.
- Disconnect the hoses.
- At this stage, ensure that the fuel tank body is properly supported. To do this, place a special stand or ask someone to support the product with your hands.
- Holding the gasoline storage container, unscrew all the bolts securing the clamps. Move the clamps themselves to the side.
- Unhook the securing straps.
- Remove the tank (the brake pipe may prevent its removal; in this case, you just need to tilt the tank).
- This completes the replacement of the VAZ 2114 gas tank. Installation should be done in reverse order.
When starting the engine after reinstallation, be sure to check all joints and connections for leaks. If leaks are detected, tighten and tighten the clamps and hoses.
Every child knows why a gas tank is needed in a car. From the outside it seems that this is the simplest and most reliable element in the car. However, during long-term operation or as a result of an accident, the tank itself or its elements may be damaged. Any driver should know how to act correctly in these situations so as not to aggravate the problem.
- How to repair or replace the gas tank of a VAZ 2107
Currently the average delivery time on ORDER is approximately 1 week.
All body elements are painted in Tolyatti by our supplier in the color of the new car in an industrial environment according to the standards and in compliance with AvtoVAZ technology using modern paint and varnish coatings.
Prices are indicated at the warehouse in St. Petersburg. Please check the cost of delivery to your city individually.
CHOOSE SECURE PAYMENTS After payment you will receive an electronic cash receipt
Trunk seal VAZ 2108-21099, 2113-2115
with 12% discount
Original sport nameplate from Lada Granta Sport
with 10% discount
Reflectors at the door
with 15% discount
Freebie! Silent door lock bolts with silicone insert for VAZ 2108-2115, 2110-2112
with 19% discount
Stands for tweeters (aimed at the glass) for VAZ 2108-21099, 2113-2115
with 9% discount
Pay for goods by credit card, using QIWI, Yandex.Money or WebMoney and save on your purchase from 4%, avoiding postal and bank commissions
50 customers chose this product
Factory (original) gas cap.
Attention! When ordering, please indicate the color of your car. Please note that the color of the front fender may not match the color of the body if the car is old, as the paint fades over time.
Weight, kg: 0.35 Dimensions, cm: 21 x 16 x 4 Volume, m3: 0.00134
inspection of the separator and replacement of check valves - logbook Lada 2114 gReyMouse 2005 on DRIVE2
It’s already warmer outside and due to the above-zero temperatures, the old problem has returned, namely the smell of gasoline and the constantly wet separator.
but in order to ensure its integrity and carry out a visual inspection, you need to remove the bumper.
Let's start removing the bumper
unscrew these bolts to pull off the bumper on clips along with the stiffener, I didn’t have clips)))) PS forgot to take a photo, two more bolts are located at the bottom of the bumper almost in the middle
unscrew the protection approximately to the middle of the wing so that there is more opportunity to bend it
Now let's move on to the side mounts
for convenience it is better to jack it up
and here is the mount itself, unscrew it on both sides and the bumper is removed! You can’t do without WD-40, but it didn’t help in this case either, the bolts broke (((
such perfect cleanliness awaits you under the gas tank flap))))) The culprits who caused it all to start are marked in red. the separator turned out to be intact...
this is basically the end result, I changed some presses, valves that were clogged, changed them to regular ones
On the left is my valve, only there is something metallic rattling inside, and on the right what should it be)))))
I bought new mounts for the bumper, 2a check valves and a clamp
Result of the work: after two days of driving, everything is dry near the neck! Thanks to everyone who finished reading, I hope this post is useful to someone! Good luck to everyone and avoid any breakdowns!
never remove the bumper like this)))))