December 18, 2014 Lada.Online 149 485 24
Depending on the configuration, the layout of the Lada Kalina stove may vary. In one case, the design of the ventilation and heating system is simple and reliable, in the other, temperature control in the car interior is controlled by automation and electronics. Let's look at the operating principle of the Lada Kalina heater in different modifications.
➤ How to unfold or remove the rear seat on a Granta Liftback
Unlike the “Sport” modification, the seats of the Lada Granta Liftback are not equipped with height adjustment. For a driver of average height this is not significant. But for those who are over 180 cm or under 165 cm, this becomes a problem.
Often, owners independently install seats from Opel, Ford, Mercedes-Benz, Audi in order to increase comfort.
Driver and passenger front seat overview. Adjustment mechanism
The ergonomics of the driver's seat are good, the range of settings for the steering column and seat allows a driver with a height of 180 cm to fit comfortably. However, the longer the distance, the faster fatigue sets in; the right leg increasingly becomes numb from the limited position.
For the first time in the Lada Granta Liftback model, the seat is equipped with lateral support. This was previously installed in the second generation Kalina, Kalina Sport. Scheme for manufacturing the structure:
- metal frame;
- foam pillow;
- back.
The frame is a supporting structure. The backrest and cushion are installed on the movable hinges of the frame. In the Liftback model, the backrest is solid, the height is proportional to the height of 170 cm. There are bolsters on the sides that provide a comfortable seat for the driver and passengers.
The seat elements have a spherical structure: springs covered with special foam and polyurethane are placed on a metal base. The top is covered with upholstery fabric.
Adjusting the front seats of the car
longitudinal: to adjust, pull the lever under the seat up. Move the seat, release the lever.
Note to the driver!!! Do not adjust the seat while the vehicle is moving. Even the slightest jerk with your hand will provoke an accident.
vertical: adjustment using the handle located on the left side of the seat. By rotating your hand, you select the most optimal position for the backrest.
head restraints: by mechanically pressing your finger on the bracket on the right side, set the appropriate height.
It is important to know!!! The natural position of the head restraint is when the upper perimeter is at the level of the driver’s (passenger’s) head. Optionally, the owner can install heated seats on the Grant Liftback. The process is not complicated and will take no more than half an hour
The process is not complicated and will take no more than half an hour
Optionally, the owner can install heated seats on the Grant Liftback. The process is not complicated and will take no more than half an hour.
Rear seat overview. Adjustment
In the back of the Lada Granta Liftback it’s already cramped for three, but there’s plenty of space for two. The sofa is flat, without ergonomics. For tall passengers, long trips will be painful.
Adjustment of the sofa is not provided, unless you move up and down around the perimeter yourself. Don't forget about the restrictions on the back of the seat back and roof lining.
In order to increase safety and reduce the likelihood of injury to passengers, the rear row of seats is equipped with seat belts.
How to fold out the seats in a Grant Liftback
If necessary, the back row folds completely onto the floor, forming a flat platform without steps or bends. Folding the seats is easy: just press the side hinges of the upper backrest. The lower sofa is fixed with metal hinges at the base.
How to remove the rear seat on a Grant Liftback
- Lower the top back.
- Unscrew the rear seat mount - three “13” bolts at the base.
- We remove the lower sofa.
- We take it out of the cabin.
Operation algorithm
- The front door seal will need to be bent and pulled towards you very carefully;
- The decorated plastic casing must be removed from the front roof pillar. This is easy to do - just remove the 3 clips that secure the cover;
- Now you will need to find two screws securing the air vent grilles, as well as the trim in front of the glass. The screws are on both sides, and to unscrew them you will need a shaped screwdriver (preferably with a short handle);
- We turn them inside out and take out the ashtray;
- After that, putting your hand under the ashtray, use a screwdriver to pry off the two side plugs. They are located on both sides of the emergency system key;
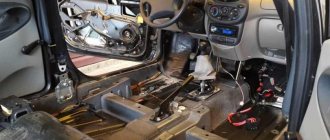
Let us note right away that it is easier to remove the panel through the passenger door. As for the method of draining the coolant and removing the stove, everything is done almost the same, except with some nuances.
After soundproofing has been completed, we install the panel in place. Don't forget to first pass the block with wires for the switch. We also insert the glove box light in advance using the appropriate holes.
Thus, the operation can be considered completed. Having learned how to remove a torpedo on Kalina, you can safely take on this work, even without the help of an assistant. On the other hand, an extra pair of hands certainly won't hurt.
COMFORTABLE
Both models are equipped with spacious interiors. Nothing interferes with the movement of the driver's and passengers' legs. But Kalina 2 has modern seat materials and plastics of much higher quality. The interior of the Grants is made of low-quality materials, they are highly wearable and creaky.
The new Kalina seats have an orthopedic structure. This provides high comfort for motorists traveling long distances.
The Granta chairs are made without pronounced lateral support and cannot be called comfortable.
Leather interior and cruise control are not available in Russian cars in any of the trim levels. But Kalina 2 has climate control in the “luxury” version, as well as a heated windshield + rain and light sensor. Granta does not have all these options.
Noise insulation is poor in both models. But in Kalina 2 it is still a little better and the ride is quieter.
So, in terms of the quality of interior materials and sound insulation, Kalina 2 takes the lead
Instructions for installing ready-made components
Installing commercial heated mirrors is a relatively simple operation. To carry it out, it is necessary to remove the part from the car and disassemble it. Glued products are heated with a hair dryer or by soaking in boiling water, after which the reflective overlay is easily removed. » alt=»»> Products fastened with bolts are disassembled using the appropriate tool. Do-it-yourself installation of heated rear-view mirrors purchased in a store is permissible only on clean and dry surfaces.
Before starting the procedure, it is necessary to evaluate the dimensions of the heating element and housing. If printed circuit boards are used, it is possible to remove the stiffeners. The film is cut to size while retaining the heating strips.
The boards are glued to the inside of the case with glue, the films are fixed directly to the reverse side. In both cases, wires are soldered to the contacts of the thermoelement, which go to the power source.
Source
How to remove the seat trim of a VAZ 2110
The most common problem with the driver's seat of the VAZ 2110 is its misalignment. The reason lies in the breakdown of the seat frame, backrest or brackets that connect them. Naturally, there is no point in buying and installing a new seat, since you can repair the old one. To repair a seat, you need to disassemble it, find the cause and eliminate it.
Removing the seat of a VAZ 2110
First you need to move the seat forward completely, after which, using a screwdriver, we remove the torsion bars from the brackets that are located under the seat at the rear and remove them. Then you need to move the VAZ 2110 seat all the way back and unscrew the nuts that secure the brackets.
We remove the brackets. Now you can lift the seat and unscrew the bolts that secure the slides, first the front ones, and then, by moving the seat forward, the rear ones. Now you can remove the seat and continue disassembling it.
The seat belt bracket is secured with a bolt passing through two bushings. Unscrew it and remove the bracket. In order to disconnect the slide, you need to release its axle by removing the locking ring, and then remove the spring.
They are attached in exactly the same way as the seat belt bracket, so we unscrew the bolt, remove the bushings and disconnect the slide.
Removing seat upholstery VAZ 2110
First of all, you need to disconnect the seat from the backrest. To do this, unscrew two bolts on each side that hold the backrest and seat frames together. When this is done, we disconnect the seats and begin to disassemble it.
The standard seat bottom upholstery is secured with plastic pads. In order to remove them, you simply need to pull the pads one by one towards the center of the seat, after which they will come off the metal frame. Now you can remove the filler.
In order to remove the upholstery from the backrest, you first need to remove the headrest. At the lower end of the backrest, the upholstery is secured using metal teeth. We straighten them with pliers and release the upholstery.
Now we remove it (there is no need to pull it up), turning the front and back sides inside out alternately. When the seat back cover is almost completely removed, you need to use two flathead screwdrivers to remove the fasteners in which the headrest was installed. Now you can remove the filling and the soft foam part of the back.
Nuances of VAZ 2110 seat repair
A crack or rupture can occur in any part of the metal frame of both the back and seat of the VAZ. Carefully inspect all parts of the frame, since the appearance of one crack may trigger the appearance of another.
The places where there are breaks need to be thoroughly boiled and cleaned with a grinder, after which it is advisable to prime and paint them. If a crack or rupture occurs on a removable part of the frame, or on the brackets that connect two parts of the seat, welding work must be approached with particular care.
It is best to cook “in place” - set the frame to its normal position, connecting the backrest to the seat. If it is necessary to weld brackets, one of them (whole) must be used as a sample so that the geometry of both matches.
It may happen that the situation was neglected and the frame “led”. In this case, before carrying out work, you need to level it so that the frame takes a symmetrical shape and all fastening parts coincide with the corresponding places.
Almost all modern cars have heated seats. Naturally, VAZ owners would not refuse it either.
The cost of such a procedure is about 1000 rubles.
Main components of the system
The air conditioning system in Lada Kalina includes various components, one of which is a condenser. This device is located in front of the engine cooling radiator in the corresponding compartment. It is fixed with brackets. Its honeycombs are made of aluminum tubes, which contain longitudinal partitions and ribs that improve heat transfer.
The tanks are made of aluminum and equipped with flanges that are connected to the pipelines. Each tank has sections. When the air conditioner is turned on, the fan starts, which improves heat exchange and reduces pressure in the system. If the part does not work, the capacitor is repaired.
The cabin filter should be changed periodically
It is recommended in the spring to wash the fins A and B of the unit from dirt that has accumulated on its surface. Such prevention improves heat transfer, reducing pressure and increasing the service life of the entire condensing system.
Do not wash the condenser with special installations that release a stream of water under high pressure, otherwise the thin-walled plates may be damaged. Using this flushing method results in frequent replacement of the capacitor. This is due to the fact that he is the first to fall under the flow of reagents and pebbles.
If the condenser seal is compromised due to corrosion, repairs will be expensive. The pressure in the system in summer can reach 25-28 bar. This takes into account the complex structure of the tube. The channels inside the capacitor may be blocked due to welding work. Such repairs lead to a decrease in power dissipation and deterioration in the operation of the air conditioner. Auto mechanics in this situation recommend installing a new capacitor.
Lada Kalina Cross. SEATS
Front seats. To adjust the front seats longitudinally, pull locking lever 1 (Fig. 9) up. Once the seat is in a comfortable position, lower the lever and move the seat back and forth slightly until it is securely seated.
Front seat height adjustment
In a variant in
The car has a front seat height adjustment function. To change the angle
tilt and position of the seat cushion, raise or lower the lever (see Fig. 9a) located on the outside of the cushion. To lower the seat cushion, push the lever down several times. To raise the seat cushion, pull the lever up several times. The tilt of the seat back is infinitely adjustable by rotating the round knob on the side opposite the seat adjustment lever.
It is prohibited to adjust the position of the driver's seat
days while the vehicle is moving. The seat may move suddenly, causing you to lose control of the vehicle.
The tilt of the seat back is infinitely adjustable by rotating handle 2.
In a variant version
The front seats are equipped with electric heaters, which are turned on with switches 1 when the engine is running (Fig. 10).
The height adjustment of the headrest (Fig. 11a) occurs by direct action
on the headrest. The headrest is raised by pulling it to the required height. To lower the head restraint, press the stopper lever 1 (on the right side of the head restraint) and push the head restraint down. To remove the head restraint from the seat back, lift it to its full height, simultaneously press both locking levers 1 and 2 (on the right and left sides of the head restraint) and pull the head restraint up.
The optimal position of the headrest is when its upper edge is at the same level as the top of the head (Fig. 11 b). If this is not possible, for very tall people the head restraint should be raised to its highest position, and for very short people it should be lowered to its lowest position.
Only drive with a correctly adjusted head restraint.
Rear seats
. The head restraints of the rear seats are adjusted and removed in the same way as the head restraints of the front seats (Fig. 11 c). To increase the luggage compartment area, the rear seat can be folded down.
In a variant version
Each of both parts of the seat can be folded out separately if necessary. When any part of the rear seat is folded down to carry cargo, the remaining part can accommodate only one passenger. The rear seat head restraints are adjusted and removed in the same way as the front seat head restraints.
Before folding the rear seat (or part of it), it is necessary to pass the tapes of 2 rear side belts (Fig. 11 d) through the holders of 1 tapes (in the variant), remove the tongue of the middle seat belt from the mini-lock (see Fig. 156) and install all the locks rear seat belts into the buckle holders located in the lower part of the backrest. Removing the middle seat belt tongue is done by pressing the button on the side of the mini-lock with a sharp object, such as an ignition key.
When returning the backrest to its working position, make sure that the shoulder branches of the side belts do not fall behind the backrest.
After returning the seat to its working position, the seat belt buckles must be removed
from the holders, and insert the tongue of the middle seat belt into the mini-lock, aligning the index arrows.
Do not allow the belts to be behind the backrest when returning it to the working position to ensure that they can then be used for their intended purpose and to avoid damage to the belts by the backrest lock.
Lay out the rear seat in the following sequence:
— remove the head restraints from the seat back (in the optional version),
— pull loop 4 (Fig. 12) and place pillow 1 in a vertical position. If necessary, move the front seats forward;
— pull the handle 3 of the lock drive and place the backrest 2 in a horizontal position;
Reinstall the rear seat in its normal position in reverse order.
Video on the topic “Lada Kalina Cross. SEATS"
Source
Connection
Connecting the central lock
. We use a circuit of two relays so as not to go under the panel to the central locking unit:
Connecting heated mirrors
(to the wiring harness under the driver's threshold)
Connecting mirror turn signals
:
- Option 1: Pull the wire from the direction indicator on the fender.
- Option 2: To the wiring harness under the driver's threshold (blue - left turn signal; blue-white - right).
We transfer the wires from the power windows from the standard buttons to a new block with a joystick.
For Lada Kalina and Granta with heated and electric side mirrors (without direction indicators):
- The new mirror has a chip with six wires, but the old one has only five. We pull the sixth contact, which is used to operate the turn signals.
The process of installing exterior mirrors from a liftback on a Lada Granta sedan is also shown in the video:
”
Are you considering replacing old mirrors with new ones with turn signals?
>
Gearbox lever rattling
For LADA Kalina, a typical malfunction is rattling in the area of the gearshift lever, which mainly becomes noticeable when the engine is running at speeds of about 3000. The source of the side sound is the bushing, which is made a little thicker than necessary, and because of this, a gap appears in the mount. To resolve this problem you need to do the following:
- remove the handle cover, which is attached with latches;
- using two 13mm wrenches, unscrew the nut and bolt;
- remove washers and bushings;
- to eliminate rattling, the bushing in the middle needs to be slightly sharpened in width or the mount should be lubricated with sealant;
- Having done this, mount everything back. The sealant does not help out every time, but if you sharpen the bushing by 0.3 mm, the result is guaranteed.
It’s safe to say that repairing a Lada Kalina car yourself is not so scary. Every car enthusiast has the opportunity to eliminate minor malfunctions of this car. You just need to believe in yourself, follow our advice and everything will work out!
Main components of the system
The air conditioning system in Lada Kalina includes various components, one of which is a condenser. This device is located in front of the engine cooling radiator in the corresponding compartment. It is fixed with brackets. Its honeycombs are made of aluminum tubes, which contain longitudinal partitions and ribs that improve heat transfer.
The tanks are made of aluminum and equipped with flanges that are connected to the pipelines. Each tank has sections. When the air conditioner is turned on, the fan starts, which improves heat exchange and reduces pressure in the system. If the part does not work, the capacitor is repaired.
The cabin filter should be changed periodically
It is recommended in the spring to wash the fins A and B of the unit from dirt that has accumulated on its surface. Such prevention improves heat transfer, reducing pressure and increasing the service life of the entire condensing system.
Do not wash the condenser with special installations that release a stream of water under high pressure, otherwise the thin-walled plates may be damaged. Using this flushing method results in frequent replacement of the capacitor. This is due to the fact that he is the first to fall under the flow of reagents and pebbles.
If the condenser seal is compromised due to corrosion, repairs will be expensive. The pressure in the system in summer can reach 25-28 bar. This takes into account the complex structure of the tube. The channels inside the capacitor may be blocked due to welding work. Such repairs lead to a decrease in power dissipation and deterioration in the operation of the air conditioner. Auto mechanics in this situation recommend installing a new capacitor.
Replacing the electric window
If the window lift cable on a Lada Kalina car has become unusable or the motor has burned out, the ESP must be changed. We carry out the replacement operation in the following order:
- dismantle the power window control unit;
- remove the door trim;
- to disconnect the window regulator from the glass, the latter must be raised all the way up;
- unscrew the four bolts that secure the glass to the ESP (two in the front and two in the back). The glass is held on by seals, but it can also be secured so that it does not fall down;
- unscrew the black metal strip (three screws);
- unscrew the eleven window regulator fasteners (10 bolts), disconnect the power plug from the electric motor;
- We begin to remove the power window from the rear, first removing one half of it;
- then we take out the front part along with the motor from the door cavity;
A burnt-out electric motor on a lift can be easily replaced. For this:
- unscrew the three studs on the mechanism body, then four more screws;
- dismantle the motor, holding the cable spool with your hand, install a new part;
- We install the window regulator in the door, connect it to the glass guides, and put the trim in place.
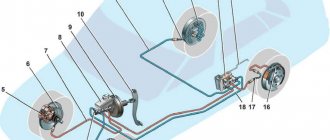
Operation of climate control
To determine the causes of the malfunction of the unit in question, you first need to find out the principle of its operation and the refrigerant flow pattern. This system in Kalina includes the following elements:
- sensor;
- pipeline;
- radiator;
- fan;
- evaporator.
The air conditioning compressor is located on the BC of the engine. It works by rotating the belt. The compressor shaft is located on the housing. The air conditioner pulley is located on a bearing, which rotates regularly when the engine is running. The important elements of this mechanism are:
- friction clutch;
- electromagnetic drive.
Front seat slides: features of removal and installation
Today I decided to write a short article about replacing the front seat slides, since I found practically no information about this on the Internet, and I think that the material will be useful for many beginners and others. I’ll immediately write about the devices that will be needed for the most convenient dismantling and installation of these mechanisms.
- Large wrench, E10 torx head, extension - this is for removing the seats themselves.
- Head for 8
- Small ratchet and crank
- Extension
How to remove the skids on Kalina
- First of all, we will need to completely remove the front seat of our Kalina, which requires intervention and replacement of the runners. Read about this in this section.
- Next, turn the chair over to a comfortable position and perform the following steps, which are described below.
- The removal procedure will be shown using the example of one slide, which is located next to the adjustment lever, since this is where certain difficulties may arise. By pressing the lever, we set the position of the runners so that the fastening bolts are in sight and can be freely unscrewed. From one edge:
And on the other hand, where there are two more fastening bolts, so that they become visible, it is necessary, with the adjustment lever pressed, to move the skids in the desired direction so that the bolts are visible through the holes, as shown in the photo below:
After all this has been done, we move the sled a little to the side, as is clearly shown below:
Next, you need to pull this part up with a little force and it will come out without difficulty:
On the other side, everything is made even simpler, since there are only two bolts securing the runners to the seat and there is no spring that will get in the way.
Subtleties when installing the slide
When replacing these parts, a slight difficulty may arise, and this applies to the side where the chair position adjustment lever is located, since there is a spring there, which will then need to be installed in place. To do this as simply as possible and without unnecessary problems, you must first put the slide on the edge of the spring and the end of the lever, approximately all of this will be at an angle of 30 degrees. The picture below shows it more clearly and is marked with arrows:
When everything is hooked, holding it in the same horizontal position, we bring the runners closer to the seat and put this edge (there is a special hole there) on the lever rod:
Immediately after this, we attach the fastening bolts and tighten everything conscientiously, as it was from the very beginning. It is better not to twist the ratchet, as you will ruin the tool and will not achieve the required tightening. The procedure on the other side is carried out exactly the same, only you will not have problems with the spring and therefore everything can be completed much faster. If you have any questions, please contact us and we will sort it out together.
Diagnosis and troubleshooting
The easiest way to resolve the issue is regarding the cabin filter. For the first time, thorough blowing of the element will be enough, but then it is better to replace it. The real problem is a leaking radiator or a broken fan; an expensive replacement of the unit cannot be avoided. An equally high price will have to be paid for a new control unit.
It will be somewhat cheaper to install a new temperature sensor, gearmotor or Kalina heater resistor. Moreover, the malfunction still needs to be correctly diagnosed, which can be quite difficult. A burnt resistor is easily identified - the fan only runs at maximum speed. It is more difficult to check the sensor hidden in the lighting shade. A sign of a malfunction is that a hot or cold stream flows from one or more grilles, regardless of the position of the regulator handle.
It is more difficult to detect how well the mechanical heater regulator is functioning. To do this, you need to get to it by disassembling part of the front panel. In the same way, the proper operation of the air dampers is determined.
To carry out diagnostics, it is better to start searching for problems with the most accessible elements, and only then start disassembling.
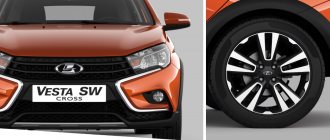
Which seats are suitable for Lada Kalina or Granta from a foreign car?
The standard seats of Lada cars may not be entirely comfortable. Some people lack more developed lateral support, others want height adjustment or adjustable lumbar support. All the shortcomings can be solved in one way - installing alternative seats, for example, from a foreign car.
The front seats themselves are different for Granta and Kalina (first or second generation), but the fastenings are similar. Distance between skid mounting bolts:
- width - 450 mm;
- length - 340 mm;
- diagonally 560 mm.
Luxury trim levels have similar seat mountings, which now have height adjustment. Seats from Lada Granta Sport, Kalina Sport or Kalina Cross are also perfect. The seats of sports versions of cars are more rigid (the seating position will be higher) and have little lateral support.
If you decide to choose seats from a foreign car, then pay attention to two things:
- Overall dimensions of the seats. They should not only fit in the cabin, but also be adjustable in all positions;
- The width of the slide (the distance between the fastening bolts). If the width of the seat slides of a foreign car is 45 cm, then it becomes possible to install them on a Grant or Kalina without alterations (with minimal modifications).
We analyzed reviews from owners on the Internet and compiled a list of “which seats are suitable for Granta or Kalina without modifications” (where the seat mounts for foreign cars have a similar width of the slide). The table is updated as new information becomes available:
| Automobile model | Note |
| Mazda 6 (2008 onwards) | Width 450 mm. Lumbar support, seat lift up/down, larger pillow under the knees ( source ). |
| Kia Rio | The slides are not symmetrical; the seats move inside the cabin by 1-2 cm. |
| Hyundai Solaris | The slides are not symmetrical; the seats move inside the cabin by 1-2 cm. |
| Skoda Fabia | Width 450 mm |
| Chevrolet Lacetti | Width 450 mm |
| Hyundai Tucson | Width 450 mm |
| Honda CRV | Width 450 mm |
| Opel Vectra C | Width 450 mm |
| Renault Megane | Width 450 mm |
| Nissan Qashqai | Width 450 mm |
| Mazda CX-5 | Width 450 mm |
| Volvo V40 | No fastening measurements were taken |
| Skoda Octavia | No fastening measurements were taken |
| Peugeot 308 | No fastening measurements were taken |
| Toyota Camry | No fastening measurements were taken |
| Opel Astra H | The width at the edges of the slide is 455 mm, in order to tighten the bolts you will have to cut off the edges of the slide |
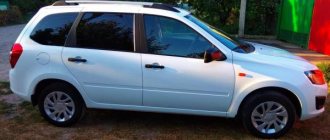
General characteristics of the car
Kalina in the cheapest configuration differs only in mirrors and door handles, which are not painted in body color. In order not to overpay when purchasing another package, and not to lose the appearance of the car, you can buy covers for mirrors and handles. These elements are sold in pairs; if one is lost or broken, you will have to purchase a new pair.
For Kalina, both in the old and in the new body, new mirror caps will not hurt. These elements will help change not only the color of the mirrors, but also their shape and function. Nowadays, the market offers a large assortment of linings, allowing you to select parts in accordance with the taste preferences and financial capabilities of the buyer. These can be standard attachments for Kalina mirrors or painted in body color or equipped with additional options. Variations of forms are also very diverse. Stylish embossed mirror caps give the car sporty features. With them the car looks faster and more energetic.
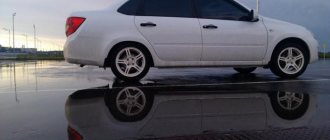
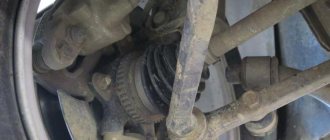
Knock in the front suspension of Lada Kalina
Many motorists dread the day when strange knocking noises appear in the suspension, especially the front suspension, which increases with increasing speed. Of course, there is reason to worry, but at the same time, a car’s suspension is a strong and reliable unit that will clearly withstand a few more kilometers to a service station or garage, where it can be diagnosed.
There are four main reasons for the occurrence of knocks and squeaks in the front suspension of the Lada Kalina. Of the three possible causes of knocking, two of them can be eliminated independently.
So, the first reason why a knocking sound may occur in the suspension is the quality of the road surface. Yes, suspensions, even the most ideal and new ones, can squeak and knock on a bad road, even if this has not been observed before. To test this theory, you should drive onto a well-paved road and drive a few hundred meters; if there is no knocking, everything is fine with the suspension; if not, look at the second reason.
The second reason for the knocking sound, if it is accompanied by vibration in the steering wheel, is a malfunction of the steering, or rather the steering rack, or thinning of the brake discs. If the discs can be replaced independently, then in the case of steering, if you are not a level 80 mechanic, it is better not to flirt with it right away bring the car to the service station.
The third reason is the springs that have lost their tone, as a result of which the car body practically hits the suspension. You should not deal with this problem on your own - it is better to immediately take the car to a service station or service center, since self-repair may seriously damage the front suspension strut.
The fourth reason is a worn-out silent block, which is designed to dampen vibrations and knocks when driving. You can replace the silent block yourself; see the step-by-step replacement of the silent block in the Lada Kalina mono in the next paragraph.
Replacing front suspension silent blocks
Replacing the silent blocks of the Lada Kalina front suspension is necessary after 15-17,000 km, otherwise noises and knocks may be observed when driving. In most cases, the loss of its functions is observed after 15-17,000 km; knocking noises that appeared during this period of kilometers are a problem of faulty silent blocks.
Silent block
The silent block replacement diagram looks like this:
- The machine is placed above a hole or ditch in order to be able to comfortably see the entire suspension. The movers are fixed by the wheels, we put the car itself on the handbrake, then it’s worth checking again that the car is stationary.
- Use a jack to lift the car and remove the front wheel.
- After this, you should fix the bolts of the ball joint with your hands, after which its fastenings are removed.;
- The SPU nut is unscrewed, before this the ball-type support is knocked out into the lower part, after these manipulations the bolts are removed.
- After removing the bolts, the sleeve blocking the lever is pulled out. After pulling out the bushing, the lever is pulled out.
- There are marks on the lever that indicate the direction of installation of new silent blocks; this should be taken into account when installing new blocks.
- The silent blocks must be lubricated at the point of contact with the lever. Using a vice or pliers, apply pressure to the blocks until they fall off.
The diagram is approximate and is for informational purposes to understand how many manipulations need to be made to replace silent blocks.
Common faults
If the cooling system is working properly, a click is heard when the main device is turned on, otherwise it is faulty. There are several signs that make it possible to determine the reason why the air conditioner is not working. Sometimes cleaning the air conditioner helps. To do this, you need to remove the radiator and clean it and all pipes. You don't have to remove the radiator, but bleed the entire system.
Causes and solutions
If, when turned on, the clutch produces extraneous sounds and it gets hot, the reason is the bearing, which should be replaced. Sometimes a click is heard, but the air in the cabin does not become cool, this means that the air conditioner is idling; diagnostics by an experienced mechanic are required.
If there is no click after turning on, the following reasons are possible:
- freon leak, due to which the air conditioning system is blocked;
- the coil winding is burnt out;
- pressure sensor is faulty;
- clutch fuse burnt out;
- evaporator temperature sensor is broken;
- power supply interruption;
- relay is broken;
- The motor control is blocked, which prevents the compressor from turning on.
The cause of compressor failure may be easy and free rotation of the clutch, during which extraneous sounds are heard. The internal part of the compressor is not repaired, but the unit is replaced with a new one assembled.
The air conditioner's safety mechanism is designed in such a way that when it overheats, it turns off. If this happens while driving, you need to wait until the air flows reduce the temperature and the unit can turn on again. If the fan is constantly spinning when valve 8 is running, experts advise turning off the freon pressure sensor. In this case, the fan operates in normal mode, and the reason for its continuous operation on an 8 kL motor is a broken sensor. It is changed along with the seal.
Refrigerant leaks
Refrigerant leakage is a common cause of poor air conditioner performance. It is important to monitor the condition of the pipelines. The air conditioner tube is checked using a soap solution. Apply the solution in suspicious places; if it starts to foam, it means there may be a leak in that place. In this case, it is necessary to replace the air conditioner tube. When repairing an air conditioner, it is imperative to change the O-rings at the joints.
Before you start refueling, you need to get rid of moisture and air using a vacuum pump.
For Lada Kalina, it is recommended to purchase R-134a freon. For refueling, use a special refueling kit, which has two hoses and a ball valve.
Filling the climate system with freon consists of the following sequence of actions:
- The car needs to be put on the handbrake and put in neutral.
- Before connecting the filling kit hose to the low pressure port, it must be cleaned of dirt.
- When the hose is connected, you need to start the engine.
- The second hose should be connected to the freon cylinder.
- During refilling, you need to press the gas pedal so that the refrigerant is evenly distributed throughout the air conditioning system. Cooled air should enter the cabin.
- When refueling is complete, remove the hose from the low pressure port and screw on the cap.
This completes freon charging. Now you need to turn on the car air conditioner and check how it works.
Heater fan (stove)
| When the door windows are closed, air is supplied to the cabin by an electric fan. The intensity of the air supply is regulated by the rotation speed of the electric fan impeller. The fan electric motor has four speed modes (lower speeds are provided by an additional resistor with two windings). |