Heater (stove) control circuit for VAZ-2110, 2111 and 2112
Heater (stove) control circuit for VAZ-2110, 2111 and 2112
The VAZ-2110, 2111 and 2112 are equipped with an automatic heater control system (AHCS), which itself creates the temperature in the car set by the driver. A kind of climate control without air conditioning, winter version. The brains of the system are controller 3 on a diagram of type 13.3854 with two control knobs. With the left knob we adjust the temperature in the cabin (from 16 to 30 °C), with the right knob we adjust the fan: 0 - off; I - average rotation speed; II - low rotation speed; A - automatically. So, here is a breakdown of the VAZ-2110 heater circuit
1 — fan electric motor; 2 - additional resistor; 3 - controller; 4 — mounting block; 5 — ignition switch; 6 — cabin air temperature sensor; 7 — recirculation switch; 8 — recirculation valve; 9 — micromotor gearbox for heater damper drive; A - to the instrument lighting switch; B - to power supplies
If the heater motor stops working, you should check fuse F18 in the mounting block
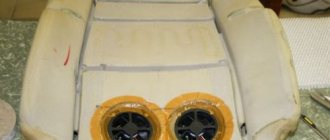
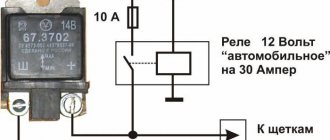
SAUO controllers (automatic heater control system). The one on the left - with automatic mode - is a primitive climate (it is tied to a temperature sensor under the ceiling). On the right is the more common 4-speed. When connected, they are compatible with the standard wiring of the VAZ 2110, with the exception of the misalignment of the MMR sensor (you just need to transfer + - on it).
Heater (stove) control circuit for VAZ-2110, 2111 and 2112
The VAZ-2110, 2111 and 2112 are equipped with an automatic heater control system (AHCS), which itself creates the temperature in the car set by the driver. A kind of climate control without air conditioning, winter version. The brains of the system are controller 3 on a diagram of type 13.3854 with two control knobs. With the left knob we adjust the temperature in the cabin (from 16 to 30 °C), with the right knob we adjust the fan: 0 - off; I - average rotation speed; II - low rotation speed; A - automatically. So, here is a breakdown of the VAZ-2110 heater circuit
- fan motor;
- additional resistor;
- controller;
- mounting block;
- ignition switch;
- cabin air temperature sensor;
- recirculation switch;
- recirculation valve;
- micromotor gearbox for heater damper drive;
A - to the instrument lighting switch;
B - to power supplies
If the heater motor stops working, you should check fuse F18 in the mounting block
SAUO controllers (automatic heater control system). The one on the left - with automatic mode - is a primitive climate (it is tied to a temperature sensor under the ceiling). On the right is the more common 4-speed. When connected, they are compatible with the standard wiring of the VAZ 2110, with the exception of the misalignment of the MMR sensor (you just need to transfer + - on it).
If you find an error, please select a piece of text and press Ctrl+Enter.
We recommend reading:
Privacy Overview
This website uses cookies to improve your experience while you navigate through the website. Out of these cookies, the cookies that are categorized as necessary are stored on your browser as they are as essential for the working of basic functionalities of the website. We also use third-party cookies that help us analyze and understand how you use this website. These cookies will be stored in your browser only with your consent. You also have the option to opt-out of these cookies. But opting out of some of these cookies may have an effect on your browsing experience.
Necessary cookies are absolutely essential for the website to function properly. This category only includes cookies that ensures basic functionalities and security features of the website. These cookies do not store any personal information.
Checking the automatic control system
Diagram of the automatic heater control system : 1 – fan electric motor;
2 – additional resistor; 3 – controller; 4 – mounting block; 5 – ignition switch; 6 – cabin air temperature sensor; 7 – recirculation switch; 8 – recirculation valve; 9 – micromotor gearbox for heater damper drive; A – to the instrument lighting switch; B – to power supplies Pinout of automatic control system :
The SAUO receives information from:
- – cabin air temperature sensor (No. 6), which has a built-in small-sized fan.
- – MMR (micromotor reducer) (No. 9), information about the position of the heater damper.
Damper control : Based on the received information and the set air temperature, the controller controls the position of the heater damper, sending appropriate signals to the damper drive micromotor.
Fan speed control : to obtain a low rotation speed (all but the last), an additional resistor (No. 2) is used, which has two spirals with resistance (0.23 and 0.82 Ohms). When both spirals are connected to the electric motor power supply circuit, the 1st fan rotation speed is ensured; if a spiral with a resistance of 0.23 Ohm is turned on, the 2nd speed is provided. When the electric motor is turned on without a resistor, the fan rotor rotates at the maximum 3rd speed (4100 min-1).
Adjusting the automatic control system
Place a regular mercury thermometer near the temperature sensor on the ceiling. Turn on the heater controller and set the fan control knob to position “A”, and set the temperature dial to 2C higher than the air temperature in the cabin. If, with the doors and windows closed, after 15 minutes the temperature in the cabin does not correspond to the set temperature, then the heater control unit should be adjusted.
To adjust, pull out the SAUO block from the socket and rotate the regulator on the left side of the controller:
- turn clockwise to increase temperature.
- turn counterclockwise to decrease.
Check the operation of the heating system again by repeating the above steps.
Climate control operating modes
Before using the unit, you must calibrate the climate control by pressing the A/C button and, without releasing it, turn on the ignition. As soon as three horizontally oriented bars appear on the display, the button can be released. Calibration will be performed automatically, and its duration is about 5 – 10 seconds. If, during operation of the climate control, it is discovered that the position of the air damper does not correlate well with the entered value, it is necessary to recalibrate using the same algorithm. As already noted, climate control operates in three modes: automatic, manual and “Semi-automatic” mode.
When manual mode is selected (which will be indicated by a non-lit LED located above the AUTO button), the damper is controlled manually using the corresponding regulator. On the display, the left scale in the form of stripes is responsible for displaying the position of the damper. The rotation speed of the furnace fan is controlled by pressing the regulator handle and then rotating in the desired direction (clockwise - increase the speed, counterclockwise - decrease). After a five-second time interval has passed, the fan speed control mode is switched off, and the regulator returns to the damper climate system control mode.
To switch the QC operation to automatic mode, just press the AUTO button. At the same time, the corresponding LED lights up, and with the adjustment handle you can set the temperature required for a comfortable stay in the car. In the future, the VAZ-2110 climate control unit will independently control the operation of the air conditioner and heater to ensure the required temperature conditions. Semi-automatic mode is activated as soon as the user tries to change the fan speed using the appropriate control. In this case, the climate control damper will still be controlled automatically, unlike the furnace fan mode. To switch to automatic operating mode, press the AUTO button twice quickly.
The rightmost key with the inscription INJ is responsible for turning on the mode of monitoring and indicating the voltage of the vehicle's electrical network, the operating temperature of the power unit and displaying ECM error codes (if there are problems with the engine). The display of each of the listed parameters is selected by successively pressing the key. For the button to work, it is necessary to connect the VAZ-2110 diagnostic circuit to the climate control control unit.
The second button from the right is responsible for turning on the display on the air temperature measured by the internal sensor. The key located in the middle turns on the mode for displaying the air temperature outside the car. Both of these keys require the installation of appropriate sensors and their connection to the control unit. The leftmost A/C button is the air conditioning on/off switch (if equipped in the car). Maintaining the set temperature when the air conditioner is turned on is carried out in the same way - by controlling the damper that regulates the supply of warm and cooled air.
As befits an air conditioning system, the main parameters of its operation (including the temperature inside the car, the rotation speed of the furnace fan, the operating mode of the electronic control unit) are stored in the internal memory of the controller when the ignition is turned off or the on-board power supply is completely de-energized. When you turn on the ignition, the air conditioning system turns on with some delay so as not to interfere with starting the engine. After this artificial delay, the climate control begins to function in accordance with the saved user preferences that were working at the time the ignition was turned off.
SAUO repair
Before repairing the SAUO VAZ 2110 unit, you should make sure that the problems with the stove are associated with it. To do this, you should connect a known working heater control unit (borrow from a friend or from a store). If there are no problems with the stove with the working unit of the automatic control system, then we try to find out what the reason is. If the obviously working unit of the automatic control system did not help, then the problem with the stove is somewhere else.
Remove the buttons next to the SAUO block. We take out the stove control unit. Set the controls to position 0 and remove, and then remove the front cover and glass from the latches. Unscrew 2 screws in front and 1 in back. We remove the board from the plastic case and check the integrity of all tracks, jumpers and resistors. In this example, a broken jumper was found. We solder it on one side and the other. Reassemble in reverse order. Now all speeds of the SAUO block work .
FAQ on the operation of the VAZ 2110 stove
1st oven speed does not work
- All heater fan speeds (except the last one) are connected through an additional heater resistor, which is located under the frill (wind flap). One of the reasons when the first speed of the heater does not work is a malfunction of this resistor. Depending on the ACS unit, this additional resistor varies:
RDO 2108-8101081 is used on the oldest SAUO units, which have only 2 speeds. (0 A 1 2).
RDO 2110-8118022-01 is installed on a modified heater until September 2003, the SAUO unit has 3 speeds (0 A 1 2 3). The most common malfunction in this resistance is that all stove speeds stop working, except maximum 3. The reason is that the thermal fuse is unsoldered (indicated by a red arrow), and is treated by soldering it in place. But if it is unsoldered later, you need to look in the direction of the motor, the motor takes a very large current (not lubricated, wear on the brush assembly, etc.).
RDO 2123-2118022 has been installed on the latest heaters since September 2003, the SAUO unit has 4 speeds and does not have an auto mode (0 1 2 3 4).
- In addition to a malfunction of the additional heater resistor, the problem may also be in the contacts of the heater control unit board. Often, due to high temperatures, the board becomes very hot and the contact is soldered off. Carefully examine all contacts on the boards, especially at the power supply points.
- Clean contacts.
Heater speed 2 doesn't work
- The reason is exactly the same as in the case when the first heater speed does not work.
3rd speed heater doesn't work
- If the 3rd speed is the last, then it works without resistance (directly). And the problem may be in the contacts of the ACS unit (stripped/crimped), or in the contacts on the board of the ACS unit.
- If you have a stove control unit with 4 fan speeds (0 1 2 3 4), then look for problems with the 1st stove speed.
4th oven speed does not work
- The reason is exactly the same as in the case when the third heater speed does not work.
The stove blows equally at speeds 1 and 2, that is, there is almost no difference between the first speeds, but at speed 3 it blows much stronger
- The reason is the additional heater resistor, it needs to be replaced.
The temperature on the heater control unit is not regulated or the heater fan does not work. Disassemble the ACS unit and carefully examine all tracks and contacts. If there are no visible defects, then you need to look for the cause in the part indicated in the photo.
- Another reason could be poor contact in the fuse box. On the back of the block there is a 6-terminal chip, the blue wire on it is to the fan. Perhaps it was burnt in this connector at the connection point. It is necessary to replace the chip and crimp the new connector. Remove the block, disassemble and solder the leg (perhaps it melted and became unsoldered due to heating).
ps If there are other solutions to problems with the operation of the stove , then leave comments, we will supplement the FAQ on the operation of the SAUO unit . By the way, malfunctions in the heater can be caused by other reasons.
What most often failed in the stove of your “ten”?
FakeHeader
Comments 59
Tricky question. Do you still have the part numbers for the pads? To order on the same klemma505
This is an SAUO 2110 n/o block, not a Priora.
And the fact that the factory code for this VAZ-2170 block is 0812802000, was installed on Prioras of the first series and on VAZ 2110-2112 of the latest series.
It was never put on priority, neither the first series nor the last. If only for the reason that its body has a completely different shape. Your block is from tens with the so-called. “European panel”, produced in 2006-2008, which then until 2012 (sort of) were produced in Ukraine under the name “Bogdan”. An early block of self-propelled guns with priors (2007-2008) in the photo below.
And the fact that the factory code for this VAZ-2170 block is 0812802000, was installed on Prioras of the first series and on VAZ 2110-2112 of the latest series.
But yours, the late tenth block, is in its rightful place.
He's right, there was no such block on the early Priors.
Tell me the operating algorithm - the position of the “forehead-foot” damper and the fan speed are manually set, and the automation controls the “hot-cold” damper. Right?
The disease is a dozen - common problems with the stove and one of them is the incorrect operation of the automatic control system unit. Surely you yourself have encountered or found on the Internet about problems when the Nth speed of the VAZ 2110 stove does not work. Let’s consider how you can repair the heater control unit.
Design features of the VAZ-2110 stove control unit and the specifics of its DIY repair
High-quality operation of a car’s heater in winter is one of the main conditions for comfortable driving. In domestic vehicles, even in new models, the heater is one of the problematic elements that very often fails. And if in the summer you can turn a blind eye to this, then in cold weather you immediately have to take measures to eliminate the problem.
To eliminate the malfunction, it is first important to diagnose which element of the car’s heating system has failed and repair the non-functioning unit. The easiest way is to turn to specialists for help, but their services are not very cheap. Very often, vehicle owners troubleshoot and repair the heater on their own, since domestic cars are highly maintainable.
This article will talk about how to diagnose a malfunction of the VAZ-2110 heater control unit and repair it yourself.
Design features of the VAZ-2110 stove control unit
One of the common heating system problems that VAZ-2110 owners encounter is the failure or malfunction of the heater control unit. Dozens of them are equipped from the factory with stoves, which are coordinated through an automatic heater control system. In short, the system is called the SAUO block. The main indicators of its malfunction are the operation of the heating system not in all modes. If one or more stove speeds do not work, then most often the problem is in the ACS unit. Thanks to the electronic module of the VAZ-2110, the temperature set by the driver is maintained in the car interior.
Before you begin repairing the VAZ-2110 heater, you need to find out what kind of heater is on your vehicle. Cars that were produced before September 2003 are equipped with old-style stoves. Accordingly, there are significant differences in the design, which are important to pay attention to during repairs.
The ACS unit consists of electronic elements, which are coordinated using handles on the central console of the machine.
The VAZ-2110 stove control unit is equipped with a controller with two handles. The right handle is responsible for turning on a certain fan speed. An additional resistor is directly responsible for switching its speeds. Old style stoves have resistors for two or three fan speeds. The new model stoves have a modified resistor RDO 2123–2118022. The unit for coordinating the operation of the improved stove model has four speeds and does not have an auto mode.
The left handle is responsible for turning on the temperature mode in the vehicle interior. Depending on the position of the handle, information about the set air temperature is supplied to the micro-reducer of the damper drive and, using the controller, the required position of the damper is set. Using the regulator, you can set the temperature from sixteen to thirty degrees Celsius.
Until 2003, cars were equipped with old-style stoves with four- and five-position controllers, which are now out of production and are very difficult to find. Also, the simple VAZ-2110 heater control unit is not suitable for car models that were produced after 2003 and are equipped with modified stoves from the factory.
Accordingly, before buying parts to repair the heating system of a vehicle, you need to look in the technical documentation to find out which heater model is on your top ten. The stoves differ not only in the ACS unit, but also in the heater radiator, micro-reducer, and resistors.
Device
First of all, you should know the very structure of the heating system in order to clearly understand what and how to repair, because for the VAZ 2110, interruptions in the operation of the heater are a typical phenomenon, and from time to time requiring the intervention of reliable hands - be it a driver or a service station worker.
For stable and high-quality driving in a car, it is recommended not only to be able to use the heating system, but also to understand the heater’s structure. The operating principle of the system can be found here: https://vazweb.ru/desyatka/otoplenie/otopitel.html
So, the heating system consists of: 1. The actual heater unit, which provides heating for the interior. It is represented (by importance of details):
- An electric motor on which a fan is also attached to pump hot air;
- A radiator, without which the entire system does not work. Moreover, unlike the old heater, the radiator of the VAZ 2110 stove of the new model does not have a tap that shuts off the flow of antifreeze (antifreeze) through the radiator. Thus, it is always (whether in winter or in summer) heated. This was done supposedly in order to eliminate leaks that were often observed through this tap, and also to heat the interior as quickly as possible when necessary. In the summer, the supply ventilation goes past the radiator, but still some VAZ 2110 owners, when repairing the stove, add this tap to the system;
- There are three dampers. One is responsible for air intake recirculation, the second opens/closes the heater duct, the third, the most important for the interior, controls the heater;
- A resistor that regulates the blowing speed.
All parts are packaged in a block with additional valves, shields, and fittings. This entire device is housed in a housing and is located under the hood closer to the instrument panel.
2. The next block represents the air ducts of the VAZ 2110. They extend directly from the stove and provide:
- Interior ventilation through central nozzles;
- The air distributor works to supply heat (or regular air for ventilation);
- Two air ducts are directed to the rear of the cabin;
- There is a whole system of five nozzles for heating the feet;
- Two side air ducts provide heating for the side windows and part of the interior, providing better heating;
- Two nozzles for ventilation.
This, in a nutshell, is the principle of distribution of hot or cold air inside the VAZ 2110.
3. The electronic control unit for the stove operates from the passenger compartment. It includes:
- Controller handle. This device allows you to set the temperature in the cabin that the stove unit should produce. It turns on by turning the knob and sets the temperature from the air, the temperature of which will correspond to that outside, up to 30°C. Most often, this part is called the ACS controller (automatic heater control system);
- The temperature sensor is responsible for turning on the heater when the temperature in the cabin drops by 2 degrees against the set one. The sensor has a microfan, and if the control knob is in position A, then the micromotor in the stove block turns on and the damper begins to operate, ensuring proper heating. Therefore, before starting repairs of the heating system, the operation of this sensor is usually checked. It is located next to the heating lamp on the ceiling of the VAZ 2110. Since it is not repairable, in the event of a breakdown this device should be replaced immediately.
This material will help you quickly and efficiently replace the stove fan in a VAZ 2110: https://vazweb.ru/desyatka/otoplenie/zamena-ventilyatora-pechki.html
Ceiling interior air temperature sensor
Diagnostics of serviceability and dismantling of the stove control unit
The SAUO module is located on the center console of the car and is responsible for proper heating of the interior. Repairing the VAZ-2110 stove control unit requires certain knowledge in electronics, so before you begin repairing the part, you need to determine whether the problem is really in the electronic module itself.
To do this, you must initially dismantle the unit and install a known-good part in its place. Take the SAUO unit from friends or at a service center to diagnose the heating system of your car.
Before performing any work on the vehicle that involves electronics or wiring, turn off power to the battery to avoid shorting or burning out the electronic components.
Then you can proceed directly to removing the unit through which the functionality of the stove is coordinated. To do this, the buttons that are located on the sides of the stove are initially dismantled. The heater controls must be switched to zero positions. Only then can the module be pulled out. This must be done very carefully, since the power plugs are connected to the back of the unit. As soon as you see them, they must be carefully disconnected so as not to damage the contacts. At this point, dismantling can be considered complete.
The working unit is installed on the standard seat, and the operation of the vehicle’s heating system is checked. If the stove functions correctly with the new unit, then the fault is in the ACS unit itself. Otherwise, it is necessary to diagnose other elements of the heating system.
Assembly
When installing a new damper, be sure to make sure that the fork located on its axis is clearly engaged with the lever. If the flap is in the raised position, you did everything right. Otherwise, it will be impossible to control the device, so you can forget about restoring the functionality of the stove.
Damper location
After this, reverse the assembly procedure according to the dismantling steps. Refill the system with coolant and check that the new damper is in place.
It is important to ensure that there are no leaks or tight hose connections.
Turn on the stove and check how the heater behaves. If everything is normal, you have carried out competent and successful work, for which we congratulate you.
DIY repair of the VAZ-2110 heater control unit
If during diagnostics it turns out that the problem is in the heater control module, then you need to try to repair it or install a new part. Since the price of new electronic units is quite high, the right decision would be to repair the control part, especially since this requires only basic knowledge of electronics, the ability to use a tester and a soldering iron if necessary.
Before you begin, you need to disassemble the heater control unit. To do this, the front cover with regulators is removed from the latches from the previously dismantled electronic module. Next, a special glass cover is detached. Using a screwdriver, unscrew two screws on the front panel of the unit and one on the rear wall. After this, the top cover of the module can be removed; this must be done very carefully so as not to damage the contacts inside the part.
Inside the module there are electronic tracks, contacts and resistors that are responsible for the high-quality functioning of the vehicle’s heating system controllers. It is necessary to inspect all contacts, electronic tracks on the board, resistors and jumpers. High operating temperatures can cause the board to become very hot, which will lead to disconnection of the contacts. Particular attention should be paid to the power supply points and the contacts should be cleaned. If there is visible damage to the electronic circuit, it is necessary to solder the damaged elements. In parallel, using a tester and an ohmmeter, the functionality of the electronic elements and resistors located on the board is checked. If necessary, non-functioning parts on the ACS module board are replaced.
After troubleshooting, the heater control unit is assembled in the reverse order and installed in its original place. Next, you need to connect the battery power and check the operation of the vehicle’s heating system; if necessary, adjust the heater controller.
If third speed does not work
If the third fan speed is the last (as in older models), then it is connected without resistance. Malfunctions may lie in the contacts of the automatic control system. Below we will talk about this in more detail.
Replacing self-propelled guns
Control units cannot be repaired - they are simply replaced with new ones. But first you need to make sure that the reason is in this mechanism. Instead of the route, a working control unit is installed. Its price is about 1500 rubles. Removing the element is very simple - just remove the buttons installed next to it.
And then the device can be removed. The handles are set to the zero position and then removed. Then the glass and front cover are torn off. Before removing the heater control unit on the VAZ-2110, unscrew two screws in the front and one in the back. The card can then be removed from the case and carefully inspected to ensure its integrity.
If there is any damage to the board slats, they will need to be repaired. Subsequent editing is done in reverse order. If the control unit does not regulate temperature, the entire board must be inspected. There will definitely be shortcomings. But before you remove the heater control unit on the VAZ-2110, you need to check the fuse box.
Setting the air temperature from the heater
You can set the desired temperature in the cabin using the adjustment knob. But for a more accurate result and adjustment, there is a special screw in the block. To check the accuracy of temperature control, close all doors and windows. Place a reference thermometer in the sensor area.
Then the element is switched to automatic mode and heating is controlled by a thermometer. How long can the control unit of the SAUO VAZ-21102 stove be adjusted over time? The procedure takes no more than half an hour. If after 15 minutes the actual temperature values do not correspond to the set values, the device is removed.
Turn the adjusting screw clockwise. If you turn the screw clockwise, the temperature will increase; if not, it will decrease. Then the element is installed in place and its serviceability is checked.
As for the possibility of troubleshooting, the control unit of the VAZ-2110 stove of the new model cannot be repaired (however, like the old one). In case of serious malfunctions, it is completely changed. In addition, the cost is low.
Differences in design
The VAZ 2110 was equipped with stoves of the so-called new or old model. Both systems, including those on the VAZ, which have an injector instead of a carburetor, are not particularly structurally different.
So, the differences are direct:
- The main difference between the new model and the old stove is the design of the heater radiator. Therefore, if you are repairing a heating system and decide to install a new model instead of an old radiator, then take into account some nuances;
- Moreover, even the controller from SAUO is not quite the same. 4- or 5-position regulators produced before the fall of 2003 have already been discontinued and are not suitable for new heater models;
- Micro gearboxes are also different from the September 2003 issue. They have different resistors (shaft position sensors), so you need to check if the resistor is interchangeable in the MMR model you purchased.
Repair
If you're thinking about furnace repair, especially if you have an older system, start by purchasing a new furnace radiator (buy a copper one, it heats up much better) and this will only improve the furnace's performance.
But the design of the stove on the VAZ injector is practically no different from carburetor cars.
The following is an analysis of the following points:
- There is a plug in the engine block from which antifreeze is drained into a kind of container;
- Pull the ruffle forward a little (the operation continues), remove the wipers and everything that gets in the way;
- The heater housing has been removed. You should know that the body is divided into two parts. The facade is removed along with the fan;
- Next comes the cabin filter housing. It can be changed at the same time;
- The other part of the fan housing is removed;
- Clamps are loosened, pipes are removed;
- Then, with some effort, the radiator is removed.
Assembly, as they say, is in reverse order. Another nuance - if you have an outdated stove, pay attention to two points:
- When installing the plastic housing, make sure that the pedal fits into the desired groove;
- Knowing the structure of all components, be sure to double check their tightness.
Adjusting the stove controller
The manufacturing plant provides for heating the interior to the specified temperature in fifteen minutes with a deviation of up to two degrees. Use the controller knob to set a comfortable temperature in the car interior.
To check the proper functioning of the stove, use a regular mercury room thermometer. If after fifteen minutes the interior has not warmed up to the required temperature, the controller must be adjusted.
To do this, pull the heater control module back out and rotate the temperature regulator, first to the maximum value, then in the opposite direction. After carrying out such actions, install the unit in place and check the operation of the stove again.
At the same time, it is necessary to check the operation of the heater dampers. If there are extraneous sounds when switching temperature modes, then you need to check the condition of the dampers. If cold air flows well, but hot air hardly flows in, then the lower damper is faulty. If there is no normal flow of cold air but there is a good flow of hot air, there is a problem with the upper damper. The reason may be deformation of the dampers under the influence of air of different temperatures. In this case, it is better to replace the standard plastic dampers with aluminum analogues, which are more resistant to temperature changes.
After adjusting the controller, all heater elements are installed in their original places. Assembly is carried out in reverse order.
Causes of malfunctions
Depending on the design of the stove, the damper may cause a disruption in the efficient operation of the heater for the following reasons:
- deformation;
- wear of seals;
- deterioration or damage to control levers and rods;
- skew.
Deformation is a problem with old-style heaters. The first dampers of the VAZ-2110 stove were equipped with plastic elements that bent under the influence of temperature. Because of this, even when completely closed, cold air from outside leaks in and mixes with the heated air, and the efficiency of the stove decreases. Subsequently, the designers replaced the plastic flaps with aluminum ones and the problem with deformation disappeared.
To ensure tightness, the dampers have seals that reduce air leakage. Initially, foam rubber seals were used, which quickly wore out and became damaged. Later, foam rubber was replaced with rubber, but this only extended the service life of the seal; over time, the rubber ages, cracks and collapses.
On old-style stoves, rods and levers may break. On new heaters, there is another problem - wear on the edges of the square end of the gearbox, with which it is inserted into the groove made in the damper axis. As a result, the limit switch bypasses the groove, and the heater damper jams, although the gearmotor operates. The misalignment occurs due to the displacement of the damper axis in the mounting holes of the housing. Because of this, the damper warps and jams when opening.
Let's sum it up
Malfunctions of the VAZ-2110 heater control unit can lead to both incorrect functioning of the vehicle’s heating system and complete failure of the heater. During the cold season, this will affect not only a comfortable stay in the car, but also safe driving for the driver of the vehicle.
Repairing the stove control unit can be done on your own if you have basic knowledge of electronics, a desire to work and improve your comfort.
High-quality repairs and timely regular inspections of the unit before the onset of cold weather will help you save money on stove repair services at service centers and the purchase of expensive heating system elements.