For any car operating in the cold season, the importance of flawless heater operation cannot be overestimated. You can have different attitudes to the heat, but you’re unlikely to find anyone who likes to ride in a car wearing felt boots and fur mittens. Therefore, any heater malfunction that occurs in winter will be considered a disaster, regardless of the make and model of the car. If we talk about the VAZ-2105 stove, then it can hardly be called a technically perfect device - heater breakdowns are not that rare, and many owners have questions about the heating efficiency. Therefore, the improvement and repair of the VAZ 2105 stove are procedures that are of interest to the majority of “A” owners who are forced to use a sedan even in severe frosts.
How to independently repair and replace a VAZ 2105 stove.
Removal and installation
If you decide to completely replace the stove, then this is done as follows:
- the ground wire is disconnected from the battery;
- the instrument panel and receiver panel are removed;
- the heater valve control lever is moved all the way to the right;
- the coolant is drained from the heating system;
- the clamps are loosened;
- the rubber hoses are disconnected from the heater pipes (they control the supply and removal of fluid);
- the seal is removed (it is recommended to watch a detailed video before removing);
- two bolts securing the bracket are turned out (they are located inside the engine compartments);
- the bolts of the fastening brackets are loosened;
- the rods are disconnected and the bracket is removed;
- the nozzles are removed on the left and right;
- nut fixing the right air duct for heating the side windows;
- the left air duct is removed in the same way;
- we find four spring-type holders and remove them;
- remove the heater fan casing assembly;
- loosen the radiator casing nuts;
- the ground wire is disconnected and the casing is removed;
- the air duct is removed;
- the old heater is removed;
- The new heater is installed in the reverse order (photo below).
Advice
When installing the heater, pay attention to the installation of the sealing gasket
It is located between the car body and the radiator casing. Also, the heater control should be adjusted during installation.
You can do a lot with your own hands in a way that no specialist can do. The step-by-step instructions given above will help novice motorists do everything on their own.
In addition, you can save a lot of money, because the price for these services is high today
Removal process
- Drain the coolant.
- Loosen the clamps and disconnect the pipe that comes from the radiator and the inlet.
- Loosen the clamps themselves.
- Remove the pipes by disconnecting them from the water pump.
- We take out the thermostat. Disconnect the remaining pipes.
When installing the thermostat, you need to take note that this is a serious operation and must be carried out carefully:
- Clean all surfaces thoroughly and replace the O-ring.
- Correctly orient and place the thermostat in the housing.
- Next, tighten all existing cover bolts. To be able to do this, you need to try.
- Reinstall all hoses in their original locations, then fill with coolant.
- You should also start the engine until it reaches operating temperature to make sure there are no leaks.
Replacing the heater valve for better heater operation
It is best to use ceramic faucets rather than metal ones. So let's get started:
- you need some kind of container;
- find the plug on the block and unscrew it to drain the coolant;
- You will still need the container with the liquid, but for now put it away;
- we find the pipes, then unscrew the clamps;
- using a metal brush, clean the threaded connections of the two studs (you can moisten them with brake fluid to make them unscrew better);
- While this whole thing is settling down, we remove the pipes and go to the interior, where we remove the side panel of the torpedo;
- unscrew the pipe clamps;
- Having removed the pipes, we replace them;
- You need to find the nuts under the car that secure the heater valve. Unscrew;
- Returning to the salon, remove the tap and spring retainer;
- Next you need to disconnect the control cable from the crane;
- We install a new heater valve, but first connect the cable and attach the valve to the body.
Why the stove on the VAZ 2107 does not heat well, reasons:
A common cause is an underheated engine.
Signs: The temperature gauge is in the white zone, the engine takes a long time to warm up. At an outside temperature of -20, within 8-10 minutes of idling the engine, it should warm up to 40-50 degrees (the very beginning of the white zone of the temperature gauge). If the temperature rises less, it’s bad (the thermostat is faulty), higher is good. Next, you need to drive in 1-2 gears, and in 5-8 minutes the temperature should rise to 80 degrees (the border of the green and white zones). If the engine has not warmed up to 80, replace the thermostat!
Air in the cooling system.
First of all, you need to check the antifreeze level in the expansion tank and the serviceability of the radiator cap. If the radiator cap is faulty, air will remain in the system, which will result in poor circulation of coolant and, accordingly, cold air in the cabin.
The stove blows poorly to the left
The lower flap is completely open, or its latch is broken. To fully blow the glass, this damper must be closed. If it does not lock, you can use an elastic band, hooking it onto the “choke” handle, or somewhere else.
Main malfunctions of the VAZ-2105 heating system
Let's consider the main reasons that cause the inoperability or decrease in the efficiency of the “five” heating system:
- Often the cause of deterioration in interior heating is a decrease in the level of antifreeze in the cooling system. If the car has been in use for a long time, this phenomenon can be considered quite natural, but if the level drops sharply, it is necessary to look for the reasons. If a leak is detected, it should be eliminated, coolant should be added and the air lock should be eliminated by pushing through the hoses with the power unit running;
- a malfunction of the thermostat, which is responsible for the possibility of coolant circulation through a large or small circuit, can also cause the inability to reach the required temperature regime, as well as a breakdown of the heater tap;
- A common cause of poor heating efficiency is a clogged stove radiator. The fault can be localized by touch while the power unit is running: in the place where the radiator honeycombs are heavily clogged, there will be a noticeable temperature difference;
- Finally, problems may arise due to the heater fan not working or not working at full strength.
The stove alternately blows hot/cold air
The most obvious reason for this particular problem is the presence of air in the cooling system line. As a rule, the VAZ-2101 stove does not heat well due to the fact that air pockets do not allow coolant to circulate as expected, and due to its deficiency in the heater radiator, problems periodically arise with heating the air supplied to the cabin.
Reasons for the formation of CO airiness:
- adding antifreeze without following the correct technology;
- depressurization of the cooling system line (the leaking coolant is replaced by air - laws of physics);
- The expansion tank valve is faulty.
If the cause of airiness is an antifreeze leak, it must be detected and eliminated. The problem with a faulty valve is solved by replacing the expansion tank plug.
In any case, you need to get rid of the airiness. This is done in the standard way: unscrew the engine cover and, with the engine warmed up to 90 degrees, press the accelerator pedal several times almost all the way for 3-5 minutes. A good gas release should expel air from the system, but to obtain guaranteed results it is advisable that the front of the car is raised (a gradient of 15º is sufficient).
Why the stove on the VAZ-2105 does not heat well and what to do
Today we will try to figure out why the stove on the VAZ-2105 does not heat well in winter.
If the car takes a long time to warm up or cold air is blowing directly into your cabin, then there can be many reasons - from banal inattention to really serious problems. For this:
- check the thermostat. This may be the reason; if the hoses are hot, it is most likely jammed open;
- The air intake may be closed: check and open manually if necessary;
- gasket: if it is broken, gases from the combustion chamber can flow towards the cooling system. To understand whether this is really the reason, you need to look into the expansion tank in a warm car: if there are bubbles there, the gasket is broken. These bubbles most often can get stuck in the pump and stove;
- check the pipes from the stove. If they are cold, and you have a whole gasket, then you can simply remove the air from the stove. Poor pump flow is also possible;
- It may also be that the cable at the heater valve drive cannot open it because the cable braid comes off and does not push the valve handle. In this case, you can correct it manually;
- Another reason that the stove does not work well may be a violation of the polarity of the heater engine brushes: if you have reverse polarity of the air, then it will move from the passenger compartment to the engine compartment. It shouldn't be this way.
Repair
After the diagnostics have been completed, you can begin troubleshooting.
If the coolant level drops, it is necessary to find the location of the leak and eliminate the leak. Then add liquid until the neck is full. Then remove the air plug from the cooling system by pushing through the rubber pipes with the engine running, and add fluid if necessary. To replace the thermostat, you need to drain the coolant, unscrew the thermostat cover and replace it with a new one. Then fill in coolant and get rid of the air lock, as described in point No. 1.
To “break” a soured faucet, you can try to turn it manually (without a cable drive), and if it does not turn, you need to dismantle it and replace it with a new one. To do this, it is not necessary to drain the coolant; it is enough to clamp the pipes before and after the tap. You can try to lubricate a soured valve “remotely” by spraying water-repellent grease onto the hinge joint. If this procedure does not bring results, then you need to dismantle the entire heater and “develop” the damper. You can clean a clogged radiator by rinsing it with a special liquid or running water. But this will only help clean the inside, and the outside will remain clogged, so to achieve the maximum result from the work done, you need to remove it and wash it both inside and outside. If flushing does not produce results, then you need to replace the radiator with a new one.
Before replacing, it is advisable to flush the entire cooling system, otherwise this replacement will have a positive effect in a short time
The body is fastened together with iron brackets; it is important that they all stand in place and tightly press the parts of the body to each other. The radiator must be sealed in the housing around the perimeter to prevent flow from passing through the honeycombs
It is better to use foam rubber for compaction. After checking the fuse and wiring of the fan, you can begin to dismantle it. Then assess the feasibility of repairing this unit. Before final assembly, you need to connect the motor to the standard wiring and check the functionality on the car. The fan impeller is made of plastic and can be damaged with slight force, so special care must be taken during assembly.
https://youtube.com/watch?v=D7rHla9Rk1M
The diagnostic and repair methods outlined above will help you carry out repairs in the shortest possible time with minimal costs. After this, you will enjoy the warmth and comfort in your car for a long time.
Replacing the heater VAZ 2105
What does the stove consist of?
Before you start replacing, it is useful to familiarize yourself with the design of the VAZ 2105 stove. It consists of:
- control lever bracket;
- internal ventilation air ducts;
- special control lever handles;
- air ducts for heating side windows;
- from flexible rods;
- from a clamp;
- rubber hoses;
- tap;
- pipe seal;
- air duct damper;
- air distribution cover.
Removal and installation
If you decide to completely replace the stove, then this is done as follows:
- the ground wire is disconnected from the battery;
- the instrument panel and receiver panel are removed;
- the heater valve control lever is moved all the way to the right;
- the coolant is drained from the heating system;
- the clamps are loosened;
- the rubber hoses are disconnected from the heater pipes (they control the supply and removal of fluid);
- the seal is removed (it is recommended to watch a detailed video before removing);
- two bolts securing the bracket are turned out (they are located inside the engine compartments);
- the bolts of the fastening brackets are loosened;
- the rods are disconnected and the bracket is removed;
- the nozzles are removed on the left and right;
- nut fixing the right air duct for heating the side windows;
- the left air duct is removed in the same way;
- we find four spring-type holders and remove them;
- remove the heater fan casing assembly;
- loosen the radiator casing nuts;
- the ground wire is disconnected and the casing is removed;
- the air duct is removed;
- the old heater is removed;
- The new heater is installed in the reverse order (photo below).
Advice
When installing the heater, pay attention to the installation of the sealing gasket. It is located between the car body and the radiator casing.
Also, the heater control should be adjusted during installation.
You can do a lot with your own hands in a way that no specialist can do. The step-by-step instructions given above will help novice motorists do everything on their own. In addition, you can save a lot of money, because the price for these services is high today.
The radiator of the heating stove of the VAZ 2105 car is removed in case of leakage for subsequent replacement with a new one, or for preventive cleaning, as well as when performing other repairs in which its presence will interfere with the progress of its implementation. Prepare a standard set of tools, also prepare two new rubber gaskets for the heater valve and two clamps for securing the pipes. If you have everything you need, do the following:
- It is recommended to place a rag or other material under the pipes inside the car, since removing them may leak a small amount of coolant.
- We drain the cooling system into a previously prepared container.
- In the engine compartment, use a screwdriver to loosen the clamps securing the inlet and outlet pipes.
- Then we remove the pipes. When removed, a small amount of coolant may leak out of them if you did not drain the system.
- Now you need to remove the pipe seal; to do this, use a screwdriver to unscrew the two screws that secure it to the partition of the body of the engine compartment and the car interior.
- Next, we move into the car interior and remove the decorative casing of the heater fan.
- Also disconnect the fan drive rod.
- Then carefully remove the radiator from its seat.
At this point, the repair work to remove the heater radiator on the VAZ 2105 has been completed. Replace it, and then perform the installation in the reverse order. If you plan to install the old one, then it is first recommended to check it for leaks; to do this, we plug the inlet hole and connect a compressor with compressed air to the outlet pipe. By pumping up pressure in it and lowering it into a container of water, we determine the presence of depressurization by the presence of air bubbles and, if necessary, either eliminate the defect or replace it with a new one. When assembling, do not forget to change the rubber sealing gaskets.
Sources
- https://masteravaza.ru/sistema-otopleniya/u-klassiki-sistema-otopleniya/zamena-otopitelya-vaz-2105-146
- https://remont-vaz2106.ru/vaz-2105-zamena-radiatora-pechki
Replacing the heater fan
The previous post “heater noise VAZ 2101 - 2107” revealed to us the main sources of noise in the heating system. And it may happen that the fan motor will need to be replaced. I will try to tell you how to do this in more detail.
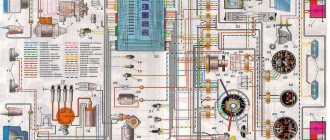
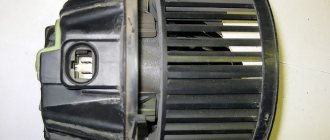
Connection diagram and details of the electric motor of the heater VAZ 2101 - 2107
1 – battery; 2 – generator; 3 – ignition switch; 4 – fuse block;
5 – heater switch; 6 – additional resistor; 7 – heater fan electric motor.
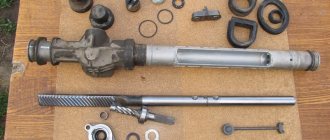
It is useful to know about the parts of the heater; if you have disassembled the heater motor, then during reassembly this picture will serve as a small manual for you.
1 – lock washer; 2 – washers; 3 – body;
4 – anchor; 5 – crackers; 6 – cover
Other problems with the heating system
Although heater radiator breakdowns occur most often, there are other malfunctions that can be easily fixed with your own hands:
- Fan motor failure. Problems are created by the rotor bushings, which on the “original” motor are made of low-quality material. As soon as the heating system fan begins to whistle, it needs to be replaced with a non-original one, in which bearings are installed instead of bushings.
- Heater valve wear. It suffers from scale, dirt, and simply wears out. Cranes are usually not repaired, but replaced. It is better to replace a faucet with a ceramic core; it is much more reliable and durable than a metal one.
- Breakage of control unit rods. Everything is clear here: what should be regulated is not regulated - check the condition of the rods and their connection. Sometimes the problem is solved in just half an hour.
More complex work, such as tuning or modifying the stove, is no longer considered troubleshooting. Of course, the stove on a VAZ opens up endless possibilities for improvements and additions, but you can get by with what you have at the moment. The main thing is that everything works as it should, and then you definitely won’t freeze in winter.
It is better to check the heating system before the time comes to use it. In the summer it is more comfortable and easier to do repairs; you can take your time and look for high-quality and inexpensive spare parts, and generally come to the cold season fully armed. In most cases, when the VAZ 2107 stove does not heat, you can correct the situation yourself. You just need to have straight hands and the desire to do the repairs correctly and efficiently.
cold in VAZ 2105
#1 Evgeniy 2105
- New
- 6 messages
- Car make: VAZ 2105
- From: Zheleznogorsk
People, please tell me, it’s cold in the car, the heater only blows on the windshield and on the legs, closed the legs, it’s blowing harder on the windshield, it’s blowing warm, but it’s still kind of cold in the car, tell me what to do?
#3 Evgeniy 2105
Is this why it doesn’t blow in the sides?
Because of this, the air flow decreases and there is not enough of it to be divided into the side nozzles.
Evgeniy 2105 likes this
#5 Evgeniy 2105
Because of this, the air flow decreases and there is not enough of it to be divided into the side nozzles.
thanks, I'll try to take it apart and clean it
Because of this, the air flow decreases and there is not enough of it to be divided into the side nozzles.
and how to clean it?
#8 Schulz 21043
Maybe for now we should just look at the heater tap? Sometimes it doesn’t open completely with a cable, it jams a little, like mine, for example. Switch it by hand and look. Otherwise, you can immediately disassemble the stove - it’s a lot of hassle in the cold. And in the same place where you can crawl up the faucet and slightly remove it from the top of the radiator, not everything, of course, but still
Evgeniy 2105 likes this
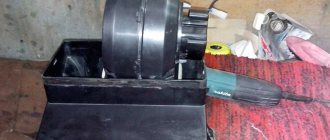
Replacing the heating fan
If your car is cold, it could be the fan. Now we will tell you how to replace it:
- Remove the bottom of the heater, then the old fan.
- Cut off one of the aerodynamic ridges that supplied air to the legs.
- Increase the diameter of the hole in the impeller. Push the new shaft into it.
- You need to check the operation of the fan, adjust the resistor and reassemble everything in reverse order.
We hope that our recommendations will help you put your classic VAZ-2105 in order!
How to improve airflow yourself
The air conditioner removes moisture from the interior well and improves glass blowing. It's summer. In autumn it is cool to use it, but in frost it is undesirable. We need to study the ventilation system.
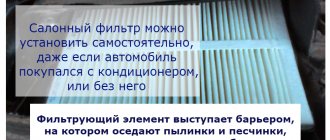
You need to start by examining the air intake. If it is clogged, the carpets in the driver's and front passenger's cabin are damp, or even damp. It is necessary to carry out measures to clean the airways.
Next you should look at the cabin filter. They probably forgot to change it in time. Increased interior humidity indicates a necessary replacement. Some car owners don't put it back at all. But this affects the quality of the inhaled air and increases the level of humidity in the car.
A failed recirculation valve is easily identified. They understood the cabin filter, but there is no feeling of fresh air inside the car. In the Toyota Corolla 150 body, it is located on the left under the dashboard. You can take out the cabin filter and open the valve manually through the hole in the shelf, but it is better to repair the damper opening mechanism. The control cable may be loose or the sensor may be faulty.
If all else fails, then the car has such a feature. You can improve the airflow for your windshield yourself. Refining the windshield blower will not require expensive funds. You will need an ordinary indoor ventilation grille. Buy it without frame.
Pre-measure the length of the deflector holes. You need tape or glue, car paint.
The heater of VAZ 2108, 2109, 21099 does not heat, causes of malfunction
Using the example of the interior heater - the “stove” of VAZ 2108, 21081, 2103, 2109, 21091, 21093, 21099 cars, let’s look at the causes of a common malfunction: “the stove does not heat.” The solution to this problem will be relevant with the onset of the first cold weather. Causes of malfunction - the stove does not heat
1. The car’s engine cooling system is contaminated.
The heater radiator is a “stove” that is part of a small circle of the engine cooling system. Therefore, warm coolant (coolant) begins to flow into it, from the “jacket” around the cylinders, immediately after starting the engine. As a result, the “stove” should start heating almost immediately.
If there is air in the cooling system, it is driven into its highest point - the radiator, and the “stove” does not heat up and no coolant enters it. He rarely leaves there on his own. Therefore, it is necessary to force the air plug out. More details about this procedure: “How to remove an air lock in a car engine cooling system.”
2. Insufficient coolant temperature.
Reasons: the thermostat is faulty - the valve does not close, there is not enough coolant in the engine cooling system.
3. The heater radiator is clogged.
The blockage may be oxidation products of the cooling system or sealant, if it is repaired using it. Or after eliminating the leak using a special product. In this case, the coolant does not circulate through the radiator and it does not heat. It is necessary to remove it, wash it with a stream of water, and blow it with compressed air. If it is completely clogged, replace it with a new one.
4. The heater fan motor does not work.
In this case, warm air is not driven into the car interior. The motor may not operate fully or may not operate at any speed. Details of the malfunction of the heater electric motor on “The heater does not work on the VAZ 2108, 2109, 21099, reasons.”
5. The heater control damper does not work.
The flow of warm air is not directed into the car interior.
6. The stove valve is stuck in the closed position.
In this case, coolant does not circulate through the radiator and it does not heat.
7. The partition inside the heater radiator fell out.
A partition is installed inside the radiator to prevent coolant from leaving it immediately. The delay allows the stove to work more efficiently. Without a partition, the stove will heat, but weakly.
The radiator can be checked for the presence of a baffle. We remove the radiator and direct a stream of water into one of its pipes. In a working radiator, the stream of water from the other pipe should come out with a delay. In a faulty one - immediately.
Notes and additions
— The warm-up time for the interior of a VAZ 2108, 2109, 21099 car at a temperature of about zero degrees (or with a slight minus) with a working heater - “stove” - is approximately five to ten minutes.
— A working “stove” 2108, 2109 should provide heating of the car interior at an air temperature of minus 20, at maximum speed, up to 20 degrees Celsius, and in the area of the driver’s and front passenger’s feet up to 25 degrees Celsius.
More articles on the interior heater (“stove”) of VAZ 2108, 2109, 21099
Radiator and heater fan
You should know that in order to always keep the interior of a five-wheeler warm and cozy, especially on winter days, you need to be able to increase the amount of heat supplied. Which part is directly responsible for supplying warm air? Of course, the radiator. But there is a problem - at the top five the fan is so loud that it makes you laugh. It is very small and simply not capable of creating the required flow. What to do? First, let's compare the fans on the VAZ 2105 and the VAZ 2108. The first motor consumes 4.5 A current and has a rotation speed of 3000 rpm, and the second one 14 A, but spins 4100 rpm. This already says something. It is recommended to replace the fan with another one.
Replacing the heater fan VAZ 2105
Replacing the heater fan on a VAZ 2105 is carried out as follows:
- the lower part of the stove is removed (this is a simple casing, on top of which a regular electric fan is installed);
- the old fan is removed;
- we cut off one of the aerodynamic ridges that supply air to the legs of the driver and passenger (this is done due to the fact that the fan motor of the VAZ 2108 is much longer);
- the impeller is also removed, which will not allow the fan from the VAZ 2108 to sit in place;
- Instead, a homemade one is installed.
Advice. In order not to remove the impeller, but to leave everything as is, you can use another fan. A standard five-bladed fan for classics, which has a motor several times more powerful, is suitable. And its weight is much lighter, and the rotor of the new motor rotates stronger than even that of the VAZ 2108.
- increase the diameter of the impeller hole;
- we insert a new shaft there (we do this very carefully so as not to break the impeller);
- connect the fan and check its operation;
- adjust the resistor and assemble everything in reverse order.
Heater VAZ 2105 fan replacement
Advice. It is recommended to replace the resistor on the five by installing the eight version. The new resistor must ensure quiet operation of the fan. The fan switch should also be replaced.
The stove blows slightly warm air
Every owner of a VAZ classic has probably encountered this phenomenon, because all big problems begin with small ones.
However, even with diagnostics, things are not so simple here, because there can be many reasons why warm or cold air is blowing from the VAZ 2101-2104 stove.
For example, due to the fact that the heater fan motor rotates much slower than the nominal operating mode. This malfunction is a consequence of oxidation/contamination of the collector. Cleaning the commutator brushes or completely replacing the electric motor are possible repair options.
Bearing jamming usually leads to the same results - it is diagnosed by the appearance of creaks from the side of the stove, which intensify over time, up to the jamming of the armature shaft.
The second common reason why the VAZ-2101 stove heats poorly is insufficient warming up of the engine. If the temperature gauge needle does not rise to the required 90 degrees, it can be assumed that the thermostat is jammed, and in a position where coolant is constantly circulating through a large circuit. In this case, you will need to replace the thermostat, which can be done independently on a penny:
- you need to work with a cooled power unit installed on a level surface;
- unscrew the plugs of the main radiator and expansion tank;
- pour the antifreeze into a previously prepared container of suitable volume (about 3 liters);
- tighten the drain plug;
- Using a flat-tip screwdriver, loosen the clamps of the pipes connected to the thermostat;
- dismantle the thermostat;
- We replace it with a known working one;
- We carry out all other work in reverse order.
After the coolant is added to the norm, we start the engine and monitor how the thermostat behaves by feeling its pipes - the lower one should remain cold until the engine warms up to 85-90 degrees.
Heater air duct VAZ-2101
Another common reason why the VAZ-2101 stove does not heat is contamination of the stove radiator. As a result, the heat transfer of the device is sharply reduced (which is facilitated by both the deterioration of antifreeze circulation and the decrease in heat transfer due to the adhesion of scale and other contaminants on the external and internal walls of the tubes).
How do you know if a clogged radiator is to blame for the lack of heat? It’s very simple: with the engine warm, check the inlet and outlet hoses by touch. If the first one is hot, and the second one is much colder, it is obvious that heat loss occurs precisely in the stove radiator.
It can be revised, but it is better to replace it with a new one - the decision is made after its dismantling based on the results of the inspection.
Here is the algorithm for dismantling the “kopek” stove:
the user instructions recommend draining the antifreeze, but in this case, due to the loss of a small volume of liquid, this may not be done (no more than a liter of antifreeze will spill out); from the engine compartment side, loosen the clamps on the radiator flanges and pull off the pipes
You need to work carefully - the hoses usually stick, and it will take a lot of effort to remove them; unscrew the cover of the rubber seal and dismantle it; go to the interior, unscrew the screws holding the car radio panel (if any); loosen the fasteners for the heater faucet drive, disconnect the cable; unscrew the brackets securing the fan casing; we move the casing down and to the left - it will not be possible to completely dismantle it due to the electrical wiring; we take out the stove radiator from the casing.. VAZ-2101 stove fan
Heater fan VAZ-2101
Now you can begin a thorough inspection of the radiator, as well as the stove faucet. If the tubes have traces of through or almost through corrosion, further inspection can be stopped - it will not be possible to repair such a radiator.
If the condition of the radiator is more or less tolerable, you can try to clean it using store-bought or “folk” remedies.
We also check whether the faucet handle is stuck - this usually happens if the stove has not been used for a long time (it has not been turned on throughout the warm season). We replace the faucet if traces of leakage are also found on its surface.
When installing a new or restored radiator, do not forget to install new gaskets, which can be pre-lubricated with silicone - this will prevent possible leaks. We perform the same operation in relation to the rubber pipes connected to the radiator. Add the required amount of antifreeze and check the operation of the stove, as well as the tightness of all connections.
Processing the engine compartment
But one more problem remains - the long time it takes to warm up the interior. And to eliminate it, you need to insulate the engine. This will allow the engine to reach operating temperature faster and cool down more slowly.
But it is not possible to insulate the motor itself; there are a significant number of moving elements on it that cannot be covered. But insulation of the engine compartment is allowed.
First you need to insulate the hood of the VAZ-2107. To do this, you can purchase a special cover from the auto store that is attached to the cover from the inside of the hood.
But many car enthusiasts prefer to do this with improvised materials. But when deciding to treat the hood, you should choose the right insulating materials. They must be non-flammable and not absorb oil. Therefore, it is not recommended to use ordinary fabrics.
The engine compartment can be better insulated by gluing insulating materials onto the shield separating the engine from the passenger compartment. But this can only be done by removing the engine from the car.
We recommend: Replacing the pump on a 16-valve Priora
In addition to the hood, the radiator also needs to be insulated. For this purpose, masks are used that are attached to the radiator grille.
Instead of a mask, you can use a regular cardboard sheet placed between the radiator and the grille. But it is worth considering that you cannot completely close the radiator; heat exchange must still occur. Therefore, a sheet of cardboard should not cover more than 2/3 of the radiator area.
There is no need to take this into account with a mask, since in addition to the grille, there are enough holes in the front end for the air flow to pass to the radiator.
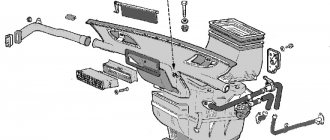
Diagram and design of the heating system in the VAZ-2107
The design of the heating unit on “sevens” with a carburetor engine or injector is identical:
- Blower The line is aimed at blowing the windshield.
- Airflow cover.
- Radiator unit.
- Radiator protective cover.
- Heating unit faucet pull.
- Radiator outlet line.
- Underwater pipe of the radiator assembly.
- Radiator tap. Used to drain refrigerant.
- Blower Designed for blowing air flow through the glass of the right window.
- Nozzle for supplying air flow to the side glass.
- Air duct damper intended for blowing right glass.
- Additional resistor device.
- A cover located on the air flow distribution device.
- Blower damper for heating the windshield.
- Electric fan motor for heating system.
- Impeller of the ventilation device.
- Blower in the internal ventilation system.
- Cover air flow control knob.
- External blower flap control handle to direct air flow to the windshield.
- Bracket for fixing air flow control handles.
- Lever for controlling the blower flaps of the heated glass system.
- Airflow cover control handle.
- Radiator faucet control lever.
- Air flow cover pull.
- The damper rod designed to control the heated windshield.
- Left blower for heating the side window.
- Ventilation nozzles located in the center of the console.
- Nozzle blade.
- Directly the nozzle of the heating system.
- Nozzle handle.
- Toothed pulley of the damper drive device.
- Air inlet seal located at the rear.
- Air supply pipe.
- Front sealing element of the air supply pipe.
- Air supply valve.
- The latch of this hose.
- Damper equipped with a gear sector.
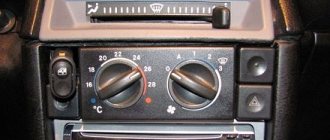
Diagram of the VAZ 2107 heating unit Three levers are used to control the heating system:
- The top one is designed to supply refrigerant to the radiator unit. This slider is connected to the faucet via a cable. It is mounted on the inlet line. In the extreme left position, the device does not work and the heating unit does not heat. If you move it to the right state, it will open and the coolant will enter the radiator device.
- In the middle position, it is possible to control the air flow flaps. If the slider moves to the left state, the air supply from the street is cut off. It will only circulate inside the car. When moving to the far right position, air flows from the street into the car.
- In the lower state, the damper is controlled, which is designed to distribute the air flow among the blowers. In the extreme left position, the flow flows to the side deflectors and to the center, and in the right position - to the windshield.
Each of the listed levers can be set to any state, this will allow for optimal functioning of the heating unit.
Installation
The new electric drive is installed in the reverse order. Do not forget to check the functionality of the purchased unit before installation. This will avoid unnecessary steps to re-disassemble the heater. Check if the engine is functioning
Fortunately, just connect it to the battery installed on the car directly.
When replacing the fan, it makes sense to also inspect other elements of the heating system of your “Seven”. Make sure that:
- there is no damage to them;
- the seal is not broken.
Pay special attention to the heater valve and radiator. Timely detection of problems will allow them to be eliminated with minimal expenditure of money and time.
This video will give you a better idea of the process:
This video will give you a better idea of the process:
Electric motor parts and heater switching diagram for VAZ 2107
1 - battery; 2 - generator; 3 — ignition switch; 4 - fuse block; 5 — heater switch; 6 — additional resistor; 7 — heater fan electric motor
The easiest way to replace an electric motor is in VAZ 2101, 2103, 2106 cars. In a VAZ 2107 car this is always associated with minor difficulties, since it has a more extensive ventilation system, placement of buttons, etc. That is why I would like to consider how to replace the stove fan exactly on this this make of car.
So, how to replace the VAZ 2107 stove fan:
1. First of all, you should move the lever (lower) to the extreme right position, this is done so that the side air duct dampers close. 2. Remove the instrument panel. 3. Then we move to the opposite side and remove the glove compartment body and the shelf for things. 4. We outline the wires and remove the beard, carefully, without tugging, remember what is located and where. 5. Using a 7 key, loosen the cable fastening and disconnect the rod.
6. Remove the end of the damper drive cable
7. Using a 10mm wrench, unscrew the nut that secures the heater radiator casing. It is located behind the central air duct.
8. Remove the ground wire from the stud
9. Then you should unscrew the fasteners of the right air duct. 10. We do the same with the left air duct.
11. We remove the side air ducts from the heater body using a screwdriver.
12. Remove the entire assembled casing.
13. Remove the fan from the housing, passing the wires inside, and disconnect the terminal from the resistor
14
Remove the impeller, paying attention to the adjusting washers
15. Disconnect the spring clips and remove the heater heater motor.
Assembly is carried out in reverse order.
Notes on replacing the fan: -You should only disassemble the electric motor yourself to check and clean the commutator. -If the stove is disassembled, you can at the same time inspect the remaining parts of the interior heater. -In order for the radiator to produce more heat, it should be washed. This can be done by using water pressure from a hose connected to the radiator inlet or outlet pipe.