Repair of the front side member on a VAZ 2101 – 2107 car
Spars on VAZ “classic” cars, i.e. VAZ from the first to the seventh models have the same design. The weak points of these side members are the mounting points for the steering mechanism, cross beam, stabilizer bar mounting and on the right side of the pendulum mounting. By design, these places cannot be called weak, since it is in these fastening points inside the spar that amplifiers are installed, but they also do not withstand our road conditions and the service life of these vehicles.
Since the beginning of this spring, several cars have already been received for repair of side members at the place where the beam is attached and the steering mechanism is attached. Basically, cracks on the side members are discovered by technicians when diagnosing the chassis and refuse to adjust the wheel alignment angles until these defects are eliminated. The main cause of cracks is loose fastenings, road conditions, and, as they say, metal fatigue.
Most often, the rigidity of the steering mechanism fastening on the left front spar is broken and a crack appears in the area of the lower mounting bolt, resulting in a backlash of the body relative to the spar, which significantly affects the violation of wheel toe adjustment. In the initial stage, there may not be a crack, but play has already appeared, this indicates that there is a crack on the amplifier, inside the spar. All this means that this defect cannot be eliminated by simple welding on the outside of the spar, and it is impossible to weld along the mounting plane, since the correct installation of the steering mechanism will be disrupted.
In this situation, an operation is required to penetrate the internal cavity of the spar, the procedure for which we will familiarize ourselves with. Read more »
gaingak.livejournal.com
Spy photos, overcooking of VAZ 2107 side members) — Lada 2107, 1.6 l., 1985 on DRIVE2
-Hello everyone!) -In general, as stated in the last entry, my right spar and beam burst (( -Since I noticed the cracks at the stage, big problems passed me by) -But I couldn’t do without replacing the beam and side members, because to remove the beam, it was necessary to saw it off from the side members “For which a HUGE thank you!” to the previous owner, he just welded the whole thing... -For this reason, I had to change the left side members, another problem arose when I started sawing them out... -It took me it took 3 or 4 days, I don’t remember, everything was welded with a seam, not a single point... so it wasn’t easy. - After cleaning, preparing and finally adjusting the spars themselves. - It wasn’t so easy to push them in, but after screwing the beam everything was aligned , I spent 2 days on this by the way =) -I hit all the holes, inserted the bolts, opened the inside with bars, and of course welded it) -I welded it semi-automatically with carbon dioxide, of course I’m still a welder, but it turned out better than some one hundred in our city “How sad is this not.” -After welding, I decided to unscrew the beam, I thought I would knock it out, but no, to my great joy it came off very easily) -Cleaning the seams, priming and painting the engine compartment are coming)))
-Like and comment!)
Issue price: 3,000 ₽
Prevention of spars
In order for the car to serve for a long time, it is advisable to monitor the condition of the side members and carry out preventive maintenance. Correcting the spar is very expensive, so it is better to monitor it and carry out routine preventive maintenance. Since the inside of the spars is hollow, dirt and moisture can accumulate in them, which leads to metal corrosion. Therefore, it is advisable to apply anti-corrosion mixtures at least once a year before winter. You can find out what the spar looks like from the instructions for the car, which shows the load-bearing elements. This also usually shows drainage holes through which a protective anti-corrosion agent should be applied. In addition, it is advisable to avoid excessive loads on the car body. Under severe overload and operation in difficult conditions, the side members may burst or bend. If it is necessary to use the machine in difficult conditions, a spar amplifier can be installed. This part allows you to reduce the load and extend the service life of the spar. It is necessary to monitor the condition of the car, especially the supporting elements. If it is operated in difficult conditions or driven at high speed on bad roads, it is advisable to regularly check the condition of the side members. Many used cars are sold after cosmetic repairs. In this case, the side members may be rotten or burst, although the car body looks like new.
To completely replace the front side member you need:
- Remove sealant and anti-corrosion materials from the repair area.
- Drill out resistance welding points (see here).
- After temporarily installing the spar, you need to measure all the distances between the control points, and also check the height position of the spar with a level (in comparison with the whole spar).
- If all distances are within normal limits, then the spar can be welded.
- Install all adjacent panels and components.
- Apply sealant and do anti-corrosion treatment and painting.
Body structure of the VAZ 2101
Before we begin tuning the body of the VAZ 2101, I consider it necessary to take a detailed look at this most important part of our vehicle. So, the body of the VAZ 2101 is a rigid spatial truss made of steel, which consists of sequentially assembled, non-separable elements:
So, the body of the VAZ 2101 is a rigid spatial truss made of steel, which consists of sequentially assembled, non-separable elements:
| 1 | Base (bottom) assembled with front part and rear panel |
| 2 | "Plumage" of the front part |
| 3 | The left and right sidewalls are in line with the rear “tail” |
| 4 | Roof |
The base is a trough-shaped, all-stamped panel with a tunnel in the center. The tunnel has two functions:
- Protects the elements placed in it from damage (in our case, the driveshaft is located in it);
- Increases underbody resistance to torsion/deformation, as do side members welded along the base*.
Spar* is a stamped steel beam with a box-shaped section.
Profile view
In the front part they are combined into a single whole:
- The front side members serve as power elements carrying the front suspension with the power unit;
- Front shield;
- Panel;
- Wings;
- Mudguards.
The rear section also contains mudguards and a luggage compartment panel.
Side view
The left and right sidewalls consist of outer and inner panels connected to each other:
- The outer panel consists of the C-pillar, A-pillar, B-pillar, sill and rear fender;
- The internal panel includes many power elements (strut amplifiers, etc.).
View from above
And finally, the all-stamped structure, reinforced with cross members, is called the roof of the car.
The elements of the body shell are made by stamping from thin sheet steel. The low weight, high strength and durability of such a design fully comply with the basic requirements of the functionality inherent in it.
Next, its removable elements are mounted to this resulting one-piece welded body:
- Trunk lid;
- Hood;
- Doors;
- Front facing;
- Decorative elements, etc. accessories.
But there is no point in flattery going into extraneous “wilds”; let’s continue the conversation about strengthening the body of classic vases.
Spar malfunctions
Every day when using a vehicle, the spar experiences serious loads. Over time, the strength factor of the metal decreases (“metal fatigue”) and the beam becomes less strong or may even “burst.” If the use is intensive and prolonged, cracks may appear on the part. Such changes reduce the ability of the spar to perform its intended functions.
Signs of side member malfunctions:
- cracks and gaps appear on the outside of the machine that cannot be adjusted;
- deterioration of steering control - the car “drives” to the right and left;
- doors close and open poorly;
- there is incorrect wheel alignment;
- tire wear accelerates (the car “chews” the wheels).
If such changes are observed, then the likely cause is deformation of the spar
It is important to correct the problem in a timely manner
In what cases does the spar need to be changed?
The decision to repair or replace the spar is made based on the degree of damage. Most often, side members are damaged during an accident. In addition, the reason for partial or complete replacement may be corrosion, as well as the appearance of cracks during the operation of the car.
If the damage after the accident is smooth, without sharp corners, then the spar must be repaired; if the damage has sharp corners (pressures with an angle of less than 90 degrees) in a small area, cracks, tears or corrosion that are difficult to remove after pulling, then the spar needs to be partially or completely change. The metal structure of the spar with such damage changes, as do its characteristics.
Spars with significant damage, made of ultra-high strength steel (UHSS-Ultra High Strength Steel) most often need to be replaced, as they are very difficult or impossible to repair. Heating significantly weakens the strength of such steel.
Repair and replacement of spar
In the event of an accident, specialists first inspect the spar to make sure that it has not moved out of place. No wonder. If this happens, then it is impossible to straighten, stretch or strengthen it with your own hands. The spar can be corrected only at a specialized body inspection and straightening stand - a caroliner, by disassembling half of the car.
As practice shows, it is very difficult to reassemble it. Replacing a spar with another is also not easy. But in the conditions of a regular car service it is impossible. In simple words, a cracked spar is a death sentence for a body that no longer meets reliability requirements. Editing, straightening and stretching of the car spar in a car service occurs when the spar is slightly deformed or bent.
The decision to straighten or completely replace the spar can only be made by a specialist. He must determine the degree of deformation of the part. As a rule, if the distortion is not severe over a long length, replacement may not be necessary. Such a bevel can be restored using a jack or square without changing the characteristics of the body.
However, if the damage is significant, the spar will have to be replaced with another one, but in this case the strength and characteristics of the body will change
That’s why it’s so important when buying a used car to pay attention not so much to the appearance of the car or engine, but to the geometry of the body and the condition of the side members.
1200 rub. for the photo report
We pay for photo reports on car repairs. Earnings from 10,000 rubles/month.
Write:
The problem of failure of the VAZ 2108/2109 side member is not a pleasant situation, but this does not mean that it cannot be corrected. There are two ways to fix the problem: replacement or welding, DIY repair or in a workshop. You will learn further how to make the right choice.
Hood of VAZ 2107
VAZ 2107 owners often modify the hood of the car. First of all, the lid stop, which was made at the factory in an extremely inconvenient way, changes. First you need to remove it from the latch and only then close it. On the VAZ 2106, the same stop is designed much simpler and more functional.
Installing an air intake on the hood
An air intake or snorkel is often installed on the hood of the VAZ 2107, which improves the appearance of the car and helps cool the engine. It is mounted so that air flows directly onto the air filter. Sometimes additional pipes are installed to the main air intake to increase cooling efficiency.
The snorkel is usually made by hand. In this case, it is better to use durable plastic or metal as a material. The air intake is mounted as follows.
- A U-shaped hole is cut in the hood with a grinder.
- The cut out part of the hood is bent to form the snorkel profile.
- Triangular metal pieces are welded along the edges to cover the ends of the part.
- The hood is puttied and painted to match the body color.
When cutting the hood, it is important not to touch the stiffeners provided by the design. Otherwise, the strength of the body will noticeably decrease.
The air intake on the hood of the VAZ 2107 changes the appearance of the car and improves engine cooling
Hood lock
Sometimes car owners modify the hood lock of the VAZ 2107. If it does not work well or fails, the mechanism is dismantled. It is recommended to first outline the lock with a marker - this will avoid adjusting a new or restored lock. The mechanism is removed in the following order.
- The hood opens.
- The lock cable clamps come out of their seats.
- The bent end of the cable is straightened with pliers. The fixing sleeve is removed.
- Use a 10mm wrench to unscrew the lock nuts.
- The lock is removed from the pins.
- A well-oiled new lock is installed.
When replacing the cable, it is first disconnected from the lever handle. This is done from the salon. Then the cable is pulled out of its sheath. Nowadays, cables are often sold complete with a sheath. In this case, when replacing the old cable, it is pulled out along with the casing.
A brief excursion into history
The development of the spar and the creation of various body elements are closely interrelated. This is not surprising, because on the first vehicles only frames were used as support.
At first they were made of wood, but over time they were replaced by durable metal structures.
In the last century, in the 1920s, Auburn developed the first spar frame with an "X" cross member.
Over time, the parts were improved and became one with the bottom of the vehicle.
At the present stage, spars are an integral part of the machine design, regardless of the type of supporting system.
Method of strengthening spars
Overlays for strengthening the side members
The main way to strengthen the front side members on a Niva 2121 car is to install a ready-made set of linings. Those available for sale cost between 3000-4000 rubles, they look like semi-handicraft production. Here we simply reproduced a drawing of a part that is freely available. Agree that it’s impossible to think of anything more sophisticated in appearance and price for a budget car for off-road driving. The kit includes a reinforcement in the form of steel sheets (3 mm thick) and shock absorbers for brackets (4 mm thick). If you have excess free time, but no money, then you can make the overlay yourself; the drawing of the Niva 2121 spar overlay for KOMPAS can be freely downloaded on the Internet. But it is better to “cut out” the part based on a cardboard pattern, which can be made based on the existing spar. Then, using a 3mm thick steel sheet, the part is cut out with a grinder. Since you will still need access to them, we present an algorithm for dismantling the surrounding units of the Niva 2121.
How to access the side members
- You will need to drive the Niva 2121 onto an overpass or a lift. Then the wheels are dismantled.
- Remove the caliper by unscrewing the clamp
- Using the “lever” technique or a hammer, knock out the knot
- Loosen both shock-absorbing fasteners
- Hang the brake system cylinder on the hoses
- Removing the upper arm, upper bump stop and cup
- Releasing the gearbox and steering pendulum
So, let's move on to the next part of the work on strengthening the side members of the Niva 2121 - installing the linings:
Check the quality of the seat for the shock absorbers.
Note! The trim must be in close contact with the spar!
If you have already made a part of the lining, the drawing of which was somehow received - congratulations - the main stage of work on strengthening the side members is behind you.
- Drill holes on the side members and the freshly made trim
- The cover is bolted on and securely secured.
- Using semi-automatic welding, the part is processed around the perimeter
- A “house” is installed, which in turn is also welded
Attention! The working surface must be covered with anti-corrosive. The mastic will fit perfectly, drying in just 24 hours
It is also possible that the spars are partially destroyed. Sometimes they can be restored. Otherwise, only replacement is possible.
strengthening the spar and rear stub — Lada 2107, 1.6 l., 2003 on DRIVE2
Once upon a time, one trouble was noticed at the wheel alignment: a burst spar under the steering gearbox. In principle, this is familiar to those who have had greens for a long time. These plates were purchased from Ilyusha Polikarpov for reinforcement.
they are welded on both sides to each spar. Everything was stripped down to metal and welded. Then the seam is sealed with joint compound, primed, painted and covered with mastic
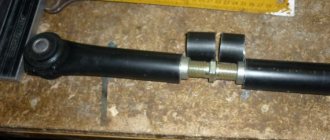
Now about the stabilizer. After driving around, I realized that the ass was soft, the car's stock screws were so good (I decided to try to tighten it up with a stub. I didn't reinvent the wheel, but stupidly copy how everything in the E30 is. On Avito I found a stock E30 stub for pennies, took it right away (for the future I'll change it from M , on the one that is thicker). Surprisingly, everything fits in size. Well, of course, without welding and an angle grinder, there’s nowhere. The attachment to the levers was made exactly the same as the E30, only from thicker metal
Full size
boiled and painted
To the body I welded a part of the profile with a hole for a bolt and a plate, like a groove, into which a plate is inserted for clamping the rubber band of the stub.
Full size
Full size
The bones are the same as the BMW E30, the only drawback is that on low cars the bones will rest against the body, I have a margin of 1 cm left with the suspension as compressed as possible. In the future, when replacing the bones, I will install from E34, they are half the height
Full size
Full size
That's all) then re-welding the floors where the front jacks are and welding normal fastenings for the buckets...
Replacing the rear spar of VAZ 2105/07 cars
Spars on VAZ “classic” cars, i.e. VAZ from the first to the seventh models have the same design. The weak points of these side members are the mounting points for the steering mechanism, cross beam, stabilizer bar mounting and on the right side of the pendulum mounting. By design, these places cannot be called weak, since it is in these fastening points inside the spar that amplifiers are installed, but they also do not withstand our road conditions and the service life of these vehicles.
Since the beginning of this spring, several cars have already been received for repair of side members at the place where the beam is attached and the steering mechanism is attached. Basically, cracks on the side members are discovered by technicians when diagnosing the chassis and refuse to adjust the wheel alignment angles until these defects are eliminated. The main cause of cracks is loose fastenings, road conditions, and, as they say, metal fatigue.
Most often, the rigidity of the steering mechanism fastening on the left front spar is broken and a crack appears in the area of the lower mounting bolt, resulting in a backlash of the body relative to the spar, which significantly affects the violation of wheel toe adjustment. In the initial stage, there may not be a crack, but play has already appeared, this indicates that there is a crack on the amplifier, inside the spar. All this means that this defect cannot be eliminated by simple welding on the outside of the spar, and it is impossible to weld along the mounting plane, since the correct installation of the steering mechanism will be disrupted.
In this situation, an operation is required to penetrate the internal cavity of the spar, the procedure for which we will familiarize ourselves with.
The internal steering gear mounting reinforcements can be accessed from the mudguard side; in this case, you need to remove the left front wheel and unscrew the lower steering gear mounting bolt without completely disconnecting it.
We drill out several welding points (the number of points depends on the required size of the window, in our case there are 4 of them) and cut them out with a grinder as shown in Figure 1. We cut them down along the edge. As can be seen in Figure 2, a second layer has appeared - this is an amplifier, which also needs to be removed.
Around the hole you can see three points that also need to be drilled - this is the fastening of the spacer sleeve to the inside of the amplifier and then open it. In this case, the spacer sleeve no longer held on the inner wall of the spar and was removed along with the amplifier plate, as we see in Figure 3.
And here is a crack that definitely had to be there and it is located on the amplifier, as a result of which the spacer sleeve broke off during welding at three points. Next, you need to weld everything and install the reinforcing lining of your design.
In order to accurately install the spacer sleeve, we tighten it with the same fastening bolt, only with a nut on the side of the steering mechanism, which is in its place and does not interfere with the repair of the spar. We weld the bushing with three points.
Next, remove the bolt and weld the window with the same overlays and through the drilled holes.
All that remains is to treat the welding areas with anti-corrosion materials, install the lower steering gear mounting bolt, install the front left wheel and the repair is complete.
In this case, the destruction of the spar was at the initial stage, so the window had to be cut to a minimum size and only one bolt was unscrewed. As they say, any treatment is always easier to carry out at the initial stage, and the result is always better.
Lada 2107 Classic › Logbook › Replacing the belt inserts of the front spar of the classic (beam fastening)
Fireworks to everyone. In general, anyone who reads my bulletin board knows that I am rebuilding the suspension on my 07. So, after I took everything apart, I decided to check the bodywork, so as not to have to disassemble the suspension several times later. And I saw a small crack crawling out from under the beam. Well, I decided to remove the beam and see what it was all about, as I realized later, it was very, very not in vain. I brushed the metal a couple of times and this picture opened up in front of me.
Full size
On the one hand I was upset, on the other I was happy. And the thought immediately settled in my head: “It’s good that I filmed it.” Well, accordingly, it was immediately decided to weld the repair insert. After I bought a repair insert and cut off this part of the spar, I saw this picture).
Full size
Full size
I coated the inside of the spar with epoxy primer and began to fit a new repair insert. I didn't expect this here. The workmanship is simply ., in general, one mat. From welding there are only three points and two tacks with an electrode. (It was with an electrode that they didn’t even remove the slag)). First I strengthened it a little, someone welds the bolts tightly, I think this is not an effective method. Let’s say you don’t even weld it right and that’s it, you won’t be able to install the beam, you’ll have to either weld it or drill holes in the beam itself. Therefore, I simply grabbed the plate itself so that it would not rise up, thereby preventing the bolts from turning under any circumstances.
Full size
By the way, the length of the tube is about 1-2 cm longer than the factory one. Therefore, as mentioned above, one checkmate...
Well, I welded the repair insert accordingly.
Full size
I didn’t completely clean the weld seams from below, because it’s very inconvenient, it’s almost impossible to get under the grinder, and cleaning the seams will only make them weaker. And under the beam and dirt it will not be visible at all).
Next, I applied it according to the following scheme: Epoxy primer > Acrylic primer > Paint from a balloon. By the way, I almost didn’t have enough gas, and ended up taking a little shit on the bottom right (you can see it).
Full size
Tomorrow I'll clean the snot from below and everything will be ready).
And at the same time I replaced the bolts on the beam, because these were already rotten, without threads and crooked).
Full size
Good luck everyone on the road!
Basic work when repairing a part
If the rigidity of the steering system fixation is violated, a crack will form in the area of the lower fixation bolt on the left front side member. As a result, there is a backlash in the body in relation to this design, which has a negative effect on wheel toe adjustments. If there is no crack, but play has appeared, then we can talk about the presence of a defect on the amplifier, inside the VAZ 2107 spar. It is impossible to fix the problem using conventional welding. It is forbidden to weld along the fixation plane, as the correct installation of the steering mechanism will be disrupted.
Auto mechanics recommend getting to the inner plane of the VAZ 2107 spar. To do this, you will need the following tools: keys, welding, grinder, screwdriver, pencil, ruler. You can approach the mechanism from the side of the mudguard. First, the front left wheel is dismantled by unscrewing the lower bolt securing the steering mechanism.
https://youtube.com/watch?v=ft7NO8ComGQ
Further repairs involve drilling out several welding points. The exact quantity depends on the parameters of the window that is cut using a grinder. The amplifier is removed in the same way.
3 points appear around the hole and are drilled. With their help, the spacer sleeve of the amplifier is attached. Often this element no longer adheres to the inner wall of the VAZ 2107 side member, so it is removed along with the amplifier plate.
Now you can see the crack that has appeared on the amplifier itself. This defect can be eliminated by welding and installing a reinforcing lining. The same mounting bolt is used to install the spacer sleeve. In this case, the nut is screwed on from the side of the steering mechanism, which is in its place (it should not interfere with repair work on the VAZ spar). The bushing is welded with 3 points. After removing the bolt, the window is welded using the same pads. All welding points are treated with special anti-corrosion materials.
Do-it-yourself car body exhaust
Body stretching is a very complex process, which is usually performed after an accident, when all distortions in the geometry of the car body are eliminated by applying the opposite force to that received during the accident.
What does it take to pull out damage?
To correct damage of this nature, special tools are always used that can return any part of the car to its previous state; these are hydraulic and screw jacks, which can be used on:
How it works?
Leveling the body shape using jacks should occur in several stages:
This method may involve the use of a vacuum in cases where the concave part has retained the integrity of the paint layer; it will avoid the need to do “cosmetics”. It may cost more, but considering how much it costs to paint a car, such a hood is still cheaper.
It is also possible to use a reverse hammer, but painting cannot be avoided here. The method works like this:
Sometimes, to install a reverse hammer, a hole for a hook may be drilled into which a nut and washer are threaded. Once completed, the hole is treated with putty or welded.
Another method of repairing a body is stretching using a gas torch; it is mainly used to upset the stretched metal and smooth out folds.
You need to work here very carefully, keeping the burner at a distance, otherwise there is a risk of burning the body
Please note that the hood must be completed in a timely manner. This means that you must complete all work at the same time as the surface has completely cooled, otherwise it may return to the wrong position.
The most popular among devices for eliminating deformations of the car body is a special stand:
Also worthy of attention is the easiest way to repair deformations - dismantling the damaged part using an amplifier, which with a 6 mm drill will pass along the perimeter of the weld and separate part of the body from the body. It is straightened and welded into place.
If the entire body is being repaired, then it is necessary to prevent the doors from sagging by placing special trestles under the front and center pillars in the amount required for reliable support.
For each type of deformation, various drawing and straightening methods can be used, all of which are aimed at reducing the extent of interference with the integrity of the body. Therefore, the preferred method of stretching is working with the car body on a stand or using jacks. Small dents can sometimes be eliminated with your own hands using a household hairdryer using heat.
Protective polishing of the body
Protective body polishingfrom 10,0002. Slipworks.installation of a car on a slipwayfrom 2,000removal of a simple misalignment of the car bodyfrom 5,000removal of a misalignment of the body of a medium-complex carfrom 10,000removal of a complex misalignment of the body of a foreign carfrom 12,0003. Reinforcement works.removing the front bumper of a car complete from 1,000installing the front bumper of a car assembling from 1,000removing the rear bumper of a car assembling from 1,000installing the rear bumper of a car assembling from 1,000rear bumper disassembling from 500car rear bumper - assembled from 500front bumper disassembling from 1,000car front bumper - assembled from 1,000car front door - disassemble, assemble for painting from 2,000 car rear door - disassemble, assemble for painting from 2,000 foreign car front, rear door - replacement with reinforcement overhaul from 2,500 car front, rear assembly - replacement with adjustment to the opening from 2,500 side mirror of foreign cars without electric drive - replacement from 500 foreign car mirror side with electric drive -replacement from 500replacement of front headlight from 500replacement of rear headlight from 5004. Replacement of body parts.Replacement of a car hood from 2,000 Replacement of a car trunk lid from 2,000 Replacement of a removable front wing from 2,000 Replacement of a car roof without a sunroof assembly from 10,000 Replacement of a car roof with a sunroof assembly from 15,000 Replacement of a front spar with a mudguard from 7,500 Replacement of a car's rear panel from 7,500 Replacement of a front panel complete carfrom 4,000Replacement car side sill assembly from 6,000 Replacement of the middle pillar with part of the sill assembly from 10,0005. Repair of body parts.Repair No. 1 of the side of a car - sedan 10,000 Repair No. 2 of the side of a car - sedan 13,000 Repair of No. 3 of the side of a car - sedan 16,000 Repair of No. 4 of the side of a car - sedan contractual Repair of the side of a car - station wagon No. 112,000 Repair of the side of a car - station wagon No. 214,000 Repair of the side of a car - station wagon No. 318,000 Repair of the side of a car car - station wagon No. 4 negotiablerepair of front car mudguard No. 12,000repair of front car mudguard No. 23,000repair of front car mudguard No. 34,500repair of front car mudguard No. 4negotiablerepair of front car door No. 11,500repair of rear car door No. 11,500repair of rear car door No. 23,000repair of front car door No. 23,000repair of the front door of a car No. 34,500repair of the rear door of a car No. 34,500repair of the front door of a car No. 4 negotiablerepair of the rear door of a car No. 4 negotiablerepair of the hood of a car No. 11,500repair of the hood of a car No. 23,000repair of the hood of a car No. 35,000repair of the hood of a car No. 4 negotiablerepair of the front fender of a car No. 11,000repair of the front car fender No. 22,000repair of the front fender of car No. 33,500repair of the front fender of car No. 4 negotiablerepair of the roof panel of the car No. 11,500repair of the roof panel of the car No. 23,000repair of the roof panel of the car No. 36,000repair of the roof panel of the car No. 4 negotiablerepair of the car trunk lid No. 1, 5th door1,500repair No. 2 of the car trunk lid, 5th door3,000repair No. 3 of the car trunk lid, 5th door5,000repair No. 4 of the car trunk lid, 5th doornegotiablerepair of the rear panel of the car No.12,500repair of the rear panel of the car No.24,000repair of the rear panel of the car No.36,500repair rear panel of car No. 4 negotiablerepair of foreign-made sidewall threshold cost 2,0006. Additional body workRestoration of cloudy plastic headlights of foreign cars 800Abrasive polishing of the car bodyfrom 8,000Protective polishing of the car body5,000 - 10,000Find out the cost of repairs from photos in 10 minutes!
In road accidents, side members are often deformed. The lion's share of such cases occurs in the front part of the car body. The part itself performs the function of volume shock absorbers and amplifiers for mudguards, hood and trunk. When replacing or welding, the technology is the same, the only difference is in the use of tools and devices.
–> You will need
- - welding machine;
- - Sander;
- – plasma cutter;
- - metal spatula.
Instructions 1 Free the surface to be repaired from parts and components of the engine, chassis and electrical equipment. Most of the work on replacing and repairing side members occurs on the front part of the car.2 Pull out the most damaged side member to its original condition. Do not cut off the deformed part without stretching. This will make it difficult to repair other parts of the body in the future. 3 Take a gas burner and heat the places where the parts are welded. Use a metal putty knife to remove the primer, sealing tape and sound insulation.4 Cut off the spar. When replacing a wheel arch, it does not need to be separated from the part being repaired. 5 Straighten the damaged body parts that are in contact with the spar and prepare a new wheel arch. 6 Cut the part of the new spar to the size of the old one. For this operation, use a plasma cutter or a hand saw. Fitting the new part will be easier if you make the cutout oblique. Replace the front panel and wheel arch.7Take a jack and place it under the side member and secure it. Connect the new spar to other parts with special clamps. Use guide templates for precise installation.8Check that all dimensions match and secure the spar in several places by welding.9Weld the spar into the joint using gas shielded arc welding. Spot weld the wheel arch to the front panel and the repaired part. The welding must be through to ensure the strength of the connection between the parts. 10 Align and grind the welding areas. To do this, use a sanding machine. Tap the places where the side member comes into contact with the wheel arch with a hammer. This will give a closer contact with each other.11 Apply primer coat, soundproofing and sealing tape to the surface. –> Please note: When welding the spar, remember that it is not recommended to strengthen it. In this case, it stops shock-absorbing, which can lead to negative consequences. Helpful advice: Cut the spar in the places specified by the manufacturer. They cannot be located in shock absorption and deformation zones. Sources:
- how to digest arches yourself
- Replacing the front spar on a VAZ 2101, 2106, 2107
–> Is this advice useful? All videos New videos Popular videos Video categories
| Auto | Video blogs | Road accidents | For little ones | Food, drinks |
| Animals | Law and law | Celebrities | Games | Art |
| Comedy | Beauty, fashion | Cooking, recipes | People | Moto |
| Music | Cartoons | Science, technology | News | Education |
| Policy | Holidays | Jokes | Nature | Incidents |
| Trips | Entertainment | Rzhach | Family | Series |
| Sport | Life style | TV programs | Dancing | Technologies |
| Goods | Horror | Movies | Show Business | Humor |
Main newsThe State Traffic Inspectorate is looking for eyewitnesses!”>Results of the preventive event “Safe Road””>Fire safety rules during the spring-summer fire hazard period”>Verkhnyaya Salda firefighters took part in the All-Russian open lesson”>Fire inspections and briefings in churches before Easter”>Results promptly -preventive event “Tinting”>About new opportunities and prospects for the development of “Titanium Valley”>Salda residents are increasingly becoming victims of scammers from ad sites”>Representatives of the veteran organization of the Ministry of Internal Affairs of the Russian Federation “Verkhnesaldinsky” laid flowers at the Monument to the heroes-liquidators of the Chernobyl accident NPP”>Salda police ask citizens to hang up if money is discussed”>Let’s play 0707 = Tele2 = (:HoHmA:) we’re going to Moscow”>Compact irrigator RL 210 from Revyline with fast delivery to Sochi”>Can I buy it inexpensively laptop for corporate purposes”>Orthodontic wax “Revilane” in stock in Izhevsk”>How to gain the trust of the audience? How can an expert gain the trust of the audience at a webinar?”>Compact irrigator Revyline RL 650 is available in Orenburg”>Exclusive furniture to order”>Employees of the Belgorod linear department uncovered the theft”>The day must not come►SWAN: Chernobyl Unexplored►Walkthrough►Part 3″> Is it possible to do an MRI with dental implants? Is it possible to undergo an MRI if you have dental implants? pvpu2g, pvvng-ls, pvkp2g, asbl, sbshv, aabl and others in Russia”>I will buy fluoroplastic FUM tape, FUM harness, fluoroplastic film, surplus stock in Russia”>We buy power cable in Yekaterinburg, region, surplus stock in the Russian Federation”>Fluoroplastic F4 pipe, F4PN tape, I will buy from storage, unclaimed in the Russian Federation”>I will buy fluoroplastic powder throughout Russia, illiquid stock, from storage”>I will buy insulated wire SIP-2, SIP-3, SIP-4, SIP-5, unclaimed, illiquid stock in the Russian Federation” >Fluoroelastomer SKF-26, 26 ONM, SKF-32 I will buy all over Russia, surplus, unclaimed”>Photo LASTOCHKA-OMSK”>Photo”>Photo [email protected] “>Photo west o.”>Photo Olga Gantseva (Nazarova)” >Photo VALERY TSARKOV”>Photo Sergey Reva”>Photo God is love”>Photo lalapta108″>Photo Svetlana Vlasova (Verkhunova)”>Studio headphones32 min. backDarkside is an excellent choice for all hookah connoisseurs45 min. backSteroids1 h. 2 min. backShop for manicure and pedicure1 h. 22 min. backHow to choose the right tonometer?2 hours 58 minutes. backDestruction of cockroaches3 hours 22 minutes. backtax code3 hours 41 minutes backSights of Moscow5 hours 7 minutes backMotorcycles8 hours 27 minutes backoffice with normal output9 hours 52 minutes back Last comments Anna Volkova As it turned out, the task was not so simple: to get the product certified as quickly as possible. Somewhere the cost is just exorbitant...23 hours 49 minutes. agoanna0303good afternoon! I used this article as a recommendation and ordered a portable computer from the website https://my-gadget.com.ua/ May 12, 2022 15:42:39 Website creation in Krasnodar SeoZhdanovCleaning of apartments from the cleaning service https://total-cleaning. ru/ #totalcleaningru #cleaningcompany...May 12, 2022 11:31:07 rom kov Thanks for the article! May 11, 2022 15:18:02 Igor It must be said that the Zlato brand is very praised, at least by my friends who bought jewelry from this company , but what...May 10, 2022 12:53:24grischaeva From the company you can purchase certified desigo software, Siemens controllers, sensors and other equipment...May 8, 2022 22:31:27rom kov I will say that you definitely need to study as much information as possible and read reviews on the Internet about different bookmakers, by... May 7, 2021 9:40:28 rom kov Unfortunately, banks only issue loans to those with a high salary, local registration, and official income. If you don’t have this, then... May 7, 2022 6:46:35 Lilia Razumovskaya Nice young man and educational video! My niece just wants to go to study to become a dentist)?) It seems to me that this... May 6, 2022 9:34:35 Alex1985 I recommend ordering flowers in trusted stores, I buy from Roses Delivery. , I really like Dutch and Kenyan roses....5 May 2022 13:49:44
Hello! The next post on my blog will be about replacing the front side member on a classic VAZ, since this problem can befall both an old, tired car and a fairly fresh one.
Crack on the front side member of a VAZ
In practice, there are three most common problems with the front spar:
- Corrosion, the spar rots, and accordingly the front part of the body in the suspension area loses rigidity, a beam or anti-roll bar may fall off
- The second option is when the spar does not seem to have holes, but the studs that secure the beam to the spar have broken out.
- The third problem is the fatigue of the spar at the place where the steering column is attached; when the steering wheel wobbles, the column body moves.
There are two options, but there is only one solution - replacing the VAZ front spar with your own hands . Practice has proven that it is not necessary to replace the entire spar; it is enough to replace most of it; if, for example, a beam has broken out of the spar, then it is enough to replace the front part of the spar, 10–20 cm long, by the beam mounting studs.
This replacement option is less problematic and suitable for the average user; it gives fewer problems, since when replacing an entire spar, you will need to remove the interior carpet and weld the spar from below, at the junction with the whip. And it’s not particularly convenient to work there, I’ve already replaced more than 10 side members in parts - no problems have arisen with any car, the main reason for asking for a side member replacement is that the studs that secure the beam have broken out.
If you have a problem in the place of the spar where the steering column is attached, then a complete replacement cannot be avoided. When replacing the spar for this reason, I would recommend also increasing the rigidity of the mudguard.
Rail saver repair tool
Tim Gerhards, an American auto body repair specialist who has been working in this field since 1986, has come up with a tool that helps remove dents and bends in side members by attacking the imperfections from the inside. This is a fairly new invention. The tool is called Rail saver (literally translated as spar saver). It is a metal body, to one end of which a hydraulic cylinder connected to a pump is screwed. There is a metal pipe inside the housing.
p, blockquote 23,0,0,0,0 –>
p, blockquote 24,0,0,0,0 –>
A hydraulic cylinder acts on one end of this pipe, and at the other end there is a wedge, which gradually lifts the part of the body where the wedge is also located. It turns out something like a long jack, which is inserted inside the spar to the place where the bend is located and the bend or dent is applied from inside the spar. Anvils of different shapes, which are included in the kit, can be screwed to the place in the tool that rises. Thus, this tool can work on dents and folds caused by the displacement of the side member from the inside.
p, blockquote 25,0,0,0,0 –> A tool for straightening the side members from inside the Rail saver is placed inside the side member. The arrow shows the place where the fold is located, which the tool will straighten.
If necessary, the unevenness is tapped from the outside with a hammer, and the tool for straightening the side members acts as support. Since a hydraulic cylinder with a pump is used to operate the tool, it is possible to remove deformation on the metal of a spar of any thickness without much effort. The most important thing is to correctly position the tool in the right place. To do this, you need to measure the location of the deformation and position the tool inside the spar to the desired length. There is a measuring scale on the body of the instrument.
p, blockquote 26,0,0,0,0 –>
Depending on the size of the spar, you can place wooden blocks in its cavity to position the tool as best as possible.
p, blockquote 27,0,0,0,0 –>
The Rail saver tool has been tested and approved by General Motors for repair of salvage vehicles at authorized service centers. The advantage of this tool is that it eliminates the need to cut segments in the spar to access the reverse side of the damage. There is no need to heat the metal, especially since modern high-strength steel is sensitive to heat and is significantly weakened and loses its properties.
p, blockquote 28,0,0,0,0 –>
The design of the Rail saver tool is quite simple and if it is thoroughly understood, you can make such a tool yourself.
p, blockquote 29,0,0,0,0 –>
On the left, at the top of the tool body, you can see a wedge on which another wedge acts, lifting it. The pipe with the wedge inside the housing is pushed by a hydraulic extension. The place with the wedge, which rises when exposed to hydraulics, must be installed opposite the fold, inside the spar. Special anvils/supports can be screwed to this part of the tool. p, blockquote 30,0,0,0,1 –>
Repair of the VAZ 2107 spar under the steering column
Unread message Kirill58 » Sun Oct 02, 2011 12:09:46
Re: the spar moves at the steering gear mounting location
Unread message GoBLIN » Sun Oct 02, 2011 12:11:48
Re: the spar moves at the steering gear mounting location
Unread message Kirill58 » Sun Oct 02, 2011 12:14:20
Re: the spar moves at the steering gear mounting location
Unread message Alex** » Sun Oct 02, 2011 12:17:50
Re: the spar moves at the steering gear mounting location
Unread message ewg908 » Sun Oct 02, 2011 12:26:24
Re: the spar moves at the steering gear mounting location
Unread message GoBLIN » Sun Oct 02, 2011 12:30:34
Re: the spar moves at the steering gear mounting location
Unread message ewg908 » Sun Oct 02, 2011 12:41:15
Re: the spar moves at the steering gear mounting location
Unread message Alex** » Sun Oct 02, 2011 12:53:13
Re: the spar moves at the steering gear mounting location
Unread message ewg908 » Sun Oct 02, 2011 17:17:58
Re: the spar moves at the steering gear mounting location
Unread message mik58 » Sun Oct 02, 2011 17:46:11
Re: the spar moves at the steering gear mounting location
Unread message by VladiZlav » Sun Oct 02, 2011 17:49:09
Re: the spar moves at the steering gear mounting location
Unread message Aleksandr » Sun Oct 02, 2011 18:26:30
Source
Installation of the power element and adjustment
The front suspension beam of the VAZ 2107 is mounted in the reverse order of its removal and in compliance with the rules and safety measures. A qualified replacement of this power element involves the use of new fasteners. During the work, it is necessary to defecate the suspension units, especially the ball joints and silent blocks. Replacing faulty elements will avoid repeated repairs in the near future.
Repair and restoration work of this kind on a VAZ 2107 car is usually carried out by the owners themselves. This is usually done in order to save money, but precise adjustment of wheel alignment angles is quite difficult to perform without special equipment. To do this, contact a specialized service station. Replacing load-bearing body elements inevitably leads to changes in settings.
Installing a new beam on a VAZ 2107 car will eliminate the problem of yaw while driving. The car becomes more controllable and does not deviate from the chosen trajectory. The new beam increases the torsional rigidity of the body, which has a positive effect on its overall condition.
To watch online, click on the video ⤵
Reinforcement of the steering spar. classic.More details
VAZ 2107. Strengthening the steering column. More details
Cracks on the side member under the steering column RepairMore details
how to strengthen the steering spar on a classic VAZ 2106Read more
Spar amplifier. How to strengthen or repair the mounting points of the steering gearbox and pendulum.Read more
The Whole Truth about the Steering Brace or Power Steering Column on the VAZ Classic ZhiguliRead More
Strengthening side members on a VAZ (Part 12)More details
Repair of the spar under the steering gear.More
Bursted side members - repair of VAZ 2106. More details
ABOUT NIVA# Repair and strengthening of the side member under the steering column of the VAZ NIVA 2121. More details
How to adjust the steering column of a VAZ. Adjusting the VAZ-2106 steering gear. VAZ steering gearbox.More details
VAZ 21053 “John Rambo”/No. 5/Mudguard stand, floor reinforcement, jack.More
Reinforced pendulum and reinforced side membersRead more
WHY DOES THE STEERING STEERING LOCK ON ZHIGULI? We fix the problem. Read more
Steering column knock (steering gearbox).Read more
Strengthening the steering column of a VAZ 2107, repairs in the Zhiguli garageRead more
A beam on a classic was torn out, spar repair [PVS]More
WELDING OF THE SPARM. spar crack repairRead more
Repair of Niva 21214 spar (mounting point of the steering column)More details
Source