Replacing the support bearing on VAZ-2110, 2111, 2112
Support bearings are designed to reduce body loads transmitted from the vehicle wheels through the shock absorber struts.
They are components of the upper supports of the front shock absorbers. The support bearings are located in the upper inner surface of the “cups” located in the engine compartment above each of the wheels.
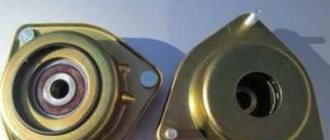
The design of the standard support bearing of the VAZ 2110 consists of the bearing itself (a thick rubber separator with steel balls built into it) and two protective rubber gaskets.
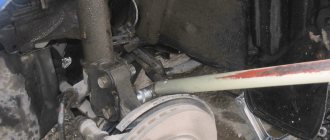
Rear suspension of the VAZ 2110 - main components
The rear suspension device of the VAZ 2110 consists of two longitudinal arms 13 welded together through amplifiers with connectors 12, to the rear of which brackets 14 are welded with places for attaching shock absorbers and with flanges 15.
The wheel axles along with the brake mechanisms are attached to them. In front of the levers there are bushings 16 with rubber-metal hinges 1; bolts are threaded through them, which are connected to brackets 2, which, in turn, are attached to the body side members. Springs 11 are located at one end in the shock absorber cup 9, at the other - in the support through the rubber gasket 10, which is welded to the inner arch of the body.
Double-acting telescopic shock absorbers. They are attached to the bracket with bolt 9. The rod is attached to the upper support 5 of the spring through rubber pads 6 and a support washer 3. A thrust bearing 12 is installed in the hub 13. It is similar to the front one, but is smaller in size and, unlike the front one, where the inner ring is installed with an interference fit, bearing 12 on axle 14 has a transitional fit. During operation, it does not need to be adjusted or lubricated; any play that occurs cannot be eliminated by tightening the nut, only replacement.
It is not recommended to disassemble the hub if the bearing is in good condition, since it is destroyed when pressed out.
Basic faults
When a support bearing fails, a knock resembling dull blows appears in the front part of the car in the area of the pillars. Most often, such symptoms are observed when driving over uneven surfaces.
A knock indicates that the bearing has ceased to cope with its duties due to a violation of its integrity. This is caused by the destruction of its structure due to:
- exceeding the recommended resource;
- excessive dynamic loads;
- dirt and moisture getting inside the bearing.
However, knocking in the area of the racks may have other causes. To check the bearings and make sure that they are the ones knocking, lift the hood of the car, remove the cover of the supposed “glass”, and place your palm on the upper shock absorber support.
Rock the car up and down. If at the same time you hear the same knock and feel the corresponding vibration with your hand, immediately replace the bearing.
Malfunction of other rack elements
All of the above methods for checking the rolling element are quite accurate and effective. But none of them gives a 100% guarantee until the unit is disassembled. The cause of the creaking that appears in the area may be steering rods or other adjacent parts or suspension elements.
Spring fault
If the strut spring sags or breaks, this will immediately result in a deterioration in comfort and a decrease in the vehicle’s handling quality. And hence the decline in road safety in general. A sagging spring on one of the wheels is clearly visible visually. Creaking and grinding noises are only possible if it breaks.
How to identify a malfunction of the support itself (not the bearing)
If the support is worn out, a dull sound or knocking sound will be heard when overcoming uneven sections of the road. It is easy to verify that the support is faulty; you just need to assess the condition of the rubber bands. If they are damaged or do not take their place, the entire support will have to be replaced.
Compression progress buffer failure
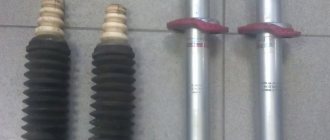
A rubber or polyurethane compression stroke buffer may lose its integrity or elasticity over time. In this case, extraneous creaks and noises may appear that occur at the moment of maximum compression of the spring. A standard visual inspection of the element will help verify the malfunction (or absence thereof).
Shock absorber wear
There are several ways to determine the wear of a part. This includes noise on bumps and excessive body roll, especially during sharp turns. The malfunction of the shock absorber is most clearly felt when overcoming an uneven section at speed, when the car continues to sway for some time.
When to change
The service life of standard bearings for the VAZ 2110 is 100 thousand km, but given the state of our roads, it is better not to take risks and change the bearings after no more than 50 thousand km or 2-3 years of operation, especially if they are no longer factory.
Also, support bearings must be immediately replaced when their malfunction is diagnosed. Otherwise, in addition to the body, the supports themselves and the shock absorber struts will suffer.
It is recommended to replace two support bearings at once.
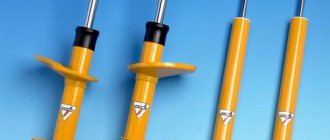
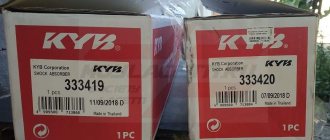
The cheapest support for the “ten” costs about 300 rubles . A good alternative to the original bearing models are products from other manufacturers, such as SS-20, ASOMI, TRACK or FENOX ( up to 800 rubles per piece ). They may have a modified design designed to meet certain consumer requirements.
You can also buy the entire upper support assembly. This will cost approximately 1200-3000 rubles per unit .
The cost of replacing one prop at a service station is about 500 rubles.
It is not necessary to overpay for the work of replacing support bearings. Having the necessary tools at hand, you can do this yourself.
Tools and tools:
- wheel wrench;
- car jack;
- a special puller for steering tips (as a last resort, a hammer and a small pry bar);
- wrenches 9, 13, 19;
- pliers;
- two spring ties.
Work order
- Park the machine on level ground. Jack up the body on the desired side. Remove the corresponding wheel.
- Unscrew the nut securing the steering tip (pliers) and unscrew it (19mm wrench).
- Using a special tip puller, press out the pin. If you don’t have such a tool, knock out the finger by carefully tapping it with a hammer from below and prying it up with a small pry bar from above. Be careful not to damage the threads on the finger.
- Unscrew the two nuts securing the lower part of the strut in the steering knuckle (19mm wrench). If you cannot unscrew them, treat the connections with anti-rust liquid.
- Under the hood there are three nuts securing the upper support to the body. Unscrew them (key 13).
- Remove the entire shock absorber.
- Using two spring ties, tighten the spring enough to relieve the load on the support.
- Unscrew the nut of the central fastening of the support to the rack (wrenches 9 and 22). Remove the support and disassemble it.
- Replace the support bearing in it with a new one.
- Carry out work on assembling the rack and installing it to the body and suspension in the reverse order. Replacing the second bearing is carried out in the same way.
Tuning and repair of VAZ 2110
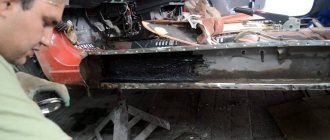
I think everyone understands that with roads like ours, the chassis often requires repairs. Quite often after winter, when the snow has melted and the holes are not yet visible due to puddles, shock absorbers and support bearings often get damaged. Because of such situations, it is necessary to repair this component of the VAZ 2110 chassis. It is better to carry out repairs in a timely manner, since in the first stages it will result in you spending less money than if you cause a breakdown and it will lead to a more disastrous result.
This article will provide information so that you can replace the VAZ 2110 support bearings with your own hands. Moreover, we will do this in such a way that we do not have to adjust the wheel alignment. That is, we will not touch the camber bolts.
Replacing the front support bearing of a VAZ 2110
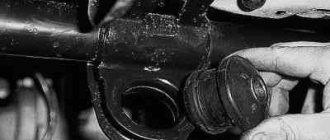
1. First of all, remove the cap on the hub, and then loosen the nut.
2. Now, put the assistant behind the wheel, let him keep his foot on the brake pedal. At this moment you must unscrew the nut, or rather tear it off. 3. Jack up the car and remove the wheel. 4. Remove the cotter pin from the steering tip, unscrew the nut and use a puller to press out the pin.
5. Press out the ball joint pin.
6. At this stage you need to release the brake hose; it is held on the strut clamp.
7. Next you need to remove the caliper from the brake disc. When it is unscrewed, hang it to the side so that it does not interfere with you, but at the same time does not strain the brake hose.
8. Now unscrew the 3 nuts holding the strut under the hood. Before doing this, I advise you to loosen the strut nut a little. This will make it easier for you to work with the stand further.
9. Unscrew the CV joint nut and remove the strut so that the CV joint comes out of the splines.
10. Now that the strut is removed, you will need a spring remover, called a spring puller. Having installed them on different sides of the spring, we begin to tighten the nuts on the pullers one by one. This will compress the spring. After the operation, unscrew the support bearing of the VAZ 2110.
11. We put a new one in place of the old support.
Everything is assembled back to the parsing algorithm.
As you can see, replacing the support bearing of a VAZ 2110 is not an entirely simple matter. But if you decide not to spend money on a service station and do this repair yourself, then following these instructions you should not have any difficulties.
For greater clarity, I suggest watching a video in which the support bearing of the front strut of a VAZ 2110 is replaced:
Signs of malfunction of the rear struts of the VAZ 2110
The main signs of wear on the struts on a VAZ 2110 car can be considered:
- steering wheel beating;
- increased body vibration on the “comb” side; damaged rack;
- leaving a car from a straight trajectory;
- abnormal skidding when cornering;
- increased braking distance;
- the appearance of knocking noises in the strut, which indicates abnormal operation of the shock absorber valve group;
- the presence of smudges, i.e. oil leakage.
It becomes clear that you need to look for and eliminate the cause of the suspension’s malfunction. Further operation of a vehicle with obvious signs of such deviations in the suspension is extremely undesirable.
What can this lead to if you do not replace the struts on a VAZ 2110 in a timely manner:
- Firstly, after 1.5-2 thousand kilometers, you can simply “break” the support bearings of the front struts;
- Secondly, coupled with mediocre balancing of the front wheels, increased uneven wear of the tires occurs, sometimes even with “bumps”, because the wheel “jumps” on the road while the car is moving; Wheel bearings break, but their price and replacement work today amount to a decent amount;
- Thirdly, an increase in braking distance is directly related to the safety of car operation, when a few meters or a fraction of a second can decide the issue of repairing the body or its parts not in favor of the car owner;
- Fourthly, the service life of the brake pads is reduced, their uneven wear occurs, again - a safety issue, and as a consequence - unforeseen expenses for their forced replacement.
The main causes of knocking in the rear suspension of the VAZ 2110
Knocks in the rear suspension of the VAZ 2110 occur for various reasons, so this should be looked into in more detail.
- If knocking noises are observed when driving on uneven ground, the shock absorbers have apparently failed. The only solution is to replace with new ones.
- If you see that the rubber bushings of the levers are worn out, change the suspension.
- When the spring settles, it must be replaced.
- A knocking sound is likely a sign of a loose shock absorber or worn rubber eye bushings.
- When the rear suspension is overloaded or damaged, knocking noise also occurs.
- If the bushings of the suspension arms are destroyed, the rear axle moves and a knock appears.
- When knocking is observed from the suspension arms, it is recommended to replace them with new ones.
- Knocks can also be determined by how busy the rear part is. Empty the trunk and do not seat anyone in the second row. This makes it easier to figure out what the reason is - shock absorbers or springs.
How to replace the front support bearing and strut on a VAZ 2110
The support bearing of the VAZ 2110 is one of the important parts of the chassis. Thanks to it, the shock absorber can easily rotate around its own axis without pushing through the upper part of the mount. This ensures the durability of the suspension itself and also guarantees comfortable driving.
With proper operation, the part should fail only after 70-100 thousand km. However, situations arise when repairs will be required sooner. You can learn how to recognize a malfunction in time, diagnose a breakdown, or professionally replace a VAZ 2110 support bearing with your own hands from this article.
Frequency of replacement of rear struts of VAZ 2110
The service life of the rear struts and the frequency of their replacement depend on three factors - workmanship, compliance with the weight of the vehicle and driving style. Therefore, on some cars, shock absorbers have to be changed every six months, on others they work properly for 5–7 years. There are often cases when shock absorbers from well-known companies (Kayaba, Koni, Monroe, Sachs), when installed on VAZ 2110 cars, failed after 2 - 3 months, and unpretentious shock absorbers manufactured by AVTOVAZ worked for more than 3 years.
Causes of failure and how to check the support bearing of a VAZ 2110
The original supporter is capable of traveling 70-100 thousand km. But if used incorrectly, failure will occur earlier. For example, a breakdown can occur due to:
- dynamic driving style;
- ignoring the features of the roadway;
- liquid getting inside the part, which will wash out all the lubricant from the bearing.
The main symptoms of a malfunction will be:
- knocking noise when driving on rough roads;
- vibrations on the steering wheel when it rotates while driving;
- slow reaction to driver actions.
How to check the support:
Below is a video with verification recommendations:
Creak when turning the steering wheel in the area of the front wheel of a VAZ 2111:
How to check the support bearing of a VAZ 2110 strut:
vazoved
I drive a LADA VESTA CROSS, Moscow
Then there will simply be no one to pay the fines! This is a Korean 7 in 1 car tablet video recorder for Android..
I forgot about fines and Yandex Navigator.
There is FULL HD shooting, radar detector and GPS with 32 satellites. I got it at a reasonable price for just a few thousand here >>>> MORE...
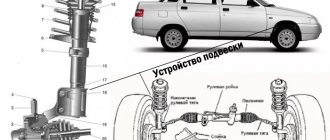
Diagram and design of the unit
This photo shows a diagram of the front suspension of the car with a list of main elements:
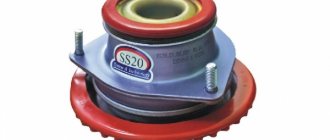
How does a support bearing work and what does it look like?
What the support bearing itself looks like can be seen in the photo below.
Several different types exist and are used in cars, including the VAZ 2110. It should be noted that the support bearing can be:
- With built-in ring (outer or inner). When installing it, the use of clamping flanges is not required; this design provides installation holes. Such a bearing can be used to rotate parts using both the outer and inner rings, and its photo is shown below:
- With detachable outer ring (photo below). With this design, the inner ring is connected to the body, and the outer ring is separated.
- With detachable inner ring (shown in photo)
- Single split bearing (see photo). Its characteristics are the same as those given above, but the ring has greater rigidity.
A little clarification is necessary here. The name itself - support bearing - suggests that it acts as a kind of support, on the VAZ 2110, and on any front shock absorber strut, it is located directly at the point of connection to the car body. This arrangement suggests that the support is capable of withstanding axial loads, rather than radial ones.
About replacing an assembled part
If there are leaks on the shock absorber, the entire strut needs to be replaced. To do this, you need to carry out the disassembly process:
- Hang up and dismantle the wheel;
- Loosen the top fastenings;
- Remove the brake caliper with hose;
- Disconnect the steering tip and CV joint;
- Disconnect the steering knuckle;
- Dismantle the unit;
- Replace the brake disc, spring and other elements on the new strut, and then reassemble.
It is important to remember that after such a procedure it is necessary to adjust the wheel alignment, because when dismantling the shock absorber, the camber bolts are disconnected.
Rack disassembly process
Next, you need to disassemble the unit in order to remove the support bearing of the front strut of the VAZ 2110:
- We tighten the shock absorber spring with two ties until its upper coil stops pressing on the upper element;
- Unscrew the central nut and remove the “chandelier”;
- We remove the support along with the accompanying elements;
- Replace the support, and then inspect the condition of the remaining parts;
- Next we proceed to the installation;
Check adjacent rack parts and replace if necessary
After disassembly, you should definitely check the condition of all other parts of the assembly. There should be no cracks or holes on all rubber parts, insulators and boots. The spring must be free of cracks and creases. Eliminates oil leaks on the shock absorber. Otherwise, along with replacing the bearing, all faulty elements should be replaced.
Buyer's choice: cost of support bearing VAZ 2110, its manufacturers and articles
There are many different options on the market. It is advisable to take original parts - article number: RS-67499 or 2110-2902820-RU. The width of the part is 144 mm, length – 148 mm, and height – 62 mm with a weight of 1260 grams.
However, there are plenty of other options with good reviews. Among the well-proven products are parts from the Balakovo plant, as well as products from the Asomi company. The price fluctuates between 750 – 1800 rubles. When choosing a spare part, you should pay attention to the quality of the processing of the edges of the part, as well as the packaging. In addition, the part must have certificates of conformity and quality certificates.
How to find out that the support bearing is broken
In the vast majority of cases, the support bearing fails due to severe contamination. Therefore, if you often drive in bad weather or travel on almost complete off-road conditions, this part will break down much more often than when using the car in the city.
What symptoms indicate bearing failure? There are several of them:
- knocking of the front suspension when driving even on small uneven sections of the road;
- an unpleasant grinding or crunching sound when turning the steering wheel in any direction;
- clicks that can occur even while driving on a flat road.
Replacement of the VAZ-2110 support bearing should be carried out immediately after detecting any of these symptoms. Otherwise, the safety of car operation is significantly reduced, the risk of rapid tire wear increases, the support struts fail, the restoration of which will cost much more.
The procedure for replacing a bearing on a VAZ-2110
In order to cope with the replacement of a part relatively quickly, you will need to prepare in advance all the necessary tools - a standard set of keys, a spring tie, a mechanical steering wheel end puller and a jack. In addition, it is important to choose the right support bearing itself, which must meet the specifications of your car.
The replacement procedure does not take as much time as it might seem at first glance, and includes several main steps:
- We install the car on a perfectly flat, hard surface and dismantle the hub cap;
- Unscrew the CV joint nut using a wrench or a special socket. At this point, you will need help to press the brake pedal at the same time;
- lift the car using a jack and remove the wheel;
- remove the cotter pin of the steering tip nut using a special puller, then completely unscrew it;
- remove the finger, which will have to be pressed out with very noticeable force;
- unscrew the bolts holding the ball joint and dismantle it;
- remove the brake hose, after which you need to unscrew the bolts holding the caliper and move it slightly to the side. This will allow you to reach the bearing without interference;
- pull out the CV joint, compress the spring using the tie mentioned above and remove the support bearing;
- Carefully install a new support to replace the worn one, after which we reassemble in the reverse order.
Replacing support bearings without removing struts on a Lada Granta
Hello. Chassis repair is perhaps the most common work that a car owner has to do, or more accurately, “our” car owner has to do. These constant knocks and squeaks seem impossible to completely “defeat”, and after one is put in order, another goes out of order. In general, this is not strange, given the state of the roads in Russia. Constant loads and driving on uneven roads have the most unfavorable effect on the chassis. In principle, it would probably be wrong to blame the roads alone; part of the problem certainly lies with the designers of AvtoVAZ, who, despite problems with the roads, continue to produce cars with flimsy suspension and chassis. Well, enough of the ranting, I think, we need to get to work.
Today, dear readers of VAZ Repair, you will learn how to replace the support bearings on a Lada Granta, and not just replace them, but replace them without removing the struts. I wonder how? Then continue reading.
I’ll say right away that before replacing the support bearings, you need to make sure that they are really faulty. Read about how to check support bearings here.
Those who have ever encountered the need to replace support bearings know that to perform this work it is necessary to remove the struts along with the springs, which certainly complicates the task. However, as you know, laziness sometimes works wonders; in addition to being the “engine of progress”, it also often allows you to make your life easier. This photo report will clearly demonstrate to you how to replace the support bearings without removing the strut and you will be able to see that sometimes laziness can work wonders :-). Joke!
To work you must have:
- Set of keys: “13, 14, 17, 22”;
- Hexagon (to fix the rod from twisting);
- Two jacks or supports for the car;
- Special spring ties;
- Actually, the support bearings themselves.
Replacing support bearings on a Lada Granta without removing struts - step-by-step instructions
- We hang the wheel, then remove it.
- We unscrew the bolt securing the stabilizer strut, and then remove it so that it does not limit the travel of the strut.
- Next, take the hexagon and, holding the strut rod with it, loosen the fastening nut.
- We install the jack under the ball pin, and jack the rack, thereby removing the load from the second jack. At the same time, the stand will begin to “play” a little.
- We take the spring ties and attach them to the coils. We tighten the spring quite a bit, and then lower the jack installed under the ball. After these manipulations, the stand should go down.
- Now you need to unscrew the support bearing and rod; to do this, lower the rod down and pull out the “support” through the resulting void.
- We clean the rubber band and support cup from dirt. If you are going to install SS-20 supports, then the lower cup will not be useful to you.
Further assembly is carried out in reverse order. I recommend lubricating the bolts and nuts with “graphite” or at least working off, and after completing all the work, do not forget to tighten everything properly. We put the wheel in place and do the same with the second “support”, after which you can safely check the work. As you can see, in order to replace the support bearing on a Lada Granta, it is not at all necessary to completely dismantle the shock absorber struts.
That’s all I have, I hope this “life hack” will be very useful to someone and will significantly “make life easier.”
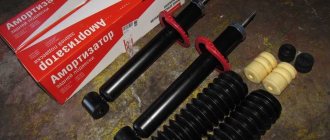
Installing rear struts on a VAZ 2110 – step-by-step instructions + photos
Before installing a new rear strut, the previously removed lower support cup is attached to the shock absorber, and a compression stroke buffer, a protective cover, a cushion, and a lower thrust washer are attached to the shock absorber rod.
- Next, a spring is installed on the shock absorber, which must be positioned so that the rubber gasket on the spring coincides with the support washer on the car body.
- Then the lower part of the rack is secured to the rear beam, while the fastening bolt should not be fully tightened, but simply slightly tightened.
- On the shock absorber replacement side, a stop is placed under the rear beam, and the car is lowered on a jack, while it is necessary to direct the strut rod into the hole in the body. After the rod comes out of the hole in the body, the upper support washer and cushion are put on it, the rod nut is tightened, and the wheel is installed.
- The lower mounting bolt of the strut to the beam is tightened after the car is removed from the jack and is on its wheels.
- When the rear struts of the VAZ 2110 have been replaced, it is necessary to adjust the camber of the front wheels and the pressure regulator of the rear brakes.