In our short article we will talk about what elements the VAZ-2108 cooling system consists of. The engine of this car has a combined system - not only heat is removed using liquid, but also air is blown through the radiator. Moreover, the blowing occurs both with a counter flow and with air, which is created by the impeller of the electric fan. It is worth noting that on VAZ-2108 and similar cars only an electric fan is used; mechanical ones are not installed on these models. They could only be found on “classic” VAZ 2101-2107 cars with carburetor engines.
Help for engine cooling system 21083 (2108, 21081)
Reference information on the engine cooling system 21083 (2108, 21081) of VAZ 21083, 21093, 21099 cars.
Help for engine cooling system 21083 (2108, 21081)
Description of the design of the engine cooling system 21083 (2108, 21081) of VAZ cars 21083 (2108, 21081), 21093 (2109, 21091), 21099
The engine cooling system 21083 is liquid, closed type with forced circulation of coolant and an expansion tank. Circulation is provided by a centrifugal pump (pump) installed in the cylinder block, driven by the crankshaft pulley through a timing belt.
Pump - centrifugal pump of the coolant system
Depending on how the engine warms up, the coolant can circulate either in a small circle or in a large circle (including the radiator). The thermostat controls the direction of fluid flow. On a cold engine, coolant circulates through its bypass valve (small circle), as it warms up (from 87ºC), the main valve opens and the liquid enters the radiator (large circle), where it is cooled by the incoming air flow.
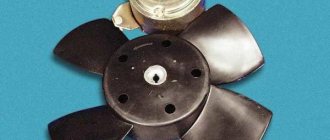
To intensively cool the coolant and maintain the optimal operating temperature of the engine, a cooling system radiator installed in the front of the car is used. If the coolant overheats excessively, its electric fan is turned on for additional cooling.
To compensate for the thermal expansion of the coolant, an expansion tank . It also has maximum and minimum marks on which the volume of liquid is controlled.
There are safety valves in the expansion tank cap. The exhaust releases pressure in the system when it is exceeded, the intake serves to compensate for the decrease in its volume when the engine cools.
Plug of the expansion tank of the engine cooling system of VAZ 2108, 2109, 21099 cars
Data for monitoring, maintenance, adjustment and repair of the engine cooling system 21083
Coolant volume in the engine cooling system 21083: 7.8 liters
Starting temperature of the main thermostat valve: 85-89ºС
Full opening temperature of the main thermostat valve: 102ºС
Expansion tank outlet valve opening pressure: 110-150 kPa
Opening pressure of the inlet valve of the expansion tank plug: 3-13 kPa
Operating temperature in the engine cooling system 21083 (warm-up engine at an ambient temperature of 20-30º C, when driving a fully loaded vehicle at a constant speed of 80 km/h): 95º C
Tightening torques for threaded connections
Coolant temperature indicator sensor (M14x1.5 thread): 24-27 N.m (2.5-2.8 kgf.m)
Coolant pump (pump) mounting bolts (M6x1.5 thread): 7.6-8.0 N.m (0.8-0.8 kgf.m)
Nuts for fastening the thermostat pipe (thread M8x1.5): 16.0-22.6 N.m (1.6-2.3 kgf.m)
Bolts for fastening the cooling system pipe flange to the cylinder block (thread M6x1.5): 4.2-5.2 N.m (0.4-0.5 kgf.m)
Bolts for fastening auxiliary engine elements (thread M6x1.5): 6.7-8.2 N.m (0.7-0.8 kgf.m)
Notes and additions
On the 21083 engine with a Solex carburetor, the cooling system includes a carburetor heating unit, which improves engine starting in cold weather by warming up the throttle valve unit.
Source
DIY technology for replacing antifreeze on injection VAZ 2109
The replacement concept involves draining the used compound through special holes and filling the system with new antifreeze. The designers provide two drain holes in the cooling system of VAZ engines:
- on the left side of the main radiator;
- on the front wall of the cylinder block.
Replacing antifreeze on VAZ 2109 engines is not possible without first dismantling the ignition module located on the front surface of the cylinder block:
- remove the negative terminal from the battery;
- disconnect the wires from the spark plugs;
- remove the ignition module power supply block;
- unscrew the bolts securing the module relative to the cylinder block and clutch housing;
- loosen the upper left bolt of the front engine mount;
- remove the module bracket from under the bolt;
- remove the module with wires from the engine compartment.
Replacing coolant: antifreeze or antifreeze on VAZ 2110, 2114, 2115 injector
The procedure for replacing coolant on all injection 8-valve VAZs: 2108, 2109
, 2110, 2111, 2112, 2113, .
GROUP https://vk.com/avto_tochka LIVE.
Draining of used antifreeze is carried out according to the following method:
Engine cooling system VAZ-21083
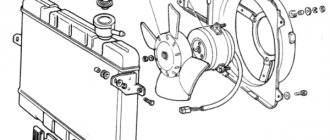
1 – expansion tank; 2 – expansion tank plug; 3 – steam removal hose; 4 – hose from the expansion tank to the thermostat; 5 – radiator supply hose; 6 – radiator outlet hose; 7 – left radiator tank; 8 – aluminum radiator tubes; 9 – sensor for turning on the electric fan; 10 – right radiator tank; 11 – drain plug; 12 – radiator core; 13 – electric fan casing; 14 – electric fan impeller; 15 – electric motor; 16 – pump gear pulley; 17 – pump impeller; 18 – camshaft drive toothed belt; 19 – heater radiator outlet pipe; 20 – pump supply pipe; 21 – tap; 22 – heater radiator; 23 – hose for draining fluid from the heating of the inlet pipe to the carburetor heating block; 24 – carburetor heating block; 25 – exhaust pipe; 26 – heater supply pipe; 27 – hose for draining fluid from the heating of the inlet pipe and the carburetor heating unit; 28 – coolant temperature indicator sensor; 29 – thermostat.
VAZ-2111 engine cooling system (with fuel injection system)
1 – expansion tank; 2 – plug; 3 – steam removal hose; 4 – hose from the expansion tank to the thermostat; 5 – coolant temperature sensor in the outlet pipe; 6 – throttle unit; 7 – radiator supply hose; 8 – radiator outlet hose; 9 – left radiator tank; 10 – right radiator tank; 11 – drain plug; 12 – radiator core; 13 – electric fan casing; 14 – electric fan impeller; 15 – electric motor; 16 – pump gear pulley; 17 – pump impeller; 18 – camshaft drive toothed belt; 19 – heater radiator outlet pipe; 20 – pump supply pipe; 21 – tap; 22 – heater radiator; 23 – coolant drain hose from the throttle pipe; 24 – coolant supply hose to the throttle pipe; 25 – coolant temperature indicator sensor; 26 – exhaust pipe; 27 – heater supply pipe; 28 – thermostat; 29 – coolant level sensor.
Description of design
The cooling system is liquid, closed type, with forced circulation. The tightness of the system is ensured by the inlet and outlet valves in the expansion tank plug. The exhaust valve maintains pressure in the system when the engine is hot (due to this, the boiling point of the liquid increases and steam losses are reduced), it opens at a pressure of about 1.1 kgf/cm2. The intake valve opens when the pressure in the system decreases relative to atmospheric pressure by 0.03–0.13 kgf/cm2 (on a cooling engine). The thermal operating conditions of the engine are maintained by a thermostat and an electric radiator fan.
The coolant pump is a vane, centrifugal type, driven from the crankshaft pulley by a camshaft drive timing belt. The pump housing is aluminum. The roller rotates in a double-row bearing with a “lifetime” supply of lubricant. The outer ring of the bearing is locked with a screw. A toothed pulley is pressed onto the front end of the roller, and an impeller is pressed onto the rear end. The distance from the mating surface of the pump cover to the outer end of the pulley should be 52±0.5 mm, and to the outer (facing the block) end of the impeller - 39.8±0.1 mm. A thrust ring made of a graphite-containing composition is pressed to the opposite end of the impeller, under which there is an oil seal. If the pump fails, it is recommended to replace it as an assembly.
The redistribution of liquid flows is controlled by a thermostat with a solid heat-sensitive element. On a cold engine, the thermostat valve closes the pipe leading to the radiator, and the liquid circulates only in a small circle (through the thermostat bypass pipe), bypassing the radiator. On VAZ-2108, -21081, -21083 engines, the small circle includes the heater radiator, intake manifold, carburetor throttle assembly heating unit (on engines with semi-automatic starting - and the liquid chamber of the semi-automatic starting device). On the -2111 engine, fluid is supplied to the heater and the throttle assembly heating unit.
At a temperature of 87±2 °C, the thermostat valve begins to move, opening the main pipe, while part of the liquid circulates in a large circle through the radiator. At a temperature of about 102 ° C, the main valve opens completely, and the bypass valve closes, and all the liquid circulates through the engine radiator. The stroke of the main valve must be at least 8 mm.
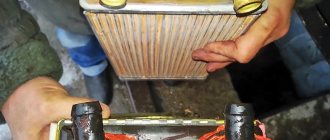
The radiator consists of two vertical plastic tanks (the left one has a baffle) and two horizontal rows of round aluminum tubes with pressed-on cooling plates. To increase cooling efficiency, the plates are stamped with a notch. The tubes are connected to the tanks through a rubber gasket. The liquid is supplied through the upper pipe and discharged through the lower. Next to the inlet pipe there is a thin pipe for the steam pipe.
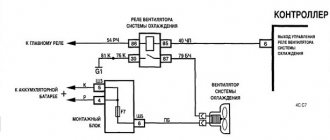
The electric radiator fan on VAZ-2108, -21081, -21083 engines is switched on by a sensor-switch screwed into the right radiator tank. Its contacts close at a temperature of 99±3 °C and open at 94±3 °C. On cars manufactured before 1998 (with an old fuse box), another sensor (TM-108) was installed that controls the fan motor through relay 113.3747 in the mounting block. On the -2111 engine, the fan is turned on by a signal from the electronic engine control unit (via a relay).
Classic way
It is worth noting right away that it is quite labor-intensive and will take quite a lot of time. You will need a lot of patience and care (as mentioned above). The most difficult part is removing the instrument panel and installing it, as it is much more difficult to get the instrument panel into place correctly.
Tool
- Coolant drain container
- Screwdriver Set
- Head with a wrench to unscrew the steering wheel
Let's start in order:
- Removing the terminals from the battery
- With the heater tap open, drain the coolant by unscrewing the drain plugs located on the radiator and cylinder block (into a substitute container)
- Removing the decorative trim from the steering wheel
- We unscrew the nut securing the steering wheel so that its end is flush with the end of the steering column shaft.
- The steering wheel is seated very tightly on the shaft splines, so for safety reasons it is not recommended to completely unscrew the nut securing the steering wheel: with a sharp impact, it will jump off the splines and can cause injury
- Be sure to mark the location of the steering wheel in relation to the shaft
- Knock the steering wheel off the shaft splines with sharp blows of your hand.
- Now you can finally unscrew the nut and remove the steering wheel
- Unscrew the six screws securing the lower steering column casing
- Remove the lower casing from the steering column, as well as the lining of the ignition switch (lock)
- Then remove the upper casing from the steering column
- Loosen the bolt securing the base under the steering switches
- We remove the base from the shaft, disconnect the blocks with wires (there are two of them) from the contacts of the car horn
- Now we disconnect the block with wiring from the windshield wiper and washer switch lever
- It is recommended to mark the terminals with wiring before disconnecting. This will help you avoid confusion during assembly and save time.
- Disconnect the block with wiring from the headlight and turn signal switch lever
- Pull the carburetor choke control handle (aka “choke”) towards you so that the draft comes out, remove the handle from it
- Unscrew the two screws securing the dashboard console trim
- Removing the cover from the console
- Remove the cigarette lighter from the socket
- We take out the ashtray from the nest by pressing on the plate to extinguish cigarettes
- Remove the handle that switches the heater fan
- Then we remove the three knobs that control the stove and hook them with a screwdriver
- Disconnect the block with wiring from the heater fan switch, located under the heater control panel
- Disconnect two wires from the contacts of the lamp illuminating the heater control panel
- Remove the headlight direction adjustment handle, just pull it towards you
- Now remove the instrument cluster lighting switch knob
- Unscrew the nut securing the instrument lighting switch
- Unscrew the nut securing the headlight hydraulic corrector
- We push the hydraulic corrector for headlights and the instrument lighting switch inside the panel
- Remove the side nozzles located on both sides of the dashboard using a screwdriver
- Unscrew one screw securing the trim on both sides of the dashboard
- Using a screwdriver, use a screwdriver to remove the exterior lighting switch.
- Disconnect the block with wires from the switch. Push the block inside the dashboard
- We use a screwdriver and remove the socket intended for radio equipment. If you have radio equipment installed on your VAZ 2109, remove it first
- We remove radio equipment according to the manufacturer’s instructions
- Then unscrew the screw securing the trim to the dashboard
- We insert two screwdrivers so that we can bend the plastic latches
- Raising the dashboard trim
- Disconnect the wiring harness from the cigarette lighter
- Disconnect the block with wiring from the block for lighting the cigarette lighter
- Disconnect the block with wiring from the lamp illuminating the hazard warning switch
- We disconnect the block with wiring from the hazard warning switch, and finally remove the dashboard trim
- Gently press down and remove the speaker cover located on the left side of the dashboard. Be careful - latches break easily
- Disconnect the block with wiring from the heated glass switch
- Remove the block from the rear fog lamp switch
- Unscrew the two screws securing the instrument cluster
- We take out the instrument cluster from the dashboard, unscrew the nut securing the cable from the speedometer and disconnect it
Cooling system VAZ 2108: characteristics, description and photo
In our short article we will talk about what elements the VAZ-2108 cooling system consists of. The engine of this car has a combined system - not only heat is removed using liquid, but also air is blown through the radiator. Moreover, the blowing occurs both with a counter flow and with air, which is created by the impeller of the electric fan. It is worth noting that on VAZ-2108 and similar cars only an electric fan is used; mechanical ones are not installed on these models. They could only be found on “classic” VAZ 2101-2107 cars with carburetor engines.
Classic way
It is worth noting right away that it is quite labor-intensive and will take quite a lot of time. You will need a lot of patience and care (as mentioned above). The most difficult part is removing the instrument panel and installing it, as it is much more difficult to get the instrument panel into place correctly.
Tool
- Coolant drain container
- Screwdriver Set
- Head with a wrench to unscrew the steering wheel
Let's start in order:
- Removing the terminals from the battery
- With the heater tap open, drain the coolant by unscrewing the drain plugs located on the radiator and cylinder block (into a substitute container)
- Removing the decorative trim from the steering wheel
- We unscrew the nut securing the steering wheel so that its end is flush with the end of the steering column shaft.
- The steering wheel is seated very tightly on the shaft splines, so for safety reasons it is not recommended to completely unscrew the nut securing the steering wheel: with a sharp impact, it will jump off the splines and can cause injury
- Be sure to mark the location of the steering wheel in relation to the shaft
- Knock the steering wheel off the shaft splines with sharp blows of your hand.
- Now you can finally unscrew the nut and remove the steering wheel
- Unscrew the six screws securing the lower steering column casing
- Remove the lower casing from the steering column, as well as the lining of the ignition switch (lock)
- Then remove the upper casing from the steering column
- Loosen the bolt securing the base under the steering switches
- We remove the base from the shaft, disconnect the blocks with wires (there are two of them) from the contacts of the car horn
- Now we disconnect the block with wiring from the windshield wiper and washer switch lever
- It is recommended to mark the terminals with wiring before disconnecting. This will help you avoid confusion during assembly and save time.
- Disconnect the block with wiring from the headlight and turn signal switch lever
- Pull the carburetor choke control handle (aka “choke”) towards you so that the draft comes out, remove the handle from it
- Unscrew the two screws securing the dashboard console trim
- Removing the cover from the console
- Remove the cigarette lighter from the socket
- We take out the ashtray from the nest by pressing on the plate to extinguish cigarettes
- Remove the handle that switches the heater fan
- Then we remove the three knobs that control the stove and hook them with a screwdriver
- Disconnect the block with wiring from the heater fan switch, located under the heater control panel
- Disconnect two wires from the contacts of the lamp illuminating the heater control panel
- Remove the headlight direction adjustment handle, just pull it towards you
- Now remove the instrument cluster lighting switch knob
- Unscrew the nut securing the instrument lighting switch
- Unscrew the nut securing the headlight hydraulic corrector
- We push the hydraulic corrector for headlights and the instrument lighting switch inside the panel
- Remove the side nozzles located on both sides of the dashboard using a screwdriver
- Unscrew one screw securing the trim on both sides of the dashboard
- Using a screwdriver, use a screwdriver to remove the exterior lighting switch.
- Disconnect the block with wires from the switch. Push the block inside the dashboard
- We use a screwdriver and remove the socket intended for radio equipment. If you have radio equipment installed on your VAZ 2109, remove it first
- We remove radio equipment according to the manufacturer’s instructions
- Then unscrew the screw securing the trim to the dashboard
- We insert two screwdrivers so that we can bend the plastic latches
- Raising the dashboard trim
- Disconnect the wiring harness from the cigarette lighter
- Disconnect the block with wiring from the block for lighting the cigarette lighter
- Disconnect the block with wiring from the lamp illuminating the hazard warning switch
- We disconnect the block with wiring from the hazard warning switch, and finally remove the dashboard trim
- Gently press down and remove the speaker cover located on the left side of the dashboard. Be careful - latches break easily
- Disconnect the block with wiring from the heated glass switch
- Remove the block from the rear fog lamp switch
- Unscrew the two screws securing the instrument cluster
- We take out the instrument cluster from the dashboard, unscrew the nut securing the cable from the speedometer and disconnect it
Description of the system design
First let's look at the system design. It is also worth noting that the cooling system of the VAZ-2108 engine with a carburetor is slightly different from that used on injection engines. But there are not very many differences - just a different design of the throttle assembly. An improved thermostat can also be used, as on more modern cars 2114-2115.
The sealed cooling system is constantly under pressure, it is slightly higher than atmospheric pressure. The pressure is created by a liquid pump, which allows the antifreeze to move a little faster through the pipes. In addition, a radiator is connected to the cooling system, which heats the interior of the car. To ensure a normal microclimate inside the cabin, you need to distribute warm air throughout the cabin as much as possible. The air is pumped by a fan, heated by a radiator and supplied through pipes to several outlets - on the windshield, in the face of the driver and passengers, and also in the legs. Moreover, on the “eights” the air ducts are directed even to the feet of the passengers in the back seat.
Liquid pump
This is an element of the VAZ-2108 cooling system with a carburetor or injector, which allows for the best circulation of antifreeze through all pipes.
It is driven by the timing belt. Cooling system pump design:
- Aluminum alloy body.
- Axle mounted inside the housing.
- To ensure that the axle rotates normally, a bearing or bushing is installed. To prevent liquid from leaking out of the system, a seal is installed.
- On the outside of the axis there is a toothed pulley, which is driven by a timing belt.
- An impeller is installed on the inside. On cheap pumps they are made of plastic, on more expensive ones they are made of metal.
Perhaps these are all the elements of the coolant pump; you only need to mention the three mounting bolts and the paronite gasket.
Expansion tank
This is one of the main components of the VAZ-2108 cooling system with an injector. Why is an expansion tank needed in a car? First of all, to maintain an optimal fluid level in the system. The problem is that when heated, any liquid, including antifreeze, expands. Therefore, all expansion tanks have two marks - minimum and maximum levels.
The tank is connected to the highest point of the system. Refilling must be carried out in such a way that the antifreeze level is clearly between the minimum and maximum levels. Therefore, when heating, the level will increase to the maximum level, and when cooling, it will drop to the minimum. Thanks to this, air pockets do not form inside the system, which affect the temperature.
Antifreeze replacement process
The procedure for updating antifreeze in a VAZ 2109 is not particularly complicated. For this reason, the vehicle does not have to be sent to a specialized technical workshop - he himself can change the coolant to the system of his car. For these purposes, the car enthusiast will need:
- Select the correct location to install the vehicle before changing antifreeze. The site must have a completely horizontal surface, without descents or elevations;
- Prepare a set of tools, which includes: Pliers or pliers;
- A capacious (at least 10 liters of volume) container for draining spent technical fluid. For these purposes, a volumetric basin, bucket or canister can be used;
- Wipes for wiping parts from antifreeze residues;
- Set of keys and screwdrivers;
- Thick gloves;
Attention - safety precautions! When working with the VAZ 2109 cooling system and technical coolant, remember that:
- Before changing antifreeze, you must stop the engine and let it cool completely. Otherwise, the coolant, heated to its own boiling point and under high pressure, can burn the car owner’s hands and face;
- Coolant has a high level of toxicity. Therefore, you should never drink it, and if antifreeze gets into your eyes or on the mucous membranes of your nose or mouth, it is recommended to rinse the affected area with boiled water.
To replace the coolant in the VAZ 2109 system, you will need 8.7 liters of fresh coolant. Older “Nines” can hold up to 7.5 liters of technical fluid, but there are models with a capacity of up to 9 liters. Therefore, it is recommended to stock up on 10 liters of fresh antifreeze when changing it in the VAZ 2109 cooling system.
During the process of changing the coolant, problems may arise such as detection of a hidden leak or air entering the system. If a minor leak is detected, you can use sealant for VAZ cars, but in most cases it is recommended to replace the damaged part. When an air lock forms, the engine is run.
The procedure for changing antifreeze on a VAZ 2109 can be divided into 2 stages. Let's talk in more detail about each of them.
Stage one
The first stage is draining the antifreeze from the VAZ 2109 tank, as well as from the cylinder block of the vehicle in question. The step-by-step structure of this procedure is presented below:
- Place a container for drained used antifreeze under the expansion tank of the car;
- Using keys and a screwdriver, unscrew the plugs and release the drain hole;
- Allow the waste liquid to flow steadily into the container. If the coolant does not flow out, the drain is clogged;
- Move the container for drainage under the cylinder block of the VAZ 2109;
- Allow the remaining antifreeze to drain;
- Tighten all drain plugs.
Next, it is recommended to flush the cooling system of the VAZ 2109. It is necessary to flush system parts if:
- The antifreeze used is replaced with an incompatible analogue, since during washing the protective microfilm formed by the previous cooler is washed off;
- The drain is very clogged.
However, system flushing is still recommended early, because during this process, leaks can be easily detected before fresh antifreeze is added. To flush the VAZ 2109 system, you can use both special chemicals and clean distilled water. The liquid is poured into the expansion tank of the VAZ 2109, and the car engine starts for 15 minutes. After this, the spent rinsing substance is drained and the procedure is repeated until the water becomes completely clear.
Stage two
The completion of the procedure for replacing antifreeze on a VAZ 2109 Injector and a standard “Nine” is to fill in fresh coolant. First of all, you need to dilute the coolant concentrate. To do this, you will need a clean container and distilled water. The ratio of liquids depends on the desired boiling point of the antifreeze - the higher it is, the more concentrated the cooling substance should be in relation to water.
Before pouring fresh coolant into the VAZ 2109 system, it is necessary to ensure the tightness of the tank by tightly sealing all drain plugs. The finished mixture is poured into the expansion tank. After this, the engine starts (for 10-15 minutes, the so-called “run”). This is necessary to remove air trapped in the system. After running the engine, be sure to check the level of the coolant; if it has dropped, you need to add the missing amount of antifreeze.
System connections
These elements are made of rubber with reinforcement. With their help, all components are connected to each other. The VAZ-2108 cooling system pipes are secured using clamps. But the design has a number of disadvantages, among which are the following:
- The thermostat housing is connected to the engine block using a short pipe. This makes the design cheap, but there is a possibility that a leak will occur.
- The pipes that go from the cooling system to the heater tap are located very close to the exhaust manifold. This affects the condition of the rubber - it quickly becomes unusable due to high temperature. In addition, water and dirt constantly get into these pipes, which only aggravates the situation.
It is worth noting that the quality of the pipes is quite low, so they should be changed at least once every two years. The lifespan of the pipes is approximately the same.
Replacing the stove tap
It often happens that a part such as a faucet breaks (it is worth noting that on the 2114 it is not very reliable). When replacing it, you should simultaneously replace the pipes, even if they are in good working order (the location of the pipes of the VAZ 2114 stove was described above).
All faucet replacements are performed in the following order:
- place the car in the pit and secure it;
- unscrew the screw plug and drain the coolant;
- using a screwdriver, loosen the clamps on the pipes located in the engine compartment, and then remove them;
- find the tap in the passenger compartment on the passenger side (located under the panel), loosen the clamps of the pipes suitable for it, and then remove them;
- Using a 10mm wrench, unscrew a pair of nuts screwed onto the studs and securing the valve body;
- from the interior side, pull out the tap and disconnect the control cable from it;
- install a new (similar) faucet in its original place;
- perform assembly in the same sequence, but in reverse order.
Many car enthusiasts who carry out such a replacement are sometimes interested in how to properly connect the pipes to the VAZ 2114 stove? After all, by mistake or forgetfulness, you can connect them incorrectly, which will disrupt the normal circulation of coolant.
In order not to make a mistake, it is worth remembering that the connection diagram for the connection pipes of the VAZ 2114 stove is as follows: the pipes located in the engine compartment are connected: the first - from the tap (inlet) to the hole in the cylinder head, the second - from the tap (outlet) - to "saxophone". The connections in the cabin are connected: the first - from the tap to the thermostat, the second - from the tap to the pump inlet.
For even greater convenience, you can use the following general diagram of the heating system:
Antifreeze or antifreeze?
Many drivers argue about what is better to fill in the cooling system of the VAZ-2108. Some people prefer foreign brands of antifreeze in red or green colors, while others try to pour exclusively blue antifreeze. But which is better and which driver is right? In fact, antifreeze is the same antifreeze, only of a domestic type. If we go deeper into the question, then literally “antifreeze” is any liquid that does not freeze. Even “Triple Cologne” can be called antifreeze.
Of course, the red and green liquids that are found on sale contain many more additives; they contribute to the normal operation of the entire system. But antifreeze also consists of a large number of additional substances that counteract the formation of scale and lubricate the pump elements and the insides of radiators. Therefore, to save money, you can safely use antifreeze in your VAZ-2108 car. It has high efficiency and fairly low cost.
Thermostat and its design
Now let's talk about the thermostat, which is used on cars of the eighth series. In essence, the design of these devices is the same on all machines, but there are differences in small details. The essence of the work is to make timely switching and direct fluid from a small circle to a large one and vice versa. In other words, a thermostat is necessary to connect the main radiator to the circuit when the liquid temperature rises.
Consists of a mechanical valve, which is driven by a bimetallic plate.
Expansion tank plug
This is one of the key elements of the VAZ-2108 engine cooling system; it is installed on the expansion tank and is necessary in order to maintain optimal pressure in it. The fact is that the boiling point of antifreeze or antifreeze is slightly higher than that of plain water. And if this liquid is still under pressure, the temperature rises another few degrees. The design of the plug consists of a body and two valves - one lets air in when the pressure decreases, and the second releases it when the pressure increases excessively. As a result, an optimal pressure value is maintained inside the system.
Malfunctions in the system
In a domestic car VAZ-2109, you can independently identify problems in the cooling system.
For example, system overheating occurs if:
- lack of coolant - check, add if necessary;
- the pump belt is torn or worn - replace it;
- the radiator is clogged with dirt - flush or replace;
- The fan may be broken.
There are also a number of other malfunctions:
- Coolant leak. Hoses may be damaged or parts may crack. If fluid is lost, the system is overfilled.
- Corrosion can occur if the water is contaminated or the antifreeze solution is not formulated correctly.
- Air locks (warm up the engine properly, then let the car sit, remove the hose and start the engine again - this will help expel the air).
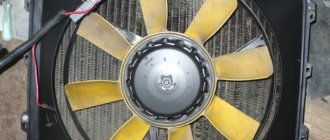
Fans and sensors
There are only two fans on the VAZ-2108 - on both radiators. Moreover, on carburetor engines, the main radiator fan is turned on using a sensor. Calling it a sensor, of course, would be a stretch, since the device is more like a thermostat, only the bimetallic plate moves not the valve, but the power contact. The element is installed in the side tank of the radiator.
As for the fan on the heater, it is turned on manually. Moreover, in order for the air to be hot, you must first open the tap with the appropriate handle. The fan power circuit uses a switch with 3 operating positions and a resistor block. A resistance is simply connected to the circuit, which allows you to lower the supply voltage. Because of this, the engine speed drops.
As you can see, there is nothing complicated in the design of the system. And all the elements that can be found on G8s are used on other machines, but in a slightly different design.
Source
Replacing the coolant temperature sensor on a VAZ 2109 (injector)
- Location
- Malfunctions
- Examination
- Replacement
On any car, including the VAZ 2109, the coolant temperature sensor plays a huge role, since it largely ensures the proper, efficient operation of the engine cooling system.
Location
To repair or replace the coolant temperature sensor, the first thing you need to know is its location.
In VAZ 2109 cars, the DTOZH is located between the thermostat and the cylinder head. The device has two contacts, one of which serves for ECU readings, and the second turns on the fan.
It is also worth noting that near the DTOZH there is a single-contact sensor, which are often confused with each other.
The main function of the DTOZH is to cool the liquid. The colder it is, the richer the air-fuel mixture entering the engine will be.
Location
Malfunctions
There are several main malfunctions that lead to failure of the coolant temperature sensor. Namely:
- There is an electrical contact inside the sensor that may break or become cracked. If the contact is broken, this leads to complete combustion of the regulator. If there are cracks, the sensor can still function, but the lack of proper contact does not allow accurate information about the coolant to be transmitted;
- Sensor insulation is broken. If the wiring insulation is poor, short circuits occur. They, in turn, cause the device to burn out;
- Wires break near the sensor. Because of this, the regulator cannot turn on the fan, which leads to overheating of the car.
In the summer, a failure in the operation of the diesel engine is rarely noticed, but in winter it becomes much more difficult to start the engine.
Signs of breakdown
How can you determine that the coolant temperature sensor has stopped working normally or has completely burned out?
- The cooling fan turns on randomly even at normal engine temperature. But in fact, the fan should only turn on when the power unit overheats.
- It's difficult to start the engine when it's hot. The cooling system is responsible for regulating the temperature, but a faulty sensor does not allow obtaining objective data and a signal to start a particular operating mode.
- Fuel consumption increases noticeably. This is caused by overloading the engine, which has to drive at elevated temperatures. Because of this, fuel consumption is increasing.
Before making final conclusions regarding the breakdown or malfunction of the DTOZH on the VAZ 21099, be sure to carry out verification activities.
Examination
Today, VAZ 2109 car owners use two methods to check the condition of the coolant temperature sensor. Let's say right away that the second one is more reliable, but the first one is easier. Decide for yourself which of the methods presented below to use.
According to the table, check whether the resistance corresponds to that required at a particular temperature of coolant or boiling water.