Installation of an instrument panel from Priora on a VAZ 2110-2112
There is another method of modifying and tuning the instrument panel, which consists of replacing the dashboard from the Priora - VAZ 2170. Of course, the appearance will be much more interesting than even the Europanel, but connection and installation require a lot of investments, both financial and physical. The main problem with this modification is that the connectors for the under-panel wiring of the Priora and the under-hood of the VAZ 2110, which of course need to be connected, are different, and the connectors simply do not fit together.
In this case, there are two ways:
- Completely take all the wiring from the Priora, including the engine compartment harness, interior harness, power window control unit, comfort unit, etc.
- Join completely two different types of wiring manually, cutting off the connectors and insulating almost every wire.
Everyone decides for themselves whether the game is worth the candle, namely whether the result obtained is worth the money and time that will be spent on all these improvements and alterations. Even if you take the price of the Europanel, you will have to pay up to 20,000 rubles for it. new or from 8000 for a used one, it’s already expensive. As for the panel from Priora, everything here will be even more expensive - the assembled panel alone can cost 25,000 rubles. new and from 10,000 rub. boo. at a car wrecker.
Where do you get ideas for tuning?
Oddly enough, quite a lot of problems arise with finding an idea that will be implemented when tuning the dashboard. An example is that not everyone can create an instrument scale sticker. Where can you get original ideas?
On the Internet you can find quite a lot of images of modifications to the instrument panel. It is these photographs that can be used as a reference point when creating your own dashboard.
You can also borrow design styles from other cars. For example, by taking an image of the dashboard of one of the foreign cars, you can make minor modifications and get an original design.
Recent comments
- admin to the post differences between 8v and 16v controllers using the example of January 7.2 8v and Bosch 7.9.7 16v
- admin to post Useful information
- admin to post Atomic soft
- admin to the post Answered questions (comments) over the past months
- admin to the entry Pinout of the connection block SUD M7.9.7./January7.2 to the interior wiring of the Europanel (VAZ 2114)
- admin to the entry Chiptuning - About the table of monitoring stations and control centers (for dummies)
- admin to the post Answer to a question about Atomic Tune 2.8.8
- daser on Angel Eyes
- Kirill on the entry Pinout of the connection block SUD M7.9.7./January7.2 to the interior wiring of the Europanel (VAZ 2114)
- Anonymous to the post Answered questions (comments) in recent months
Modification of the rear of the car
Tuning the trunk of a VAZ 2109 includes the following work:
- making your own shelves;
- lighting.
To make a shelf, you will need plywood, cardboard, upholstery, glue, 2 furniture hinges, handles. We first determine the location of the shelf. Then we make holes. On the template of the future design we mark the moving part. We attach the model to the plywood. We first cut out the lifting part of the structure. We connect it to the stationary part of the shelf (hinges).
Then the structure is installed. We use any material for its upholstery. The shelf is covered with PVA glue in 2 layers. We carefully place the upholstery on top of the structure. To secure the fabric at the edges, use double-sided tape. If the glue has dried, install LED lighting in the trunk. Similar tuning can be done in the VAZ 21099 model. The electrical circuit of the vehicle is first studied. To illuminate the luggage compartment you will need an indicator, 5 m of two-core wire, pliers, electrical tape, a pipe, and a 5A fuse.
We install a button with an on/off indicator in the shelf for the rear speakers. To make a hole, use a drill. An LED strip is glued to the trunk threshold. An additional wire is laid under the floor covering; it is connected through a fuse to the power supply. The ground of the limit switch is connected to the backlight. The advantages of such tuning include:
- Multiple sources ensure uniform illumination of the luggage compartment.
- The light turns on only after pressing the corresponding button.
- Saves battery charging.
Tuning the trunk on the VAZ 21099 involves reworking the floor. For this, plywood, piano hinges, an electric jigsaw, and glue are used. The trunk is pre-lined with fiber (2 mm thick). Then we cut the plywood to the size of the carpet and the hatch for the spare tire. The next stage is making a frame from 20x30 mm bars. The resulting structure is fixed to the trunk floor. Then splen and soundproofing material are laid. Sheathing is being installed.
The downside of this modernization is the accumulation of condensation inside the optics. This is due to the low quality of the material and lack of tightness. At the same time, black headlights, unlike their standard counterparts, are less efficient (by 30%). To partially solve this problem, we install more powerful light bulbs in the tuned headlights of the VAZ 2109. High power lamps should not be used. Otherwise, the lights will overheat or begin to melt. You can make your own optics. But such tuning is recommended for the rear lights (to reduce the risk of accidents).
Installation of electric window lifts
The car in question was also produced with a mechanical window lift - a thing of the past that still haunts the domestic auto industry. In order to make it convenient for passengers and the driver himself, electric lifts should be installed.
You can carry out such an upgrade yourself. This is due to the fact that the lift is purchased disassembled. You can choose a design that was installed on a more expensive configuration of a particular model, which determines ease of installation.
Problems can only arise when connecting the mechanism to a power source, since for this you will have to create chips and lay out the wiring yourself.
Problems may also arise with the output of the glass control unit. As a rule, the buttons are located directly on the door and can be duplicated on another panel. Therefore, when purchasing a window lifter, you should also select handles with window lifter control buttons.
When tuning, it becomes possible to duplicate the control unit on other panels, which will increase the comfort of performing this function.
Installation without completely disassembling the panel
The panel, as many people know, consists of three parts, but the Europanel of the VAZ 2110 is, in fact, only the upper part of the dashboard. And if the goal is only to replace it, without any modifications or other tuning, then you can safely do a partial disassembly without removing all the equipment.
You will need:
- Drill;
- Screwdriver;
- Self-tapping screws.
The dismantling process goes like this:
Remove the dashboard; Open the glove compartment and unscrew the three screws from the inside. It is quite difficult to unscrew the screw near the windshield, but still doable; Next to the ECU, pull out 4 buttons and unscrew the screws from the inside; We loosen the fastening of the backlight adjustment. You can unscrew it completely, as is more convenient; Having opened the instrument fuse box, we also unscrew 2 screws from the inside; There are still two self-tapping screws that hold the panel trim, but they cannot be unscrewed without complete disassembly
Therefore, either these screws are carefully broken out, or even cut out by lifting the overlay on the right, using a metal file. At the same time, the appearance of the future updated “face” of the interior will not be affected, since the Euro trim will cover these places; Now you can safely remove the cover.
Climate change inside the cabin
Another modification is the installation of air conditioning. During a warm couple of years, quite a lot of breakdowns occur with a significant increase in temperature in the cabin. On sale you can find small car air conditioners that can be installed on a VAZ. There are quite a lot of difficulties with such a modification.
To begin with, you should pay attention to the fact that the design does not provide a compartment for the air conditioner, which is quite large. Therefore, installation involves changing the front dashboard: quite often the glove compartment is sacrificed, using its space to install an air conditioner.
Also, do not forget that for such a design to work, an air supply is needed. In this case, the air must be filtered, since the ingress of debris causes a significant reduction in the service life of the structure in question. For the air conditioner to operate, power must be supplied - another reason why you should entrust the work to real professionals.
Other options for tuning the instrument panel of the VAZ 2114
There are several more options for improving the VAZ 2114 tidy
It is important to choose the one that will be most convenient for you. You can consider the following models:
- AMC - has chrome edging, color scales, integrated oil level indicator;
- STREET STORM – has an original color design (with a classic arrangement of instruments), an interesting backlight design, which can be changed independently in the dark;
- PRO-SPORT – is an overlay for the existing instrument panel. Presented in 2 versions (with dark and light backing). The backlight is blue, but its brightness is adjustable. The scales need to be glued only after installing the insert;
- AMC-2 – here the tachometer is central. All dials are white, giving the panel a sportier look. LEDs are used for illumination.
In conclusion, it should be noted that there are many options for upgrading the VAZ 2114 dashboard
It is important to decide which parameters are paramount for you, choose the appropriate option and only then start tuning
Set of original internal door handles for VAZ 2109, 21099, 2114, 2115
with 19% discount
Factory door upholstery LUX-3 leatherette for VAZ 2109, 21099, 2114, 2115
with 19% discount
Reinforced "Hedgehog" pistons for interior door trims of VAZ 2108-21099, 2110-2112, 2113-2115
with 19% discount
Steering column cover VAZ 2113, 2114, 2115
with 19% discount
Right center pillar upholstery for VAZ 2109, 21099, 2114, 2115
with 19% discount
Black sun visors with mirror for VAZ 2108-21099, 2113-2115
with 19% discount
Trim of the rear trunk cross member on VAZ 2109, 21099
with 19% discount
Stands for tweeters (aimed at the glass) for VAZ 2108-21099, 2113-2115
with 19% discount
Left center pillar trim for VAZ 2109, 21099, 2114, 2115
with 19% discount
Factory door trim LUX-2 for VAZ 2109, 21099, 2114, 2115
with 19% discount
Designed for installation on VAZ 2110, 2111, 2112 cars. This panel has been installed from the factory on these cars in the “Lux” configuration since 2006. It is installed in standard places, without any modifications. If you want to replace the old panel with a new one, then there will be no problems with this, since the kit includes everything necessary for its installation.
Installation is carried out in a regular place.
Installation is carried out in a regular place.
Installation is carried out in a regular place.
Pay for goods by credit card, using QIWI, Yandex.Money or WebMoney and save on your purchase from 4%, avoiding postal and bank commissions
This product was chosen by 185 customers
Designed for installation on VAZ 2113, 2114, 2115, 2108, 2109, 21099 cars; this panel was also equipped from the factory on these cars with an injection engine.
Installed in standard places, without any modifications.
If you want to replace the old panel with a new one, then there will be no problems with this, since everything for its installation is included in the kit. Also, if your car has a high panel 2109 installed, and you are planning to replace it with this one, then this process will be successful, since their parts are interchangeable.
Attention! Europanel is sent only by a transport company due to its size! If you doubt the availability of a transport company in your city, leave this question to us, we will select the optimal company for you.
Torpedo device
What is a torpedo? In short, this is the dashboard. The word “torpedo” came to us from the West and has now become firmly established in the everyday life of domestic car enthusiasts.
Dashboard of a VAZ 2115 car
The instrument panels on the VAZ 2113, 2114 and 2115 are almost the same. These are complex collapsible structures made of metal with plastic inserts. In addition, in the panels of this line of VAZ models, engineers actively used polymer film, which covered most of the controls.
Diagram of the main elements of the VAZ 2115 dashboard
VAZ 2110 panel, removal, installation of dashboard, sound insulation of VAZ 2110 panel
The VAZ 2110 panel or the “tens” dashboard has become a new word in the interior design of Lada cars. Despite its interesting shape and ergonomic appearance, panel 2110 eventually begins to make a lot of unnecessary sounds when the car is moving. This is especially noticeable on cars with high mileage. Therefore, very often the “tens” torpedo is completely disassembled in order to carry out total sound insulation and eliminate squeaks.
Let's say right away that disassembling the VAZ 2110 panel is not difficult in principle, but it is a very labor-intensive job that requires time and attention. The fact is that to remove the panel you will have to completely unscrew the steering wheel and disconnect a lot of electrical connectors. In order not to damage the electrics, before disassembling the VAZ 2110 dashboard, be sure to disconnect the battery. This is how the “tens” panel looks schematically.
This figure shows in detail, in the smallest detail, all the fasteners of the VAZ 2110 panel.
- 1 – panel
- 2 – side nozzle for ventilation and heating of the cabin
- 3 – instrument panel trim
- 4 – cover fastening screws
- 5 – panel fastening screws
- 6 – box
- 7 – console trim
- 8 – cover
- 9 – instrument panel panel
- 10 – mounting block cover
If you remove the panel completely, then only this should remain, look at the photo -
The red arrows indicate where the nuts and screws are attached, and the two large white arrows indicate the special mounting pins. When installing the panel, it must be installed on them; they serve to center the dashboard relative to the body.
Changing the backlight color
You can change the backlight color yourself.
Such tuning can be characterized as follows:
- The standard instrument panel is being dismantled. This work only involves unscrewing a few screws, unsnapping the clamps and disconnecting the chips. After this, you can completely remove the panel for ease of use.
- After that she sorts it out. Disassembly is also quite simple.
- The design has a light source, which in this case will be replaced. Replacement is quite simple, the main thing is to choose the most suitable diode. In some cases you will have to use a soldering iron.
- We replace the diodes with those that have the color we need.
- We reassemble and install the instrument panel. It is quite important to check the instrument readings after completion of work.
Overall the process is quite simple to perform. Therefore, many decide to slightly update the interior of their car in this way.
To change the torpedo trim, it is not necessary to remove it completely!
So let's get started, let's look at the panel overlays, which are divided into:
Euro-1, another name is “Caprice” and has an index of 21104. The features of this lining are that it does not have a passenger shelf.
Euro-2, index 2110L, cover but already comes with a passenger shelf.
Euro-3, a cover without a shelf, but under the instrument panel of Kalina, Priora, and has a climate control module with 3 knobs and an emergency stop button.
There are also exclusive panel overlays that make the interior of the VAZ 2110 similar to the Nissan Primera, where the instrument panel is in the center.
In addition to these Euro-overlays, there are overlays that are installed on top of them. For example, the overlay of the Chestnut panel.
It is not difficult to install the Kashtan overlay on the dashboard, so we will not dwell on this, but changing the old panel overlay to the Euro one is already more difficult.
The euro overlay for the panel consists of:
- The pad itself
- Inserts for buttons (small insert 2110L-2120031, large 2110L-2120032)
- Air ducts (2114-81080623)
- Device panel trim (2110L-5325124)
- Double button for turning on the headlights and low beam
- Key for turning on the rear fog lights (with fixation)
- Rear window heating switch (latching)
- Key pads - 2 pcs.
- Plugs instead of keys - 6 pcs.
- Wiring harness for connecting the dual side position switch and low beam headlights
- Block
- Device panel fastenings
- It may be necessary to purchase separately different keys for the VAZ-2114 and pads for them.
The cover gives the impression of a high quality product. It is softer than the old pad and, as the developers say, is more injury-proof. They also promise improved air flow to the side windows.
Now we are moving towards installation, and here we can distinguish 2 methods, each of which has its own advantages and disadvantages:
Refinement of the brake system
This operation can be excluded in the tuning program, since the VAZ 2115 is equipped with brakes of acceptable quality. It is recommended to improve the system to give the VAZ 2115 a sporty character. Tuning in this case may include the installation of double-membrane vacuum brake boosters, which will double the pressure on the pedal. If the car is equipped with brakes with a disc mechanism of increased diameter, then preparatory work should be carried out to increase the connectors for installing parts.
Sources
- https://tuningsport.ru/tuning-vaz/2115/
- https://avto-all.com/rossiyskie-avtomobili/tyuning-vaz-2115-svoimi-rukami
- https://TuningStock.ru/vneshniy-tuning-lada/vaz-2113-2114-2115/
- https://TuningStock.ru/tuning-salona-vaz-standartnye-zapchasti-lada/vaz-2113-15/
- https://autocarmy.ru/dorabatyvaem-i-uluchshaem-vaz-2115-tyuning-salona/
- https://prometey96.ru/modeli/kak-uluchshit-vaz-2115.html
- https://bibiauto.club/tuning/kuzov/restayling-vaz-2115.html
Instructions for installing a new panel
If you want to replace a low tidy with a more advanced, high one, then in any case you will have to change the entire center console.
Removal and installation instructions look like this:
- First, you need to turn off the power to the on-board network; to do this, disconnect the battery, remove the steering wheel, as well as the steering column switches and the ignition switch. You will also need to disconnect the ignition relay.
- Next, unscrew the two bolts that secure the control panel visor and remove it.
- Now you need to compress the spring and remove the shield itself from the center console. Disconnect all wires and connectors connected to the dash, including the speedometer cable, the econometer hose, and the odometer cable. After this, the tidy can be moved to the side.
- Then remove the regulator from the hydrocorrector of the optics light, the tidy light switch knob, as well as the interior heater and fan regulators. To do this, pull the controls towards you.
- After this, unscrew the two bolts securing the center panel trim on the sides; the trim itself can be moved towards you. Then you need to disconnect the connectors.
- Now the key in the lock should be turned to position “0”, this will disable the anti-theft system. A connector with wires is connected to the lock itself; it must be disconnected. Next, unscrew the two nuts and two bolts, after which you can remove the steering column pipe with the switch.
- Remove the choke handle located under the instrument panel. Pull it towards you so that you can feel the pull. You need to unscrew the two bolts that secure the damper guide rod, after which the choke can be removed.
- Now you can unscrew four more screws that secure the heater control panel in the car. Unscrew the bolts located on the side of the shield on both sides. Also unscrew the lower console mounting bolts with nuts that secure the control panel lighting switch and the optics hydraulic corrector. To do this you will need a 22mm socket wrench, it must be high.
- After completing these steps, you need to unscrew the bolt that secures the center console in the glove compartment. Then all you have to do is unscrew one bolt at a time on each side securing the center console. The console itself can then be dismantled.
- As for installing a new high panel with tidy, this process does not present any particular difficulties. All dimensions at the mounting points on the body are the same, but this procedure also has its own characteristics. To install your new console, you will need the appropriate wiring harness. If you use an existing harness, then you will need to rearrange the terminals in it, taking into account the connection diagram. In addition, it will be necessary to change the cables leading to the heater to longer ones, the same applies to the speedometer cable. If you are installing a new console, you will also need other roof pillar side trims, these must be installed before you install the console. Since the new dashboard will not use a flow meter, the tube from it will need to be plugged. In addition, the signal to the tachometer will need to be supplied from wire K on the coil, which is connected to the speed sensor cable bracket.
- Immediately before installation, you should reassemble the new console, and wrap the connection points of the blowers with electrical tape and, preferably, glue them with foam rubber or anti-creaking agent. It is also necessary to change the foam rubber of the heater, since the old one will no longer be able to perform its functions. Also make sure that the choke can close completely and remember that the cable from the new speedometer should be installed before you install the console. The assembly procedure begins with laying a new wiring harness and connecting all connectors. Before you finally assemble everything, turn on the dashboard and check how all the indicators and gauges work. After this, the console can be put back in place.
Possible malfunctions and ways to eliminate them
What problems can a car owner encounter:
- The shield works fine, all sensors function, but there is no backlight. As you know, the backlight on the tidy appears only when the side lights are turned on. Therefore, if there is no light on the dashboard, you need to check whether the side light, license plate light and lamps in the engine compartment are working, since one fuse is responsible for all these elements. We are talking about a 7.5 ampere fuse device F10. If it is burnt out, the device needs to be replaced. Sometimes the reason lies in the inoperability of the backlight control located under the tidy.
- The speedometer does not work, in some cases the needle rises and falls, and it moves jerkily. If the speedometer stops functioning, then first of all you need to check the cable connecting it to the gearbox. Older versions used a mechanical cable, the ends of which wore out over time, causing the speedometers to not work. You need to replace the cable itself or try to restore its functionality by winding a piece of food foil around the end connected to the speedometer. If we are talking about an electronic sensor, then you need to remove it, clean the contacts and reconnect it; if this does not help, then the controller must be replaced.
- The economy sensor does not function. There can be many reasons for its inoperability, ranging from failure of the device itself to damage to the electrical circuit. In practice, this sensor breaks down in many cars; this is considered a “disease” of the Nines.
- The engine temperature controller does not work. If the needle does not rise at all, then you need to diagnose the sensor itself, located in the exhaust line of the cylinder head, next to the thermostat. You should also check the quality of the controller connection, make sure that the power circuit is intact, and diagnose the connector. It may happen that the needle rises sharply and goes beyond the red zone, while the engine has not even warmed up. Most likely, there is a short circuit problem; you will have to use a tester to diagnose car wiring or seek the help of a specialist.
- The indicators on the dashboard or part of the backlight do not work. In case of such a malfunction, the cause should be sought in burnt-out lighting sources. You need to remove the tidy and check the light bulbs; if they are really burnt out, then they will have to be changed (the video was shot by Semyon Pedan).
Europanel: standard equipment
With a total weight of 17 kg, the panel has overall dimensions (in cm) – 170x90x100.
The package includes all the elements necessary for quick installation and further operation:
- Instrument panel (qty. - 1 pc.).
- Set of devices (qty. - 1 pc.).
- Under-panel wiring harness (qty. - 1 pc.).
- Central console (qty. - 1 pc.).
- Floor tunnel (qty. - 1 pc.).
- Control unit for the heater (qty. - 1 pc.).
- Top cover for the glove compartment (qty. - 1 pc.).
- External lighting switch (qty. - 1 pc.).
- Rear fog light switch (qty. - 1 pc.).
- Heating switch for rear window (qty. - 1 pc.).
- Set of plugs for switches (qty. - 4 pcs.).
- Heater air duct deflector (qty. - 5 pcs.).
- Cigarette lighter (qty. - 1 pc.).
- Metal frame (quantity - 1 piece).
Euro torpedo VAZ 2114: advantages and disadvantages
The Europanel is perfect for installation on a VAZ 2114 and does not require additional alteration or adjustment.
Its quality significantly exceeds that of the panel provided by the factory, due to such points as:
- more modern design;
- better quality material (plastic);
- availability of built-in VDO devices (with internal lighting);
- presence of a digital odometer;
- original design of signal lamps;
- the presence of several additional compartments for storing small items;
- well-equipped air duct, etc.
In addition, the VAZ 2114 Europanel allows the driver, if necessary, to connect various additional sensors (for example, levels of antifreeze or windshield washer fluid or open doors).
Of course, the europanel has some disadvantages, including:
- not full amplitude (does not reach the edges of the slots) and tight movement of the air damper control levers;
- poor adjustment of rods and cables, etc.
Experts' opinion
Michael. I am engaged in the professional provision of services for upholstering the interior of a vehicle with new fabric. I would like to note right away that quite often I come across a situation where I have to redo it after trying to do the work myself. In this case, costs only increase, since the previously used material becomes unsuitable when attempting to complete the work independently.
Igor. I am involved in installing air conditioning systems on cars. An air conditioner is a complex and quite expensive piece of equipment that must be installed correctly for long-term operation. You can install it on a VAZ, but the work is quite difficult due to the lack of this option even on expensive trim levels. Therefore, the cost of the service is high.
Grigory. Do you want to increase your comfort in your car and travel long distances without feeling tired? Seats with lateral support are designed specifically to solve the problem at hand. You can buy them with delivery, installation will not cause much difficulty.
Denis. I can consider myself a VAZ fan, since in all my driving experience I have only driven cars from the domestic auto industry. After much thought, I chose 2115 tons for myself and did not regret it at all - after modifications, the car does not look like the money that was invested in it.
Product delivery options
Note! Below are the shipping methods available specifically for this product. Payment options may vary depending on the delivery method.
Detailed information can be found on the delivery and payment page.
Transport companies
Available payment methods:
- Using cards Sberbank, VTB, Post Bank, Tinkoff
- Yandex money
- QIWI
- ROBOKASSA
Delivery is possible to any locality where there is a representative office of the transport company. Delivery time – from 2 to 10 days. Sending large parcels is approximately 50% more profitable than by Russian Post.
Courier delivery in Togliatti
Available payment methods:
- Cash upon receipt
- Using cards Sberbank, VTB, Post Bank, Tinkoff
- Yandex money
- QIWI
- ROBOKASSA
Delivery time from 1 to 12 hours.
Pickup from our warehouse
Available payment methods:
- Cash upon receipt
- Credit
- Using cards Sberbank, VTB, Post Bank, Tinkoff
- Yandex money
- QIWI
- ROBOKASSA
Pickup times must coincide with store opening hours.
Catalog number: 2114-5325012
Standard price:
1540.00 rub. Your price
Price For registered:
1430.00 rub.
Before visiting the store, check product availability!
Car dashboard cover
Another way to get rid of low-quality plastic in the car interior is to cover the dashboard. As a rule, leather or a high-quality substitute is used for this. It is quite difficult to do the covering yourself; the plastic, which was previously part of the interior design, will serve as the basis.
Sidebar: Important: It is recommended to carry out the covering only after creating all the necessary niches for installing additional equipment. Otherwise, costs increase significantly
When choosing a material, you need to abandon fabric, since the front panel is constantly exposed to direct sunlight and is often exposed to greater impact than other upholstery elements. When choosing a color, you need to give preference to not bright shades that will not be very noticeable. Quite often you can find examples of tuning that use bright fabric: red, blue and other colors. Note that this option looks quite attractive, but during a long trip the driver and passengers will be very tired.
Where do you get ideas for tuning?
Oddly enough, quite a lot of problems arise with finding an idea that will be implemented when tuning the dashboard. An example is that not everyone can create an instrument scale sticker.
Where can you get original ideas?
On the Internet you can find quite a lot of images of modifications to the instrument panel. It is these photographs that can be used as a reference point when creating your own dashboard.
You can also borrow design styles from other cars. For example, by taking an image of the dashboard of one of the foreign cars, you can make minor modifications and get an original design.
What types of overlays are there?
If you just need a Euro pad, then there are two options:
Euro-1 rubber, another name for which is Caprice. It has the same instrument cluster as the VAZ 2110, the only thing is that there is no shelf on the passenger side;
Panel trim VAZ 2110 Euro-1
Euro-2 is practically no different except for the presence of the mentioned shelf.
Panel trim VAZ 2110 Euro-2
There is also a Euro-3 overlay on sale. But it is for later and more advanced VAZ cars - Priora, Kalina. The fact is that this version provides more devices, for example, there is a unit for climate control, which is not observed in the top ten. Although, in principle, if desired, installing this option is also possible.
Panel trim VAZ 2110 Euro-3
Any Euro pad mentioned above is a quality product, unless, of course, it is a cheap fake. It is softer and even, according to manufacturers, less traumatic, like the old one. In addition, after its installation, the supply of warm air to the side windows should improve.
Components
When purchasing, you will receive what is included in the kit, namely:
- Europlate;
- Inserts for switches (buttons) of devices;
- Trim on the instrument panel;
- Since your instrument combination may differ from those whose installation is structurally provided, there should also be six plugs; they can be inserted instead of buttons;
- The buttons themselves and two pads for them: • Double – for low beam and dimensions; • To turn on the fog lights; • Heated rear window.
- Air ducts;
- Block and wiring harness designed to connect a double button for side lights and low beam;
- Brackets securing the instrument panel.
In addition, if you are not entirely satisfied with this combination, and you need more buttons for other devices, then they, as well as the pads for them, can be purchased separately.
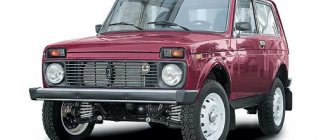
VAZ 2109 wiring diagram
The VAZ 2109 car has remained one of the most popular in the country for many years. Not just popular, but also prestigious. In the social hierarchy, owners of nines were not much lower than owners of used Cadets and Jettas. One could argue with the reliability of the car, but since there was no alternative, the car filled the entire CIS and was even assembled using the hub method in Finland, but this has little to do with the 2109 model.
This is interesting: 10 ways that will save you from frequent car washing
Content:
Wiring diagram VAZ 2109
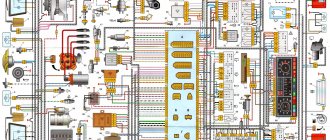
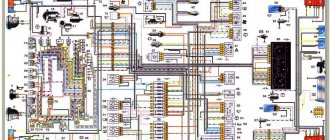
Like the entire car, the electrical equipment was not at the highest level, so owners of nines should know the VAZ 2109 wiring diagram thoroughly. To do this, we have provided the factory diagram in good resolution, which can be used with adjustments for changes made from time to time.
This is a diagram of the canonical nine with factory markings and explanations. In principle, the circuit is quite simple, but the electrical appliances themselves caused difficulties, the problems with which we will talk.
Basic problems with electrical wiring 2109
The biggest problem with the electrical equipment of the VAZ 2109 was the low quality of components and unsatisfactory build quality. Despite the fact that Togliatti traditionally blames suppliers for all mortal sins, in the end we have to take the rap, and as ordinary users, we should not be interested at all in why the spirals on the double-filament rear light bulbs constantly burn out. Also, in principle, we don’t care which factory made the housing for the fuse box - we only see the inadequate operation of the electrical equipment when pressing the brake pedal turns on the right turn.
And a lot of such examples can be given. If the factory is not confident in the quality of the components, then why install them on the car. Therefore, rhetorical questions only lead to unnecessary vibrations in the air, and do not solve the problem. The above problem with feet can be solved quite simply:
- the rear light cover is removed;
- the power terminals are disconnected from the trunk;
- the entire strip on which the lamps are mounted is unscrewed;
- The contact on the flexible board at the point of attachment to the lamp socket is checked.
Short circuits of the tracks of this board occur due to contamination of the contacts and tracks. Then the signal sent to the stop lamp can simply be redirected to the turn signal lamp. This can be radically solved by replacing the entire board with a new one, but the new strip will not last as long as we would like due to poor sealing of the lamp from inside the luggage compartment. It seems like a trifle, but we spend precious time solving trivial problems that are solved at the production level with the right approach, not the VAZ approach.
Improvements and correction of factory errors
In light of the above, a breakdown of the electronics control unit is very typical for the nine. The reason is very simple - its body simply allows water, dust and moisture in the form of condensation to pass through. Its very placement on the air supply shelf is not entirely clear, but there are also more significant disadvantages that can be eliminated with your own hands. The factory provided a tiny groove to drain water from the housing, but it constantly gets clogged, the housing fills with water, and the control unit slowly and surely dies. It is not cheap, so such negligence of the designers cannot be explained. There are two ways out of the situation - constantly clean the water drainage channel, or change the block at least once a year.
It is also worth paying attention to the fact that the power wiring on the bottom shelf of the radiator is constantly exposed to high temperatures. In addition, in this place it is in no way protected from water and dirt. This is also a difficult moment to explain. The category of wiring harness oversights includes the harness under the carpet next to the driver's seat. Moisture constantly accumulates there, and in order to remove it, you need to dry the floor, inevitably tugging on the rope. Of course, this problem cannot be solved on your own - the amount of work required to re-tighten all the wiring in the car is too large.
It is worth paying special attention to the power terminals on the generator. They very often become loose, heat up, spark and melt the wiring. But that's not the worst thing. The wires may short out, and it already smells burnt. Therefore, you should not be lazy, but check this unit as often as possible for tightness of the terminals.
Wire harness insulation 2109
No one will disassemble half a car for the sake of insulating the harnesses, but if necessary, you need to do this for your own safety. Using the diagram that we placed at the beginning of the article, all the work will not take much time, but you will be confident in the quality of the wiring insulation. For this you will need:
- Corrugated hose for electrical wires.
- Insulating tape.
- Wire cleaner.
Before wrapping old wiring in a sleeve, treat the wires with a cleaner, which is widely available in aerosol cans. Next, following the instructions and checking the electrical diagram, we proceed as follows:
- Disconnecting the battery
- Disconnect the terminals and remove the harness.
- We treat it with an aerosol.
- We carry out a visual check of the contacts.
- We lay the tourniquet in the corrugation.
- We fix and seal the entry points of the harness into the corrugation.
- We put the finished cable in place.
- Referring to the diagram, connect the terminals.
Particular attention should be paid to sealing the harnesses in places where they come into direct contact with water or hot surfaces. Also, when assembling, pay attention to the integrity of the pads and the condition of the contacts and terminals.
Thus, having spent very little time, we will save the wiring and get rid of unnecessary problems with short circuits. Keep an eye on the wiring, and good luck on the road!
How to easily update the “tidy” of a VAZ 2114
Upgrading the 2114's dashboard is actually not as complicated as it might seem at first. Buying such a “device” is quite simple. You should consider what options owners can use to update their VAZ 2114 wardrobe (examples in photos and videos).
1. AMS. This model has several features.
- To begin with, it is worth noting that you can order its design yourself;
- This panel is equipped with an integrated oil indicator, which is missing in the classic version. Its appearance is associated with the very persistent requests of many car enthusiasts to install this “component” as standard.
- This instrument panel looks more interesting due to the colored scales with chrome trim.
2. PRO-SPORT. This “tidy” is designed as an overlay for the instrument panel on the presented model. The updated design of this device gives them an impressive, completely new look. There are two options for its execution: with a light and dark backing. The backlight of the VAZ 2114 panel has a special brightness adjustment, but there is only one color - blue. The scales are glued after installing the insert. This is to give this element of the car an original look.
3. AMS-2. The central instrument was the tachometer, which was moved from left to center. The white scales create an overall sporty look for the entire panel. This allows you to quickly read the necessary information from it. The backlight has been redesigned and LEDs are used, with the help of which it is not difficult to read information at night. Installation is recommended to be carried out by qualified specialists, since its installation involves significant “redevelopment” of the classic model.
4. STREET STORM. The main feature of this model is its color design. Nothing was changed in the classic arrangement of instruments,
the emphasis was on the color scheme. The “appearance” of the dashboard has undergone certain changes, however, at the same time, its style fits harmoniously into the existing interior. Another feature of this model should be noted – its backlight. During the day it is light with red symbols. In the dark, you can easily change not only the brightness, but also the color.
5. "North Wind". This model is different in appearance. The developers have shown that even with a standard arrangement of instruments, the entire panel looks dynamic and bright. It clearly shows sporting features. The color of the backlight depends on the shade of the insert scales.
Changing the backlight color
You can change the backlight color yourself.
Such tuning can be characterized as follows:
- The standard instrument panel is being dismantled. This work only involves unscrewing a few screws, unsnapping the clamps and disconnecting the chips. After this, you can completely remove the panel for ease of use.
- After that she sorts it out. Disassembly is also quite simple.
- The design has a light source, which in this case will be replaced. Replacement is quite simple, the main thing is to choose the most suitable diode. In some cases you will have to use a soldering iron.
- We replace the diodes with those that have the color we need.
- We reassemble and install the instrument panel. It is quite important to check the instrument readings after completion of work.
Overall the process is quite simple to perform. Therefore, many decide to slightly update the interior of their car in this way.
Installation of a multimedia system and other elements
With the spread of touch screens, they have become quite often used in the production of multimedia systems that are installed in cars. Of course, you can purchase a GPS navigator that will be mounted on top of the panel. But still, this design option is impractical, as it takes up a lot of free space and impairs visibility.
If desired, you can implement a multimedia system into the torpedo. For this:
1. Select a multimedia system. 2. Find out its exact dimensions. 3. We mark the area on the dashboard. 4. We cut out the plastic. 5. Install the multimedia system. 6. Connect the system. 7. We carry out decoration.
In the same way, you can install control units for additional functions, for example, self-installed fog lights or interior lighting. In order to significantly simplify the work, you can buy a disassembled control panel from another car, also mark the location on the dashboard and cut out a place to install the panel.
In general, we can say that it is possible to modify a factory torpedo almost beyond recognition.
Peculiarities
Most of all, “chisels” liked the “low” panel due to one significant difference from the “high” one - the well-designed arrangement of air ducts. In 21083, the air forced by the fan from the heater core is lost somewhere inside it. As a result, the interior does not warm up well.
The second feature is the low quality of plastic and poor fit to body parts. At the slightest vibration or pressure, it begins to creak unpleasantly. And when driving on uneven roads, the noise from it is similar to a baby rattle.
Instrument panels with indexes 2108 and 21083 were installed on the first generation of front-wheel drive models; in addition to the cuts, they differ from each other only in the location of the equipment control buttons and differently combined control devices.
( 2 ratings, average 4 out of 5 )
Removing and installing the instrument panel on VAZ 2110, 2111 and 2112
Before you begin this repair, you must do the following:
After this, you can proceed to further actions. We immediately remove and remove all the elements of the panel, such as: the standard clock, the heater control unit, the display unit, as well as the central deflector, and do not forget about the buttons with the radio. As a result, we get approximately the following picture:
Next, using a screwdriver, pry up and remove the plugs at the upper corners of the instrument panel mounting. In reality it looks like this.
On the other side, we do the same, after which, using a socket and an extension, we unscrew the nuts securing the instrument panel in the upper part.
Now let's move on to the remaining attachment points. At the bottom, in the left and right parts of the panel - in the corners, there is also one screw that needs to be unscrewed. The first one is shown below.
The second one is located on the right side of the panel in the same place - at the bottom in the corner. Also, immediately unscrew the self-tapping screw that secures the diagnostic block:
Now we move on to the side fastening points of the frame, which are located in the center on each side - the photo below shows the left side:
On the right everything will be the same. Next we move on to the internal frame fastenings, which are located in the following places. The first one is under the fuse mounting block, to get there we open the cover and look inside the panel:
The second one on the right is visible when the glove compartment lid is open:
Of course, the mounting block will also have to be removed so that it remains intact with the sub-panel wiring.
We thread it inside with the instrument panel pulled back; you will also have to cut off some of the wiring fastening clamps, for example, in this place, which is shown in the photo:
Now we are trying to remove the VAZ 2110 panel, moving it to the side on both sides, evenly, without much effort or sudden movements.
In the photo above you can see that the headlight hydraulic corrector tubes were cut off, since in my case they were simply not needed. If you need to save them, do everything carefully and remove them by pulling the control unit out of the instrument panel. Next, we finally remove the panel, of course, after first disconnecting all the wires that will interfere with this.
Installation occurs in the reverse order, connecting all wires and connectors to their places, blocks and switches, as well as other elements that were removed as a result of this procedure.
Shendys › Blog › Installation of Europanel Option 1
The author is not responsible for what is written here. I remade it myself as described here, and everything works for me. And other people connected the Europanel according to this article and everything works for them. If you have problems, then you are to blame for the incorrect connection, or the previous owner made changes to the wiring and it does not correspond to the diagrams, or the new wiring or devices are faulty.
If something is not clear, look for friends who understand electrics, or do according to option 2 www.drive2.ru/b/482638876423225627/ Europanel 2114 connection report instead of high or low.
In this article we change only the instrument panel wiring on 2114 and make some changes to the rest of the wiring that we do not change!
First, think again whether it is necessary. With the Europanel, the interior will be tighter, especially in the legs. And you can glue the old one with Madeleine and it will be so quiet that it’s as if there is no panel in the car. All parts for the europanel can be found in stores and markets. Collecting it in parts will cost the same amount as buying a new one. Tested by personal experience. You can install any tidy from the new Niva, Oda, or 2110 (the 2110 will not show the outside temperature). The panel can be installed without metal brackets, everything will hold together. Any panel wiring will go to both the carburetor and the injector; there are three types: with 8, 9 and multi-pin connectors for the injector (the latter uses ignition switch 1118). The cover can be soft with a glove compartment, with a recess, or hard plastic. The soft and plastic ones have different nozzles for blowing the door windows and short air ducts for them. We remove the old panel according to the instructions we found on the Internet. The new one is screwed on the left with two screws, on the right with two (like the old one), and to the frame, which is attached to the steering column and to the floor (you can do without the frame). We attach the frame ears under the steering column with two studs there, you will have to take longer studs or bolts, or you can saw off/bend the sides of the ears and not extend anything. If an adjustable column is installed, then first the frame ears are leaned against the body, and then the column is attached. The old panel mount behind the glove compartment is not used. On the 2114, on the floor tunnel there are brackets for attaching the panel frame and the lining between the seats, you can do without them, everything will hold on but dangle. Can be made from iron locally. Changing the ignition switch
(the shear bolts are unscrewed with a chisel) to lock 2110 (if the wiring to the ignition switch has one 8-terminal block) or lock 1118 without a sensor and backlight (if there is one 3-terminal and one 2-terminal block to the lock).
You can leave the old one and rearrange the wires: pink euro wiring to the brown lock (and connect the pink lock with it), blue (and a small gray one if there is one) to the blue-black and its own blue lock, red to red, don’t touch the rest. Well, attach the emergency light button somewhere (2114 or from the classic one will do according to the contacts). The heater cables to the levers are a bit short. I opened the stove valve all the time, anyway, there is an air mixing damper in the stove, and from the four cables from the old panel I took three long ones and used them, and everything worked. By the way, the block with the stove levers is used 2114. We collect everything. It is not necessary to change the CY (mounting block) and the rest of the wiring
.
We only change the instrument panel wiring to 2114
,
and you also need to make 10 points from electrics:
1) If the block has 9 places for relays, then we skip this point.
If we have a mounting block with 11 relays (relay 1 of the rear window washer), then at the wiring of the europanel to the white-black wire from block Ш4/4 (to the mounting block) you need to connect 2 more with narrow terminals in Ш4/13 and Ш3/13.
That is, we need two wires with narrow terminals, we insert them into sh4/13 and sh3/13 and connect them to the white-black wire from sh4/4. Otherwise the dimensions won't work. The photo below shows the contacts that need to be connected together (I repeat: if the mounting block is an old model), this photo is not an example of the wiring of the europanel, but the old one, where they are already connected
.
2) For both the injector and the carburetor:
at block Ш9 (wiring to the lights from the mounting block in the cabin), you need to disconnect (you can cut) wires Ш9/5 and Ш9/6 (blue-red and pink). We connect the pink one to the pink one (red block), and leave the blue-red one dangling, nothing will happen to it. Or the pink one can be connected to the pink connector on the injector (its photo is below), or to the pink one next to this connector. Next, we need a wire (like those on Sh9) and several narrow female terminals. You can buy a plug with wires, and pull out the terminals with wires from there, or take them from old wiring. We find the wire from the driver's door switch and cut it. We connect three wires to block Ш9: 6 and 7 to the wire that previously went to the limit switch (to the lampshade and other limit switches). 12 to the wire from the limit switch itself (to the very limit switch of the driver's door).
3) If the car is carburetor,
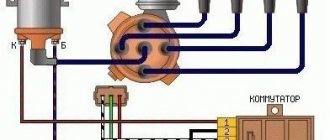
(if we have an injector, then we skip this point) you need to install a speed sensor, Sh7/7 (between gray-black and green-white at the long block in the engine compartment of the mounting block) needs to be connected to the speed sensor. To get to the connector you need to remove the switch and the shield behind it. The sensor is suitable from tens of 6-pulse (there are many types). It is better to use a metal roller (the plastic one will overheat and soon fail). We unscrew the cable on the gearbox and screw in the sensor instead. If you look at the sensor connector so that the two protrusions are at the bottom, then from left to right: plus, signal, minus. Plus can be connected to the orange one from the reverse sensor (Ш6/12) or to the orange one from the wiper motor (same thing). Minus on the body.
ATTENTION! If we have a white-black wire from the CheckEngine light bulb on Ш7/7, then we disconnect it from there, extend it and connect it to the blue of the white instrument block (pin 9 next to the orange one), and the white-red one next to it (the contact is connected to the body or black one same instrument pads, and the check light in the instruments will be an AFR light.
4) for both injector and carburetor
: On the europanel, the brake light works from the positive (and from the starter for checking). We disconnect the black wire at the brake fluid sensor, and instead connect the wire to the positive, for example to the orange one from the reverse sensor (Ш6/12). Or you can use the orange wiper motor.
If the car is injection
, then the speed sensor is not needed, (we carry out the points with the temperature and brake sensor as described)
ON THE INJECTOR YOU NEED
to connect the panel and engine injector connectors, then the tachometer, speedometer and CheckEngine lamp will work. The connectors will be different. Popular old panel injector connector
Later the connector for the injector was made like this, wiring of the second type
On the latest versions (On E-Gas), the injector connector is different (third type of wiring). Here is a photo of the connector NOT the panel. The panel has the opposite.
5) Next to the mounting block in the wiring there will be a connector for a relay with blue wires, put the relay there
(you can take it from the old ignition switch if the lock has been changed) and screw it to one of the two studs on the mounting block, otherwise the heater, washer, rear wiper and heated glass will not work.
There may also be sockets for relays in the wiring. For example, heated seats, we don’t need it. Or there may be a connector on the starter blocking relay (pictured below), on 2114 the injector unit turns off this relay so that the starter does not turn on when the engine is running. If we have such a connector, then we only need
: either close the thick wires with a jumper or twist them together (the red ones are the big ones), or throw a wire directly from the red ignition switch to the red starter under the hood, or put a relay and connect another injector unit so that it turns it off, or put a relay and a red-black connect to minus or to the signaling device for blocking.
I recommend connecting red and red-blue together and doing nothing else
. On the right in the photo is just a diagram of how it was connected to 2114 for anyone interested.
6) IMPORTANT!
If the wiring on the panel is installed new from the store, then we check it according to the connection diagram. I had DC power connected incorrectly in two places. I have the diagrams on my blog.
7) If the rear fog lights do not turn on or will turn on at any time, then connect the wire at the Ш3/21 block connected to the ChYA (orange-white) through a 5-10 Ampere fuse to Ш3/8 (green).
We install a decimal fuel level sensor. Well, or we leave the old one and study which position of the arrow on the new device corresponds to what. Or we install a minibus and calibrate the liters in the tank. If you look for the right blow in the store
, take a tester with you and measure the resistance of the sensor. We need one whose resistance at extreme positions will be about 300 Ohms, and about 10 Ohms.
9) If the wiring comes across for E-Gas, which is expensive, under the ignition switch 1118 and with a bunch of incomprehensible additional connectors, then we cut off and isolate the orange and red-green wires from the connector to the brake light sensor on the pedals, and put wide ones on the rest terminals and connect to the sensor, or do not cut anything off and install a sensor for E-Gas (4-pin). We don’t touch the connector for the immobilizer (we leave it at the factory with the injector wiring), and we forget about the rear fog lights, or we get ready to rummage through the wiring, and write to me and ask how to restore them. The black and white incomprehensible wire goes to the seat belt sensor, you don’t have to connect it. If the power windows do not work, then place a jumper on contacts 30 and 87 of the relay in the mounting block.
10) We collect everything, connect it and rejoice. And if everything works and the car starts, we’ll be even more happy!
Don’t forget to connect the rheostat for adjusting the instrument lighting. And then I get a lot of letters where people ask why the backlight doesn’t work... You need a rheostat from a classic with large terminals, or you can take it from an old panel and change the terminals, or you can not install a rheostat and short the white and brown ones at the connector together.
Also, during installation of the panel, it would not be superfluous to remove the stove, wipe it and lubricate the cables. And also find out the principle of its operation and paste everything over so that it works properly))) Any device from 2110 will be suitable, with a display or a digital meter. Oda 2126 of the new model has a similar one. There is no need to install from Oka, which is 344.3801 (it’s written on the back of the piece of paper), its speed will show 2 times more. The floor tunnel does not need to be screwed in; it will hold on anyway, and brackets for it are difficult to find.
I understand that you want to install the Europanel quickly, but my personal advice is: be patient and install the panel gradually. First we install only the wiring, connect everything and drive like this for a while. If everything is fine, everything works and nothing rattles, we install the frame with the cover and air ducts, and drive like that. If everything is fine, nothing rattles, it still works, etc. we collect until the end. I didn’t do that, and after assembly I took the panel apart several times to redo something.
On the soft cover (with a glove compartment or recess) there are nozzles for blowing side windows 2114-8108062(3)-10, which have a pin. In Moscow, at the South Port car market, they are considered rare and are sold for 500 rubles. per piece, when at the same time there are plenty of them in auto parts stores and their price is 30-50 rubles. On the plastic cover which 2114-5325182-35 there are nozzles 2114-8108062(3)-20 they are wider, have a latch and stick out a little. And the short air ducts for the nozzles are also different (no photos or numbers). That is, the soft and plastic linings have their own nozzles and air ducts for them.
source
Popular methods for changing a torpedo
To begin with, here is a list of the most popular methods for changing the front panel. We include:
1. Complete replacement. Installing a new torpedo, which was taken from another car, can be called a rather difficult job. Note that if instrument panels and other small tuning parts can be found on sale, then suppliers of such parts do not create a torpedo (it can be found on sale extremely rarely). This is due to the fact that such tuning is carried out quite rarely. However, only by completely replacing the panel can you get rid of cheap plastic and put an end to the crickets that can make long-distance travel simply unbearable.
2. Quite often, partial modifications are carried out, which is represented by the creation of additional niches for the multimedia system, a control unit for new functions, and so on. Such work cannot be called difficult, since plastic is used in the manufacture of the torpedo - a material that can be easily processed using available tools. The main thing is to carry out such work carefully, since if mistakes are made, important electrical elements and so on can be damaged.
The first method is implemented quite rarely, but allows you to achieve truly unsurpassed results. The second is easier to implement, but does not allow you to completely get rid of low-quality plastic.
Replacing the speaker system
Another way to significantly change the interior of a vehicle is to install new acoustics. Good sound in a car is the dream of many car owners. The standard acoustics in the VAZ are, to put it mildly, of low quality. Also, don’t forget about the radio that plays tracks.
It must also be of high quality, since otherwise installing expensive acoustics will not lead to improved sound. Replacing the speaker system should be carried out taking into account the information below:
1. In order for the sound in the car to be surround, you should install several additional speakers at once. At the same time, you can choose high-quality tweeters that do not have high power. It is better to install several low-power tweeters than one powerful one. When using a high-quality radio, the sound will be distributed across channels, creating a truly unusual effect.
2. It is best to install the acoustics at the time of reupholstering or insulating the interior. This is due to the fact that new tweeters will need seats. They can be made in doors and other finishing elements.
3. No acoustic system is complete without a subwoofer. It is responsible for the bass that tweeters do not reproduce. This acoustic element has quite large overall dimensions, which makes it difficult to choose a place to install it.
4. Do not forget about the correct placement of the wiring and its fixation.
Sidebar: Important: Complex speaker systems require the installation of an amplifier, which is also supplied with power. Therefore, as in the case of interior upholstery, the work of installing acoustics should be entrusted to professionals in the field of activity in question.