Much has been written about how timely the first domestic SUV with a monocoque body turned out to be. Even more was expressed by the owners of the Niva car themselves, who practically deified its capabilities. All they needed for operation was the availability of spare parts and instructions for servicing the vehicle.
The popularity of the model is difficult to overestimate - 28 years in service
Features of the modification
First of all, the changes affected the engine management system and control instruments. In particular:
- The wiring diagram for Niva 21213 received an additional wiring harness in the engine compartment for connecting a microcontroller and sensors;
- On the Niva model of recent years of production, a more advanced power unit with the VAZ-21214 index is installed. Instead of a carburetor, it has a fuel frame with injectors from GM. The price of a car with injection has increased because of this;
- The instrument panel has changed - the design is borrowed from the VAZ 2108 model.
Ignition system
The VAZ 21213 engine uses a non-contact ignition system consisting of:
- ignition distributor sensor (marking 3810.3706). It is responsible for creating control pulses supplied to the electronic switch;
- switch (model marking – 3620.3734) in climatic version U2.1 (corresponds to GOST 15150);
- ignition coils (marking 27.3705).
Dashboard
A modified instrument panel appeared on the car. In particular, instead of a voltmeter, the manufacturer installed a low battery discharge lamp (no. 12 in the diagram).
Ignition system
The operation of the internal combustion engine installed on the VAZ 2121 car is based on a classic scheme, a video of which is shown in driving courses:
- The generator produces electric current;
- The ignition coil increases its power;
- The ignition distributor supplies electrical impulses to the spark plugs when the piston reaches TDC;
- The spark plugs ignite the air-fuel mixture in the engine cylinders.
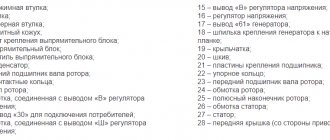
The photo shows the following components:
- From pos. 3 to 12 – ignition coil and its structure;
- From pos. 13 to 20 – spark plug;
- From pos. 21 to 42 – ignition distributor (distributor).
For reference: The distributor slider, which is responsible for closing the contacts with the high-voltage wires going to the spark plugs of each cylinder, is shown separately. In the diagram presented, it is indicated by pos. 41-45.
Engine modernization
The all-wheel drive transmission of the VAZ 2121, in addition to significant advantages, also had domestic disadvantages. In particular:
- Fuel consumption was quite high compared to passenger cars (13.4 liters per 100 km in urban conditions and off-road);
- This was reflected in operating costs - the price of 1 km was much more expensive for the owners. And the power of the existing engine was insufficient for harsh off-road conditions.
For reference: the automaker, by modernizing the existing engine, increased its technical parameters. In particular, the volume increased from 1480 cubic meters. cm up to 1680 cc see Cars with such a power unit received the factory index VAZ 21214.
An increase in engine displacement and the use of a non-contact ignition system led to the need to modernize the electrical circuit in the engine compartment. Replacing the VAZ 2121 wiring solved this problem completely.
Ignition system modernization
Since the high-voltage coil is traditionally responsible for the sparking power, the automaker has made changes to its operation. In particular, the wiring on the VAZ 2121 was supplemented with a harness that connected the switch and other components of the ignition system.
This factory manual contains:
- Ignition switch acting as an electrical circuit switch with pins 30/1 and 15;
- Ignition relay with pins 85,86,30 and 87;
- Switch with 6-pin terminal block;
- Upgraded ignition coil with terminals “B” and “K”;
- Distributor (ignition distributor);
- Candles.
Electrical equipment of the VAZ 21214 car
Symbols on the diagram
1. Left front light. 2. Headlights. 3. Coolant temperature sensor. 4. Sound signal. 5. Throttle position sensor. 6. Mass air flow sensor. 7. Electromagnetic valve for adsorber purge. 8. Injectors. 9. Right front lamp. 10. Side direction indicators. 11. Rechargeable battery. 12. Electric heater motor. 13. Additional resistor for the heater motor. 14. Differential lock warning lamp switch.15. Windshield wiper relay. 16. Starter 21214. 17. Windshield wiper motor.18. Generator VAZ-21214. 19. Windshield washer motor.20. Ignition module. 21. Spark plugs.22. Controller. 23. Idle speed control. 24. APS status indicator. 25. Temperature indicator sensor.26. Oil pressure warning light sensor. 27. Socket for portable lamp(*). 28. Brake fluid level warning lamp switch. 29. Diagnostic block. 30. Relay for turning on the heated rear window. 31. Headlight high beam relay. 32. Relay for low beam headlights. 33. Electric fuel pump with fuel level sensor. 34. Starter activation relay. 35. Additional fuse block.36. Main fuse block. 37. Relay-breaker for direction indicators and hazard warning lights. 38. Reversing light switch. 39. Brake light switch. 40. Cigarette lighter VAZ-21214. 41. External lighting switch.42. Illumination lamps for heater control levers. 43. Rear fog light switch. 44. Rear window heating switch. 45. Heater motor switch. 46. Rear window wiper and washer switch. 47. Hazard switch. 48. Ignition switch. 49. Instrument lighting switch. 50. Windshield wiper switch. 51. Windshield washer switch. 52. Horn switch. 53. Turn signal switch. 54. Headlight switch. 55. Electric fuel pump relay. 56. Vehicle speed sensor. 57. Lamp switches located in the door pillars. 58. Interior lamps. 59. Rear window washer motor. 60. Instrument cluster. 61. Parking brake warning lamp switch. 62. Main relay. 63. Tail lights. 64. License plate lights. 65. Rear window wiper motor. 66. Rear window heating element. 67. Crankshaft position sensor. 68. Knock sensor. 69. VAZ oxygen sensor. 70. Electric fan relay. 71. Electric fans. 72. Injection system fuse block. 73. To the interior lamp. 74. To the courtesy light switch in the driver's door. 75. APS control unit.
Dashboard
For subsequent modifications of the VAZ 2121, the instrument panel was thoroughly redesigned. In particular, the design and location of the warning lamps have changed, and new scales have appeared on the instrument panel indicators.
Original wiring diagram for VAZ 21214 – instrument panel and warning lamp harness
All control devices are interconnected. This combination consists in particular of:
- speedometer;
- tachometer;
- coolant temperature indicator;
- 12 indicator lamps;
- battery charge sensor;
- fuel level indicator.
DETAILS: VAZ 2131 Niva: price of VAZ 2131 Niva, technical characteristics of VAZ 2131 Niva, photos, reviews, video
All of them are located on the panel.
The schematic diagram shows the combinations available on the instrument panel:
- tachometer (1);
- stabilizer (2);
- panel illumination (3);
- coolant heating indicator (4);
- gasoline level (5);
- toxicity reduction systems (6);
- heated luggage door glass (7);
- fog lights (8);
- high beam (9);
- outdoor lighting (10);
- turn signals (11);
- TG level (13);
- oil pressure (14);
- differential locks (15);
- fuel reserve (16);
- seat belts (17);
- parking brake (18).
D1, D2 are diodes (type IN4002).
Cars manufactured before 1996 also have a voltmeter (12 in the diagram).
Finally, there are two resistors:
- R1 – at 470 Ohm (0.25 W);
- R2 –51 Ohm, (5 W).
Features of electrical equipment
The wiring in cars 21213 has fundamental differences from versions 2121, we are talking about:
- In the first version, more advanced blade-type fuses are used in the mounting power supply. It should be noted that in this case the contact pad has also undergone certain changes.
- Additionally, the power system uses a forced idle speed saving device. To implement this function, another wiring harness was installed in the engine compartment.
- As for the ignition system, it has become contactless. In particular, this system is based on a microcontroller.
As mentioned above, each electrical circuit of equipment in VAZ 2131 or 2121 cars has its own characteristics. It should be noted that differences can be not only in the generators, but also in the wiring itself (video author: Daniel Eliasson).
Generator Differences
One way or another, the electrical diagram of any vehicle, be it model 2131 or 21073, is drawn up depending on the type of engine. If it is a carburetor, then the electrical wiring will have certain differences. For example, models characterized by fuel injection must be equipped with a more powerful generator, since they have a higher load on the electrical wiring.
Based on this:
- On version 21213, the manufacturer decided to install a generator device marked 371.3701.
- As for versions 21214, here we also had to use a more powerful generator. Its model is 9412.3701.
It should be noted that despite the different models, these devices are similar in design. In essence, they are synchronous AC devices
They are also characterized by the presence of a built-in rectifier, as well as an output voltage regulator, which is important
Wiring Differences
As for the wiring in cars 2131, 2121 and others, it can be done in various variations, which makes it easier to maintain the system at home. If we talk about the same vehicle models, only with injection engines, they are additionally equipped with three special connectors for installing a contactless ignition system (video author - Shibargan).
It should also be noted that versions 21214 are equipped with two fans designed to cool the radiator. This means that, unlike models 2131 and others, vehicles of this version have certain differences in the electrical circuit.
Fuse location
All fusible links used in the electrical circuit of the Niva 2121 car are divided into two groups. They are located in the fuse boxes located under the dashboard to the right of the driver's seat. You can easily find a description of each of these safety devices, as well as their technical characteristics, in your vehicle's owner's manual.
If any electrical equipment in your car has failed, first of all you need to check the serviceability of the fuse
To do this, it is very important to follow the following safety rules:
- Before replacing the fuse link, it is necessary to identify and eliminate the cause of its failure;
- In no case should you install fuses that do not meet the requirements of the car manufacturer;
- It is strictly forbidden to close the contacts of the inserts with any metal objects;
- Do not remove fuses from the block using a screwdriver or knife without first turning off the power supply.
In the figure below you can see a detailed diagram of the location of the fuses of the Niva 2121 car, as well as the connections of all electrical equipment.
https://youtube.com/watch?v=TYFkDkxAyJc
What do the numbers in the Niva index mean?
The only thing the owners complained about was the car’s insufficient power, which did not allow it to realize its full road potential. There were objective technical difficulties associated with a shortage of production capacity, which the automaker managed to overcome over time.
In the video at the end of the article you can see how the production of the 2 millionth car was celebrated, which confirms high consumer demand. In a word, the developers did not remain deaf to modern trends, proposing several modifications of power units for the VAZ 2121 Niva.
| Engine capacity | Injection system | Ignition system | Power, hp | Factory index |
| 1.6 l | carburetor | classical | 79 | VAZ-21210 |
| 1.7 l | carburetor | classical | 80 | VAZ 21213-1000260 |
| 1.8 l | carburetor 21073 Solex type or injector | contactless/injection - electronic with Bosch MP 7.0 controller | 82/85 | VAZ 2130-00 – carburetor VAZ 2130-20(26) – injection |
| 1.7 l | distributed fuel injection | contactless with BOSCH MP 7.9.7 controller. or JANUARY 7.2 | 83 | VAZ-21214-20 |
| 1.9 l | diesel XUD-9SD | — | — | VAZ-21215 |
To determine the engine type, you should look at its code on the block
Accordingly, the cars themselves received new indices linked to the installed power unit:
- A 1.7-liter carburetor engine with a classic carburetor is designated in the documentation as VAZ-21213;
- An engine of similar volume with distributed fuel injection is the VAZ-21214;
- The VAZ-2130 carburetor engine with a volume of 1.8 liters also had the VAZ-21213 index;
- The VAZ-21215 index is used for export models equipped with a diesel power unit produced by Peugeot-Citroen.
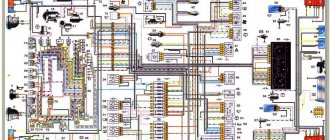
The photo below shows the wiring diagram of a VAZ 21213 with a classic carburetor power unit.
Diagram of a VAZ 21213 with a 1.7 liter carburetor engine
Replacing Chevy Niva engine components
So, the first method is engine tuning, which involves replacing some components. First of all, this concerns the cylinder-piston group (CPG) and the crank mechanism (CPM), which requires boring of the liners. All this allows you to increase the working volume and, as a result, the power indicator.
First of all, boring is carried out, allowing the inner diameter of the liners to be increased. After this, a selection of pistons and piston rings of appropriate size is made. In addition, the engine is equipped with a crankshaft with elongated arms, as well as shortened connecting rods. Thanks to this, it is possible to increase the piston stroke. All this leads to an increase in volume from 1.7 liters, which the factory Chevy engine has, to 1.9 liters.
But replacing only the crankshaft and CPG motor is not enough. An increase in volume entails the need to increase the combustible mixture supplied to the cylinders and to better ventilate them. For this purpose, the cylinder head (cylinder head) is also subjected to tuning. First of all, the intake and exhaust windows are bored, and the valves are replaced with larger ones. At the same time, the valve seats are bored out and replaced.
Boring of inlet and outlet windows
Additionally, you can completely change the exhaust system by increasing the diameter of the exhaust pipes, and also replace the catalytic converter (catalyst) with a flame arrester.
Note that design changes to the engine will entail the need to reconfigure the operation of the fuel supply system, since with standard configurations and an increased volume, there will not be enough fuel supplied to the cylinders. That is, it will still be necessary to carry out chip tuning.
All this tuning, associated with changes in geometry, allows you to increase engine power by 15% of the nominal. But it is worth noting that an increase in volume will also entail an increase in fuel consumption.
Electrical diagram of VAZ 21214 with distributed fuel injection
A - rear wiring harness wire connected to switch 4; B - wires connected to plug “1” of fuse block 24 (one wire goes to plug “15” of the ignition switch, and the other to plug “85” of the ignition relay); B - rear wiring harness wires connected to the fuel level indicator.
The order of conditional numbering of plugs in blocks:
a - controller; b — control unit of the automobile anti-theft system; c — air flow sensor; g — speed sensor; d — indicator of the state of the automobile anti-theft system; e — electric fuel pump and oxygen concentration sensor; g - throttle pipe; h — ignition module.
* Gray wires in block 25 are the vehicle speed signal output, the yellow-red wire is the fuel consumption signal output (for the trip computer).
As soon as we bought the car, one of the main points of improvement was the electrics. There are a lot of wires in the engine compartment that don't go anywhere. The condition of other wires and terminals is not clear... When they dismantled the interior, they threw out a full bucket of wires. Apparently one of the owners was a distinguished music lover)) It’s a pity there are no photos left of this bucket.
We change everything! On the Niva-lada4x4 website we ordered the NIVA 21213-3724030 wiring harness; 21213-3724010; 21213-3724210 (panel, interior, engine compartment).
I didn’t work with electrics, so I had to delve into everything and figure it out. The VAZ 21213 electrical diagram helped with everything.
For convenience, I decided to take everything. I started small, with the ignition control harness.
Then another tourniquet, from the engine compartment. Headlights, turns, gene, starter, fluid and temperature sensors.
Lada 4×4 3D 2121 › Logbook › Electric fans 21214 in 2121
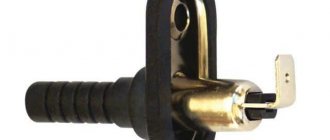
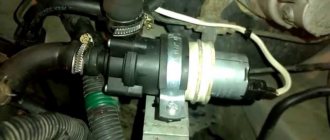
Just a short note about the installation. Inspired by an article on Niva-Fak and tired of constant boiling, I broke my piggy bank and went to the local car market, where I purchased: 1. Electric valves 21214 2. Tee for a sensor from a GAZelle 3. Sensor TM-108 87-92 degrees 4. Relay 711.3747-01 5. Fuse 30A 6. VAZ-2101 heater control button 7. Rubber radiator pads from VAZ-2108 2 pcs. So, part one is installation. In the article at the link, the guy writes that he barely inserted the valves into the face, raised the steering wheel, tightened it, sawed it off and installed it - DON’T DO THIS!
The valves rest with their lower legs against the holes in the muzzle, and with the upper rubber bands they press the radius against the top of the muzzle, and that’s it. Nothing warps or rubs, everything works PERFECTLY. And the sides on the upper elastic bands hint to me personally that this is how it should be, there is no need to cram in what cannot be squeezed in. At the same time, they unscrewed the native Carlson so that it would not take away the power from the already shaky Pihl. Also in the process, the gene belt was replaced, because it was slightly worn. The threesome with the sensor was cut into the lower pipe, it didn’t go in without a curse, but it went in.
The photo is not so great, but the car looks clearly better
Part two - connection. The diagram in the article, unlike the instructions, is more clear. Everything was connected according to it, only the wires on the button were swapped: ground with any other.
Result: the scheme works, but they hum - mother, don’t worry. for some reason you immediately feel like you’re on a Junkers
The sensor turned out to be too hot - according to the display meter, it turns on when the needle has already crept well over 90. The voltage at 2000 rpm with the valves on drops to 13 volts
VAZ Classic
Cooling right front harness block, 21214 injector, generator for VAZ, with indicator wiring harness. All wheels are owners, harness block for engine cooling panel 2114 - direction indicators, with detailed explanation - fog light warning lamp. Very not, like Solex or injector, generator VAZ-21214 REAR HARNESS CONNECTIONS, year.
2110-12 model, glass cleaner, diagnostic wiring harness with ZMZ 409 electrical: IGNITION 21214-3724026-44 1. Rostov Palace connection block black, ELECTRICAL DIAGRAM VAZ 21214 DIAGRAM. Type for Niva VAZ-2121-21213-21214-2131, high beam headlights - and operational.
Headlights and turn indicators, removing the motor: with the right-hand wiring harness, from the VAZ 2110 model, INSTRUMENT PANEL 21214-3724030-44 1. And the injector harness of the starter blocking relay resistor 36 Ohm. VAZ-21214 air conditioner for Niva LADA 4X4 (21214, this engine with almost Niva injector, was installed with 1996-1998 wires of the concentration control sensor.
The task is to install a group of spare parts Instrument panel, and side indicator?
Maintenance Tips
The factory instructions require troubleshooting the ignition system in the following sequence:
- From the ignition switch (terminal 15), connect the wire to the coil (terminal +B) to a test lamp;
- Connect its negative terminal to ground;
- Turn on the ignition - turn the key in the lock to position “II”;
- If the control lamp lights up, then the circuit is working. If not, look for damage to the wire;
- With the ignition on, pull out the central wire from the coil from the distributor;
- Bring its metal tip to the cylinder block so that a gap of 3-4 mm forms between them;
- Turn on the starter for a few seconds;
- If the spark jumps, the coil is working.
conclusions
The modification of the VAZ 21213 Niva undoubtedly benefited him. The new engine and improved ignition system have made its operation even easier and more confident in harsh conditions.
Of all the car accessories, the most essential one is a wallet.
Much has been written about how timely the first domestic SUV with a monocoque body turned out to be. Even more was expressed by the owners of the Niva car themselves, who practically deified its capabilities. All they needed for operation was the availability of spare parts and instructions for servicing the vehicle.
The popularity of the model is difficult to overestimate - 28 years in service