LADA Kalina has been produced since 2003, when the first copies rolled off the assembly line. Before this, prototypes of future production models were repeatedly tested.
The process of creating the model itself turned out to be quite difficult and lengthy.
The first developments began back in 1999 and lasted until 2003.
During its existence, the model has undergone repeated updates. There were four in total:
- 1.4 liter engine, 16 valve mechanism, Euro standardization – 3, 4;
- 1.6-liter engine, 16-valve mechanism, Euro standardization – 3, 4 (production started in December 2009);
- 1.6-liter engine, 8-valve mechanism, Euro standardization – 2, 3 (subject to the “Basic” package);
- 1.6-liter engine, 8-valve mechanism, Euro 4 standardization (Lux+ package from November 2011).
Despite the many positive aspects of the car and the brand as a whole, it is necessary to highlight a number of weak points. These are: fuel system, exhaust gas recirculation system.
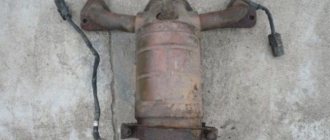
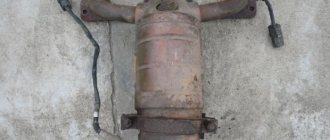
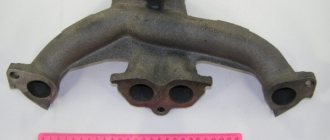
After a run of 80-100 thousand km, the metal housing of the exhaust manifold begins to crack at the seams. Flange connections are torn away from their seats. This does not take into account the fact that the catalyst itself needs to be changed due to burnout of internal parts due to systematic contact with a hot flame flow. The average gas temperature reaches 600℃.
Removing and replacing the catalyst on Kalina 8 valves
Replacing the catalyst on Kalina 8 valves involves work both in the engine compartment and under the bottom of the car.
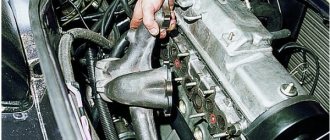
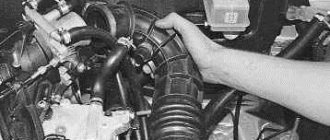
- Initially, we provide ourselves with access to the exhaust manifold housing, move the high-voltage wires to the sides, and remove the plastic cover covering the motor at the top. Our collector itself is located at the front of the engine, if you look at it while standing in front of the car. When carrying out dismantling work, there is no need to drain the coolant.
- Using socket wrenches, unscrew the fastenings of the catalyst body. We do not remove it from its seat.
- At this stage, the work in the engine compartment is completed; it is necessary to lift the car on an electric lift for further dismantling.
- We need to unscrew the flange connections at the junction of the corrugated pipe and the back of the catalyst.
- Carry out a similar procedure in the resonator area.
- Now, piece by piece, remove the products from under the car and place them on the work surface for repairs.
Replacing the Lada Kalina catalyst begins with the fact that the owner of the technical device needs to decide on the further choice of part: a new standard catalyst or a “spider”. Considering the short lifespan of factory equipment, the second option would be the most practical. The catalyst is also often replaced with a flame arrester; Kalina accepts this alternative well. But in this article we will not consider this issue.
Replacing the device
- heater resistance value;
- probe electrical circuit diagram;
- catalog number of your sensor.
Please note that a non-heated sensor can be replaced with a heated sensor. Not the other way around. Before installing a new oxygen sensor, it is necessary to remove the terminals from the battery and apply graphite grease to the device itself (that is, to its threads)
We install the lambda in its original place, start the engine and wait until the sensor warms up to operating temperature. As it warms up, we monitor the signal output voltage with a voltmeter.
Before installing a new oxygen sensor, it is necessary to remove the terminals from the battery and apply graphite lubricant to the device itself (that is, to its threads). We install the lambda in its original place, start the engine and wait until the sensor warms up to operating temperature. As it warms up, we monitor the signal output voltage with a voltmeter.
In one of the wires the voltage will be about 4 W; it is to this wire that you need to solder a resistor with a resistance of 1 Ohm. It is also necessary to solder a capacitor with a capacity of 2.2 F, after which the 1st sensor is connected to the converted exhaust, and the second one simply remains dangling in its original place. This method usually saves money because it eliminates the need to reflash the ECU, which is expensive.
The emulator is a device precisely designed to be compatible with the brains of the engine. Using it, you will not damage the lambda in the intake manifold and will not make things worse for your iron horse. Otherwise, the ECU simply will not allow the engine to operate normally, since it will stop receiving data from the catalyst and diagnostic sensor (the probe has been removed). This is how the oxygen sensor on a Lada Kalina is repaired. Good luck!
Typical symptoms of a malfunction on Lada Kalina:
- reduction in engine power (deterioration in acceleration dynamics, decrease in maximum speed) coupled with increased fuel consumption
- Difficulty starting the internal combustion engine (it took longer to start)
- strong toxic odor from the exhaust system
- Extraneous noises are heard from the catalyst (ringing, rattling)
- diagnostics shows with corresponding errors indicating ineffective operation
If there is any suspicion of incorrect operation, come and we will carry out a free diagnosis. If necessary, we will make the necessary repairs.
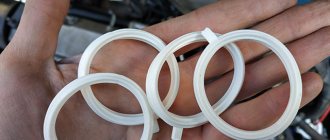
We offer the most reliable option - replacing the catalyst with a high-quality factory-made flame arrester (see pictures) made of two-layer stainless steel with the installation of a controller for adjusting the readings of a lambda probe (blende) of our own production.
Rice. 1
Rice. 2
Rice. 3
There is a misconception that after removing the catalyst and replacing it with a flame arrester, Kalina will work louder, no matter what flame arrester is installed. The latest generation of flame arresters work as quietly as catalysts, and sometimes even quieter if two or three reflective, cooling and noise-absorbing chambers are made inside, and 2-3 types of packing are used to dampen noise, temperature and pressure. The highest quality stuffing is made of stainless wire and Kevlar: it is not afraid of high temperatures and, due to its strength, is not blown out. It absorbs noise three times better than basalt (the most common). Products with such packing cool exhaust gases better than their counterparts, and last 10 times longer.
Comment. We do not replace universal catalysts for Lada Kalina due to their inability to suit our gasoline, coupled with the low quality of workmanship by manufacturers for the sake of a low price (mainly China).
All of the above operations are performed for all generations of the model and versions intended for all countries.
Sources
- https://vaz-russia.ru/remont-vaz-1117-kalina-universal/zamena-datchika-kisloroda-na-kaline.html
- https://expertvaz.ru/lada-kalina/datchik-kisloroda.html
- https://www.exhaust-service.ru/lada/kalina/katalizator/
Replacing the catalyst on Kalina: what do you need to know about the spider?
Let's look at how the Kalina car, replacing the catalyst and a device called a “spider” are connected below.
Many owners of technical equipment often complain that the stock version of the engine, tuned for Euro 3 firmware, by default “eats” 10-12% of the total power of the power unit. Part of the power is taken away by the exhaust gas removal system. This is not to the liking of many owners. You can restore justice by returning the required 10% of power by installing the so-called “spider” - a modified version of the exhaust manifold.
The catalytic converter is knocked out, is this bad for the car?
As I wrote above, this is simply an environmental system, and if it is not there, then the car, on the contrary, will improve its characteristics (power, consumption). To put it simply, the engine doesn’t care about this converter, whether it is there or not.
But why on many cars, if this unit fails (say, melted, clogged or crumbled), the CHECK ENGINE and the car begins to behave abnormally, traction disappears, sometimes it trots a little, and simply may not start at all.
And here, friends, everything is simple. If the catalyst is melted or clogged, then the exhaust gases cannot pass through it normally, which means that some returns back into the combustion chamber and makes the newly introduced combustible mixture less efficient. The motor is choking itself.
If there is no melting, but the “CHECK” light comes on, then perhaps it has simply worn out due to high mileage. In modern cars there are so-called oxygen sensors (lambda umbrellas), one is located in front of the catalyst, the other after and detects the presence of harmful compounds; if their percentage has increased, then the second (or also called the lower “lambda”) gives a signal that the converter is not working ( or it doesn’t do its job as it should) AND IT NEEDS TO BE REPLACED. By the way, some cars may not even start (a tribute to the environment).
Thus, by knocking out or removing it, you simply free the car’s exhaust tract from the obstacle in the form of a filter and lower its environmental standards. BUT AGAIN - THIS DOES NOT AFFECT THE RESOURCE OF THE POWER UNIT !
BUT in order for your car to drive normally, you need to upgrade to a lower environmental class (usually EURO2) or install a fake one. Otherwise, the program in the ECU will not allow you to drive normally.
Replacing the Lada Kalina catalyst: types of spiders
The Lada Kalina catalyst is replaced with one of two spider options: 4/1 and 4/2/1. The main difference between these options is that the first option involves attaching four pipes to one main pipe, which is supplied to the catalyst. The second option is somewhat modernized and provides the possibility of connecting four pipes into two, then into one. Both versions of the spider have no filling inside, only a solid cavity. In a standard catalyst, the specified filling allows the engine to comply with Euro 3 standards and higher, but at the same time, the filling suffocates the engine, taking away power.
Replacing the catalyst on Kalina 16 valves with a 4-1 spider system is the most ideal option. Power characteristics allow this to be done.
Depending on the type of spider, it is necessary to select the technical characteristics of the motor. It should be high-speed and forced. To ensure normal purging of the cylinders, more than 6500 rpm is required.
Replacing the catalyst with a spider on Kalina with an 8-valve system is carried out subject to the installation of a 4-2-1 type product. This design allows you to achieve maximum effect even at medium speeds. For this, no modifications to the Kalina power unit are needed, as in the version with a 16-valve mechanism.
Pros and cons of deletion
I have prepared a small sign with the pros and cons of what will happen if you remove the catalyst
| MINUSES | PROS |
| Increase in harmful substances in the exhaust, decrease in the environmental component | There is no need to buy a new catalyst, because it is very expensive |
| The smell of the exhaust becomes much more toxic, sometimes this exhaust penetrates into the car (it smells unpleasant) | A small increase in power (really small in terms of error, about 3%) |
| Exhaust sound. After knocking out the catalyst honeycomb, it is advisable to install a flame arrester, otherwise there will be a ringing sound from the empty “can” (especially at high speeds) | You can install a 4-2-1 or 4-1 spider , plus more power (which is said out of the blue) |
| You need to install either a fake or new firmware for EURO2 | Reduced fuel consumption (also about 3%) |
| Increasing the life of the power unit, because ceramic dust can get into the combustion chambers and wear it out prematurely |
As you can see, there are a few more advantages, the most significant is the price of this whole rework (removing it will cost several times, if not dozens of times, cheaper).
Now let's watch the video version.
In conclusion, I would like to say that removing the catalyst is NOT CORRECT AT ALL from an ECOLOGICAL point of view. After all, our planet is already polluted, and in this way you are making it even dirtier!
This is where I end, I think this material will help you make the right choice. Sincerely yours, AUTOBLOGGER.
( 56 votes, average: 4.50 out of 5)
Lada Kalina: catalyst replacement - final stages
The final phase of installing the spider on the Lada Kalina occurs as follows:
- We weld the standard mount for the oxygen sensor onto the spider.
- We install the new spider in its regular place and start it through the opening in the lower part of the engine.
- Next, the system is assembled from a corrugated intake pipe. We cut out the length we need in order to connect the spider and the resonator together. If you plan to completely replace the system, then forward flow will follow, without the remaining parts of the exhaust system.
- We connect the flange connections to each other.
- We connect the lambda probe with long wires to connect to the ECU.
We lower the car, screw on the manifold housing, and start the engine.
The final stage: we rewrite the data in the engine ECU about the firmware version. This will allow the computer to understand the new exhaust system as stock. There will be no error identification on the instrument panel.
Sale of spare parts and repair of muffler in St. Petersburg tel.: +7 (812) 336-43-32
Catalyst (catalytic converter) - is a metal body (in the form of a “can”), coated on the inside with a layer of refractory material in the form of numerous honeycombs.
The main symptoms of malfunction of this element are: a decrease in engine power and, as a consequence, the dynamic capabilities of the car; the “Check Engine” sign turns on (engine ECU error: “low catalyst efficiency”). Possible breakdowns may include blockage of the cells or their melting, or melting or rupture of the wires of the oxygen level sensors. Unfortunately, catalysts cannot be repaired in any way; for this reason, it is almost always necessary to remove it from the system and install a blende in its place. It is possible to replace the catalyst, but the high cost of this element repels almost everyone.
Almost all modern electronic engine control systems are equipped with numerous detectors that monitor the composition of the fuel mixture. Oxygen detectors (lambda probes) always operate in tandem with a catalyst, and two sensors are usually installed in the system:
The first of them is mounted in front of the “catalyst can”; its task is to change the fuel supply depending on conditions and send a signal to the engine ECU; The second lambda probe is inserted into the system after the catalyst and serves to determine the qualitative composition of the combustion products of the fuel mixture. If a catalyst is excluded from such a gas exhaust system, then the content of toxic elements in the combustion products of the fuel mixture will be higher than normal, and the diagnostic sensor will give a signal about excess CO in the exhaust tract. The engine ECU will receive the signal and inform the driver about the error - after the catalyst is ejected from the gas exhaust system, the Check Engine light will turn on on the instrument panel.
Device
The lambda probe consists of the following elements:
- Ceramic insulator.
- Rings and cuffs (serve for high-quality sealing).
- Tip with drilled hole.
- Protective shield (also has a hole for exhaust gases).
- Spirals (it is placed in a separate tank).
- Conductive contact.
- Postings.
All this is enclosed in a metal heat-resistant case. The Kalina oxygen sensor is attached to the exhaust manifold using a threaded connection.
Note that the technical characteristics of the lambda probe do not allow measurements to be taken at temperatures below 250 degrees Celsius. In order for the Kalina oxygen sensor to show the correct values, its ceramic tip must warm up to operating temperatures. These are considered values of 300-400 degrees Celsius. But how does the element work when starting a car “cold”? In this case, the control unit uses average lambda values that come from other sensors (crankshaft speed and coolant temperature). A little more fuel is burned in the cylinders than required by the standards. But as soon as the temperature in the exhaust manifold reaches three hundred degrees, the fuel to oxygen ratio will return to normal and will be 1:14.7.
Replacing the Catalyst on Kalina 8 Valves
But high-class auto repair shops have figured out how to deceive the engine ECU - we will reflash the engine ECU, excluding the second lambda probe from the circuit. The electronics “believes” that there is no second detector in the exhaust system, so it does not expect any readings from it, and the engine operates as usual. With the “bleeder” (installed after removing the catalyst), the consumption of the fuel mixture remains the same as before with the catalytic converter.
If the catalyst is excluded from the gas exhaust system on a gasoline engine, the combustion products of the fuel mixture will act as an unextinguished flame and lead to failure of parts of the gas exhaust system (resonator, muffler). To increase the service life of the gas exhaust system, it is necessary to install a flame arrester in it. If there is such a possibility, then you can replace the catalyst with a flame arrester in the same place. If the catalyst is simply thrown out of the system, the engine ECU will display the error “insufficient catalyst efficiency p0420”. To prevent this from happening, either a decoy is installed, or the engine ECU is fully re-flashed to operate within Euro2. The more modern and complex the car, the more complex the methods for testing and monitoring the efficiency of the catalyst, so the use of decoys in terms of the significance of the result comes to naught. For example, as catalyst performance decreases, the engine ECU can change the mixture composition to reduce catalyst wear.
When removing a particulate filter on a diesel engine, you must programmatically disable the use of the particulate filter in the engine ECU - make changes to the firmware. This allows you to further significantly improve the dynamic performance of the engine. The presence in the service station of specialists with the necessary qualifications, modern equipment, as well as firmware from global manufacturers of various car brands with the necessary modifications allow us to fully remove the particulate filter on almost any diesel engine.
The exhaust system of all modern cars contains a device to reduce the toxicity of exhaust gases - a catalytic converter. Let's consider its design and possible malfunctions.
LADA > 4×4
LADA > Granta
Renault > Duster
Toyota > Camry
Nissan > X-Trail
LADA > Priora
Catalytic converters began to be used back in the last century to reduce the toxicity of exhaust gases from spark-ignition automobile engines.
Errors and malfunctions, sensor maintenance
To check the heater circuit, you need to turn off the ignition, disconnect the harness connector from the controller and check contact X1/C4 by connecting it to the vehicle's on-board network. If a short circuit does not occur, then the controller is faulty. If there is, you need to disconnect the UDC block and check the closure of its contact D. If present, you need to check the wiring harness; if not, the UDC has failed.
When the harness, block or plug of the lambda probe is damaged, the only solution is to replace it. The oxygen sensor must be in contact with ambient air. For this purpose, special gaps are made between the probe wires, which can be easily damaged if repairs are undertaken.
Monitor the condition of the sealing pad on the outer surface of the sensor and prevent it from being damaged. To remove the lambda, turn off the ignition, disconnect the wiring harness from the probe, and carefully unscrew the device itself using a 22mm wrench. The procedure for installing a new sensor is described in the next section. The new lambda requires careful handling during installation to avoid contamination and damage.
The Check Engine on the dashboard may not light up, but if you notice increased fuel consumption and unstable engine operation, or that the engine is not reaching its maximum power, this is an indicator of failure of the UDC. If the Check Engine lights up, the ECU averages the engine settings, and it will no longer be possible to use it to its full potential - you need to go to a service center for diagnostics.
Catalytic converter for Lada Priora
For proper operation of the system, oxygen sensors (lambda probes) are installed in front of the catalytic unit and immediately behind it. The sensor located before the neutralizer is called control, and the one installed after is called diagnostic.
In world practice, a different arrangement of the catalytic converter is used. This scheme with the location of the barrel of the catalytic converter under the bottom of the car appeared at the dawn of the use of this method of reducing exhaust gas toxicity and is still used, for example, on Renault cars with Euro-4 and even Euro-5 standards.
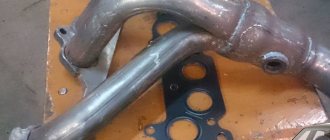
Replacement of the intake pipe gasket and catalytic collector
The intake pipe and catalytic collector are connected to the cylinder head through a common sealing gasket. The gasket also covers two channels of the cylinder head cooling jacket, which extend into the plane of the junction of the head with the intake pipe and catalytic collector. We carry out the work on an inspection ditch or overpass. Drain the coolant from the engine (see “Checking the level and replacing the coolant”). We remove the receiver (see “Removing the receiver”) and the fuel rail with injectors (see “Checking the injectors, removing the fuel rail and injectors”). Disconnect the engine management system wiring harness block from the oxygen concentration sensor wiring harness block (see “Removing the control oxygen concentration sensor”). Having unscrewed the three nuts securing the pipe flange of the additional muffler to the flange of the catalytic collector, we disconnect the additional muffler from the catalytic collector (see “Removing the additional muffler”).
Using a 13mm socket, unscrew the two nuts of the bracket securing the catenary collector.
. and remove the bracket from the bracket studs.
Using a 13mm wrench, unscrew the two bolts securing the catalytic converter bracket to the cylinder block.
Using a “13” wrench, unscrew the nut of the upper fastening of the right support bracket of the intake pipe. Remove the ground wire tip from the intake pipe stud.
Using a 13mm socket, unscrew the bolt of the lower fastening of the right support bracket of the intake pipe.
Remove the spacer bushing from the intake pipe stud.
Using a 19mm wrench, unscrew the nut securing the clutch housing to the cylinder block, which also secures the lower end of the left support bracket of the intake pipe.
Using a 17mm wrench, unscrew the nut of the upper fastening of the left support bracket of the intake pipe.
. and remove the bracket. On the left rear side of the engine...
. Using the “13” head, loosen the tightening of nut 1 securing the coolant pump pipe bracket, unscrew nut 2 securing the catalytic collector and nut 3 of the general fastening of the catalytic collector and intake pipe to the cylinder head (for clarity, shown on a dismantled engine).
Move the coolant pump pipe bracket aside.
Remove the heat shield from the cylinder head studs and the washer from the top stud. On the right rear side of the engine.
. Using the “13” head, unscrew the two nuts securing the heat shield and the eye.
Remove the heat shield and ring from the cylinder head studs. ..using the “13” head, unscrew the nut for fastening the catalytic collector and the nut for the general fastening of the catalytic collector and inlet pipe, located on the same studs. Remove the washers from the studs.
Using a “13” socket, unscrew two nuts 1 of the upper fastening of the intake pipe and one nut 2 of the upper fastening of the catalytic collector. Remove the washers from the studs.
Using a “13” socket, unscrew the two nuts of the common lower fastening of the catalytic collector and the intake pipe to the cylinder head. Remove the washers from the studs.
Remove the sealing gasket of the intake pipe and catalytic collector.
After each removal of the intake pipe or catalytic collector, the gasket must be replaced with a new one. Before installation, we clean the mating surfaces of the cylinder head, intake pipe and cathode from remnants of the old gasket and carbon deposits. Apply graphite lubricant to the cylinder head studs. We carry out assembly in reverse order. At the four common fastening points of the intake pipe and the catalytic converter (their joints), it is necessary to install thick washers with a large outer diameter on the studs.
Common mounting points for the intake pipe and catalytic collector (shown on a dismantled engine for clarity).
Source
Exhaust system Lada 4×4
The catalytic converter is considered a reliable design element of a modern car, and manufacturers do not provide regulations for its replacement. That is, in their opinion, the service life of the collector or element under the bottom of the car should be equal to the service life of the entire car. However, practice has shown that catalytic converters do not always serve flawlessly.
What could happen to her trawler?
The first malfunction of the active element of the catalytic collector is its melting, which manifests itself in the form of honeycomb sintering and leads to difficult passage of exhaust gases. This usually happens after the gas temperature threshold of 900 degrees is exceeded.
Why do you need a catalyst?
I already have an article - what is it , I won’t repeat it. You need to understand that a catalyst (and scientifically, a catalytic converter) is needed only to clean the car's exhaust from harmful emissions and make them less harmful.
In simple words, it purifies harmful gases (while glowing almost “red hot”) and “almost” harmless CO2 and N2, O2 emerge from harmful CO, CH and other compounds. This way we save the environment at least a little.
Its structure is quite simple - it is a thickened pipe, which inside has something like a honeycomb, only long and hollow. They are usually made of ceramic elements coated with noble metals (usually platinum group metals are used - iridium, rhodium, palladium).
It is because of this that it costs, to put it mildly, quite a bit, from 30 to 150,000 rubles, it all depends on the class of the car and its volume.
In order for gases to transform from toxic to less harmful, the temperature of the catalyst must be about 750 degrees Celsius, otherwise the chemical reaction will not occur. The gases that come out of a car engine have a temperature of approximately 500 - 550 degrees Celsius (which is not enough), when they pass through the catalyst, a chemical reaction occurs with the release of heat, thus heating just the right amount (750 - 900 degrees).
Catalytic converter
A much more insidious defect is when ceramic particles begin to crumble from the surface of the honeycomb. The cause of destruction of ceramics is most often low-quality fuel, which burns out during the exhaust stroke. Moreover, crumbling begins in the hottest zone, on the edges of the honeycombs located closer to the engine.
When the engine operates at different modes, some of the exhaust gases may be thrown back into the engine cylinders. Ceramic dust, which is an abrasive and gets into the cylinder with the gas flow, will quickly damage the piston group and lead to scoring on the cylinder walls.
However, this phenomenon is not dangerous for all engines. We won’t even talk about models in which the neutralizer, contrary to global trends, is fixed under the bottom of the car, and therefore harmful particles would have to travel almost a meter “against the flow.” Some manufacturers, thanks to the use of correct design solutions, avoided these problems or managed to eliminate them in a timely manner.
How's the warranty?
Against the background of such an attitude towards the consumer, the position taken by the Kia concern causes a sharply negative attitude. Until the beginning of 2016, in the service book of cars of this brand there was an inscription that the warranty for the catalytic converter extends up to 1 (!) thousand kilometers. Roughly speaking, two refuelings, and then “bad Russian gasoline” can damage the catalytic converter, but the company is no longer responsible for this. However, since 2016, the warranty for the catalytic converter has been extended to 150 thousand km.
In the author's opinion, the warranty on the catalytic converter should be at least as long as that on the car.
Now let’s take a closer look at what a car owner should and shouldn’t do to ensure that the neutralizer serves a long and happy life.
Causes of catalytic converter failure:
- Poor quality fuel - most often with a low octane number. The engine management system switches to late ignition. This causes the mixture to burn out at the outlet and an increase in the temperature of the exhaust gases.
- Incorrect operation of the ignition system (misfire). Fuel that is not burned in one cylinder is immediately ignited and burns in the neutralizer.
- Mechanical damage to the catalytic converter. Increased vibration of the power unit and impacts on the catalyst lead to crumbling of the ceramic block.
- Thermal shock. Instantaneous cooling of a hot neutralizer when overcoming a puddle, for example, can cause cracks in the ceramic element.
- Incorrect air-fuel mixture, caused, for example, by a faulty oxygen sensor. Leaky, leaking injectors will cause the same effect.
- Adding additives to gasoline. Cocktails from unverified manufacturers or a concentration imbalance may increase the exhaust combustion temperature.
- The newest engine designs with minimal toxicity are programmed to quickly warm up the converter. In cold conditions, to speed up warm-up, the engine control units initially over-enrich the mixture, which burns out on the surface of the converter.
- There have been blatant design defects in the neutralizer throughout history. For example, Suzuki carried out a recall campaign to completely replace converters on SX4 cars.
From personal experience
Second half of the nineties. I worked as a fleet manager for a commercial company. The boss calls and says: We will sell Karina (Toyota Carina E). Go to the car wash and let your engine shine like...
Removing and installing the exhaust manifold on LADA
When servicing the vehicle, it may be necessary to remove the muffler exhaust pipe with the neutralizer assembly (exhaust manifold or catalytic converter).
The process of replacing this element of the exhaust system with your own hands is not difficult, but it has a number of features that it is better to know about in advance. The following instructions use the example of Lada Vesta and Lada XRAY cars. On other modern LADA cars (Largus, Priora, Granta, Kalina, Lada 4×4) all actions are performed similarly. You will find examples of work on other LADA models under the spoiler at the end of the article.
Required
: remove the engine mudguard (for Lada Vesta, for Lada XRAY), raise the car to a height convenient for work. Prepare the tool (flat screwdriver, wrench “10”, interchangeable head “10” and “13”, extension cord and ratchet wrench).
- Disconnect the connectors with the sensor wires (Fig. 8-1, No. 12 and 13) from the brackets on the power unit and from the ignition system wiring harness connectors.
- Unscrew the three nuts (Fig. 8-2, No. 3) of the studs securing the additional muffler (No. 2) to the exhaust pipe with the neutralizer assembly (No. 5). To do this, you must first unlock the washers (No. 1).
- Remove the heat-protective screen of the exhaust pipe of the muffler with the neutralizer assembly. To do this, unscrew the bolt (Fig. 8-3, No. 1), two bolts (No. 2), two bolts (Fig. 8-4, No. 1) with washers.
- Unscrew the M8 nut securing the bracket for the water pump supply pipe, remove the washer.
- Loosen the nut securing the muffler exhaust pipe to the mounting stud of the water pump supply pipe bracket.
- Remove the exhaust pipe of the muffler with the neutralizer assembly. To do this, unscrew the seven nuts (Fig. 8-1, No. 14) and remove the washers (No. 5).
- Remove the gas pipeline gasket (Fig. 8-1, No. 2) and the muffler flange gasket (No. 9).
- Unscrew the oxygen concentration sensors (Fig. 8-1, No. 12 and 13) from the exhaust pipe of the muffler with the neutralizer assembly (No. 1).
- Disconnect the oxygen concentration sensor harness connectors (Fig. 8-1, No. 12 and 13) from the brackets on the power unit and from the ignition system wiring harness connectors.
- Use new nuts for the studs securing the exhaust pipe to the cylinder head (Fig. 8-1, No. 14). The tightening torque of the nuts is 21...25 N.m (2.1...2.5 kgf.m).
- Use a new gas pipeline gasket (Fig. 8-1, No. 2).
- The tightening torque of the sensors is 40...60 N.m (4.0...6.0 kgf.m).
- The tightening torque of the M8 nut is 21...25 N.m (2.1...2.5 kgf.m).
- The tightening torque of the bolts securing the thermal protective screen of the exhaust pipe of the M6 muffler is 7...9 N.m (0.7...0.9 kgf.m); M8 – 18…24 N.m (1.8…2.4 kgf.m).
- The tightening torque of the three nuts securing the additional muffler to the exhaust pipe (Fig. 8-2, No. 3) is 21…25 N.m (2.1…2.5 kgf.m).
You will find other repair instructions in the collection of technological instructions (see TI for Lada Vesta and TI for Lada XRAY).
Source
Toyota Carina E
In general, it burned and stopped. I returned to the car, opened the hood, opened the distributor cap, and there was a swamp. He wiped away the moisture, dried it and finally made it to the office. Now answer the question: where do you think the fuel burned?
What if it’s the end?
Not everyone can or will want to replace a failed catalytic converter on an out-of-warranty car with an original one. Before _
rogo it. What are the options for the development of events?
- Just knock the filling out of the neutralizer. This requires reflashing the control unit so that it “turns a blind eye” to the signal from the second oxygen sensor, or installing a mechanical or electronic switch. The mechanical one is a bushing in which a piece of the catalytic converter is fixed, and the electronic one simply simulates the correct signal from the oxygen sensor.
- Knock out the filling and install a flame arrester in its place. It consists of several chambers with holes that serve to reduce the temperature and pressure of gases. This somewhat reduces noise and facilitates the operation of other elements of the exhaust system. The “brains” of the car must be deceived, as described above.
- Install a universal repair catalytic converter instead of the ceramic block. Most often on a metal rather than ceramic base. The degree of cleaning will be slightly lower, but you will not feel like “pests”.
Tell us, how did you communicate with the “monster under the bottom” - the catalytic converter: does it work, was cut out, replaced?
You can get acquainted with the “illness histories” of cars of past generations by following the link.
Installing a spider in a 16-valve car
The sixteen-valve Kalina is equipped with a complex power supply and gas distribution system, so the work carried out will be more labor-intensive. The sequence of actions is as follows:
- removing the terminals from the battery, draining the coolant;
- loosening the clamps securing the air duct pipe and the throttle assembly to the filter;
- the pipe is removed;
- the chip is disconnected from the throttle assembly and oxygen sensor;
- the hose of the crankcase ventilation system is removed;
- the adsorber purge hose is disconnected;
- the receiver mounting bracket is unscrewed;
- the nuts are unscrewed and the receiver is removed;
- unscrew the upper and lower fastening nuts, remove the heat-insulating shield and eye;
- the fastenings of the spacer to the exhaust manifold are twisted;
- the heat shield is removed;
- the intake manifold is dismantled, for which you need to unscrew nine nuts near the block head and three at the exhaust pipe;
- “spider” is mounted;
- the lambda probe wire is extended, a mechanical or electronic snag is installed;
- The elements are assembled in the reverse order.
Replacing a catalyst is a rather complicated process. Inattention during operation can lead to damage to the vehicle's exhaust system and engine wear. Repairs should only be started if you have all the tools and replacement parts.
The catalyst prevents atmospheric pollution with carbon monoxide and other toxic substances. Its service life is not designed for more than 100,000 kilometers of vehicle mileage, so every owner will sooner or later be faced with the need to replace this element. You can replace the catalyst yourself or by contacting a service station. It is important to remember that inept DIY repairs will worsen the problem and cause additional costs in the future.
Content
Actions in emergency situations Daily checks Operating instructions Warnings and technical rules Basic instruments, measuring Engine and its systems Transmission Chassis Steering Brake system Vehicle electrical equipment Body Interior ventilation and heating system Applications Fault codes Electrical diagrams
Sources
- https://expertvaz.ru/2110/premer-komplektatsii-tsena.html
- https://videoremont-mashin.ru/remont-kpp-vaz-21108/ustanovka-konditsionera-v-vaz-2110-ot-priory-svoimi-rukami/
- https://monolith.in.ua/predohraniteli-lada-2110/
Technical features of the insert
Installing catalyst replacements can eliminate the problem of a clogged exhaust filter and return the car to its previous performance - power and gas mileage. But what are these substitutes? This insert is a hollow pipe that does not have filters. It is made in the form of a catalyst and in most cases there are no problems with its installation. After installing the insert instead of the factory exhaust gas filter, drivers observe:
- acceleration of warming up of the car in the cold season;
- the car picks up speed better;
- fuel consumption is reduced.
In some cases, there is a change in the sound volume when the car is running. The sound becomes more bassy. The Lada Kalina computer can display “Check” on the dashboard when driving with the insert. To prevent this, use a lambda probe or oxygen sensor. This sensor is an integral part of the exhaust system with a catalyst. The sensor analyzes the level of oxygen and harmful gases in the exhaust and transmits the information to the on-board computer. Based on the data obtained, the computer determines the performance of the catalyst. The lambda probe cannot be repaired; if it breaks, the part must be replaced.
Replacement of the intake pipe gasket and catalytic collector
The intake pipe and catalytic collector are connected to the cylinder head through a common sealing gasket. The gasket also covers two channels of the cylinder head cooling jacket, which extend into the plane of the junction of the head with the intake pipe and catalytic collector. We carry out the work on an inspection ditch or overpass. Drain the coolant from the engine (see “Checking the level and replacing the coolant”). We remove the receiver (see “Removing the receiver”) and the fuel rail with injectors (see “Checking the injectors, removing the fuel rail and injectors”). Disconnect the engine management system wiring harness block from the oxygen concentration sensor wiring harness block (see “Removing the control oxygen concentration sensor”). Having unscrewed the three nuts securing the pipe flange of the additional muffler to the flange of the catalytic collector, we disconnect the additional muffler from the catalytic collector (see “Removing the additional muffler”).
Using a 13mm socket, unscrew the two nuts of the bracket securing the catenary collector.
. and remove the bracket from the bracket studs.
Using a 13mm wrench, unscrew the two bolts securing the catalytic converter bracket to the cylinder block.
Using a “13” wrench, unscrew the nut of the upper fastening of the right support bracket of the intake pipe. Remove the ground wire tip from the intake pipe stud.
Using a 13mm socket, unscrew the bolt of the lower fastening of the right support bracket of the intake pipe.
Remove the spacer bushing from the intake pipe stud.
Using a 19mm wrench, unscrew the nut securing the clutch housing to the cylinder block, which also secures the lower end of the left support bracket of the intake pipe.
Using a 17mm wrench, unscrew the nut of the upper fastening of the left support bracket of the intake pipe.
. and remove the bracket. On the left rear side of the engine...
. Using the “13” head, loosen the tightening of nut 1 securing the coolant pump pipe bracket, unscrew nut 2 securing the catalytic collector and nut 3 of the general fastening of the catalytic collector and intake pipe to the cylinder head (for clarity, shown on a dismantled engine).
Move the coolant pump pipe bracket aside.
Remove the heat shield from the cylinder head studs and the washer from the top stud. On the right rear side of the engine.
. Using the “13” head, unscrew the two nuts securing the heat shield and the eye.
Remove the heat shield and ring from the cylinder head studs. ..using the “13” head, unscrew the nut for fastening the catalytic collector and the nut for the general fastening of the catalytic collector and inlet pipe, located on the same studs. Remove the washers from the studs.
Using a “13” socket, unscrew two nuts 1 of the upper fastening of the intake pipe and one nut 2 of the upper fastening of the catalytic collector. Remove the washers from the studs.
Using a “13” socket, unscrew the two nuts of the common lower fastening of the catalytic collector and the intake pipe to the cylinder head. Remove the washers from the studs.
Remove the sealing gasket of the intake pipe and catalytic collector.
After each removal of the intake pipe or catalytic collector, the gasket must be replaced with a new one. Before installation, we clean the mating surfaces of the cylinder head, intake pipe and cathode from remnants of the old gasket and carbon deposits. Apply graphite lubricant to the cylinder head studs. We carry out assembly in reverse order. At the four common fastening points of the intake pipe and the catalytic converter (their joints), it is necessary to install thick washers with a large outer diameter on the studs.
Common mounting points for the intake pipe and catalytic collector (shown on a dismantled engine for clarity).
Replacing the Kalina exhaust manifold gasket
on the injection engine of a VAZ 2107 car
2. For the convenience of replacing the manifold gasket, remove the battery (see “VAZ 2107 - removal and installation”).
3. Drain the coolant from the cooling system of the VAZ 2107 car (see “Coolant - checking the level and replacing”).
5. Unscrew two nuts and a bolt securing the starter shield and remove the starter shield from the exhaust manifold studs (see “Starter of a VAZ 2107 car - removal, installation”).
6. Using a 13 mm socket wrench, unscrew the bolts of the upper fastening of the front and rear braces to the intake manifold of the VAZ 2107 pipeline.
7. Loosen the tightening of the lower nut securing the front brace to the stud of the bracket of the right support of the unit and move the brace to the side.
8. Loosen the bolt of the upper fastening of the starter (see “Starter of a VAZ 2107 car - removal, installation”) and move the rear brace to the side.
9. Using a 13 mm socket wrench with an extension, unscrew the nut securing the ground wire tip and disconnect it.
Replacing the gasket under the manifold 2108, viburnum, grant
Thank you very much for watching my videos, tell your friends, leave comments and subscribe.
I disassembled the Viburnum exhaust manifold. We'll take a new one)
Lada Kalina
catalyst.
substitution
for spider 4-2-1. nothing complicated.
11. Using a 13 mm socket wrench with a deep head, unscrew two nuts A of the joint fastening of the intake manifold of the pipeline with the exhaust manifold and two nuts B of the fastening of the intake manifold of the pipeline.
12. Using the same equipment, we unscrew two nuts A for the joint fastening of the intake manifold of the pipeline with the exhaust manifold and nut B for fastening the exhaust manifold.
13. On the VAZ 2107 car engine, unscrew the exhaust pipe clamp to the bracket and remove the exhaust pipe from the exhaust manifold studs (see “Muffler exhaust pipe - removal and installation”).
14. Using a 13 mm socket wrench with a deep head, unscrew the nut of the front fastening of the exhaust manifold.
16. Remove the washers from the studs. Under the nuts of the joint fastening of the intake manifold of the pipeline and the exhaust manifold, washers of increased thickness are installed.
17. Moving the exhaust manifold away from the cylinder head, remove the intake manifold pipeline from the studs.
18. Remove the sealing gasket of the intake manifold of the pipeline and the exhaust manifold. We replace the manifold gasket with a new one.
We install all the removed parts on the injection engine of the VAZ 2107 car in the reverse order. And we fill the cooling system of the VAZ 2107 car with coolant.
Replacing the exhaust manifold and gasket
When dismantling the manifold, the gasket is destroyed in almost any case. Therefore, it is worth removing its remains from the parts. Replacing the Kalina exhaust manifold gasket is a simple process. The use of sealants and other third-party substances is not recommended. They may later get into the crankcase.
Replacing the manifold itself is simple - just take a new part and install it according to the principle in which it was attached. Assembling the system is simply the reverse order of the steps outlined in the last section.
Advice! Don't forget about cleanliness. This is an important factor in long and trouble-free operation of the car.
Retail store at Uralmash, Baku Commissars St., 113. 8 (343) 221-35-35
02. By courier for orders over 2000 rubles, in Yekaterinburg from 20:00 to 22:00
Delivery only to the entrance. Additional +100 rubles to the apartment.
02.2. By courier for orders less than 2000 rubles, by EKB from 19:00 to 22:00
Delivery to the entrance or to the gate. To the door +100 rubles for the courier.