Replacing the exhaust manifold gasket on a VAZ-2114 with your own hands
Replacing the exhaust manifold gasket on a VAZ-2114 is a very complex procedure and requires certain knowledge and experience. So, not all experienced car enthusiasts are able to do this correctly. In addition to the fact that exhaust gases exit through the exhaust manifold, it is also responsible for the normal operation of the engine, since a lambda probe is installed on it.
Video about replacing the exhaust manifold gasket on a VAZ-2114
The video will tell you how to properly replace the exhaust manifold gasket, and also tell you about some of the subtleties and nuances of this process.
Required tool for replacement
Before you begin the process itself, you need to decide on the necessary tools. So, what will you need: a ratchet and sockets for 17, 19; screwdrivers with flat and Phillips tips; a set of keys and the gasket itself.
Now that everything is prepared, you can start working directly. In order for the manifold to be removed without any problems and rusted bolts not to create trouble, everything must be lubricated with WD-40 before performing the operation. It is advisable to do this several times. Before performing the operation, you need to think again, weigh everything and calculate your strength.
Step-by-step instructions (algorithm with photo)
If, nevertheless, the car enthusiast makes up his mind, then we will consider step-by-step instructions for replacing the gasket:
Remove the fuel pipes shown in the photo
Unscrew the pipes shown in the photo
Dismantling the exhaust pipe
Removing the intake manifold
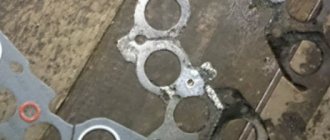
Unscrew the fastening nuts and remove the exhaust manifold
We are replacing the gasket
As you can see, the replacement of the intake and exhaust manifold gaskets takes place simultaneously and, by and large, is the same gasket material.
Part selection
21083-1008081 – original catalog number of the gasket for the intake and exhaust manifold. It consists of two parts or, on newer models, one. This part is produced at the AvtoVAZ plant. The average cost is 250 rubles per piece (if there are two of them) or 450 rubles (for a whole one).
In addition to the fact that there is an original part, you can also find a number of analogues that are recommended for installation. Let's consider which gaskets can be installed under the VAZ-2114 manifolds:
- Trialli GZ 102 0013 is a well-known Russian manufacturer that produces a wide range of analog parts for domestically produced cars. The cost of the gasket is 200 rubles per piece.
- AJUSA 13065200 is another domestic manufacturer that has won consumers over the quality of its products. The cost of the product is 450 rubles.
- Ukrainian also produces and supplies this gasket. But, if you look at it, the quality of the product leaves much to be desired, since the resource is designed for only 20,000 km.
We repair the device
The switches located under the steering wheel of a VAZ-2107 car, at the first sign of a malfunction, require, first of all, to find out the reason why this or that function does not work. To find out the reason, you must first remove the device and try to determine the problem yourself. There are not so many reasons for breakdowns, but often you have to replace the device with a new one. So, in order to determine the reasons for the failure of the steering column switches, let’s look at what parts they consist of, and for this a photo will help us.
The design of the switches is non-separable. In any case, when a problem arises with the operation of the control levers, it is necessary to remove it and try to carry out repairs. Even if it doesn’t work out, you can always buy a new element.
The steering column switch on a VAZ-2107 car is removed in the following sequence:
- Disconnect the car from the power source and remove the steering wheel.
- We proceed to removing the protective casing of the steering column shaft, where the control levers are installed. To do this, use a Phillips screwdriver to unscrew 4 bolts and a self-tapping screw.
- After removing the casing, we move on to the levers of important functions themselves. The block with the power wires is disconnected.
- Unscrew the bolt securing the switches located at the bottom.
- Once the fastening is loosened, the switch can be removed without much effort.
Now you can repair the device by first inspecting any possible damage. If there are none, you need to clean the contacts in the connecting block and bend the sagging springs. It is also necessary to check whether the wiring from the device has been unsoldered. After the repair has been carried out, we need to find out whether we have fixed the problem. To do this, we connect the pads and put the terminals on the battery; if all functions work, then the repair was successful.
How to replace a device
If after repair the steering column switch refuses to work, then there is nowhere to go, you will have to purchase a new one. The cost of such a switch on a VAZ-2107 is around 300-500 rubles
Not that much of a cost for such an important control. Now a replacement is being carried out, which involves removing the old one and installing a new element in its place.
How to remove a non-working device is already known, so let’s get down to business. To do this, you need to install the device in place, secure it and connect the power wires. Replacement does not involve any difficulties, after which the functionality of the device is checked and the casing and steering wheel are installed.
The process of repairing and replacing switches under the steering wheel takes no more than an hour, after which this device will work as if the car came straight from the showroom.
>Turn switch VAZ 2107 device
Replacing the intake manifold gasket of a VAZ 2114
It is recommended to replace the gaskets on the VAZ intake manifold after each removal. But I had to do this prematurely, as I discovered a significant air leak, which mainly manifested itself on a cold engine. Every cold start was accompanied by a terrible tripping.
In addition to the tripping when cold, there was a slight drop in speed when sharply pressing the gas pedal. This applies to both a cold and a hot engine.
A homemade smoke generator made from a cigarette helped me detect the air leak. A very simple and primitive contraption that has helped me out more than once.
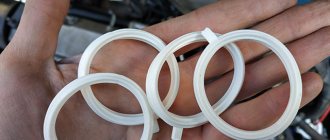
My car (Kalina 1.6 8 valves) has a plastic intake manifold (receiver). The same will be installed on all VAZ family cars with an 8-valve 1.6-liter engine (2114, 2110, etc.). 4 rubber rings act as gaskets. According to reviews, black rings last much longer than white ones. And I was convinced of this personally - these gaskets lasted for about six months and began to let air through. They felt like plastic to the touch. Unfortunately, I didn’t find black ones, so I’ll install white ones again. I hope these last longer.
To remove the intake manifold (receiver), you must first unscrew the corrugation from the air filter, the throttle cable, and the small crankcase ventilation hoses. I will not remove the throttle and its heating.
The intake manifold is attached to 5 studs - one in the center, two on the sides. To unscrew them you will need a 13mm socket. After unscrewing the nuts, you need to remove the receiver itself from the studs and move it to the side. Remove the old gaskets and wipe the seats from oil and dirt. You also need to wipe the seat on the engine.
The manifold has special grooves for guides on the gaskets. The gaskets must be installed with the higher side in the plastic manifold. It is the guide that will prevent you from making mistakes.
I additionally coated the areas near the guides with sealant on the outside of the gasket. Because it felt like that was where the ring entered the groove the deepest. In addition, there was a place for air leaks on the old gaskets.
After all procedures, the intake manifold can be installed back. I couldn't find any information on how tightly to tighten the mounting nuts. I delayed it at my own peril and risk. The main thing is not to overtighten, as the manifold is plastic and can crack.
This is how I replaced the old intake manifold gaskets on my Kalina with new ones. There is no more air leakage, the engine stopped stalling when cold and began to behave much better when warm.
1200 rub. for the photo report
We pay for photo reports on car repairs. Earnings from 10,000 rubles/month.
Write:
What are piston rings and their purpose
When the piston rings are worn out and can no longer perform their function, the car engine signals this with appropriate symptoms.
Blue or black exhaust smoke indicates that wear has reached a critical stage. This means that excess oil entered the combustion chamber behind the oil ring and burned there along with the fuel. Black smoke coming from the crankcase ventilation pipe indicates that the compression rings, due to wear, are allowing gases to escape from the combustion chamber into its cavity.
Signs of piston ring wear
Critical wear is accompanied by a decrease in compression (the ability to maintain pressure) in the engine cylinders. This means that some of the gases produced during the combustion of the fuel mixture, which should push the piston, entered the engine crankcase without performing any useful work. This is what causes the cylinder pressure to drop, causing the engine to lose some power. Increased oil consumption is observed.
Compression is checked using a special device - a compression meter. If the pressure ratings are unknown (there is no operating instructions), they are first measured in a dry cylinder, then a little engine oil is poured through the spark plug hole and the measurement is repeated. If compression increases, then the rings need to be replaced. Similar symptoms can be observed when they are quartered.
“Hardening” occurs when sediment formed in the piston grooves prevents the piston rings from springing back, reducing their seal to the cylinder surface.
This problem, if this issue is not seriously neglected, can be corrected by using special fuel additives. For an engine with a carburetor system, you can try to clean it with a descaling spray that is sprayed directly into the carburetor. When removing soot from the chamber If combustion does not work, the only solution left is to replace the piston rings and clean the grooves.
Coke formation only helps with clogging, but if the problem is wear and tear, only replacement will save you. You can do this yourself. You need a special puller, a mandrel for crimping, a metal rod, even without tweezers and a deburring tool
When purchasing new hubcaps and rings, quality should be your main focus - look for original parts. Remember that if you buy a fake, you will only enjoy proper engine operation for several thousand kilometers.
Additionally, the coating of the top rings is sometimes consistent with the engine material. Yes, and the compression and liner parts must match the cylinder liner material. If replacement is made with cheaper analogues, the result may be negative.
The main signs and causes of failure of the VAZ 2114 intake manifold
- The main symptom of a failed intake manifold is a sudden loss of car engine power.
- at the same time, there is an increase in fuel consumption , with a deterioration in traction and a drop in engine performance.
- Often a problem is indicated by a missing stud in one of the manifold flanges. It simply comes off when the collector goes “screw”, that is, due to temperature changes, for example in winter, or over time (average service life is 7 years), the collector begins to bend along the plane, and the pin simply “spits out”, pulls out .
- Due to the fact that the manifold has “leaded”, a crack may form and, as a result, exhaust gases from the engine escape, and the manifold must be replaced.
Why adjust carburetor idle speed?
A carburetor is a mechanism that supplies the air-fuel mixture to the combustion chamber of the engine in a strictly specified ratio. Depending on the quantity and composition of the mixture (the composition in this case is called “quality”), many characteristics of the engine are determined: the stability of its operation, power and fuel consumption.
An ideally tuned carburetor allows you to achieve the most efficient engine operation at idle. This means that it will have stable speeds and maximum power with the lowest fuel consumption. Therefore, it is necessary to adjust the idle speed on the carburetor when the following symptoms occur:
- The engine has unreasonable and rather high fuel consumption. The econometric needle constantly indicates that the engine is not running economically, and gasoline began to run out quite quickly.
- Reduced motor power. This means it struggles to reach the required revs before the driver engages the next gear. In addition, there may be no traction at low speeds, the engine stalls, or there are gaps in the gas pedal.
The main problem with the first two signs is that this can happen not only due to the fault of the carburetor. Fuel filters, pumps and a faulty ignition system may be to blame.
The most important and significant reason is that the engine does not hold idle speed or does not hold it stable: vibration of the engine is possible, and the tachometer needle will constantly change its position. Eventually, the engine stalls on its own.
Tips for replacing the intake manifold
Also, do not neglect the procedures for repairing and cleaning the intake manifold. The stability of the VK is very important for the normal functioning of the car. A certain vacuum is formed in the intake manifold, which is the source of drive force for many systems: cruise control, windshield wipers, vacuum brake booster. In the event of a collector malfunction, this threatens the failure of one or more of the above systems.
To avoid the appearance of cracks and distortions, you must use a torque wrench to tighten the nuts on the manifold and follow the tightening order of 20.9-25.8 (2.13-2.63) N_m (kgf_m). As a rule, it is recommended to start tightening the nuts from the center and gradually move towards the periphery, alternately tightening the nut on one side or the other.
To work on removing and replacing the VAZ 2114 intake manifold on an 8-valve engine, we will need:
- keys “for 8”, “for 10”, “for 13”, “for 17”;
- “cardan” type nozzle and socket heads “17”, “19”;
- magnetic screwdriver;
- screwdrivers, pliers;
- new intake manifold.
By the way, the price for an intake manifold from a VAZ (article 21110100801420) will be 1,350 rubles.
The cost is indicated for spring 2022 in Moscow and the region.
Loosen the clamp and disconnect the crankcase ventilation hose.
Replacement
exhaust manifold and gasket for VAZ 2114
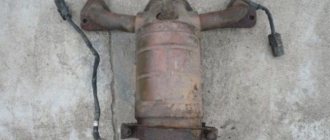
An exhaust manifold
- a unit that is responsible for ride quality, without which comfort is impossible. This is silence and the absence of exhaust smell under the hood, which can be drawn into the cabin through the hole in the cabin filter. Fixing a leak in the exhaust manifold of a VAZ 2114 is a necessary repair. Modern, it is not urgent, there is an option to prepare in advance and choose a convenient moment.
Exhaust manifold for VAZ 2114
Removal
1. Place the car on an inspection hole or overpass (see “Preparing the car for maintenance and repair”).
3. Remove the exhaust pipe from the exhaust manifold studs (see “Reception pipe - removal and installation”).
5. Disconnect the choke drive rod and the throttle drive cross rod from the carburetor (see “Carburetor - removal and installation”).
6. For ease of work, remove the battery (see “Battery - removal and installation”).
7. Using a 13 mm socket wrench, unscrew the nut of the lower air intake mounting.
8. Using the same tool, unscrew the nut of the upper fastening of the air intake and remove it.
9. Unscrew the nut of the upper fastening of the starter heat shield (see “Starter - removal and installation”)
10. Using a 13 mm socket wrench, unscrew the nut securing the eye and remove it.
11. Using the same tool, unscrew the nut securing the “mass” wire and remove it from the stud (for clarity, the chain tensioner has been removed).
12. Using a 10 mm wrench, unscrew the two nuts securing the coolant supply tube to the pump and disconnect the tube. A sealing gasket is installed at the connection point.
13. Using a 13 mm socket wrench with an extension, unscrew the seven nuts securing the intake manifold and exhaust manifold. Under the nuts of the joint fastening of the intake manifold and exhaust manifold, washers of increased thickness are installed.
Intake manifold mounting points
and exhaust manifold
14. Remove the intake pipe from the cylinder head studs and move it to the side.
15. Remove the manifold from the cylinder head studs.
16. Remove the gaskets from the studs.
https://youtube.com/watch?v=m-cWuqLCiKA
Causes of malfunctions
The key factor that causes 90% of exhaust manifold malfunctions on VAZ 2114 cars is high temperature and even poor quality materials where the parts are made. During operation, the steel heats up and cools down repeatedly, which leads to the appearance of cracks in the body. This is a common occurrence for VAZ cars older than 7-8 years.
Auto repair shops offer crack welding services using argon welding. However, for a number of reasons, this activity is useless for cars older than 7 years.
See:
1) Just removing and installing the exhaust manifold will cost about 3.5.5 thousand rubles. Taking into account the work of the welder and other actions, the cost of repairs can be 4-5 thousand rubles. If you do the work yourself, buying a new part will cost less.
2.7) Welding, even argon welding, disrupts the structure of “tired” metal. A boiled part rarely lasts longer than a year, then new holes appear. The older the car, the faster the problem returns, and the collector has to be removed again.
Replacement of exhaust manifold gasket for Skoda Octavia Tour.
If the car is older than 8 years and there are problems with cracks in the manifold, it is better to remove the part and replace it with a new one.
Introduction
Any car makes its owner happy until any troubles begin to happen to it. Naturally, such circumstances upset every driver. If the car is not new, then the repair costs may be too high, and it is very difficult to resolve the issue on your own. However, real VAZ connoisseurs are trying to study their iron horse inside and out and carry out repair work themselves. This primarily concerns the repair of important components; many are interested in installing a Solex 21083 carburetor on a VAZ-2107.
The most popular carburetor for the VAZ-2107 is Solex
Since the release of VAZ cars with carburetor engines, parts from the following manufacturers have been installed on them: Ozone, Solex, Weber. But Solex carburetors were and continue to be the most popular. Let's look at the adjustment and tuning of the carburetor of this brand in a little more detail.
Signs of trouble
Pad
exhaust manifold
One of the main signs of a leak in the system is a “sporty” growling sound when the engine speed increases. You will like this as a symptom of various exhaust malfunctions that allows you to conduct accounting (software). To check, it is better to take an assistant and go to the garage with a pit, as it is also called, to the overpass. More often it is determined by eye whether the problem lies in the muffler, resonator or exhaust.
Gasket wear may become apparent during planting. Open the hood and start the car - white, or grayish smoke, rising from unfamiliar manifolds during warm-up, indicates a leak. VAZ car owners usually encounter this problem once every 3-4 years. With the use of low-quality spare parts and 30 years. The solution may be to manufacture a custom-made steel gasket. It will last as long as the entire collector.
How to change the main muffler
Small fistulas on the body, located in accessible places, are usually eliminated using a gas welding machine or semi-automatic device. Sealing in another way will give a temporary result - gas pressure and high temperature will render any clamp or adhesive patch unusable. To weld a stainless steel muffler, appropriate qualifications are required.
If you do not have the necessary equipment and skills, it is better to replace the worn-out spare part with a new one. The operation is not complicated, and special devices are not needed either. For a beginner, the procedure will take no more than 3 hours.
Preparation of tools and workplace
Since the muffler is located under the car, disassembly requires an inspection ditch in the garage, an overpass in an open area, or a lift. It is extremely inconvenient to remove a part lying on the ground under the car. The main difficulty is to separate 2 sections in this position, whose pipes are inserted into one another and become strongly stuck during operation. Therefore, it is not recommended to change a muffler without a pit.
To complete the work, you will need the usual tools:
To make it easier to unscrew stuck threaded connections and disconnect pipes, it is worth purchasing WD-40 type lubricant in an aerosol can with a tube.
During operation, the rubber suspensions stretch, causing the body to begin to dangle in a horizontal plane. Hence the advice: change the rubber products along with the exhaust element; the kit is inexpensive (about 100 rubles).
Replacement procedure
Before starting work, you should place the “seven” in the pit and wait 20-40 minutes, depending on the air temperature in the workplace. The exhaust tract, which is heated by the engine, must cool down, otherwise you will get burns even through gloves.
Dismantling the old muffler is carried out in the following order:
Many Zhiguli owners have not used a long screw to secure the rear cushion for a long time, because the threads become sour from rust and do not want to unscrew. It is much easier to insert a nail or electrode with a diameter of 3-4 mm instead of a screw and bend the ends.
If sections of the exhaust system cannot be disconnected, use the suggested disassembly methods:
Assembly is carried out in reverse order. Install rubber bands on the new spare part, lubricate the mating surfaces with grease and place the muffler pipe on top of the resonator. Make sure that the pipe is seated all the way, then put on and tighten the clamp.
Repairing minor damage without welding
If small holes have formed on the pipe or muffler body due to corrosion, they can be temporarily sealed and the service life of the part can be extended by 1-3 thousand km. It will not be possible to weld the defects - the metal surrounding the holes has probably already rotted.
For work you will need the following materials:
It is not necessary to remove the muffler; proceed as necessary. If the defect cannot be reached otherwise, carefully dismantle the element. Perform sealing according to the instructions:
A tin clamp is made by double bending the ends of the workpiece. To avoid mistakes during the repair process, first practice on any pipe. When the sealant hardens, start the engine and make sure that the clamp does not allow gases to pass through.
Typically, the lower wall of the muffler tank rusts from the inside under the influence of aggressive condensate. There is an “old-fashioned” method for solving the problem - a hole with a diameter of 3-4 mm is specially drilled at the lowest point. The sound of the engine will remain virtually unchanged, but water will stop accumulating inside the tank.
Video: how to seal an exhaust without welding
Replacing the gasket under the manifold 2108, viburnum, grant
Thank you so much for watching my videos
, tell your friends, leave comments, subscribe.
Service specialists, when attracting clients, like to tell horror stories about the explosion of the exhaust manifold on VAZ 2114 cars due to cracks. In fact, this is more than a myth. However, the real problems of two or more are serious, so repairs should not be put off.
Replacement of cylinder head gasket for VAZ 2114 8 valves.
Cracks in the exhaust manifold or a worn gasket usually cause the engine to run dirty.
1) A lambda probe is installed in the exhaust manifold, which affects the operation of the accounting (software) injection. Strong air suction disrupts the oxygen mass content in the exhaust; the lambda incorrectly adjusts the quality of the mixture, causing tripping, uneven idling, loss of power, and “black” spark plugs.
5) Additional function – crankcase ventilation. Impaired air circulation causes disturbances in the operation of the gas distribution mechanism, increased wear of the valves, the formation of carbon deposits on the pistons and other “joys”.
If increased noise and unpleasant odors during engine operation are combined with dirty work, the car requires repair.
See:
History of creation
The VAZ-2107 is a modified luxury version of the VAZ-2105, which, in turn, traces its origins to the Fiat 124, a subcompact family sedan from 1966 (winner of the 1967 European Car of the Year). The VAZ-2107 was exported under the names Lada Nova, Lada Riva, Lada Signet, Lada 1500
.
From 2002 to 2012, the VAZ-21070 (modification of the VAZ-2107) was produced in Ukraine (LuAZ, ZAZ and KrASZ). In May 2008, the assembly of LADA 2107 was launched at Argun in the Chechen Republic. Since March 2011, the production of LADA 2107 has been mastered by the Izhevsk Automobile Plant.
In April 2012, the AvtoVAZ concern decided to finally stop production of the classic LADA 2107 sedan. This decision was made due to the greatly decreased demand for this model, as well as due to the acceleration of work in Izhevsk to prepare production for the release of the Lada Granta. The last LADA 2107 sedan rolled off the assembly line on April 17, 2012. In Egypt, LADA 2107 was assembled until the beginning of 2014.
Production of the 2104 station wagon, unified with the sedan in terms of power plant, exterior and interior of the front part of the body, continued until September 17, 2012.
In March 2022, the analytical agency Autostat conducted a study, according to which the most popular passenger car in Russia was the LADA 2107 sedan. At the time of the study, this model was driven by 1.75 million Russians.
Tools and necessary parts
To remove the exhaust manifold on a VAZ 2114 with the intention of replacing the gasket or the entire part, you will need the following tool:
- open-end and ring wrenches for 8, 10, 13, 17;
- wrench with heads 17, 19;
- screwdrivers, pliers.
It is also advisable to have tools such as a Dremel, a nutcutter, or a nutcutter. You, the fasteners on the parts of the exhaust accounting system are stuck tightly.
A few days before your planned repair, begin treating accessible nuts with WD-40 or another penetrating lubricant. Repeat the operation 2-3 times. This will make the task of removing the manifold a little easier .
The question often arises: is it worth using a sealant after removing and replacing the gasket? Experts believe that if you apply sealant to the gasket, it should only be high-quality silicone. A bad sealant can bring a lot of trouble to a VAZ 2114 engine: when it burns out, it turns into “pellets” that are pulled into the crankcase. As is known, unnecessary contamination of the piston allows accounting (software).