The principle of operation of the rear struts differs little from car to car. The station wagon leaves the machine with a two-pipe hydraulic design that absorbs shock loads due to oil resistance to the cylinder piston. From the outside, these elements look like a pump, only instead of air there is a viscous liquid.
Removing and installing front suspension springs on Priora
So, to remove the springs, you must first remove the front suspension modules from the car. More information about this is written in this article on replacing the front struts on a Priora.
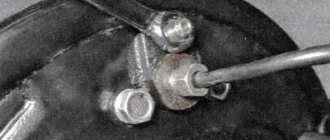
When the modules are removed, it is necessary to loosen the nut of the strut rod, holding the rod itself from turning with a hexagon:
After this, compress the springs using special ties.
Compress the spring until it no longer exerts pressure on the support.
When the spring is sufficiently tightened, unscrew the upper rod nut completely.
Next, you need to remove the nut along with the washer, and then lift the support assembly with the bearing:
After which we also remove the cup and rubber gasket:
Now you can remove the spring, since nothing else prevents its removal:
Installing a new spring occurs in the reverse order. Of course, to do this it is necessary to pull it to the same level as when removing the old one in order to put the support with the bearing in place and tighten it with a nut.
The price of a new spring on a Priora ranges from 1,000 rubles for a standard factory spring, and up to 2,500 rubles for various modifications from other manufacturers, such as SS20 or Acomi.
The rear springs on a Lada Priora car must be changed in pairs on each side, regardless of the technical condition of the second. Repair work is carried out when the springs have sagged, as a result of which the rear part of the body has sagged, in case of mechanical damage, or vice versa in order to raise the body by installing longer springs and additional rubber linings. To carry out repair work, prepare a standard set of tools and perform the following sequence of actions:
- First of all, it is necessary to dismantle the decorative trim of the luggage compartment in order to free the cups in order to unscrew the nuts securing the upper shock absorber rod.
- Next, lift the rear part of the body and remove the wheel.
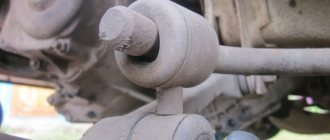
- Then unscrew the nut of the lower bolt securing the shock absorber to the rear axle bracket and remove it together with the spring.
- Next, remove the rubber lining from the glass.
- Remove the spring from the strut. Replace it. Also, if necessary, replace the rubber gaskets.
- For ease of subsequent installation, the rubber gasket on the spring must be secured with electrical tape or tied with nylon thread. Also, when placing the spring itself on the stand, orient it so that its end fits exactly into the slot on the support cup, similarly with the rubber gasket.
- Next we proceed to the installation. For ease of installation, the shock absorber rod must be completely removed, after which, placing its end in the hole in the body shell, fix it with a nut in the car interior and only then fasten the lower bracket.
Features of replacing racks
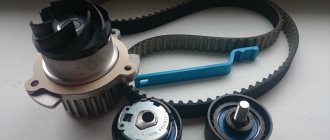
Lada Priora rear suspension parts: 1 – rubber-metal hinge;
2 – suspension arm mounting bracket; 3 – shock absorber casing; 4 – compression stroke buffer; 5 – casing cover; 6 – support washer; 7 – shock absorber cushions; 8 – spacer sleeve; 9 – shock absorber; 10 – insulating gasket; 11 – rear suspension spring; 12 – lever connector; 13 – lever of the rear suspension beam; 14 – shock absorber mounting bracket; 15 – flange; 16 – lever bushing The first generation of Priora, which debuted in the nineties, caused a lot of criticism regarding the struts and suspension. The car did not have a good chassis, it swayed, and maneuverability was not at the best level. At the beginning of the two thousandth there was a stage of restyling, which took the car along reformist paths. Now the racks have become more reliable, and the power unit is more powerful. But nevertheless, professionals propose to improve the restyled version by replacing the struts, since then its performance will be significantly improved. Although over time, replacement of parts is necessary in any case.
Replacing struts on a Priora is based on one factor: in what conditions the car will be used. Each rack has its own design differences, pros and cons, technical features, and if one type is good in one situation, then it is unlikely to be effective in another. So this should be taken into account without fail.
Before you decide to replace parts, you should be 100% sure of this. You can check the working condition of the racks in a very simple, old-fashioned way. You'll have to rock the corner of the car a little. Now count the number of free jumps. If one, then the system is normal. If there is more than one, then urgent replacement of the racks is required, since the old ones can no longer cope with the task assigned to them.
When replacing old parts, you should also take into account that oil struts, despite their affordable price, are less effective, especially in frosty weather. Gas-oil shock absorbers are somewhat more complex and expensive, but they will please you with good performance
It is only worth noting that imported spare parts are significantly better than domestic ones. Therefore, professionals, as a rule, install Kayaba struts on Priora.
Rear pillars on Priora: design features and subtleties of replacement
Today, the Lada Priora car is one of the most popular models in Russia.
This simple, laconic and at the same time elegant, dynamic car has gained widespread respect due to its practicality, endurance, and ease of use. The car, which appeared on the market back in the late nineties, more than once underwent serious reformations, which concerned both the appearance and its technical component, and to an even greater extent. At the beginning of the two thousandth, the next stage of restyling took place, which significantly modernized the Priora car. A lot has changed: the power units have become more powerful, the transmission has received a new embodiment, and the craftsmen have worked hard on the braking system. And of course, the rear pillars on the Priora were modified, a detail that, from the first years of the Lada Priora’s existence, caused a lot of criticism from car owners.
practical guide
It is convenient to carry out the work in an inspection ditch. The work is shown on a car with a hatchback body. On a station wagon, the work is performed in the same way. On a sedan car, access to the upper shock absorber mount is through the luggage compartment.
Replace shock absorbers and springs in pairs.
To complete the work you will need:
— inspection ditch or overpass;
— a device for disassembling suspension struts.
We carry out the work with an assistant.
Removal
1. Prepare the car for work and hang the rear of the car on stands.
If there is no inspection ditch or overpass, remove the rear wheel of the car from the side of the shock absorber being replaced.
2. Remove the luggage compartment shelf.
3. Fold down the back seat.
4. In the luggage compartment, use a Phillips screwdriver to remove the four screws securing the upholstery.
5. Use a screwdriver to pry off the trim of the seat back lock.
6. Using a 19 mm wrench, unscrew the lock and remove it.
7. Using a Phillips screwdriver, unscrew the screw securing the luggage compartment lining.
8. Bend down the luggage compartment upholstery.
9. Use a Phillips screwdriver to unscrew the top screw securing the cladding.
10. Using a Phillips screwdriver, unscrew the two lower screws securing the cladding.
11. Move down the luggage compartment lining.
12. Using a 13 mm socket wrench, unscrew the two nuts securing the seat back clamp bracket.
13. Remove the retainer bracket.
14. Using a slotted screwdriver, remove the plug.
15. While holding the shock absorber rod from turning with a 6 mm wrench, unscrew its nut with a 17 mm wrench.
16. Use a magnet to remove the spring washer and the upper support washer from the shock absorber rod.
17. Remove the upper rod mounting pad from the shock absorber rod.
18. Using two 19 mm wrenches, unscrew the nut of the bolt securing the lower end of the shock absorber to the rear axle beam and remove the bolt.
19. Move the lower end of the shock absorber towards the rear of the car and remove the shock absorber.
20. Remove the spring and its gasket from the shock absorber, and also, if necessary, remove the lower cushion and spacer from the shock absorber rod.
Installation
Springs of the same class (with the same color marks) should be installed in the rear suspension of the car.
1. Before installing the shock absorber, secure the rubber gasket 4 to the spring 2 with insulating tape or tape.
2. Install the spring on the shock absorber and fully extend the rod. We put a buffer 1, a protective casing 3 with a cover, a spacer sleeve 5 and a lower cushion 6 (if they are not on the rod) onto the shock absorber rod.
When installing, the shock absorber must be oriented so that the end of the lower coil of the spring faces the wheel.
3. We insert the shock absorber rod into the hole in the body cup, at the same time an assistant puts the upper cushion and support washer on the rod and tightens the rod nut a few turns.
4. Raise the lever until the holes in the shock absorber and beam bracket align. Install the lower shock absorber mounting bolt and tighten its nut (without tightening).
If you don't have an assistant, you can first attach the shock absorber to the rear suspension beam. Then, placing a stop under the rear lever, smoothly lower the car on the jack, making sure that the shock absorber rod enters the hole in the body, and after that, put on the upper cushion with the support washer and tighten the nut.
5. Install the removed wheel (if the work was carried out without an inspection ditch) and lower the car onto the wheels. We press the rear of the car several times to self-install the suspension elements.
6. Tighten the shock absorber rod mounting nut to a torque of 50-61.7 Nm (5.1-6.3 kgcm).
7. Tighten the nut of the shock absorber lower mounting bolt to a torque of 66.6–82.3 Nm (6.8–8.4 kgcm).
FakeHeader
Comments 9
hi. what kind of springs did you use? not from the hatch by any chance. Judging by the photos, the springs you have installed have 12 turns. They gave me the original (not sawn) springs from the new priors, but there are 10 turns (yellow mark). I compared them with the original VAZ 2110 - there are 11 turns and they are longer than the Prior ones. Now I'm itching :).
I don’t even remember what they are from. The store just said stock springs for the Priora. And on the market there were ones with variable pitch pitch, but everything was in the red, and I don’t want an understatement.
hi. what kind of springs did you use? not from the hatch by any chance. Judging by the photos, the springs you have installed have 12 turns. They gave me the original (not sawn) springs from the new priors, but there are 10 turns (yellow mark). I compared them with the original VAZ 2110 - there are 11 turns and they are longer than the Prior ones. Now I'm itching :).
I also took springs. I took the Priora catalog and ordered the part from Lada using the number; there were only one of them. 12 turns arrived. with black mark. The label emphasized hardness class B. and who knows what that means.
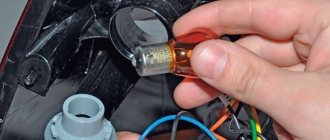
Symptoms: the front suspension breaks, the front of the car is skewed, knocks, squeaks and rattles when the car hits an uneven surface.
Possible cause: the spring of the front suspension shock absorber strut is damaged or the strut itself is faulty.
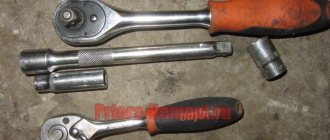
Tools: socket set, wrench set, flat-head screwdriver, vice, zip ties, hex wrench.
1. Install wheel chocks under the rear wheels.
Which ones to choose and their price
Having decided to replace the rear struts, you will have to choose among today's abundance of original spare parts and their analogues on sale. You can, of course, not bother and buy stock oil shock absorbers from the SAAZ plant, exactly the same as those installed on the Priora on the assembly line.
Part numbers:
- 217002915002;
- 217002915003;
- 217002915004;
Their prices vary from 1200 to 1400 rubles (for one rack).
If you want to change the characteristics of the suspension, namely make it softer or stiffer, you can purchase alternative struts. The most popular shock absorbers among Prior owners are SS20.
They are distinguished by high reliability, and in addition, a variety of designs that allow you to change the stiffness of the suspension. There are four modifications of SS20 for Priora on sale: “Comfort”, “Standard”, “Highway” and “Sport”, differing in rigidity in ascending order. The cost of a pair of such racks is about 3,700 rubles.
Important: it is recommended to replace shock absorbers in pairs, i.e. if you change it, then change it on both sides of one axis!
Racks, what are they and why are they needed?
Struts are a mechanism whose task is to filter the shocks coming to the car when driving on a bad road. If the racks are of poor quality and not well-designed, then movement becomes a nightmare. This is why driving an expensive foreign car and a budget domestic car, which is sensitive to every bump, are so strikingly different.
The struts have a complex design, but the basis is a hollow piston system. The piston system is equipped with multiple parts that secure the racks to the car body, and inside it is filled with either gas-oil liquid or oil. The principle of operation of the struts is that the piston, when it starts to move, seems to break the impacts falling on it, reducing their force.
Front and rear struts, depending on the manufacturer, can last a different amount of time, for example, standard Saaz rear struts installed on Lada Kalina and Lada Priora can last 75,000 - 85,000 km, after which they require replacement. If you put new ones on a Lada or Priora, of better quality, then they will last 120,000 - 125,000 km, which is already an achievement.
On the Priora, as on other cars, problems with struts are expressed in oil leakage, insufficient adhesion of the tires to the road surface, and deterioration in maneuverability. Another sign of problems with the rear strut is a sudden, sharp increase in braking distance. According to professionals, if it is necessary to replace one rear strut, then it is wiser to change both at once, since otherwise there may be a mismatch of parts, which will lead to a significant deterioration in the operation of the entire system and a decrease in the dynamics, maneuverability and controllability of the car.
What are rear struts?
The design and principle of operation of the rear shock absorber struts of the Lada Priora are practically no different from other cars. From the factory, the machine is equipped with SAAZ shock absorbers, which have a two-pipe hydraulic (oil) design.
It provides damping of shock loads due to oil resistance to the piston inside the cylinder. In fact, this design resembles a conventional pump, only oil acts as air.
At the front of the Priora there are also oil struts that work on the same principle. They differ from the rear ones only in the size and design of the body. In addition, the front struts have brackets for attaching tie rod ends.
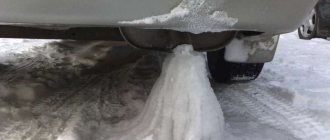
Oil shock absorbers are quite reliable and durable, and in addition, they provide maximum comfort, as they are considered the softest. However, they also have their drawbacks. The fact is that oil is very susceptible to the influence of temperatures, both high and low. When heated, it becomes too liquid, which causes the shock absorber to “soften” even more.
When exposed to low temperatures, the oil hardens, making the racks as rigid as possible. Naturally, this cannot but affect their condition, and it often happens that after a hot summer or cold winter, shock absorbers begin to “sweat”. This is the first sign of their failure.
Ball joint, replacing the lower ball joint
Shock absorbers for the factory equipment of the car are manufactured at the Skopinsky Automotive Assembly Plant (SAAZ for short), located in the village of Chulkovo. SAAZ oil devices are reliable during operation at a calm driving pace. Their main advantage is their relatively low cost.
This plant also produces gas-oil models, in which, in addition to oil, inert gas is pumped. Gas-oil SAAZ models are distinguished by increased combat forces. They better press the wheels to the road surface. This makes the entire suspension stiffer, so the car is more stable when driving fast and when cornering.
| Installation location | Product code | Rod diameter, mm | Case diameter, mm | Case height, mm | Rod stroke, mm |
| Front | 21236290500400X | 12,5 | 45 | 231 | 118 |
| Rear | 212302915004000 | 12,5 | 45 | 326 | 200 |
Chevrolet Niva owners have a question about which of the options offered on the Russian market are the best. There is no clear answer here. It all depends on the conditions in which the car is operated. Based on the requirements, they already choose a specific brand.
The cause of shock absorber malfunction can be various factors:
- gas leak;
- failure of silent blocks;
- torn oil seal;
- deformation of valve plates;
- aging of fluid in the shock absorber.
Signs of a faulty car part on a Chevrolet Niva are easy to detect:
- When accelerating and braking, the car “squats”.
- when driving on an uneven surface, the suspension spring is compressed so that it reaches the limiter;
- oil leaks on auto parts and the entire suspension;
- drifts appear;
- the quality of wheel adhesion to the road surface decreases;
- The shaking inside the car increases.
Regardless of the quality of the shock absorber, as well as the operating conditions of the car, wear and tear on this part of the car occurs constantly. Therefore, regardless of the cause of the breakdown, it is recommended to immediately replace the failed device with a new one.
Before replacing a car part, you must prepare the following tools and materials:
- metal brush with stiff bristles;
- 2 socket wrenches with ratchet 19 x 2.
It is necessary to replace shock absorbers only comprehensively, that is, on both sides, even if only the front or rear car part is faulty.
The front suspension is considered more complex in design, so replacing the front shock absorber of a Niva Chevrolet will take more time (about 20-30 minutes) and effort, but the operating principle is the same.
Compatible parts are produced by dozens of manufacturers from Russia, Europe, America and China. Let's look at the three most common brands.
1. SAAZ (Skopinsky Automotive Aggregate Plant) is a company that was founded on the basis of an enterprise of the same name. Since the 50s of the last century, the company has been supplying auto parts for VAZ, GAZ and other domestic cars. The products of this company are in high demand, since many Shniv owners try to save money, and the quality of the parts is at an acceptable level.
2. SS20 (Technology System) is another Russian company founded in 1993. This Samara enterprise specializes in the manufacture of steering and suspension parts for Russian cars. Spare parts in the mid-price range are more reliable than SAAZ budget products.
3. KAYABA (Kayaba) is a Japanese company considered one of the best manufacturers of shock absorbers. The price of oil models is slightly different from SS20 products. Expensive gas-filled shock absorbers are specially designed to perform in harsh conditions. They help keep the car on sharp turns and on uneven roads. The quality of the brand is confirmed by the fact that KYB parts are installed on rally cars.
| Manufacturer | vendor code | Installation location | Type | Price, rub |
| SAAZ | 2123-2905402 | front | oil | 1070 |
| 2123-2915402 | rear | 1130 | ||
| 45-2905402-10 | front | gas-oil | 1090 | |
| 45.2915402-10 | rear | 1050 | ||
| KAYABA | 2123-2905004 | front | oil | 2230 |
| 2123-2915004 | rear | 2070 | ||
| 344441 | front | gas-oil | 3950 | |
| 344442 | rear | 4200 | ||
| SS20 | SS20171 | front | oil | 1800 |
| SS20174 | rear | 1900 | ||
| front | gas-oil | 1900 | ||
| rear | 1900 |
Also interesting: Niva 2121 suspension lift do-it-yourself drawings To replace the lower ball joint you will need the following tools:
- Hammer.
- Jack.
- Mount.
- Wire brush.
- Wrench for removing wheel nuts.
- Keys for "27", "22" and "13".
We unscrew the nut screwed onto the support pin and press the pin out of the steering knuckle socket. then we unscrew the nuts of the bolts that hold the lever on the support and, retracting the steering knuckle, pull out the bolts. We remove the wheel hub from the splines of the outer drive joint shank, then dismantle the ball joint and install everything in the reverse order.
What shock absorbers are suitable for Priora
Replacing rear shock absorbers directly depends on the conditions in which the Lada Priora is used. When the device becomes unusable, both the driver and passengers feel it. Therefore, you will think about a possible malfunction of the racks even before you arrive at the service center and undergo special diagnostics. You can feel the deterioration of the shock absorbers on the road. Your Priora will become less stable when maneuvering while driving at high speed.
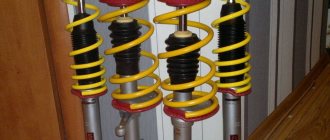
Here are the rear struts on the car
In each case, replacing shock absorbers is an individual process. Factory parts, also called oil parts, are more affordable than their gas brothers. But they have one feature associated with a small temperature range. In winter, oil-filled shock absorbers become stiff. Therefore, such parts are offered by specialists only for urban vehicles.
Gas-oil shock absorbers will cost much more, but this price will fully correspond to their manufacturability. You will feel their role in the cold. Simply put, you will not feel any changes when the car moves, but this will be a confirmation of the quality of the rack. It is generally accepted that imported spare parts are reliable and made of high-quality materials, which is why Priora is equipped with Kayaba and SS20 shock absorbers.
Replacing old struts with new ones of improved quality does not guarantee perfect suspension performance. After all, this unit consists of many elements, and only a general replacement of parts can restore comfort and convenience in the process of driving the Priora. In principle, there is nothing complicated about how to replace rear shock absorbers on a front-wheel drive car. Therefore, this information will be useful not only to Priora owners. Drivers of other VAZ models can also use the instructions below.
Rear strut replacement process
https://youtube.com/watch?v=Y_vWs_YyuSQ
Types and characteristics of racks
- Oily. Their action is based on the force of hydraulic oil. As a rule, such devices are two-pipe, although sometimes single-pipe ones are also found, but they are less efficient and difficult to operate. Oil racks are easy to install and are wear-resistant and durable. The only disadvantage of this device is that it does not cool well, which ultimately leads to deformation. But with proper care of the car, deformation may not occur soon. But oil parts are cheaper than gas-oil parts.
- Gas-oil ones are in many ways similar to oil ones, but here we have a completely different type of liquid, which means a different operating principle. Here, a part called a gas boost regulates the oxygen pressure, replacing it with nitrogen, which sets the entire system in motion. Such racks are often presented in a single-pipe version, unlike oil single-pipe ones; gas-oil ones are good in everything. The most significant advantage of the system is good heat transfer. The downside is less wear resistance than oil struts, as well as high sensitivity to external factors of various properties.
Lada Priora front suspension diagram
1 — steering knuckle; 2 - eccentric bolt; 3 — shock absorber strut; 4 — lever; 5 — stabilizer bar; 6 — mounting bracket for the stabilizer bar cushion; 7 — stabilizer bar strut; 8 — cross member of the front suspension; 9 — ball joint; 10 - stretching
1 — telescopic stand; 2 - spring; 3 — rod nut; 4 — rebound limiter of the upper support; 5 — upper support; 6 — bearing; 7 — upper spring cup; 8 — spring gasket; 9 — compression stroke limiter of the upper support; 10 — compression progress buffer; 11 - protective cover
1 — ball joint; 2 - hub; 3 — hub bearing nut; 4 — protective cap; 5 — hub bearing; 6 — steering knuckle; 7 - nut; 8 — front wheel brake disc; 9 — brake mechanism shield; 10 — eccentric (adjusting) bolt; 11 — rotary lever; 12 — front suspension spring; 13 — shock absorber rod; 14 — upper spring cup; 15 — upper support of the shock absorber strut; 16 — shock absorber rod nut; 17 — bearing of the upper support of the shock absorber strut; 18 — spring gasket; 19 — front suspension compression buffer; 20 — protective casing; 21 — rack body; 22 — bracket for mounting the anti-roll bar cushion; 23 — front suspension stretch; 24 — front wheel drive shaft; 25 — anti-roll bar; 26 — stabilizer bar; 27 — front suspension arm
Work on replacing the rear struts of a Priora
In general, this is one of the simplest repairs on the Priora. Even a beginner driver can cope with it. For this process you need a simple set of tools: a wheel wrench, wrenches from 13 to 22, a hammer and pliers.
In general, fix the side where the shock absorber will be replaced as securely as possible.
So, everything is ready for replacement. First of all, remove the wheel. When access to the bottom of the rear pillar opens, unscrew the bolt securing the bushing in the socket. You may have to tap with a hammer. In this case, you should not unscrew the nut completely, but strike it so as not to damage the bolt. After the rod is removed, release the lower part of the rack and proceed to work in the cabin. Remove the decorative shelf under the rear window; under it there is the upper nut securing the compensator to the upper body support. Holding the rod, unscrew this nut with a 22mm wrench. That’s it, the rear strut comes out freely.
Installing a new part
It is necessary to start accordingly by fixing the upper part of the rod in the body. It is advisable to have an assistant here. One supports the compensator from below, and the second screws the nut into place. It must be borne in mind that it is necessary to ensure that the compensator spring is correctly positioned at this moment. Once the top nut is secured, insert the bottom of the rear strut into the groove and secure with a bolt and nut. Check tightness
Carefully lower the machine until the spring snaps into place. Secure the top fastener
The shock absorber replacement is complete.
The process is perfectly illustrated in the video below:
Replacing the rear shock absorber: procedure
Let's take a closer look at the stages of the work. Your first task will be to unscrew the nut that secures the struts to the body. To simplify this matter, it is better to use a special wrench with dimensions 22*13. It is this tool that is used to remove and install shock absorbers in Priora.
After this, you need to securely secure the car, remove the wheel bolts and jack up the car. Never forget to install a safety system in the form of additional support under the wheels of the car. It is important that the stop is installed in the opposite direction to the lift.
Which ones to choose and their price
Having decided to replace the rear struts, you will have to choose among today's abundance of original spare parts and their analogues on sale. You can, of course, not bother and buy stock oil shock absorbers from the SAAZ plant, exactly the same as those installed on the Priora on the assembly line.
Part numbers:
Their prices vary from 1200 to 1400 rubles (for one rack).
If you want to change the characteristics of the suspension, namely make it softer or stiffer, you can purchase alternative struts. The most popular shock absorbers among Prior owners are SS20.
They are distinguished by high reliability, and in addition, a variety of designs that allow you to change the stiffness of the suspension. There are four modifications of SS20 for Priora on sale: “Comfort”, “Standard”, “Highway” and “Sport”, differing in rigidity in ascending order. The cost of a pair of such racks is about 3,700 rubles.
"Technology System" – SS20
Important: it is recommended to replace shock absorbers in pairs, i.e. if you change it, then change it on both sides of one axis! To replace the rear struts yourself, you don’t have to go to a service station.
This process can be done at home and will not take more than an hour.
To replace the rear struts yourself, you do not need to go to a service station. This process can be done at home and will not take more than an hour.
Tools and tools you will need:
- jack;
- a “shoe” or an ordinary brick to block one of the wheels;
- wrenches at “6”, at “19”, at “22”;
- rust remover like WD-40;
- small mount.
Work order:
- Place the machine on level ground.
- Secure one of the front wheels with a “shoe” or brick.
- Open the luggage compartment lid, move the trim on one of the rear “glasses” at the place where the pillar is upper mounted.
- Using a wrench set to “22”, unscrew the nut securing the strut, holding the shock absorber rod with a wrench set to “6”.
- Using a jack, lift the car body from the side of the wheel where you plan to replace the strut.
- Having climbed under the car, unscrew the nut securing the lower part of the rack to the rear beam bracket with a “19” wrench.
- If the nut does not budge (soured), treat the threads around it with WD-40, let it penetrate the joint for about 20 minutes, then try again.
- When the nut is unscrewed, remove the bolt and remove the lower part of the shock absorber from the bracket. To simplify this process, you can use a small pry bar.
- Remove the shock absorber.
- Go to the trunk and remove the support washer and strut pad from where the upper part of the shock absorber is mounted.
- Remove the lower spring, cushion, bushing, boot and compression buffer from the shock absorber. If the boot, buffer, or shock absorber pads show signs of damage, they also need to be replaced.
- Carefully inspect the shock absorber spring. There should be no cracks, chips or other signs of destruction on it. If they are present, the spring must be replaced.
- Reassemble the new rack in reverse order.
- Install the new rack by first inserting its rod into the upper mount, and then securing the lower part into the bracket with a bolt.
- It is recommended to finally tighten all connections after the car body has been lowered, i.e. after you remove the jack.
- Upon completion of the work, rock the car body several times on the side where the rack was installed.
- After 100-150 km, tighten the shock absorber mounting nuts.
Replacement procedure
To make a replacement, it is not necessary to send your hatchback to a service station. All this is easy to do yourself at home, the main thing is that you have the tools and your hands grow from the right place.
For such an event you will need:
- “shoe” for blocking the wheel;
- jack;
- keys at 6, 19, 22;
- rust remover;
- mount.
- Lock the front wheel.
- Open the trunk and move the trim on any rear “glass” at the top fixation point.
- Using a 22 wrench, release the rack mount, holding the rod with a 6 wrench.
- Raise the body with a jack on the side where you plan to replace the element.
- Once under the car, use the 19th key to unscrew the fastening of the lower part of the rack. There it is attached to the rear beam. If the process does not go well, then you will need a rust remover - the nut has oxidized. Wait until it gets wet for about 20 minutes and continue working.
- After unscrewing the nut, remove the freed bolt and remove part of the rack from the fixing bracket. This process may require a pry bar.
- Remove the shock absorber completely.
- Go back to the trunk and remove the support washer and strut pad.
- Remove the spring, bushing, boot and quiet block from the strut in sequence. Check the latter for damage. It is better to replace silent blocks at this moment, so as not to repeat the entire event again later.
- Examine the spring for cracks and other signs of deformation. As soon as you find one, rest assured that it’s worth replacing.
- Reassembling the rack occurs in the reverse order.
- It is worth tightening the connections completely only after the body has lowered.
- It is worth tightening the shock absorber mounting nuts 100-200 km after replacement.
As you can see, everything is extremely simple and you don’t need to spend extra money at the service station, just on new parts. Next time you can repeat this procedure faster, but the first time it’s better to slow down and do it right.
When to change
Factory SAAZ rear struts usually withstand 70-80 thousand kilometers, after which, according to the factory’s recommendations, they need to be replaced. But there is no point in changing shock absorbers if they do their job perfectly, unless you want to change the characteristics of the suspension.
It is not difficult to determine the serviceability of the racks yourself. As already mentioned, the first sign of their malfunction is a visible oil leak. In addition, faulty shock absorbers give themselves away with a characteristic dull knock in the area of the rear arches. This is also evidence of their depressurization and oil leakage.
You can verify that the racks are faulty in a simple way. Try rocking the left or right rear of the car. If it swung once and froze rigidly, it means that everything is in order with the shock absorber from which you rocked the body. If the car continues to rock, the shock absorber is faulty, and the body lowers and rises due to the spring.
Brief summary
As you can see, replacing the rear struts on a Priora is not particularly difficult. The main thing is to make the right choice and purchase shock absorbers that will last for many years, as well as diagnose them in a timely manner and prevent critical malfunctions.
The rear struts on the Priora, meaning high-quality factory ones, can last more than 200,000 km under normal operating conditions. Of course, not every car can boast of such mileage before replacing rear shock absorbers. If the racks no longer hold, and the back of your Priora begins to float, or its body is covered in oil (leaked), then they need to be replaced with new ones.
Each owner can replace these parts independently; the main thing is to have the necessary tools at hand. In this case, to perform this repair you will need:
- Open-end wrench 19 mm
- 19 mm head
- Ratchet handle or crank
- Hammer
- Penetrating lubricant
- Special key for holding the strut rod