Removing the Priora exhaust manifold
Every owner of a domestic Lada Priora strives to improve their car not only externally, but also to increase engine power, reduce noise in the cabin and make it more maneuverable on the road.
The exhaust gas exhaust system on the VAZ 2170 also needs to be modernized, since the standard exhaust manifold removes exhaust gases with a slight delay, which “presses” the engine, depriving it of the ability to operate at full power. Installing a spider on the Lada Priora helps solve this problem. However, there are cases when car owners also note negative factors that arise after installing the spider. In order to understand the need to modernize the exhaust system of the Lada Priora, it is necessary to understand its structure, operating principle and measures to improve its functionality.
Review of the exhaust system of Lada Priora
The exhaust gas exhaust system on the Lada Priora performs the following functions:
- exhaust gas removal;
- noise reduction when the engine is running;
- neutralization of toxic hazardous substances in exhaust gases.
The basis of the Priora exhaust system includes:
- 1. Exhaust manifold with converter;
- 2. Resonator;
- 3. Main muffler;
- 4. Auxiliary muffler;
- 5. Connecting pipes.
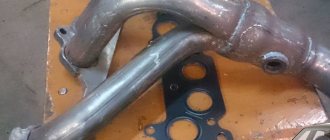
Exhaust on Priora
The manifold is used to remove exhaust gases from the cylinders into the exhaust pipe. The tightness of the connections is ensured by sealing with a metal gasket in two layers between the block head and the exhaust manifold. The attachment of the exhaust manifold to the cylinder head on one side goes into connection with the converter on the other. The collector and converter connected into one unit make it possible to reduce the warm-up time to the operating temperature of the latter, which significantly increases the efficiency of the converter.
Installation of oxygen concentration sensors at the inlet and outlet of the converter ensures constant monitoring of the quality of exhaust gases. The connection between the intake pipe and the manifold has a heat-resistant seal in the form of a metal-asbestos gasket. And the metal compensator connecting the additional muffler with the exhaust pipe serves as a vibration damper from the engine to the body and the entire exhaust system.
The exhaust gas exhaust system is connected by attaching it to the body brackets using 4 rubber rings. On the main muffler, the suspension cushion has a reinforced structure, which is due to the increased load on it.
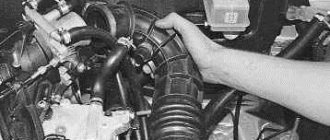
Determining whether the engine is sucking in air
Before you start removing more than half the engine parts to get to the manifold, you should check other parts of the air system.
And after that, carry out a complete tuning of the car. First of all, you need to inspect all the hoses and gaskets located on the cylinder block. The most common method of finding air leaks is to spray the hoses with plain water; if there is a hole in one of them, the engine speed will decrease when water enters.
Detailed instructions for removing the intake manifold on a new Priora
It is necessary to remove parts from a cooled engine. It will take about an hour, provided that you have at least a little understanding of the injection system. The following sequence of actions must be followed:
- First of all, you need to remove the throttle. There is no need to completely remove it, just move the assembly connecting it to the manifold to the side. You also need to remove the throttle valve to thoroughly clean everything;
- disconnect the drive throttle cable from the manifold;
- disconnect the connectors from each other to remove the wires from the ignition coils;
- on the camshaft, disconnect the sensor wires;
- disconnect all canister wires;
- disconnect the brake booster vacuum hose going to the manifold;
- then unscrew the clamp and remove the ventilation pipe;
- Unscrew the self-tapping screw of the oil level indicator guide tube;
- remove the dipstick with the guide tube;
- using sockets and a ten-size wrench, unscrew the nuts and bolts securing the exhaust module and coils from cylinders 1-2-3;
- remove the coils;
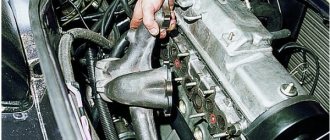
- then you need to unscrew the collector fasteners;
- slide it forward and remove the manifold.
How to remove the exhaust manifold
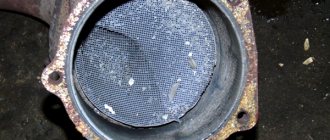
Many VAZ car owners repair and maintain their vehicles themselves. One of the most common problems when operating a car in heavy conditions is burnout of the gasket between the exhaust manifold and the cylinder head, clogging of the catalyst, and deposition of combustion products on the walls of the exhaust system. All these problems negatively affect the removal of exhaust gases from the combustion chamber. The removal of gases from the combustion chamber is an important point; their return into the chamber reduces the quality of the fuel-air mixture, which means a decrease in vehicle power will be observed. In addition, if the gasket burns out, burning gases will escape into the engine compartment, which can cause a fire in the engine compartment. The sound during such work will be quite loud and annoying to others.
Elimination of all of the above malfunctions will involve disassembling the exhaust gas removal system. How to remove the exhaust manifold and whether it is possible to do this in a garage without contacting a service center is of interest to many VAZ Priora owners who have not encountered such work.
Replacing the exhaust manifold with your own hands will require work to remove additional elements, after which it will be possible to get to the fastening elements of the exhaust system. If the repair work is not related to the burnout of the gasket, then it still needs to be replaced with a new one.
Tools
For work you will need the following tool:
- open-end or socket wrench for 8, 10, 13.
- the head is 13 deep.
- cardan and extension for the head.
- ratchet.
- slotted screwdriver.
- WD liquid.
Removal of the exhaust manifold should be carried out with the engine cool to avoid burns. The car must be placed above the pit so that there is free access to the engine compartment from below. For safe work, remove the battery terminal.
REPLACING THE INTAKE PIPE AND EXHAUST MANIFOLD GASKETS
Replacing the gaskets of the intake pipe and exhaust manifold
You will need: a screwdriver, keys “8”, “10”, “13”, “17”, socket heads “17”, “19”, pliers.
1. Remove the wire from the negative terminal of the battery.
2. Remove the safety clip.
3. . turn the throttle valve all the way. Remove the end of the accelerator drive cable from the throttle valve drive sector.
4. Loosen the adjusting nuts of the accelerator cable sheath.
5. Remove the safety cap from the cable end and unscrew the locking nut.
6. . and disconnect the accelerator cable from the bracket.
7. Remove the screw securing the pressure plate of the fuel pipes to the bracket.
8. . and remove the plate.
9. Unscrew the two nuts securing the fuel pipe bracket to the receiver.
10. . and remove the bracket.
11. Disconnect the wiring harness connectors from the throttle position sensor and idle air control.
12. Unscrew the nut securing the bracket to the receiver.
13. Loosen the clamp and disconnect the crankcase ventilation hose from the fitting on the throttle assembly.
14. Loosen the clamp and disconnect the vacuum hoses of the brake booster and fuel pressure regulator from the fittings on the receiver.
15. Unscrew the nuts securing the receiver to the intake manifold.
16. . and remove the receiver from the studs.
When is it necessary to replace and remove the exhaust manifold on a VAZ-2114
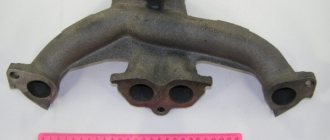
Huge temperature changes are the main problem faced by the exhaust manifold and the gasket, for which it is removed. The collector itself is made of a special grade of cast iron; it can withstand high temperatures (up to 800-900 degrees) , however, these are critical values, after which the collector may warp or crack.
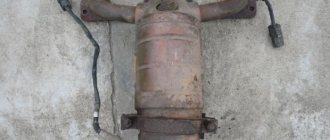
Exhaust manifold VAZ-2114
Its main task is to collect exhaust gases and distribute them into the exhaust pipe of the muffler.
Replacing or dismantling the VAZ-2114 exhaust manifold is necessary in the following cases:
- Mechanical damage to the collector.
- Warping and loss of tightness at the junction with the cylinder head.
- Burnout of the gasket between the head and the manifold.
- The appearance of cracks as a result of engine overheating.
- Replacing the collector with a device of a different configuration, adapted to a more severe operating mode.
In the event that we are not going to participate in high-speed races for the prize of the head of the regional traffic police, replacing or dismantling the collector may be necessary in a number of cases.
Tools and materials for dismantling
There are a number of symptoms that will indicate that you need to prepare to remove the exhaust manifold:
- increased noise level in the engine compartment , the engine produces a characteristic, loud sound in any operating mode;
- breakthrough of exhaust gases into the engine compartment and sometimes into the cabin;
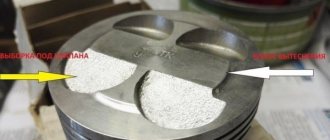
- reduction in engine power due to a mismatch between the exhaust gas outlets in the cylinder head and in the manifold.
Many people decide to replace the standard manifold with a “tuning” one, made of stainless steel and having a different configuration, thereby wanting to increase engine power and reduce the resistance that the standard manifold provides to exhaust gases. As a rule, the most common reason for dismantling a unit is gasket burnout .
Exhaust manifold gasket
The manifold gasket on the VAZ-2114 is made of pressed reinforced asbestos and is designed to ensure a tight connection between the block head and the manifold flanges. Asbestos is used to correct the coefficient of thermal expansion of the aluminum alloy from which the head is cast and the cast iron from which the manifold is cast. At high speeds and under prolonged loads, the gasket may burn out. Then its replacement and dismantling of the collector are inevitable.
To dismantle the manifold, you will need a standard set of tools, a set of sockets with extensions, and WD-40 penetrating lubricant or its equivalent. In case of broken studs, a stud extractor, drill, drill bits and a set of taps will be useful. A day or two before dismantling the collector, it is worth moistening all the fasteners several times, this will significantly simplify the removal procedure .
After installing new gaskets (they are different for an 8-valve engine and a 16-valve engine) and fixing the manifold, you should make sure that the unit does not come into contact with electrical wiring, hoses, or touch the stabilizer. Good luck to everyone!
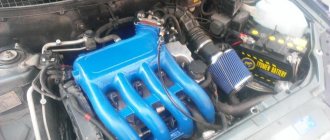
Installation of “spider” 4-2-1 on Lada Priora: step-by-step instructions and price
To install a new spider collector, you will need:
- flat screwdriver;
- 13mm head with extension;
- WD-40 lubricant.
It is recommended to perform the work in the following sequence:
- 1. Remove the auxiliary muffler from the manifold by bending the edges of the plate and unscrewing the three mounting nuts on the pipe, after making sure that the Priora exhaust system has cooled down;
- 2. Remove the protective screen and locking plate;
- 3. Gradually disconnect the old factory manifold from the cylinder head. First of all, you need to separate the wire connectors from the oxygen sensors. Then unscrew the bolts securing it to the cylinder block and remove the bracket. Unscrew the eight nuts connecting the manifold and the block head and remove it;
- 4. Free the holes in the cylinder head from carbon deposits, lubricate the open studs with graphite lubricant;
- 5. Place the 4-2-1 spider on the open studs and reassemble the exhaust system in the reverse order;
- 6. Make sure that the spider does not come into contact with wiring and body parts, which can lead to their deformation due to strong heating.
Exhaust installation steps
Before installing a spider on a Priora, you should pay attention to the cost of this design. The price range for various modifications of spiders ranges from 2 to 7 thousand rubles, taking into account consumables and labor. The installation process takes no more than one hour.
Self-replacement
Replacing the exhaust manifold of a VAZ 2110
- the car needs to be driven into the garage;
- hang a lamp with a safety light under the hood;
- before starting repairs, antifreeze must be drained from the tank;
- disconnect the battery terminals;
- take it out;
- put on a rack;
- disconnect the vacuum booster hose from the receiver;
- also disconnect the hoses of the electric pneumatic valve cover and the ramp pressure regulator;
- disconnect the chips of the throttle sensor, idle air control;
- disconnect the throttle valve cable;
- loosen the clamp on the air supply hose to the air flow sensor housing;
- disconnect it;
- loosen the clamps for attaching the hoses to the throttle pipe and ventilation of crankcase gases on the cylinder head cover;
Replacement and installation of the intake manifold Lada Priora 8 and 16 valves
Sooner or later, the car needs to be repaired.
In some places the replacement must be carried out as planned, in others it is not. But every car owner faces a similar problem. The question immediately arises: what repairs can you realistically carry out on your own, and where do you need to go to a car service center? Thanks to the Internet, all the necessary information, even with video instructions, can be found quickly.
The main function of the manifold is to distribute air among the engine cylinders, and also mix the fuel-air mixture there. And if you do not diagnose the operation of the air system in a timely manner and do not pay attention to the symptoms, this can lead to more serious engine damage.
Reasons for replacing the Lada Priora receiver
There are a considerable number of varieties of intake manifolds, for example, made from various types of metals or composite materials. However, the Priora receiver is made entirely of plastic. This material prevents excessive heating of the manifold due to a hot car engine.
Thus, the air flow characteristics are improved, which has a positive effect on the proportions and quality of the air-fuel mixture. However, plastic also has a main, negative side - fragility. As a result, numerous breakdowns occur both due to the fault of the car owner and due to low temperatures at which the plastic loses its strength coefficient.
If the receiver on your car has through holes or any other leaks, then it must be repaired (if possible) or replaced. If a part is faulty, air loss will occur, resulting in improper engine operation.
Intake manifold removal process
General view of the intake manifold
Dismantling the intake manifold is carried out with the car cooled down for safety reasons. So, this operation can take about an hour and will require some knowledge of the car’s design, namely the injection system. So, let's consider the sequence of actions for dismantling the unit:
- We dismantle the throttle. To do this, it is not necessary to disconnect all the pipes and pipes; it is enough to disconnect the unit from the manifold and move it to the side. Of course, at the same time, it is still recommended to remove the throttle valve completely for cleaning.
Location of the throttle valve on a VAZ-2112 - photo of an editorial car
Removed the wires and coil
Unscrew the clamp and disconnect the vacuum brake booster tube
Using a Phillips screwdriver, unscrew the oil level indicator guide tube
Unscrew the ignition coils and receiver
Unscrew the bolts securing the manifold to the block head
Pull the collector towards you and dismantle it
It is worth noting that installation of the intake manifold is carried out in the reverse order and does not require any additions or changes.
Dismantling the intake manifold of a 16-valve VAZ-2112 is quite easy and simple. Of course, it’s worth understanding at least a little about the design of the main power unit, but if desired, any car enthusiast can remove this unit.
Installing a receiver on a Priora
As usual, installation is carried out in the same way as removal, however, during its production you must be extremely careful not to damage the receiver body. It is extremely important to insert the installed part with the holes into the connecting pins of the cylinder block, after which the manifold is directed to the mounting points on the engine.
Small but important points for installation:
- always clean or lubricate the rubber seals installed at the points of contact between the receiver and the cylinder block;
- Properly tighten the nuts at the joints of the elements.