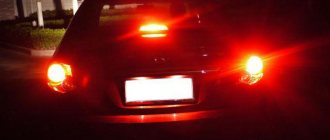
The purpose of the brake light is to warn drivers behind you about braking. It should turn on as soon as the brake pedal is pressed. If the stop is faulty, it can cause an accident. The article discusses the brake light, the principle of operation, typical malfunctions, methods for eliminating them, and provides instructions for replacing them yourself.
The principle of operation of the brake light
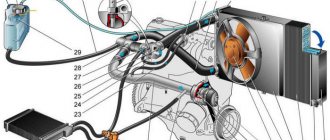
The brake lights are located at the rear of the car. Red lanterns. They light up automatically if the driver brakes. When the driver takes his foot off the brake pedal, they are also automatically turned off. The presence of stops is mandatory for vehicles.
The lights should be located symmetrically and burn brighter than the side lights. Brake lights are installed on the sides, on the rear window, in the center above the line of the side stops.
Primary and secondary brake lights can be a single bulb, a neon tube, or a set of LED bulbs. The car enthusiast is additionally equipped with a brake light repeater. The rear brake light can also serve as a fog light. You can install a formula 1 brake light (the author of the video is Mikhail Ermolaev).
The simplest brake light includes a breaker (switch) and a flashlight. The brake light switch is often called the frog switch. The plastic body of the breaker contains two terminals, a rod and a spring. This device is installed on the brake pedal.
When the driver presses the pedal, the rod enters the breaker body, the contact closes and the light comes on. As soon as the driver removes his foot from the brake pedal, the spring pushes out the rod, the contacts open and the light goes out.
LED brake lights consist of a chip and a sensor, which in this case is a frog, it sends a signal when the driver presses the brake. As with the single lamp, the frog is mounted under the brake pedal.
Foot control device diagram
Any pedal has free play. Therefore, although the driver presses the pedal, the car does not brake immediately. The brake light comes on as soon as the brake pedal is pressed. Drivers of vehicles behind will become aware of braking before the vehicle begins to brake. This way they have time to prepare for braking.
Design of pneumatic switches
Switches supplemented with pneumatics are usually installed on automotive vehicles that have a pneumatically driven , as well as on trailers. In some cases, the device is responsible not only for the operation of brake lights, but also acts as a sensor that responds to changes in air pressure in the pneumatic system and connects certain electrical equipment according to the situation. Pneumatic brake light switches are based on the following elements:
- Housing with a pair of cameras;
- Diaphragm;
- Threaded fitting or channel;
- Contact Group.
The contact group itself can have two designs: fixed pins and a movable plate; a movable pin with a return spring and a fixed contact of any shape. Of interest is the housing of the pneumatic brake light. It is divided by a diaphragm into two chambers. The point is that as soon as the pressure in one of the chambers increases, it bends and the movable contact attached to it closes with the stationary one. Of course, an increase in pressure in the system is provoked by the activation of the brake system.
Possible malfunctions: signs and causes
If the feet do not burn, the reason may be the following:
- bad contacts;
- damage to the wiring located in the corrugation between the door and the body;
- burnt out lighting elements.
There is a situation when the brake lights are constantly on if the side lights are on. In this case, the headlights may not light up. If they are turned off, additional lighting fixtures operate normally.
In this situation it is possible:
- the contacts of the parking lights and stop lights have been short-circuited;
- there is no weight on the dimensions;
- the two-pin lamp is faulty;
- the circuit closed, but did not open.
If the parking lights and brake lights are on and the ignition is turned off, then you need to check whether the lampshades are shorted to the housing. The reason may be poor contact of the negative wire with ground.
Repairing the device - several “recipes”
In general, repairing this accessory is not difficult, and it is quite possible to do it yourself, but only if the warranty period has expired. Otherwise, you need to contact the appropriate center, where specialists will eliminate all problems and, if necessary, replace the lighting device with a new one. If the brake lights do not light up or they do not work correctly, first of all we check the wiring. We clean the oxidized contacts and solder the damaged wires.
It is important to eliminate all short circuits; to do this, it is necessary to strip the corresponding contacts and restore the insulation.
Elimination of short-circuited brake light frog
Burnt-out diodes are usually replaced in pairs. The faulty brake light switch is also replaced, since this element cannot be repaired. First, we de-energize the car by disconnecting the negative terminal from the battery. Then we disconnect the switch from the supply wires and, having loosened the lock nut, unscrew the main one, which secures the part to the bracket.
Article on the topic: How to make homemade daytime running lights for a car
Before installing a new brake light frog, check it. To do this, connect the sensor to an ohmmeter. The resistance should tend to zero, i.e. the contact closes. And after you press the rod, the sensor contacts open and the resistance tends to infinity. If this is the behavior, then the frog is healthy and has the right to be responsible for your safety.
Replacing a stop repeater with your own hands
If repairing the repeater is not practical, it should be replaced.
The replacement process consists of the following steps:
- Using a wrench, unscrew the fastenings of the rear part of the stop and remove it.
- Then we connect the positive wire of the lighting fixture to the terminal where the brake light frog is located. To do this, you need to run the wire into the luggage compartment, unscrew the trim on the right side, and connect it to the desired terminal. The disadvantage may be a bolt in the luggage compartment.
- Heat shrink should be applied to the wiring. To prevent the wires from dangling, they need to be secured with insulating tape.
- The final step is to check the device for functionality.
Photo gallery
If a repeater with incandescent lamps is installed on the car, then when connecting a device with LEDs according to the above diagram, the lamp control will not work correctly due to different loads. In this case, you should insert the positive wire into the light bulb control unit and connect it to terminal 54H.
As a brake light, a strip with LEDs can be glued to the upper part along the entire length of the rear window. It needs to be connected to a standard device, and it will work in the same way. It is important to maintain polarity. To make the tape less conspicuous, it can be painted black. Attach the tape using double-sided tape. We check for functionality.
Methods for troubleshooting
Troubleshooting is not a complicated process and even novice car enthusiasts can do it (the author of the video is Avtoelektika VC).
First of all, you should check the integrity and condition of the wiring.
Using a multimeter, you need to test the wiring. Damaged or torn sections should be replaced intact or soldered. If there are traces of oxidation processes on the contacts, they need to be cleaned.
If the LEDs burn out, they need to be replaced in pairs. If the breaker fails, it must be replaced with a new one, as it cannot be repaired. Before replacing, turn off the vehicle's power by removing the negative terminal from the battery. Then disconnect the power wires from the breaker. Next, you need to loosen the lock nut and unscrew the main nut securing the switch to the bracket.
Replacing the brake light switch
Before installation, the new frog should be checked for functionality. This can be done using an ohmmeter. We connect the device to the device and measure the resistance. When the contact is closed, the resistance should be zero. If you press the rod, the contacts should open; the resistance in this case tends to infinity.
Video “Replacing a foot on a Mercedes”
This video demonstrates how to replace a brake light with your own hands using the example of a Mercedes (the author of the video is Ivan Poknya).
The reverse sensor turns on the rear white lights when you back up. The opinion that the device is unnecessary is erroneous. The signal sent by the reversing sensor to the white lights tells other road users that you are moving back or have already started and are driving in reverse. At night, these white lanterns illuminate the path back for your convenience, signaling your intentions to others. The rear light signal device is a necessary thing. As has been said in other articles, everything in the car must work properly!
Location and performance check of the DZH
You can easily find out where the reverse sensor is located by looking up at the suspension of the fourteenth. It is located on the gearbox; there are two meters in total: the one we need and the one that signals the speed of movement. If it is not possible to get under the bottom of the car, you can get to the reverse sensor by opening the hood. But the first option is more convenient.
- To make sure that the auxiliary gearbox is faulty, you need to turn the wheels to the left, looking from the driver’s side: on the side of the gearbox there is a protection with contacts inside.
- We remove the protection, look at the device and the two contacts that go to it, close them on the frog and start the fourteenth, putting it in reverse gear. If everything is fine with wires, contacts and lamps, then the white lights light up.
- The lights do not light up - with a tester we measure the voltage on the ground and the wire (orange) leading from the frog; if there is voltage, then you should check the board of the white lights and the contacts to it. There is a possibility that the contact between the fuse block and the sensor contacts has failed; you should find it and measure the voltage in it.
- Oxidation of rear light contacts
- The sensor may become loose, it needs to be screwed in deeper
- No contact with transmission wiring
- No contact between plug and fuse box
- Any fuse can blow and disrupt the contact circuit.
It also happens that the DZH is normal, and the contacts are safe and sound, but the reversing lights do not light up . The lamps themselves may become covered (elementally burn out), or the contact may be lost (for the same lamps).
Troubleshooting
Below are examples of how to fix basic problems and how to easily find them.
Fuse
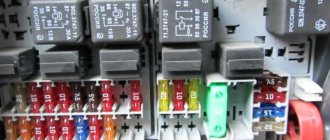
This is the most frequently damaged element in brake light failures, and also the most easily repaired. To eliminate the breakdown, you just need to replace the fuse on the mounting block.
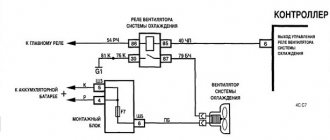
The fuse responsible for the operation of the VAZ 2114 brake lights is located on the fuse block under number F3 and has a fuse-link current of 10A.
To make sure that the fuse has blown, you need to turn on the interior lighting. If the brake light fuse is faulty, the light in the car interior will not light up because This fuse F3 is responsible for lighting the interior and the on-board computer.
Below is a diagram of the VAZ 2114 fuse box.
Brake pedal sensor
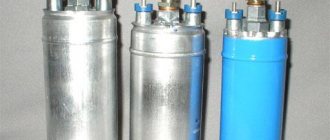
The brake pedal switch is responsible for turning on the brake lights when you press the brake pedal. This sensor is located on the pedal assembly of the car and is a kind of limit switch. When you press the brake pedal, the contacts on the sensors close the power supply circuit of the brake lights and light up their lamps, signaling that the car is braking.
Quite often, the spring that pushes the contacts to close on this sensor breaks, thus the sensor does not close the contacts when the brake pedal is pressed and the brake lights do not light up.
Replacement is carried out using a set of keys.
Lamp burnout
Often, the culprit of brake light malfunction is burnt-out lamps, but it should be noted that the likelihood of two lamps burning out at the same time is very small. Most often, when a brake light bulb burns out, one light fails.
The lamps are replaced from the luggage compartment of the car.
The type of lamp installed in the rear brake light of the VAZ 2144 is P21W – 12V.
Cartridge oxidation
Over time, due to moisture, the contact on the socket into which the light bulb is inserted can oxidize and the contact between the socket and the light bulb will disappear, which will make it impossible for electric current to pass to the lamp, thereby making it impossible to light it.
This problem can be eliminated by cleaning the contact using sandpaper and the lamp contact.
Connector oxidation
Just as with oxidation of the cartridge, due to exposure to moisture, the contacts on the connector oxidize, thereby blocking the path of electric current to the lamp. With such a breakdown, most often the entire lamp suffers and not only the brake light stops lighting, but also the turn signal, clearance signal, and reverse signal.
The problem is eliminated by cleaning the contact with sandpaper and treating with alcohol.
Damage to the board
This problem is less common, but it causes damage to the flashlight. The board is a plate of conductors to which a connector is connected. Conductors are tracks that quite often fray or break, which leads to an open circuit and, consequently, to failure of the lantern.
Solving this problem is quite problematic; it is necessary to solder the soldering iron tracks. Most often, when such a breakdown occurs, the flashlight is completely replaced.
Broken wire
A broken power cord is the most common problem. Most often, a break occurs in the luggage compartment of a car due to loading and unloading of various cargoes that can break this wire.
The most difficult thing in this problem is to find the break point. It is necessary to carefully inspect the places where the wires are laid in the luggage compartment.
We hope our article was useful to you.
Replacement of reverse sensor VAZ 2114
You can change the frog in two ways: climb into a hole (or drive the car onto an overpass) or do it while lying under the car. Many who have changed the rear light signal device themselves claim that it is easier in a pit, the sensor is clearly visible and does not splash with oil. There is an option, take the fourteenth one to a service center, where they can easily replace this device with a new one (and they will charge you the cost of two such sensors, if not three).
Reverse sensor VAZ 2114
When replacing the DHZ yourself, it is important not to waste time and quickly insert a new one! Otherwise, the oil will pour out of the box and leave a lot of pleasant memories on your clothes and the floor of the pit.
A simple diagram of how to change the reverse sensor on a VAZ 2114:
- Drive the car into a hole or onto an overpass and put the handbrake on.
- Remove the protection from the frog contacts and disconnect them.
- You should prepare some container in advance for the oil that will pour out of the sensor hole.
- Place the container, you can unscrew the sensor (if it does not give in, then you can unscrew it with a wrench with a 22-mm head; it also happens that the wrench does not help either, it can literally become stuck (the oil is nearby), then we take a chisel and a hammer and pray that everything went smoothly)
- They took out the non-working one, inserted a new one, and screwed it on.
- If the box crater is filled with oil, wipe it to remove excess dirt.
- We connected the contacts and returned the protection back.
- If enough oil has spilled out, add the required amount.
When is clutch adjustment required?
VAZs use a dry type of clutch, that is, there is a basket consisting of two parts - driving and driven
Clutch adjustment of the VAZ 2114, and other vehicles, is carried out in cases where defects associated with the operation of this mechanism appear. Such malfunctions include:
- clutch pedal adjustment;
- clutch cable adjustment;
- pedal height adjustment;
- clutch adjustment.
In another case, the need to adjust the clutch drive may arise due to previous incorrect adjustment. It is possible to reduce or increase the working stroke of its pedal.
The photo shows the clutch of a VAZ 2114
As a result, malfunctions occur in the operation of the drive - the clutch begins to “slip” or “drive”, gear shifting becomes difficult, jerks appear when starting from a standstill, fuel consumption increases, etc.
Price issue
If the price of a VAZ 2114 reverse sensor varies between 100-300 rubles, and you can install it yourself, then the problem in the wiring or with the headlight board will not be so easy for you.
Before purchasing wiring components, clean the contacts and spray with WD-40, this should help. Because the purchased wires also need to be installed wisely, and this is electronics - a delicate matter - available to craftsmen in the service for a good fee.
As for the headlight circuit board, this is also a controversial issue, requiring investment both in the part itself and in the work of a professional who will take care of it. Burnt out light bulbs in a headlight are the cheapest consumables; one light bulb costs 20-50 rubles.
Guys, can you tell me who has encountered this!? how much does a brake pedal sensor (frog) cost? and are there any nuances during installation!?
I'm about to change the clutch
by Adminrive · Published 07/29/2015
Side mirror adjustment lever can be changed
by Adminrive · Published 11/29/2016
Error pop-up P0504: factors
A code for incorrect notification of the brake pedal switches can be seen in situations involving an unadjusted limit switch. So, after flashing the M74, M74.9.7 ECU, engineers made some changes to the operation of the engine control. This results in a reduction in the number of harmful emissions. As practice shows, adjustments in the firmware only strangled the engine, thereby causing a lot of problems regarding sensors and limit switches.
Note. In the domestic car Lada Granta, one body is equipped with a brake pedal position sensor and a limit switch, a stop lamp switch. The first factor in the occurrence of problem P0504 is the incorrect adjustment of the sensor housing.