Lada cars of the 2112 family were equipped with injection engines. The fuel pump is responsible for supplying fuel to these cars. 21102-1139009. We are talking about a plastic module containing a pump and a level sensor. Similar modules were produced by several companies, and the products varied in quality. If there is a suspicion that the fuel pump is not working, you need to turn on the ignition on the VAZ-2112 - the pump should pump fuel for the first 1.5 seconds. But the sound of a running motor may not be heard. It would be better to measure the voltage at the terminals.
The following video shows how to check why the fuel pump is not working.
Fuel pump VAZ 2109: how the injector works. Replacement and inspection
You will need to consider the features that the VAZ 2109 fuel pump has. If the injector is in the fuel injection system, then the pump is of an electric type. Its use is due to the need to control the fuel supply to the combustion chambers. But, as you know, gasoline first enters a special ramp, in which it is mixed with air in a certain proportion (14 to 1). It maintains constant pressure, with the help of which the mixture is supplied to the combustion chamber through holes in the electromagnetic injectors. These are devices that transform the air-fuel mixture into very small droplets. Essentially, the mist in which the gasoline is suspended in the combustion chamber is ignited.
How does a fuel pump work?
There is nothing complicated about the fuel supply system. A conventional pump, which is driven by the rotor of an electric motor. To protect the entire fuel system from small particles, a filter is used. But this is not the end of the features, because it is worth noting that it is necessary to maintain the pressure in the ramp at the same level. And the VAZ 2109 fuel pump (the injector simply cannot work without it), provided that it constantly pumps gasoline, will begin to pump up the pressure higher and higher. And this will disrupt the operation of the system.
Therefore, it is necessary to adjust the pressure. For this, a special device is used, which is called a pressure regulator. It is installed in the fuel rail and connected to a pipeline that serves to dump excess gasoline into the tank. When the ignition is turned on, the rail pressure sensor is polled, after which the fuel pump drive is turned on. After the pressure in the rail has increased to the required value, the fuel pump is turned off. Therefore, it does not work all the time.
Price
The price of a fuel pump for a VAZ 2107 can reach 2,000 rubles for an original part, but there are many analogues on the market that cost from 1,000 rubles.
Article and characteristics
| Parameter name | Data |
| vendor code | 21073.1139 |
| Operating voltage, (V) | 13,5 |
| Productivity, (l/hour) | 60 |
| Maximum pressure, (bar) | 10 |
| Rated operating current, (A) | 6,5 |
How to remove the fuel pump
The VAZ 2109 fuel pump is located under the rear seat. The injector implies its installation directly in the tank. The thing is that the pump is a submersible type. In the same unit there is a float-type fuel level sensor. It works due to the fact that the float moves the slider using variable resistance. At the same time, the current in the power circuit changes. The amount of gasoline remaining in the tank is determined by the magnitude of the change. To remove the pump you will need to use pliers, screwdrivers and an 8mm wrench.
It is quite possible that the reason that fuel is not supplied is a non-working VAZ 2109 fuel pump relay. The injector contains it, as well as a fuse, which could easily burn out. Before starting work, thoroughly clean the entire cover so that after removal no dust gets inside the tank. Then, using a screwdriver, loosen the clamps that secure the hoses. Remove them; if you can’t do it with your hands, try gently squeezing them with pliers and twisting them. After this, use a size 8 wrench to unscrew all the nuts that secure the lid to the tank body. Please note that there are washers there. Don't lose them. That's all, now the pump can be easily removed for replacement or repair.
Signs of a fuel pump malfunction
Using these signs, you can determine that the fuel pump is not pumping.
- The most common sign of a faulty fuel pump is that the car drives intermittently. While driving, the car begins to sharply slow down and then accelerate. Uniform movement of the vehicle is ensured by a continuous supply of fuel.
- The second most common symptom is floating engine speed at idle. This way you can determine if the fuel pump is faulty before you start driving.
- The engine starts with difficulty or does not start at all. Quite often this happens because the fuel pump has completely failed. The symptom is not the most common, since the reason that the engine does not start may lie in a variety of malfunctions.
- The car's dynamics deteriorate. When you press the gas pedal all the way to the floor, the car jerks or does not respond at all to moving the pedal. In this case, the fault may lie not in the pedal, but in the fuel pump.
Do not forget that all the signs listed above are not one hundred percent. Such malfunctions can be caused by failure of various other engine parts. The engine speed may well fluctuate due to a malfunction of the mass air flow sensor or throttle position sensor.
Such malfunctions most often occur due to low quality fuel or uncleaned injectors.
Checking the pump's functionality
It is easy to check the VAZ 2109 fuel pump even without special instruments. The injector will not be able to operate without pressure in the fuel rail. Therefore, you need to keep the pump motor spinning. It’s easy to check; just connect its terminals to the battery. If you are afraid, then turn on an incandescent lamp in the gap of one wire. It will help determine the health of the motor winding. Please note that the filter must be as clean as possible. If it is clogged, be sure to change it. Otherwise, the pump will not be able to create the required pressure.
Malfunctions of the pump with carburetor
Repairing the VAZ 2109 carburetor fuel pump should also begin with diagnostics. But in this regard, there is a significant difference from the injection version of the car. It lies in the fact that the fuel pump, in this case, is mechanical. The principle of operation, and therefore the repair, is different. Diagnosis involves the following basic steps when checked:
- general condition of the fuel pump;
- intake and exhaust valves;
- tightness;
- filter for clogging or damage;
- pump diaphragm;
- pusher
VAZ mechanical fuel pumps come in two types: DAAZ and Pekar. The principle of operation is similar, there are slight differences in design. The main parts of all mechanical pumps are: inlet and outlet valves, fittings, pusher, diaphragm and rod.
To check the inlet valve, you need to disconnect the hose from the suction fitting. Close the fitting with your finger and pump up the pump manually. If the finger is attracted to the valve, everything is in order - this part is serviceable; if not, the valve must be replaced. The outlet valve is checked by unscrewing the discharge fitting. By placing your finger in the same way and pumping up the lever, you should feel pressure.
Pump installation
Pay attention to the condition of the wires when replacing the VAZ 2109 fuel pump. The injector involves powering the engine from the on-board network, so there should be no breaks or destruction of the insulation. Installation of the fuel pump is carried out in the reverse order of removal. First, place the body in the tank, landing on the studs. Then you need to tighten all the nuts, then put the hoses in place and connect the plug with the wires.
Source of the article: https://fb.ru/article/192429/benzonasos-vaz-injektor-kak-rabotaet-zamena-i-proverka
VAZ 2109 injector fuel pump does not pump reasons
If the starter of your car turns normally, but the car does not start, the first thing you need to do is check that the fuel pump is turned on. On domestic cars, its operation can be heard from the passenger compartment; when the ignition is turned on, a characteristic buzzing sound comes from under the rear seat or trunk. If the fuel pump does not work, you need to check the integrity of the fuses and the activation of the main relay of the engine management system and the fuel pump relay. On the VAZ-2107, VAZ-2108, VAZ-2109 and their modifications, relays and fuses are located on the shelf under the glove compartment or under it. On VAZ-2110 and similar ones, you should look in the heater console on the passenger side by unscrewing the fastening screws and removing the side cover. On GAZ cars they are located under the hood on the front wall of the cabin, closer to the passenger side.
The fuel pump relay does not turn on.
If the fuel pump does not work, then first of all you need to check the attraction of the main relay and the fuel pump relay. If the main relay does not click, then it is necessary to check its switching circuit and its serviceability. How to do this is described in the article the main relay does not turn on,
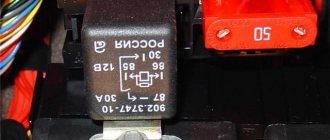
In the case when the main relay turns on, but the fuel pump relay does not, it is necessary to check the power at pins 85 and 86. When using a test lamp, its current consumption should not exceed 0.25A, otherwise damage to the controller may occur. If the control lamp does not light up on any terminal, then the relay is not receiving power. This may be caused by a blown fuse or a broken power cord.
In the case when the lamp burns brightly on one terminal, and at half-glow on the second, and the relay may be activated, you should remove the relay from the socket and connect terminals 85 and 86 with a test lamp. When the ignition is turned on, the control lamp should light up and go out after approximately 20 - 30 seconds. If the lamp lights up and there is poor contact in the connection between the block and the fuel pump relay. If the lamp does not light up, there may be a break in the wire connecting the relay to the controller or the controller itself may be faulty.
Wiring
On almost all car models, the wiring to the fuel pump consists of three wires: “positive”, “negative” and a wire for determining the amount of fuel in the tank.
If the fuel pump stops pumping, the wiring may be damaged. You can check the power using a 12 W lamp, powering it from the external connector of the fuel pump. When the ignition is turned on, the light should light up. If not, then the external circuit is broken somewhere. To check the external wiring, you need to connect in turn the “positive” and “negative” contacts removed from the fuel pump power connector. It is necessary to close the “negative” contact to ground, after which the light will light up when the ignition is turned on. So, it can be determined that the contact is inoperative. If the lamp does not light up, then the “positive” contact is damaged. Placing a contact on the relay in which the light does not light up, there may be a problem with the wiring in the section from the relay to the fuel pump.
Tips for motorists
VAZ-2109 passenger cars of the last years of production had injection engines, so on these “nines” an electric fuel pump was installed in the fuel tank. And on a small part of the VAZ-2109 with a carburetor engine still in use today, mechanical fuel pumps were installed.
Failure of the fuel pump on VAZ-2109i injection engines is determined quite simply, since when the ignition key is turned to the “ignition on” position, the driver simply will not hear the characteristic noise that the operating electric motor of the fuel pump makes. Typically, drivers of “nines” begin their search for the cause of a fuel pump failure by checking the condition of the fuse that protects this electrical circuit.
It is located under the front panel shelf, which is located below the glove compartment. When you unscrew the fastening screws, the block of three relays and three fuses on the wires will move lower, so it will be more convenient to work with it. You will need to check the rightmost fuse and the condition of its contacts. If a blown fuse is detected, it will have to be replaced with a new one. And also find the reason why he burned out.
If the fuse is intact and the contacts are not oxidized, then the next step in troubleshooting is to check the functionality of the fuel pump relay. It is located in the same block as the fuse and is located on the far right. Drivers usually check it by replacing it with a known-good relay. If after such a replacement the fuel pump starts working, then you will have to purchase and install a new relay.
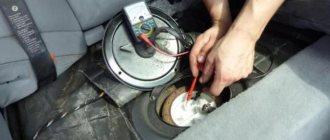
But when the fuel pump still continues to be “silent”, then you will need two wires four meters long. They are needed to check the condition of the fuel pump itself by connecting it to power directly from the battery. To do this you will need to: lift the rear seat cushion, remove the hatch cover, disconnect the plug block and connect the wires from the battery to the fuel pump terminals. There are three terminals in the block: one for ground, the negative one from the battery is connected to it, two more positive ones, for the fuel pump and the fuel level indicator in the tank.
If the fuel pump, when connected directly, works, then you will have to ring the wires going from it to the fuel pump relay, and if it does not work, then either replace it with a new one, or you will have to disassemble it and look for a fault inside the fuel pump.
On “nines” with a mechanical fuel pump, the most common malfunction is wear of the fuel pump diaphragm, as a result of which gasoline will leak through the drainage hole in the housing when it operates. The second reason for the failure of such a fuel pump is wear of the pusher, which transmits force from the camshaft cam to the fuel pump drive lever.
Hello everyone, dear car enthusiasts and owners of nines. Today we will look at the main reasons why the fuel pump on a VAZ 2109 does not work.
Throughout the history of car production, two types of fuel pumps have been installed: electric and mechanical. Everything depended on the type of engine, the injectors were electric and, accordingly, the carburetor nines were equipped with mechanical ones.
Let's start right away with the mechanical fuel pump. The most likely cause of the malfunction may be wear of the diaphragm. When the fuel pump diaphragm wears out, a gasoline leak appears in the housing. And the second reason is pusher failure.
On VAZ 2109 injection engines, you can very easily determine that the fuel pump is not working, just turn the ignition key and if you don’t hear the characteristic sound of the pump that its electric motor makes, then something is wrong with it.
The first step in this case is to check the condition of the fuel pump fuse. This fuse is located just below the glove compartment. In the block of three fuses and relays, you need to check the rightmost fuse, which is responsible for the fuel pump. If the fuse is faulty, it must be replaced with a new one, observing the amperage. And try to find the reason why it burned. You also need to check the fuse contacts for oxidation and, if necessary, clean them.
If the fuse is intact and the contacts are in order, you need to check the VAZ 2109 fuel pump relay. It is located in the same block as the fuse; checking it is very simple, you just need to replace it with a working one. If after replacing the relay the fuel pump starts working, then the problem is in the relay, you need to buy a new one and install it.
If, after replacing the relay, the fuel pump on the nine continues to not work, then you will have to check the fuel pump itself. If the pump starts working during testing, you will have to check the wires that go from it to the relay for breaks.
If, even when connected directly, the fuel pump refuses to work and there is no open circuit in the wires, then the best solution would be to replace it with a new one.
What is a fuel pump and how it works
The purpose of the fuel pump is to supply fuel to the car engine from the fuel tank. Since the engine and gas tank are located on opposite sides of each other, fuel supply is impossible without a gas pump.
There are two types of fuel pumps: mechanical and electric. A mechanical fuel pump can be found in a carburetor type car. Fuel must be supplied to the carburetor at low pressure. Electric fuel pumps are specially designed for fuel systems with injection type fuel supply (injectors).
The mechanical fuel pump is attached to the outside of the fuel tank, and the electric one is attached to the inside. Some engines have two fuel pumps at once: one of them operates at large volumes and at low pressure inside the fuel tank, and the other operates at small volumes and at high pressure, located near or on the engine.
Additionally, we recommend reading our expert’s article, which talks about what a fuel pressure regulator is and how to repair it.
Mechanical fuel pumps suck fuel from the tank into the engine. The distance between the pump and the carburetor is small. Thanks to this they can work under low pressure. The operating principle of electric fuel pumps is based on pushing fuel into the engine. The operation of such a pump is controlled by the vehicle's electronic system.
This control takes into account throttle position, fuel/air ratio and exhaust gas content. Electric fuel pumps heat up quickly and make a lot of noise due to the fact that they operate under pressure. Because of this, they are placed in the fuel tank as it muffles the noise and cools the pump.
The fuel pump is started by an electric motor. After turning the ignition switch to switch on, a signal is sent from the on-board computer to start the fuel pump. An electric charge enters the fuel pump. The engine rotates for several seconds, during which time the necessary pressure is created in the fuel system. If a signal is not sent to the on-board computer within two seconds, the fuel pump automatically turns off.
If an emergency shutdown does not occur, fuel enters the fuel pump through a tube and exits through a one-way valve. Next, it enters the fuel filter, which traps particles of debris and dirt, and only after that the purified fuel enters the engine. The fuel pump stops working simultaneously with the engine.
Pressure is the most important parameter for a fuel pump, affecting the amount of fuel injected into the engine. The gearbox is responsible for the stability of the fuel supply.
What fuel pumps were installed on VAZ 2108/2109 cars
Most VAZ 2108/2109 cars were equipped with gasoline engines with carburetor injection of a combustible mixture into the combustion chambers. Only their latest modifications were equipped with fuel injection systems.
Table: serial engines of VAZ 2108/2109 cars
| Engine modification | Volume, cm 3 | Number of valves, pcs | Injection type | Years of manufacture |
| VAZ 2108 | ||||
| 2108 | 1289 | 8 | Carburetor | 1984–1997 |
| 21083 | 1499 | 8 | 1986–2005 | |
| 21081 | 1099 | 8 | 1987–1997 | |
| 2111–80 | 1499 | 8 | Injection | 1994–2005 |
| VAZ 2109 | ||||
| 2108 | 1289 | 8 | Carburetor | 1987–1997 |
| 21081 | 1099 | 8 | 1988–1997 | |
| 21083 | 1499 | 8 | 1988–2004 | |
| 2111–80 | 1499 | 8 | Injection | 1994–2004 |
| 11183–20 | 1596 | 8 | 1994–2004 | |
Absolutely all carburetor “eights” and “nines” were equipped with DAAZ mechanical fuel pumps produced by the Dimitrovgrad Automotive Accessory Plant. They were and are now produced under catalog number 2108–1106010.
Mechanical fuel pump DAAZ 2108–1106010
VAZ 2108/2109 injection engines were equipped with electric submersible gasoline pumps produced by Russian enterprises Pekar, Utes, SAAZ, as well as pumps of joint and foreign production. Fuel pumps were installed on the latest modifications. The catalog number of the submersible electric fuel pump VAZ 2108/2109 is 2112–1139009.
Electric pump "Bosch" 2112–1139009
Features of the design and location of fuel pumps VAZ 2108/2109
The DAAZ gasoline pump has a simple mechanical design. It includes:
- a body consisting of an upper and lower part;
- lid;
- mesh filter;
- valves (inlet and outlet);
- diaphragms (3 pcs) with spacers;
- the rod to which the diaphragms are attached;
- return spring;
- manual pumping lever.
Design of the DAAZ fuel pump
The VAZ 2108/2108 mechanical fuel pump is located in the engine compartment of the car and is installed on the auxiliary drive housing (in front of the ignition distributor). It is driven by the camshaft through a cam mechanism and a rod (pushrod). The camshaft rotates an eccentric, which transmits force through a pusher to a balancer at the bottom of the pump housing. The latter raises and lowers the rod with the diaphragms. Thus, a vacuum is formed at the pump inlet, and pressure is formed at the outlet. Valves located in the device body are responsible for its maintenance.
The VAZ 2108/2109 mechanical fuel pump is located on the auxiliary drive housing
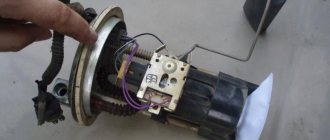
On injection VAZ 2108/2109, the fuel pump is not a separate device, but an element of the fuel module. It also includes:
- plastic storage cup;
- coarse mesh filter;
- fuel level sensor.
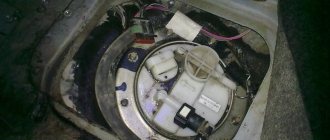
The module is located in the car tank. Its lid (base) is located at the top of the container. You will find it by removing the back seat and peeling back the carpet.
The electric fuel pump in the injection VAZ 2108/2109 is located in the car tank
Structurally, the fuel injection pump VAZ 2108/2109 is an electric motor with an impeller on the shaft, which, rotating, pumps gasoline, creating a vacuum at the inlet fitting and pressure at the outlet. The pump is powered from the machine’s on-board network, protected by separate relays and a fuse.
Design of the electric fuel pump VAZ 2108/2109
An article dedicated to self-repair and replacement of the gas tank on a VAZ 2109 is located here: https://vazweb.ru/desyatka/pitanie/zamena-benzobaka-vaz-2114.html
Fuel pump of an injection engine: checking serviceability
For those who may still be unaware, the fuel injection pump is electric and is usually installed in the car's tank. All this imposes its own characteristics on checking its performance. Namely:
- There may be malfunctions of both the electrical and mechanical parts of the fuel pump;
- The inaccessibility of the installation site of the fuel pump and its rather high price complicate the performance check by replacing it with a known good one;
- To objectively assess whether the fuel pump is working or not, you can no longer get by with a plastic bottle; you will need special instruments.
But not everything is as scary as it might seem at first glance. However, first things first.
How to check a mechanical fuel pump VAZ 2108/2109
Checking a mechanical fuel pump involves determining its performance, i.e. measuring the amount of fuel pumped per unit of time. And according to the characteristics of the device, it should be at least one liter per minute. To determine it, you will need an assistant, as well as the following tools and tools:
- screwdriver with Phillips bit;
- a piece of fuel hose;
- 2 empty plastic bottles;
- 1.5 liters of gasoline;
- watch with stopwatch.
- Using a screwdriver, unscrew the screw on the outlet fitting clamp, loosen it and remove the fuel hose.
- Pour gasoline into a plastic bottle. We lower the free end of the fuel hose (removed from the outlet fitting) into the bottle to the bottom. Through it, gasoline will be sucked into the carburetor when the fuel level in the float chamber decreases.
- We put the end of the prepared hose onto the outlet fitting of the fuel pump. Place the other end into an empty bottle.
- We ask the assistant to start the engine, start the stopwatch. If the car has a tachometer, stick to 2000 rpm. If it is not there, we rely on hearing.
We lower the hose from the outlet fitting into an empty bottle
If the amount of gasoline pumped in one minute is less than a liter, the pump is faulty
Further diagnostics should be aimed at identifying the faulty pump element. To carry it out you need:
- screwdriver with Phillips bit;
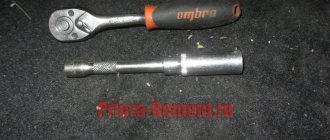
- wrenches 10 and 13;
- caliper (ruler).
- First of all, we check the operation of the valves. Unscrew the screws of the clamps securing the fuel hoses to the pump fittings. We remove the hoses. We put our finger (palm) against the outlet fitting, plugging it. Press the manual pumping lever several times. At the same time, the pump should make slurping sounds, and air pressure should be felt at the fitting. We check the intake valve in the same way. When you press the pumping lever, your finger should be sucked into the fitting. If there is neither pressure at the outlet nor vacuum at the inlet, either the valves or the diaphragms are faulty.
You should feel a vacuum at the inlet fitting, and air pressure at the outlet
The mesh filter must be clean and free from mechanical damage.
If the diaphragms are damaged or deformed, they must be replaced
The length of the pusher should be 82.5 mm
If everything has been checked, but the fuel pump does not work - article numbers
In general, the pump article number for VAZ-2112 engines looks like this: 21102-1139009-XX. Instead of the letters XX there are numbers, for example 02 or 03. They indicate the manufacturer. So, modules from different factories are not interchangeable! The resistance of the FLS resistor is different in them. However, when replacing the FLS sensor, you can borrow it from the “old” module. That's what they usually do.
Until April 2002, article numbers of the type 2112-1139009 were used.
Almost every module available for purchase contains a built-in pressure regulator. There are also exceptions - KSZC-A243, for example. The meaning is as follows:
- All internal combustion engines with a volume of 1.5 liters are equipped with a ramp with an “external” regulator (2112-1160010);
- The 21124 or 21114 motor requires a built-in regulator.
In conjunction with 1.5 liter engines, you can use any module – both with and without a built-in regulator.
Designations of analogues
- 21102-062213.0XX – instead of the letters XX there will be a plant designation (07, 13, etc.);
- KSZC-A233 or A243 – KSZC brand. No pressure regulator .
Mechanical fuel pump repair
The functionality of a mechanical fuel pump can be restored by replacing its faulty elements. You can buy them at any automobile store. But it is better to buy not individual spare parts, but a repair kit. It includes all the elements that can fail:
- intake and exhaust valves;
- diaphragms with spacers, “plates”, rod;
- pusher;
- thermal spacer;
- gaskets
Replacing valves
To replace the pump valves you will need a slotted impact driver and a small hammer. The valves are held in their seats by punching at three points. These areas must be carefully knocked off with a screwdriver. After this, the valves can be removed. Having installed the new parts, we secure them with cores. To do this, place the tip of the screwdriver on the edge of the housing along the circumference of the socket and strike it lightly with a hammer. We fix each valve in three places.
How to change apertures
To replace the diaphragms, you need to unscrew the nut by 10 in the upper part of the rod. Next, we remove the damaged elements, and in their place we install parts from the repair kit.
The kit includes three diaphragms: two working and one safety. The latter serves to prevent unauthorized fuel from entering the carburetor if the first two are damaged. It is installed at the very bottom of the rod immediately after the lower “plate”. We place spacers on top of it on the rod: first a small one, then a large one. We place the working membranes and the upper “plate” on them. We secure the resulting structure with a nut.
The mechanical fuel pump has 3 diaphragms
Replacing the pusher, thermal spacer and gaskets
The thermal spacer does not need to be replaced unless it is damaged. Inspect its mating surfaces, especially the outer one, to which the lower part of the pump housing is attached. It should be perfectly smooth. Otherwise, oil leakage may occur at the junction of parts during engine operation.
Replacing the pusher is carried out by removing the old one and installing a new rod in its place. There is no difference in which end where it will be installed.
Now about the gaskets. There are only three of them in the repair kit, and they have different thicknesses:
The first is intended for installation between the thermal spacer and the auxiliary drive housing, and the gaskets “B” and “C” are used to adjust the protrusion of the pusher above its mating surface.
The adjustment is made as follows:
- We install the thermal spacer with the first gasket and a new rod into the auxiliary drive housing.
Installation of gaskets and thermal spacer
The thinnest gasket is installed between the spacer and the accessory drive housing
The pusher should protrude 0.8–1.3 mm above the mating plane of the spacer
After the adjustment is completed, the fuel pump is installed in place and secured with nuts.
Problems with the operation of the vacuum type device
The vacuum pump may malfunction. This can happen for several reasons:
| Problems | Causes | Solution |
| Insufficient vacuum | Insufficient oil level | Add oil to the required level |
| The oil has become dirty | Dirty engine. The higher the alkali content in the oil, the faster the engine cleans and the oil turns black. | Replace the oil with clean oil. If the alkali content is high, replacement is required after 5,000 kilometers. |
| The oil fill hole is clogged | Small particles on the surface of the lid | Clean the inlet and rinse the filter |
| The integrity of the hoses is compromised | Wear, mechanical damage, hose connection failure | Check hoses and their connections |
| Insufficient pump power | Loss of voltage from the generator to the pump due to unsuccessful implementation of standard wiring, insufficient device size | Replace the wiring or purchase a new part of the required power |
| Oil started leaking | The integrity of the oil container is damaged | Replace container |
| The cover of the hole for draining the oil does not fit well or the rubber ring has become unusable | The thread of the cover is torn off, the ring is worn out | Replace the cover and replace the gasket |
| Oil splashes | Permissible oil level exceeded | Drain some of the oil to the desired level |
| The pressure at the air evacuation fitting has been exceeded | Insufficient pump power | Install a more powerful pump |
| The pump is hard to start | The temperature has become too low | The device must be turned on and off several times in a row or the oil must be heated |
| Breakdowns in the electrical part of the pump | Voltage surges, short circuit | Check and eliminate breakdowns |
| Garbage has accumulated inside | Dirt in the gas tank | Examine the contents and remove the blockage, clean the gas tank |
Replacing a mechanical fuel pump VAZ 2108/2109
Replacing a mechanical pump assembly will take no more than half an hour. To implement it you will need:
- key to 13;
- screwdriver with Phillips bit;
- container for draining gasoline.
- Unscrew the screws of the fuel hose clamps on the inlet and outlet fittings of the pump.
- Remove the hoses from the fittings.
- Using a 13mm wrench, unscrew the fuel pump mounting nuts.
- We dismantle the pump. We drain the gasoline from it.
Removing a faulty pump
Securely secure the pump with nuts
Pump gasoline into the pump by pressing the manual pump lever
Pump repair or replacement?
There are two ways to get rid of a faulty power system. Firstly, it is expensive, but reliable - replacing the entire fuel pump with a VAZ 2107 carburetor. Secondly, installing a repair kit. Which is better? If your hands are full and you can do all the work perfectly, then, of course, it will be cheaper to install only new interiors. But if you are a driver who rarely encounters such difficulties, it is better to get a new device and install it on your car. Fortunately, the procedure is simple: you need to unscrew two nuts and loosen the clamps.
If the car engine does not start, various factors can be the cause of such consequences. One of these factors could be a gas pump, the main purpose of which is to pump gasoline into the engine from the gas tank. The VAZ 2107 has an injector and a fuel pump that is much more reliable than on carburetor cars. Despite this, even on fuel-injected cars the fuel pump can fail.
Checking the performance of the fuel pump on injection VAZ 2108/2109
If in Sputniks and Samaras with carburetor engines, fuel pump malfunctions are associated only with its design, then in injection vehicles they can also be caused by problems with the power supply of the device.
Diagnostics of the electric circuit of the fuel pump
To check whether voltage is supplied to the fuel pump, turn on the ignition without starting the engine and listen. When you turn the key, you should first hear the click of the relay, and then the characteristic “squeal” that the electric motor of the fuel pump emits. If these sounds are absent, the search for the problem should begin with the pump circuit protection devices.
The fuel pump relay and fuse are located in an additional mounting block, which is located under the glove compartment. The pump relay (R2) is installed in the middle, and its fuse (F2) is located to the left of it.
The fuel pump relay and fuse are located in an additional mounting block under the glove compartment.
We check them in this order:
- Disconnect the negative terminal from the battery.
- We remove the fuse from the socket and test it with a tester. If it is faulty, we replace it.
- We connect the terminal to the battery and turn on the ignition without starting the engine. We switch the tester to voltmeter mode and measure the voltage between the relay output to which the pink wire fits and ground. The device should show 12 V. If there is no voltage, the problem must be looked for in the wiring or contact group of the ignition switch. If power is supplied to the relay, use a screwdriver to close the terminal to which the pink wire fits with the terminal connected to the gray wire. This way the pump circuit will be closed directly (bypassing the relay). The fuel pump is working - we change the relay, if not - we check whether voltage is supplied to the pump itself.
- We remove the back seat. We bend the carpet underneath and find the hatch. Unscrew the screws (2 pcs) securing it. There is an electrical connector under the hatch. Disconnect it from the pump. Turn on the ignition. Using a tester turned on in voltmeter mode, we measure the voltage between the “plus” (gray wire) of the pump and its “ground”. There is voltage - the problem is in the pump itself, if not - the reason should be sought in the wiring.
Checking the fuel pressure in the system
If the diagnostics show that the pump is working, but the above signs of its malfunction are observed, you need to check the fuel pressure in the system. For this you will need:
- a pressure gauge with a measurement limit of 5–7 atmospheres (a regular tire gauge will do);
- a piece of petrol-resistant hose with a length of 50 cm and an internal diameter of 10–12 mm;
- nipple cap;
- 2 hose clamps;
- dry rag.
We check the pressure in the following order:
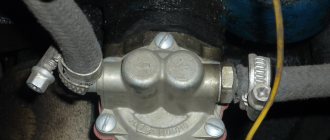
- We find a special fitting on the fuel rail. It is located on the right side of the device (when viewed from inside the car).
The fitting is located at the end of the ramp on the right side
Unscrew the spool with a nipple cap
We connect one end of the hose to the pressure gauge, the other to the fitting on the ramp
The pressure when the ignition is on should be 2.8–3.2 atmospheres
Car won't start after DIY replacement
This is a fairly common problem. It must be said that the car should not start immediately after replacing the pump. The pump first needs to create operating pressure in the system. To do this, you need to turn on the ignition for a short time (a few seconds). The key must be inserted into the lock, but not turned. The lights on the dashboard should light up. Then you can rotate the engine with the starter for five to ten seconds. If nothing works out, then you should take a break for half a minute and repeat your actions.