The fuel pump relay is a device that provides and stops power supply to the fuel pump upon command from the ECU. The device is fully responsible for controlling the fuel pump, and also performs certain additional functions, which depend on the specific brand and equipment of the car. For example, on cars with automatic transmission, if it is necessary to activate the kick-down mode (intensive acceleration), the specified relay is activated.
We also recommend reading the article on how to clean or replace the coarse filter mesh of the fuel pump yourself. In this article you will learn how to remove the fuel pump and get to the screen, as well as the best way to clean the fuel pump screen.
The fuel pump does not work, the relay turns on.
Checking relay power.
In the case when the fuel pump relay turns on when the ignition is turned on, but the pump itself does not work, you need to check the power at terminal 87 of the fuel pump relay. To do this, touch terminal 87 of the relay socket with the output of the control lamp connected to the vehicle ground, and the lamp should light up. If the lamp does not light, it means the fuse has blown or there is a break in the wire.
If there is power at terminal 87, you should remove the relay from the socket, and instead place a jumper between pins 87 and 30. In this case, if the pump and connecting wires are working properly, the pump should start working and if this happens, the relay should be changed. If the pump does not start working, then, without removing the jumper, you need to touch the power wire on the fuel pump with a test lamp connected to the vehicle ground.
Checking the fuel pump power circuit.
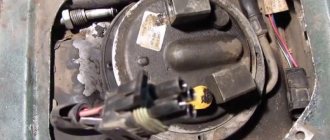
If a submersible pump is installed on the car as part of the fuel module, you need to remove the connecting connector and touch one of the thick wires. When you touch one of them, the indicator lamp should light up. If the lamp does not light up on any of the wires, then it is necessary to eliminate the break in the wire from the fuel pump relay to the module connector or the pump itself, if the pump is of a remote type. One of the reasons for the break may be the anti-theft blocking of an installed non-standard alarm system.
In the case when the test lamp lights up on one of the thick wires of the connector or one of the terminals of the remote pump, you need to connect these terminals with a test lamp to each other. In this case, the control lamp should light up. If the lamp does not light, it is necessary to eliminate a break or poor contact in the wire connecting the pump to the vehicle ground.
If, when checking the wires and relay for turning on the fuel pump, no malfunction is detected, the electric motor of the fuel pump or its connection to the module connector is faulty. It is not difficult to find the cause by removing the fuel pump module from the tank. If there is poor contact with the connector, melting of the plugs will be visible. If melting is not noticed, then to check the pump itself, you can connect it to the battery. It should be taken into account that operating a submersible pump without liquid will damage the pump. A faulty pump should be replaced.
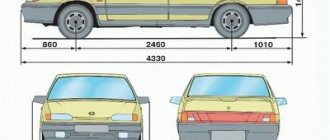
Buying a fourteenth fret is a young thing that does not require a large budget, both for the car itself and for spare parts. If you compare the VAZ 2114 with any foreign car of the same class, you will get a decent price difference in favor of the Lada. And even if a foreign car costs more, and servicing it is not more expensive than a Lada, then spare parts from the Russian automobile industry will be much easier to find in any of the most remote areas of our country.
Whatever you say, any car wears out and requires attention and care. So let's talk about a common problem with the fourteenth - the fuel pump does not pump.
Gasoline pump VAZ 2114
You're driving, and suddenly you stall. You start it, the engine growls, the starter turns, it starts moving and again there is a stupor. Or the ignition does not respond at all, you have to push it to start. This also includes the case when the engine responds every once in a while if you slow down for a couple of minutes and go to nitral. The battery is ok. We're sinning at the fuel pump.
Recommendations for use
Good and failed fuse
In order to determine whether a fuse is good or not, drivers usually practice two methods.
- The simplest one is to remove the problematic element and see if its conductive part is intact.
- The second method is a little more complicated, but is more accurate than determining by eye. To do this, you need to turn on a non-working consumer, for example, a cigarette lighter. Without removing the element itself, we check the voltage at one end and at the other. If there is voltage only at one end, then the conclusion here is clear - the fuse is blown and needs to be replaced.
If you find that your VAZ 2115 protective elements often burn out, then it is quite possible that your wiring is not in order. In such a situation, it is better to contact a service station.
- When operating a vehicle, never install so-called “bugs” or jumpers instead of electrical fuses. If the voltage in the circuit increases, the consumer may simply fail completely.
- Replace the burnt out one with a whole one of similar value.
- It would be wise to always keep in stock a set of electrical fuses of different amperages. They won’t take up much space, but in certain situations they can help out.
Sorry, there are no surveys available at this time.
Symptoms of a problem
- The first sign indicating a breakdown of the fuel pump will be a banal refusal of the engine to start. Of course, such an indicator as an unstarted car is very general. In this case, it is worth checking the spark plugs, which may become oily and not produce a spark and the ECU.
- The second point is the pressure of the fuel system. If the fuel pump is OK, it creates a pressure of 3.2 bar. The fuel rail is characterized by the following indicators:
- for a volume of 1.5 l – from 285 to 325 kPa,
- for a volume of 1.6 l - from 375 to 390 kPa.
- A very common problem is when the signal does not reach the fuel pump after ignition. When you turn the key, you usually hear a slight vibration from the fuel pump, but here it doesn’t happen. Most likely the wiring has failed. We'll have to call her and figure out what's what.
- The engine is tripping. Like reason number one, this indicator is not a benchmark. It is believed that the signs of a malfunction of the VAZ 2114 fuel pump are represented by other obvious causes of malfunctions. However, if the fuel pump is not working properly, the engine begins to jerk (which is natural, fuel combustion in the cylinders occurs incorrectly), and operate intermittently out of the blue.
- The engine may jerk even before starting or at low speeds. This reason is closer to the truth: either the fuel pump or its mesh – a low-purity filter – is not working.
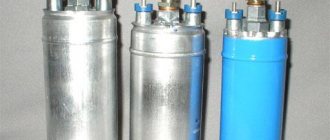
The fuel module, which includes the pump itself, is expensive - from 2,000 to 3,000 rubles. The inept owners of the fourteenth buy it entirely (together with the filter, fuel level sensor, float and intake chamber) and install it to replace the deceased. In fact, the price of a VAZ 2114 fuel pump is only 700-1000 rubles, you only need to take and install it, the rest of the module almost always remains intact.
Just don’t immediately run to the spare parts store and buy a new one! There are plenty of reasons for the breakdown, including those that may lie in the power system. Here are the main ones:
- Fuel pump fuse VAZ 2114
- Fuel pump relay VAZ 2114
- Poorly secured mass of the VAZ 2114 fuel pump
- Fuel pump motor VAZ 2114
- Contacts of the fuel pump system VAZ 2114
- The fuel pump itself
All these spare parts can break and stop the normal operation of the fuel module system. In fact, the fuel pump is the part of the fuel system that passes gasoline under pressure. The mechanism is complicated, we will understand it step by step.
What problems might you encounter when replacing?
The main problem that arises when replacing a fuel pump is the lack of the expected result: there is no fuel supply, or it is supplied intermittently.
Therefore, before starting all work, you need to make sure that the problem is really in the pump itself. After all, a weak fuel supply can be caused by a clogged fine filter, problems with the fuel lines - sometimes they can simply bend somewhere in an unexpected place, or dirty injectors on the fuel rail.
Even an air filter that is not replaced on time or a coked throttle valve can cause effects that look similar to insufficient fuel supply. But the most common problem is a poor contact in the electrical connector of the fuel module or a simply blown fuse.
Good luck to you and your car friend! Be always healthy!
Pressure system
The gasoline pump creates pressure in the fuel rail for normal gasoline supply functionality. Let's measure the pressure and we'll understand a lot right away.
Normal parameters of atmospheres in the system are as follows:
- Idle – 2.5
- Ignition – from 3
- Without pressure regulator tube – 3.3
- With pinched drain – 7
- We press on the gas - from 3 to 2.5.
We will measure in these five states with a pressure gauge with a small range of atmospheres (up to 7, to reduce the error to a minimum). Under the hood we found a pressure fitting (just unscrew the cap in advance), attached a pressure gauge (hose) to the fitting and off we went. The ignition is turned on, the pressure gauge is zero: the fuel pressure regulator is broken. We press on the gas, the pressure gauge goes to zero: the fuel pump itself is broken (now you can do some shopping at a spare parts store). There may still be a situation. When the pressure gauge needle lazily rises, look at the condition of the fuel filter.
By the way, if you don’t have a pressure gauge, it’s sad and sad, because it’s an expensive pleasure. Similar diagnostics in the service will cost half as much.
Wiring contacts
The wiring system goes to the fuel pump in the number of three wires: positive, negative and gasoline level indicator. The cause of a fuel pump failure may be a simple power failure in the wiring. If everything is normal with the pressure, then we check the contacts.
We take a simple 12 V light bulb and attach its wires to the positive and negative contacts on the external connector of the fuel pump, respectively. We turn the ignition: the light blinks, there is contact. Then you need to dig deeper - look at internal contacts.
An external problem with the wiring if the light does not light up: alternately connect the positive and negative contacts removed from the fuel pump connector to the ground of the fuel pump, and then to the snout. Negative contact on ground, turn on the ignition, the light blinks - the contact is not working, the light does not blink - the positive contact is not working. When the contact is on the snout and the light comes on, the wire is damaged in the area from the fuel pump to the snout.
Replacing the mounting block
Where is the fuel pump fuse in a VAZ-2114 car?
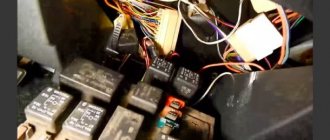
There are problems with the connectors of the mounting block, as well as with its board itself. It is quite difficult to identify such faults. A sign of such a problem is the failure of several electrical appliances at once. At the same time, they, the relays, and the fuses responsible for their operation are in good working order.
It is possible to repair connectors only if the cause is oxidation of their contacts. You can also try to repair damage to the board tracks, but it is easier to replace the faulty unit with a new one. Moreover, it is not that expensive - around 2000 rubles.
To replace the mounting block, you only need a 10mm socket wrench. The replacement procedure is as follows.
- Raise the hood and disconnect the negative terminal from the battery.
- Open the cover of the mounting block and unscrew the two nuts securing its body.
- Disconnect the nine-pin connector.
- Remove the block housing along with the board.
- Disconnect the remaining connectors.
- We install the new unit in the reverse order.
The only difficulty that may arise during installation is that some wire harnesses are very short, so connecting them will require some skill.
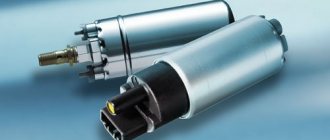
Motor
Fuel pump motor VAZ 2114
We checked the pressure and wiring, everything works like clockwork, but the engine stalls. The fuel pump may not pump due to a breakdown of the motor - the main element that drives fuel. We check its functionality with the same light bulb: attach its wires to any terminal of the motor, turn the ignition. The lamp blinked - it was time to throw out the motor. And again, run to the store for a brand new motor.
The terminals may oxidize and not make contact, as a result of which the fuel pump will not pump. The motor in this case may be normal. And the terminals just need cleaning (possibly re-soldering). There is an opinion that the terminals are oxidized due to low-quality fuel (the octane number does not match the declared one).
Diagnosis procedure
After you are convinced that the fuel pump has failed, you can proceed to the next stage. In particular, it is necessary to understand what exactly the problem is. There can be many options here. The easiest way is to check the integrity of the fuses. Let us remind you that the fuel pump itself in the “fourteenth” is located in the fuel tank. After the ignition is turned on, voltage is supplied to its terminals through fuse F3 and relay R2 - the latter are located in the cabin under the panel on the passenger side.
If the fuel pump fails, the first thing to do is remove the cover located under the panel on the right side of the console. This is not difficult to do - it is secured with two self-tapping screws. Under the cover you will see 3 fuses and 3 relays. The integrity of the above-mentioned F3 should be checked. Also, do not forget to inspect the contacts into which this fuse is inserted. If no problems are found here, move on to checking the fuel pump relay. The easiest way to do this is to borrow something that is known to work from someone you know and try how the car works with it.
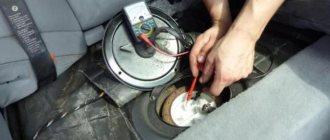
If the fuse and relay are good, we move on. The next stage of diagnosis will be to inspect the terminals of the fuel pump itself. To get to them, you must first lift the rear seat cushion. Once you have access to the cover located on the bottom, unscrew the screws holding it. A hatch will open in front of you, in which there are 3 terminals
Please note that black and gray wires lead to the two positive ones. The third terminal is negative
Through them, power is supplied to the fuel pump itself. You will need to check whether there is voltage at the positive terminal, for example, using a test lamp. It should light up for 3-5 seconds after you turn on the ignition.
The light is on, but the fuel pump does not show any signs of life - which means we arm ourselves with a tester and check the voltage level. There should be at least 10 volts here. This is the minimum required value to start the fuel pump. Note that the reason why the voltage has decreased is quite often the oxidized contacts of the positive and negative wires. Accordingly, to fix the problem, you just need to wipe them. By the way, there is another verification option. Take long wires and apply voltage to the fuel pump terminals directly from the battery. In this case, everything will become immediately clear.
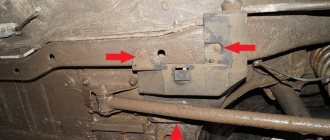
Don't forget to also check the ground of the fuel pump - it is attached near the parking brake lever, under the dashboard. This reason is quite common, this point also needs to be checked. With constant use of the handbrake, the mass may well be shifted slightly to the side. Just in case, remove the plastic casing covering the lever, disconnect the mass, clean the contacts and return it to its place.
These are all “external” reasons. If no problems are found here, then you will need to remove the fuel pump and look for the “internal” ones. One of the most common problems is worn or stuck brushes. Another fairly common cause is the motor. You can check it using the same test lamp, having first supplied power to the fuel pump.
Fuel pump weight
The contact system is normal, but the gasoline level sensor is acting up. Let's see what happens to the mass of the fuel pump. It may be poorly secured. In this case, the fuel pump will not be able to pump anything.
The mass of the fuel pump itself is attached to it in the area of the handbrake, under the dashboard. When you pull the handbrake, you can touch the ground contacts of the fuel pump, and the connection may be lost.
It is not difficult to tighten the mass of the fuel pump, it is difficult to reach it. Namely: get the grounding contact of the ground conducting the lost connection. We remove the plastic under the handbrake and the floor covering of the car, respectively; We clean the contact and firmly attach the mass to the fuel pump.
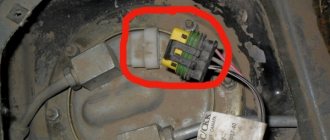
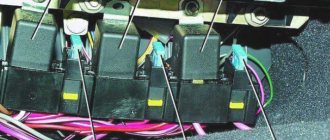
In the same place as the fixed mass of the fuel pump, under the dashboard, its relay is located.
Ideally, when ignited, the relay creates the required pressure in the system in a couple of moments and turns off. If this does not happen, the pressure is normal, but the process does not proceed, we completely lift the front facing panel that covers the contacts of the music and air conditioner and look from the passenger side: there are three switches, the lowest one is from the fuel pump. When you turn the key, the relay makes a characteristic click and works. If there is no click, the relay or its contacts are closed.
As they say, there is no need to waste time on trifles, if the motor terminals can be reanimated, then it is better to replace the relay and its contacts. The pleasure is inexpensive, the location for replacing spare parts is very convenient.
Location of the starter relay on the VAZ-2115
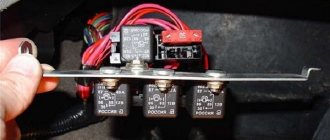
In fact, everything is quite simple - the fuel pump relay is located under the dashboard, on the passenger side. In the designated place, it is necessary to open the side panel, which covers the front part and through which the radio, on-board computer and heater radiators are mounted.
After removing the specified element, you can see a strip with three relays and fuses. The pump relay is located below the other two, just as its fuse is in the lowest position compared to the others.
Fuse
Fuse 15 A
One of the final stages of checking a malfunctioning fuel pump is its fuse. Like the relay, the fuse can be seen from the inside. Or you can climb in from the outside, through the hood. Under the hood, closer to the windshield, there will be a dark box, right on the electronic control unit. You need to open it and find the topmost fuse with a current of 15 A and the English inscription fuel pump. We take it out and look at the insides: the contact is not damaged - the fuse is alive. The contact is damaged (blown) - you need to install a new fuse. As with the price of the relay issue, buying and replacing a fuse will not be a big waste of money and time.
Not every master's hands grow from the right place. For this reason. The reason that the fuel pump does not pump can be simple stupid shortcomings of simple tuning.
For example, the alarm was installed in such a way that all the contacts were mixed up, and power simply does not go to the fuel pump. Not because the alarm should not be on the car, or the wiring system is acting up, it’s just that the person who installed it didn’t have enough brains and practice. Check all connections carefully if you decide to add some style to your little one.
Or anti-theft. The button is placed in such a way that it interrupts the integrity of the fuel pump ground contact system, and almost always fails. By the way, if you have such a lotion, I don’t think it will be very effective in the absence of a signal. And if there is a signaling system, then anti-theft is not needed at all.
In any case, remember: in any situation where a VAZ breaks down, the point is not that it is a VAZ, and it was made poorly. It’s just that the Russian auto industry is a little more delicate than the foreign one, it requires a little more attention and your ingenuity.
Replacing the sensor
And now it’s time to consider the process of replacing the reverse sensor on various VAZ cars - from 2106 to 2115. Here are the instructions.
VAZ 2107
Let's start with the Classics
Let's start with the VAZ 2107 car. On VAZ Classic models everything is done exactly the same.
So:
First, we look for the sensor - it is located on the right side of the gearbox, if you look at the car as it moves. It is very difficult to make a mistake - this is the only part in the gearbox where two wires fit.
Sensor location on Classic
- If the wires are broken, then look for protruding contacts.
- If the wires are still on the sensor, then disconnect them.
- Next, you will need a 22 key. They need to unscrew the sensor. For convenience, it is better to take a longer wrench, since over time the sensor will stick to the crankcase.
- If you cannot unscrew the reverse sensor using a wrench (head), then you need to do this using a hammer and chisel.
- Then clean the seat from dirt using a knife.
- Remove the metal washer along with the dirt and replace it with a new one.
- Insert the sensor and tighten it using the same wrench until it stops.
- Next you need to put the wires back on. If necessary, crimp the contacts with pliers.
- And now, the replacement of the reverse sensor on the VAZ 2107 is completed!
Some people have a question about oil - whether it will leak or not. In this case it will not leak.
VAZ 2109
VAZ 21099 replacement reverse sensor
Let us remind you that this point applies to the Samara family as a whole, and not just to the VAZ 2109 car:
- Remove the protection from the car engine, if any.
- The location of the sensor on a VAZ 2108 and similar cars is slightly different than on a Classic, since the car has front-wheel drive.
- As the vehicle moves, the sensor is located on the left side.
- If the Classic had to be driven into a viewing hole, then cars with front-wheel drive can simply be lifted under the left front wheel using a jack.
- Again, the electrical wiring leads to the sensor.
- Remove the wires.
- To remove the sensor you will need an extended 22mm socket and a wrench.
- Using the head, remove the sensor.
VAZ 2109 replacement of reverse sensor
- Prepare a container and, as soon as you unscrew the sensor, place it so that the oil does not spill on the floor.
- Insert the new sensor as quickly as possible.
- Screw it in by hand first and then tighten it using the same socket and ratchet.
- Connect the electrical wiring wires.
- Add the required amount of oil.
All is ready!
VAZ 2110
Cars of the VAZ 2110 family are equipped with engines from the VAZ 2108. Therefore, there is no point in writing the same information a second time. The answer is: VAZ 2110 replacement of the reverse sensor - see the information above.
VAZ 2114
Replacing the reverse sensor on a VAZ 2114 or cars of the Samara-2 family. Instructions:
- The essence of the process is the same.
- Raise the car using a jack.
- If necessary, remove the engine protection, but this may not even be necessary.
- Find the sensor; on new gearbox models of Samara-2 models it has a slightly different location, but finding it will also not be difficult.
- Disconnect the electrical wiring connector from the sensor.
- Using a 22mm wrench (it’s more convenient to use a head, but you can also use a wrench) unscrew the sensor.
- Before removing the sensor from the connector, place an oil container.
- Take out the old sensor and insert the new one along with a new ring.
- Screw the sensor using a wrench or socket.
- Wipe the gearbox housing from oil traces.
- Connect the wires.
- Top up the oil level in the gearbox to the required level.
- Reinstall the engine protection (if necessary).
So, the sensors have been changed. Now you can start checking their functionality.