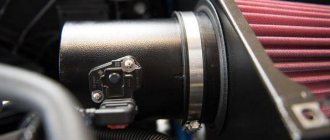
The intake manifold, or as it is popularly called the receiver, is a device that ensures a uniform flow of purified air into the cylinder head. The Priora receiver is subject to tuning and modifications, which we will talk about in this article.
In addition, the receiver accumulates air and smoothes out its vibrations, thereby ensuring smooth engine operation due to a uniform (without drops) supply of air masses. When the unit operates correctly, a highly saturated air-fuel mixture is supplied, and lower fuel consumption is achieved when the engine is running.
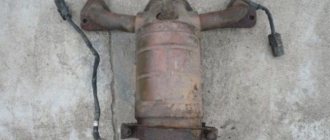
Reasons for replacing the Lada Priora receiver
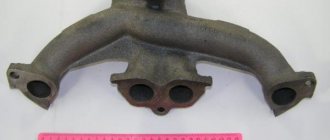
There are a considerable number of varieties of intake manifolds, for example, made from various types of metals or composite materials. However, the Priora receiver is made entirely of plastic. This material prevents excessive heating of the manifold due to a hot car engine.
Thus, the air flow characteristics are improved, which has a positive effect on the proportions and quality of the air-fuel mixture. However, plastic also has a main, negative side - fragility. As a result, numerous breakdowns occur both due to the fault of the car owner and due to low temperatures at which the plastic loses its strength coefficient.
The most common damage can be caused by: - road traffic accidents (even minor ones); — accidental impacts during any repair work in the engine compartment; — other reasons;
If the receiver on your car has through holes or any other leaks, then it must be repaired (if possible) or replaced. If a part is faulty, air loss will occur, resulting in improper engine operation.
Overhaul of Priora 16, 8 valve engines
Reasons for the need for a major overhaul of the Lada Priora engine
The main reason for starting a major overhaul of the Priora engine, be it the 16-valve VAZ 21126 and VAZ 21170 or the 8-valve VAZ 21116 engine, is the “oil burner” of the engine. The reason does not always lie in scuffing the walls of the cylinder block or damage to the pistons; often, to the delight of the car owner, the reason for the engine consuming oil is the occurrence or coking and sticking of oil rings, as well as wear of the oil seals on the valves. Such repairs will cost much less than a complete overhaul of the Priora engine with boring, replacing the piston group with a repair one and installing it on the crankshaft.
In fact, this is far from a complete list of reasons for increased engine oil consumption. In the article about the reasons for high engine oil consumption, we provided a table with a list of reasons that may cause increased engine oil consumption, as well as a table with data on oil consumption rates for various engines. Not every reason for oil loss will lead to a major overhaul of the Lada Priora engine; many reasons can be eliminated by simply replacing the element through which the engine passes oil, for example a camshaft oil seal or one of the crankshaft oil seals, a cylinder head gasket, or a damaged oil filter.
However, today we are talking specifically about a major overhaul of the Priora engine, which is caused mainly by two, often interrelated reasons: scuffing inside the walls of the cylinder block and coking or wear of the oil scraper and compression rings (as well as a violation of the integrity of the oil seals on the valves). When the latter wear out, we will observe a decrease in compression in one or more cylinders, accompanied by a loss of engine power. It should be noted that problems with rings may not be common, that is, for example, oil control rings may become stuck, while compression rings may well function normally for some time.
Due to much lower workload and more gentle operating conditions (according to statistics), the 8-valve engine in Lada Priora “runs” without problems much longer than its 16-valve brother. Nevertheless, I would like to note the general reliability of both engines, observed under normal operating conditions, and the excellent maintainability of these units!
The process of overhauling the Lada Priora engine
When starting to disassemble the Lada Priora engine, we need to study the technical documentation for engine maintenance and act in accordance with it. In preparation for disassembling the engine, disconnect the terminal from the negative terminal of the battery, drain the coolant and air filter and proceed to disassembly.
If there is a need to remove the cylinder head along with the catalytic converter and batteries, we can disconnect them from the engine block together, but if there is no such need, we remove them first. While removing the cylinder head, we simultaneously check the camshaft seal for oil leaks, since it often happens that it is also the cause of oil leakage. In the further process of disassembling the engine, we also check the front and rear crankshaft oil seals, but everything is in order.
How to remove the receiver on a Priora
Tools that may come in handy: - 10mm socket; - key 13; - screwdriver.
To remove the intake manifold you will need:
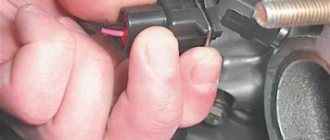
- Due to the fact that in the next steps of the instructions there will be manipulations with electrical wiring, it is necessary to remove the negative terminal of the battery.
- The next step is to remove the plastic screen (cover) from the engine housing. This is done so that it does not interfere with your work.
- After which, it is necessary to remove power from the four ignition coils and dismantle them. To do this, pull out the contact chips. Take a 10mm socket (or a wrench of the same size) and unscrew one fastening bolt on each coil. Simply pull the coils upwards using the necessary force. Now they can be removed. There is no need to remove the spark plugs themselves; they will not interfere with removal. On the other hand, it is advisable to take advantage of the situation and check their condition (gap and spark quality).
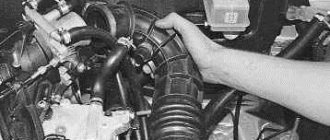
- Our next task is to dismantle the throttle assembly. The receiver cannot be removed without removing it. To remove the throttle and avoid excess antifreeze leaking out of the cooling system pipes, you need to prepare first (unscrew the cap of the expansion tank with coolant). To remove the throttle, it is necessary to disconnect all the pipes connected to it, including those responsible for the air supply (corrugation) and cooling. In order to remove the assembly itself, you need to unscrew the two fastening nuts with a wrench or a 13mm socket. Now the assembly together with the sealing strip can be removed, and at the same time inspected and, if necessary, cleaned.
- At this point, locate and remove the crankcase ventilation hose. To do this, loosen the tightened clamp using a flat-head screwdriver and pull it towards you.
- The next step is to dismantle the dipstick structure to check the oil level. It is attached to one screw, which must be unscrewed.
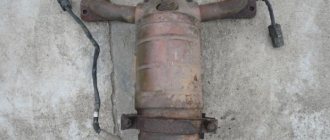
- Now the most important thing is to remove the Priora 16 valve receiver. Doing this is not as difficult as it seems. First of all, we need to unscrew the nuts from the three connecting bolts at the junction of the block and the manifold. It is most convenient to work from a repair pit or using a lift, having previously dismantled the underbody protection of the car. After that, you just have to unscrew two additional nuts.
- It's time to move into the engine compartment and unscrew the two special mounting bolts that are located on the right and left of the receiver housing.
- After which the receiver can be carefully removed.
- Depending on the type and configuration of components in your engine, you may need to unscrew, rotate or remove any component that prevents the receiver from being removed (for example, power steering or a generator).
Decarbonization of piston rings
If the engine starts to smoke, there is a possibility that there are rings stuck in the piston grooves. Nowadays, there are many different modern means for decarbonizing piston rings, and many drivers use them to restore engine performance. Among the most popular compositions are:
- Nitrox Power;
- LAVR ML-202;
- Titanium;
- LIQUI MOLY;
- WYNN'S.
Motorists believe that if the engine starts smoking, you need to use a decarbonizer, and the engine will work as before, without oil consumption and without smoke. Indeed, sometimes these remedies help, but only in cases where the motor has stood motionless for a long time (for example, after winter), and moisture has accumulated in it. If the car is subject to long-term preservation (put in a garage for winter storage), you should remove the spark plugs and pour oil into the cylinders, and plug the spark plug holes with plugs. With such prevention, the spark plugs will not become damp and rust will not accumulate on the sleeves.
But if, after all, a forgetful car owner has not taken preventive measures, you can use a decarbonizer. We get rid of rust in cylinders as follows:
- pull off high-voltage wires;
- unscrew all spark plugs;
- rotate the crankshaft so that all pistons are in the middle position;
- pour 45 ml of liquid into each cylinder, install spark plugs;
- leave the cylinders to “soak” for 6-7 hours;
- why do we turn out the spark plugs, turn the starter a few revolutions so that all the dirt flies out of the engine;
- We put the removed parts back in place and start the engine. At first it may smoke a lot, but then the smoke will go away.
Car owners should remember that decarbonization is not a panacea for all ills, and if the piston rings are worn out, then only replacing them will help.
Beginner car enthusiasts who have recently become happy owners of a Lada Priora will do well to know that this model of a domestic car differs from the VAZ 21124 engine in the engine of a lightweight connecting rod and piston group, thanks to which the vehicle moves almost silently and fuel costs are reduced. The pistons installed in the engine are called plug-in pistons, but there is a significant disadvantage - if the belt breaks, the valve immediately bends.
The manufacturer's instructions indicate that the timing drive lasts for 200,000 km, but in reality, on forums you can often find reviews from dissatisfied drivers whose timing belt broke after 40,000-60,000 km. Even when the rollers are destroyed due to wear, this can also cause the valves to bend, the repair of which costs a pretty penny.
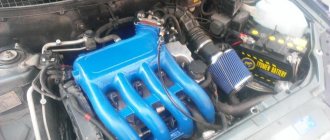
Which receiver is better for Priora?
There is no clear answer to this question. Each situation is individual. However, some comparisons can be made between receivers made of plastic and aluminum.
Advantages of aluminum products:
- higher strength and wear resistance;
- increased engine power due to design features and a larger volume of supplied air;
- Some models are easier to install and therefore easier to remove.
In addition, the shape of the collector itself plays an important role in ensuring increased power, which should not contain sharp corners and transitions. The most important difference between plastic and metal is the strength and durability of the latter. Therefore, we can recommend installing metal types of intake manifolds for Lada Priora cars.
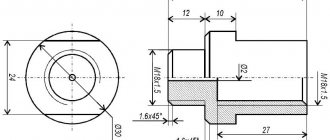
To seal the joint between the flanges of the cylinder head and the intake manifold, as well as between the flanges of the throttle assembly and the intake manifold, O-rings are installed in the grooves of the intake manifold pipes.
If the tightness of these rings is broken, the engine runs unevenly (“troit”).
When air leaks through the intake manifold, popping noises may occur from the exhaust pipe.
Interruptions in engine operation and loss of power also occur. During this malfunction, the engine consumes more gasoline.
You will need: screwdrivers with a flat and Phillips blade, wire cutters or a knife, keys “10”, “13”.
1. Lift the hood and disconnect the wire from the negative terminal of the battery.
2. Remove the decorative engine cover.
3. Remove the throttle assembly from the intake manifold (see “Removing and installing the throttle assembly”).
Remove the inlet port O-rings.
Use a screwdriver to pry off the sealing gasket
...and remove the throttle body mounting flange seal.
Install new O-rings into the manifold grooves.
Before installing the intake manifold, cover the intake ports with a rag and clean the O-ring seats
Install the removed parts in the reverse order of removal.
Piston rings are replaced when repairing the connecting rod and piston group, if they are worn out or damaged. Also, rings are replaced during engine overhauls.
To complete the job, you will need a piston ring mandrel.
Removal
1. Remove the cylinder head.
2. Remove the engine oil pan.
3. Remove the oil intake.
4. Turning the crankshaft by the bolt securing its pulley with a 17 mm wrench, set the piston of the first cylinder to the lower position.
5. Using a TORX wrench, unscrew the two nuts securing the connecting rod cover of the first cylinder.
6. Remove the connecting rod cover.
7. Place the hammer handle against the piston and push it up.
8. Remove the piston from the cylinder.
9. Remove the liners from the connecting rod and its cover.
10. Fix the piston by the connecting rod in a vice. Slightly spreading the ring lock, remove the upper compression ring. Similarly, remove the lower compression ring, oil scraper ring and its expander.
Recommendation
The rings are thin - to avoid breaking them, cut a strip from a plastic bottle slightly shorter than the circumference of the piston. Place the edge of this strip under the lock of the upper compression ring, and then in a circle under the entire ring.
Remove the strip along with the ring from the piston. Remove the second compression and oil rings in the same way.
Comment
The advisability of replacing the rings depends on the degree of wear of the cylinders. Small uniform wear of the cylinders (within 0.05 mm) can be compensated by installing a piston of a different class with a larger diameter.
Installation
1. Thoroughly clean the piston
from soot and deposits. We inspect the piston, connecting rod and pin. Cracks on them are unacceptable.
Comment
We select new rings in accordance with the piston diameter - nominal or repair size.
2. Before installing new rings, use a set of feeler gauges to measure the gap between the piston ring and the wall of the groove into which the ring will be installed.
Table 9.1.3 Permissible gaps between the groove walls and piston rings:
Comment
The permissible gaps between the groove walls and the piston rings are shown in table. 9.1.3. If the gap exceeds the maximum allowable, the piston must be replaced.
3. To select piston rings based on the thermal gap, install the rings one by one into the block cylinder to a depth of 20-30 mm and use a set of flat screws to determine the gap in the lock.
Comment
The maximum permissible thermal gap during wear (for used rings) is 1 mm, the gap for new rings is 0.25-0.45 mm. If the gap exceeds the maximum allowable, the ring must be replaced.
4. Place the rings on the piston. In this case, the oil scraper ring
and install the compression ring with the word “TOP” facing up.
We install new rings on the piston, starting with the oil ring expander.
Using a mandrel, we put on the oil scraper ring, and then the lower compression ring (we put the rings on the mandrel and carefully move them down until they are installed in the groove).
We put on the upper compression ring without a mandrel: having spread the ring lock (no more than is required to put the ring on the piston), we first place the lock on the piston, and then the back part of the ring.
5. Rotate their locks so that they are located at an angle of 120° relative to each other. The expander lock must be rotated 180° relative to the ring lock.
Replacing piston rings
On VAZ cars, as well as on all other models of passenger cars, it is advisable to change only the piston rings only if:
- there is no exhaust in the cylinders;
- there are no signs of damage to their inner surface.
If the liners are significantly worn, they need to be bored, and if the last size was already used before, the cylinder block needs to be relined. You can replace the PC on any VAZ engine without removing the internal combustion engine; this will require removing the cylinder head and oil sump. PCs are replaced if the gap at the joints does not exceed 1 mm.
For example, let's consider replacing piston rings on a VAZ-2114 car with an 8-valve internal combustion engine; such work must be carried out on a pit or a car lift:
- turn off the ignition, put the gearbox in neutral, disconnect the negative terminal from the battery;
- drain the antifreeze, remove the air filter housing along with the pipe (injector corrugation);
- remove the valve cover, camshaft, loosen the timing belt and move it to the side;
- disconnect the wires and cooling system pipes from the cylinder head, unscrew the head bolts;
- unscrew the nuts of the exhaust pipe of the muffler;
- We completely free the cylinder head from all fasteners that prevent it from being removed, and we remove the cylinder head;
- if there is protection under the engine, remove it;
- place a container under the engine sump, unscrew the plug on the crankcase, drain the oil;
- remove the lower hatch of the gearbox housing (three bolts);
- Using a 10 mm wrench or a socket wrench, unscrew all the oil pan bolts;
- dismantle the pan, remove the oil receiver;
- Unscrew the connecting rod nuts, remove the lower connecting rod caps, and carefully knock the pistons and connecting rods upward. Pistons should be knocked out through a soft metal drift or through a wooden block. First, you need to carefully knock out the connecting rod bolt without damaging the threads on it, then place the drift on the end of the connecting rod - in no case should you hit the bearings or the seat underneath them;
- It is recommended to remove the connecting rods one at a time, and immediately attach the caps to them; the caps should not be confused with each other, they are placed back strictly in their places, and a lock to the lock is required;
- remove the PC from the pistons, use a piece of the old ring to clean the piston grooves to bare metal. Be sure to check the cleanliness of the groove all around; there should be no coke left in it;
- We install new rings in the grooves, start with the lower MPC, then install the middle compression PK, and lastly the upper one. For installation, you can use a special device, but it is still more convenient to install the rings by hand. If the MPCs are cast iron, they cannot be bent along their axis, they can only be carefully moved apart. Compression rings also need to be bent carefully, to a minimum;
- we install the piston in place using a special mandrel, hammer it in with a wooden hammer handle or a brass or bronze drift;
- We install one piston-rod at a time, and immediately attach a connecting rod cap to each one. The connecting rod nuts should be tightened with a torque wrench, force - from 4.5 to 5.5 kg;
- then we put everything in place - the oil receiver, the engine sump, the cylinder head. We fill the radiator with antifreeze, oil into the crankcase, and start the engine to check. After replacing the PC, the internal combustion engine may initially smoke and consume oil - the engine needs to be run in for approximately 2 thousand km. It happens that despite the seemingly normal condition of the liners, the internal combustion engine continues to smoke even after replacing the rings after break-in. In this case, you will have to bore the cylinders and install a repair piston group.
General information and piston design
The purpose of the piston is to transfer the energy produced by the combustible mixture to the crankshaft. When combustion products expand, enormous loads are placed on the surface of the part. The maximum pressure in this case can be 80 bar, and this is comparable to a force of several tons.
The temperature in the cylinders during combustion of the mixture can reach 2,600 degrees, which is several times higher than the temperature at which the piston melts. As a result, at this moment the strength of the alloy decreases, and thermal stress occurs along the surface of the element due to the temperature difference. In order for the piston to function under such harsh operating conditions, it must not only be lightweight, but also sufficiently resistant to wear. In addition, a high-quality forged group of pistons must also have a high thermal conductivity, which will allow the elements to quickly cool when operating at high temperatures.
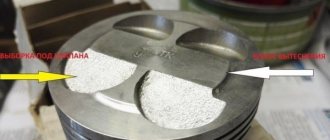
As for the surface itself, it must be formed in such a way that the piston does not jam in the cylinder under any circumstances. Otherwise, hot gases may enter the crankcase. Since the components are barrel shaped as you can see in the photo, even a large temperature difference between the bottom and skirt will not affect its functionality. It should also be noted that these parts are produced using an “anti-ellipse”, which makes it possible to compensate for the deformation of the skirt.
The top element of the pistons is the head, which consists of a bottom and grooves through which the seal rings are installed. The head should be more reliable, since most of the loads fall on it. Therefore, the piston heads are treated with an additional protective coating. The grooves for the O-rings themselves are made at a slight angle, as a result of which the outer edges of the rings will be slightly higher than the inner ones. As a result, the slope of the cross-section of the groove will not appear, and this is quite possible.
To make the piston slide better, its surface is also opened with additional materials. For greater break-in, the manufacturer usually uses phosphating or tin, which also reduces the likelihood of scratches when starting a cold engine. But such a coating usually wears out during running-in. Another coating - anti-friction - remains for the entire service life, it helps prevent the appearance of rust and erosion on working surfaces.
The piston skirt must be processed with special cutters to ensure the creation of microrelief. This way, the motor lubricating fluid will adhere better to the surface of the element, and the friction will be much less. So what are the best pistons to put on your car?
You will choose the manufacturer yourself, but on our own behalf we would like to add that all of the above requirements are met by the companies’ products:
Engine piston rings
In an internal combustion engine (ICE), piston rings (PR) serve as a seal between the cylinder walls (liners) and the piston, due to which compression is created in the cylinders. If you forget to put the PC into the engine during assembly, the engine will not start, since the necessary compression of the working air-fuel mixture will not be ensured.
In passenger cars, three rings are standardly installed on each piston - two compression rings and one oil scraper ring, and oil scraper rings can be stacked, that is, consist of several elements. Compression piston rings (CPRs) are used to create compression in the cylinders and are always made of high-strength cast iron with various additives. The upper CPC has the greatest strength, since it operates in the most severe temperature conditions and experiences maximum loads.
Engine oil piston rings (OPRs) are needed to drain oil from the cylinder walls; if the rings do not perform their function, the engine will consume oil. MPKs can be either cast iron or steel, and cast iron PCs are almost always made in one piece, but steel oil scraper rings can only be assembled (composite). Steel MPC for one cylinder consists of:
- two spring steel rings;
- axial expander;
- radial expander.
Comparative characteristics
So that you can understand which group of pistons is better, consider the comparative characteristics of all three manufacturers with photos:
- Let's start with STI products. Forged STI pistons are produced in Togliatti and they are made by hot pressing. As reviews from consumers who have already installed STI show, these forged pistons largely reduce the efficiency of the engine. This is due to the fact that STI parts have a lower compression ratio and a larger combustion chamber. It should also be noted that the alloy of STI pistons contains less silicon, as a result of which the strength of the components at high temperatures will be lower.
In addition, as a result of the reduced nickel content in the alloy, the service life of the element can be significantly reduced. With all this, STI plugless pistons are more expensive than STK and Avtramata.
Avtramat cast pistons are produced in Kharkov, Ukraine. In the production of pistons, an alloy identical to the original parts on Priora is used. However, unlike the latter, Ukrainian-made products can have deep countersinks, and this is an undoubted advantage of the Avtramat compared to standard pistons. In this case, we are talking about safety in the event of a timing belt break. As for the compression ratio, in the case of the Avtramat it has not changed.
Symptoms of malfunction and diagnostics of the piston group
Of course, if the pistons are destroyed after hitting the timing belt, then the car simply won’t start, that’s all. But how to determine normal wear, or burnout of the piston, requiring its replacement? The first sign of possible wear of the piston group is a drop in engine power. Of course, this could be a sign of many other problems. For example, fuel supply systems. But it won’t hurt to check the condition of the Priora pistons.
Even in modern times, the age of total computerization and widespread use of electronics, the condition of the pistons is checked with a good old compression meter. This is a pressure gauge equipped with a special valve that “collects” the pressure in the cylinders over several strokes.
How to measure the compression of a Priora piston
Two people need to do this work. One of those participating in the process is driving a Priora. At a signal from your partner, you need to press the gas pedal all the way and turn on the starter, rotating the engine until the second participant gives the go-ahead. The person checking the compression, having previously unscrewed the spark plugs, inserts the tip of the compression gauge into the vacated hole.
After this, a signal is given and the partner rotates the starter. The device will show the condition of the pistons and whether they require replacement.
Which pistons to replace?
Usually these parts are taken with markings according to the repair number. But these details can only be determined by an experienced mechanic. But there is one feature that replacement pistons must have. There must be a groove for the valves. When replacing with such pistons, in the event of a belt break, nothing inside the engine will be damaged.
How to change pistons to plug-in or Avtramat pistons with your own hands?
Thus, we approached the issue of replacing pistons on a VAZ Priora car with our own hands.
Prepare a set of wrenches in advance:
- In the event that the replacement of elements is carried out on a car with high mileage, using an internal meter you will have to measure the distances from the upper edge of the cylinder in the transverse and longitudinal direction of the engine. In this case, you need to deviate from the top edge by 3, 10, 60 and 112 mm, respectively, you should end up with four values. This way you can determine how worn the cylinders are. If the wear is small and amounts to 0.05 mm, then this distance can be compensated for by installing elements with a slightly larger diameter. However, if the wear is 0.15 mm or more, then your cylinders will need boring. To do this, we recommend combining this process with the installation of plug-in elements. Immediately before disassembly, the motor should be cleaned. Use wrenches to unscrew the screws that secure the right engine support, as well as the front support and generator bracket. All brackets are dismantled.
- Then you should disconnect the pipeline, the block head, the flywheel, and the filter element. The pump supply pipe to the cylinder head is also disconnected. Now you will need a workbench or a suitable stand.
- Next, the oil pan, oil pump and oil receiver are dismantled. The screws securing the rear crankshaft oil seal are also unscrewed using a wrench. The holder itself can be dismantled by prying it with a screwdriver into the grooves on the body.
- Then you should unscrew all the bolts of the connecting rod caps one by one, and the connecting rods themselves with the pistons should be dismantled.
- After this, the piston rings are removed. The ring itself is removed from its installation location using the same screwdriver. Here, pay attention to the condition of the rings - if they are worn out, then it is better to change them.
- Using a mandrel, the piston pin is pushed out, after which the piston itself can be removed. After replacement, all assembly steps are carried out in the reverse order. Make sure that the mark on the bottom of the element is directed in the same direction as the arrows on the connecting rod are pointing.
Which plugless pistons are reliable?
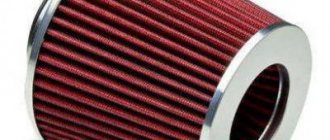
If you do not have the time and desire to constantly care for your car, you should think about converting your engine pistons to plug-free ones, which are characterized by a longer duration of trouble-free operation. Of course, each component has a number of advantages and disadvantages, your task is to choose the lesser evil. Experts recommend taking a closer look at the following non-tube pistons in an auto parts store:
- “Avtramat” - cost about 20,000 - 23,000 rubles per set. For 4 pistons you will have to additionally buy pins, stoppers and rings. If you look at the size category, the devices are classified as group C. The advantage of the “Avtramat” is that the noise level of the car’s movement remains minimal, because the new piston is installed on top of the original one.
- STK, which is praised by many car enthusiasts. They are distinguished by a Teflon coating that protects the “skirt”, they also have a displacer, and the bottom, as in the previous sample, is thicker. The thrust of the Lada Priora after reinstalling the pistons remains the same as before. The set costs from 2,200 rubles, and is sometimes difficult to find.
- ShPG from engine 21124 is another good option for the Lada Priora.
- The STI forged part is suitable for racers. Forging assumes a wide range of revolutions, up to 7800 revolutions in 1 minute.
Video “Replacing elements with plug-inless ones”
You can learn more about this process from the video.
Operations performed when replacing the intake manifold sealing rings on a VAZ 2170 2171 2172 Lada Priora
To seal the joint between the flanges of the cylinder head and the intake manifold, as well as between the flanges of the throttle assembly and the intake manifold, O-rings are installed in the grooves of the intake manifold pipes. If the tightness of these rings is broken, the engine runs unevenly (“troit”).
Tools required when replacing the intake manifold o-rings on a VAZ 2170 2171 2172 Lada Priora
You will need: screwdrivers with a flat and Phillips blade, wire cutters or a knife, keys “10”, “13”.
Why change pistons?
There are three reasons that motivate a car owner to start such a global operation:
- Piston failure.
- Prudent replacement.
- Engine tuning.
Now we will briefly analyze these reasons.
Piston failure
Usually this is either simple wear of rubbing parts or mechanical damage. For example, if the timing belt breaks. Often, the pistons are destroyed, showering debris inside the Priora engine. This naturally leads to replacement.
Prudent replacement
Often, the prudent owner of the Priora, who is aware of this unpleasant feature of the VAZ 2170 engine and modifications, replaces the pistons in advance.
Engine tuning
This is mainly a youth option, although not 100%. Many people want to own a sports car. And at hand is a Priora. And here the tuning begins. There are many different techniques to increase engine power, and one of the mandatory ones is installing pistons of a different configuration.
Is it worth taking on?
Once you find out how much it costs to replace valve stem seals on an engine, you will probably begin to be interested in the complexity of the technology and the list of required tools. And indeed, oil seals cost nothing: about 500-1,000 rubles, why not replace them yourself?
We hasten to warn against such a temptation to save money. Theory is theory, and practice is practice:
- When performing an operation for the first time, you will probably encounter incomprehensible moments, and your ingenuity will work at the wrong time. For example, what do you think about a cracker flying into the engine compartment or a valve falling into the cylinder?
- It is unlikely that you will be able to assemble a BMW Valvetronic system or its analogues on other cars and adjust the unit the first time.