In some cases, when starting the engine, smoke and a gas smell may appear from under the hood. Most often, this indicates that the exhaust manifold may have burned out, and on the VAZ 2110 it needs to be replaced, since the metal has burned out. And here you should not delay replacement or repair, since all these problems can adversely affect the operation of the engine as a whole. You can replace the part yourself; there is nothing difficult here.
Usually the burnout site is practically invisible, but with the engine running you need to open the hood of the car. And then consider where the exhaust gases come from; if they pass with a whistle, then they go past the exhaust pipe, and go through the burnt-out place.
VAZ 2110: replacing the exhaust manifold on your own
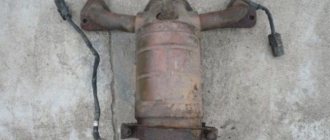
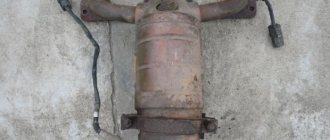
Exhaust manifold VAZ 2110
When the car engine is running, smoke and the smell of gas may appear under the hood of the car. The reason may be that the exhaust manifold has burnt out. On a VAZ 2110, replacing the exhaust manifold is associated with metal burning. In this case, it is not recommended to delay replacing it. Since further operation of the machine may cause big problems. Replacing the exhaust manifold of a VAZ 2110 can easily be done with your own hands. Burnt holes are almost impossible to visually examine. When the engine is running, the hood should be open. Exhaust gases will escape, not into the exhaust pipe, but will whistle through these burnt holes. Gases can escape under the bottom of the machine, since the material burns out mainly in those places where the pipe is bent.
Where is the VAZ ECU located and the interchangeability of control units
First of all, to determine the type of control unit, you need to find its installation location in the car. To do this, you should study the manual. As an example, let's look at the VAZ 2108 - 2115. On these cars, the ECU is located in the passenger compartment, on the front right, slightly below the glove compartment.
By the way, this information is also useful for computer diagnostics, since you need to know where you can connect to the diagnostic connector installed in various places on a particular model.
As for the units themselves, VAZ 2108 - 2115 of different years of production have different ECU models. For example, the most popular ECU January 4 was installed on early models of injection engines with central injection into the intake manifold.
Version January 5 - 6 are ECUs with distributed injection, but without oxygen sensor support. The January 7 control unit has appeared on cars since 2007, supports all sensors, and effectively controls the engine.
Let us also add that in addition to January, different generations of GM units were actively used at VAZ, being an analogy of January 4 - 7. The same can be said about Bosch or Itelma ECUs. Taking into account all the features, interchangeability is possible, but you need to select analogues that are suitable for the class, version, number of supported sensors, etc.
Self-replacement
Replacing the exhaust manifold of a VAZ 2110
- the car needs to be driven into the garage;
- hang a lamp with a safety light under the hood;
- before starting repairs, antifreeze must be drained from the tank;
- disconnect the battery terminals;
- take it out;
- put on a rack;
- disconnect the vacuum booster hose from the receiver;
- also disconnect the hoses of the electric pneumatic valve cover and the ramp pressure regulator;
- disconnect the chips of the throttle sensor, idle air control;
- disconnect the throttle valve cable;
- loosen the clamp on the air supply hose to the air flow sensor housing;
- disconnect it;
- loosen the clamps for attaching the hoses to the throttle pipe and ventilation of crankcase gases on the cylinder head cover;
Replacing the cathode collector for a VAZ 2110
- remove the hoses in pairs;
- loosen the crankcase ventilation hose clamp;
- remove it from the throttle assembly;
- In the same way, carry out further work with the coolant inlet and outlet hoses.
Note. Use a 13mm socket to make the work easier, unscrew the 2 nuts from the throttle assembly from the studs. The throttle assembly is attached to the receiver.
- loosen the clamp;
- disconnect the adsorber purge hose;
- remove the throttle assembly;
- remove the sealing gasket.
Note: these nuts must be unscrewed using a number 13 wrench.
The receiver must be removed together with the throttle assembly. In addition, it is necessary to disconnect all inlet and outlet hoses and idle speed sensor chips from the assembly. Carefully check to make sure that all fastenings are completely loosened.
Note: it is recommended to remember all the attachment points; you can use threads of different colors. To prevent incorrect connections during assembly.
Note: place the parts in a container so that during assembly you do not have to look for missing spare parts.
Unscrew the 2 nuts for attaching the fuel supply and outlet pipe bracket to the receiver. The same - 1 nut for fastening the receiver to the bracket, 5 pieces for fastening to the intake manifold. Remove the receiver, remove the gasket.
Detailing
Assembly elements on the front brake mechanism:
- Dustproof cover;
- Pad holder;
- Noise protection gasket and spring;
- Two pads: internal, with a wear indicator, and external;
- Fastening plates;
- Cylinder cover and piston;
- Caliper;
- Bracket;
- Air release valve;
- Gasket, bushing, pin, seal.
For the tenth to twelfth VAZ models, these units are structurally the same, only the VAZ 2110 caliper bracket is different. Therefore, it becomes possible to install not only the “native” unit, but also from “related” models. Naturally, this requires replacing the bracket itself.
It plays a vital role in securing the caliper and brake mechanism, and also forms the front clamping mechanism along with the caliper, piston and caliper.
Thus, the bracket is not only a holding element, but also a guiding element of the front wheel locking mechanism.
Front caliper parts
Naturally, when it fails, the entire assembly is often replaced, but individual elements can be repaired, for which there are special repair kits.
The price of a repair kit averages about 500 rubles and includes:
- 1 hose fitting with cap;
- 2 protective covers for guides;
- 1 O-ring;
- 1 caliper protective ring.
The price of a new left or right front caliper fluctuates around 1000-1500 rubles.
Ramp
Replacing the cathode collector on a VAZ 2110
The ramp is removed as an assembly with the fuel pressure regulator:
- It is necessary to disconnect the vacuum hose from the regulator.
- Using 2 open-end wrenches 17, unscrew the fittings securing the gasoline supply pipes to reduce pressure.
- Disconnect the ramp voltage connector.
- Using a screwdriver, unscrew the screw of the bracket for fastening the gasoline supply and outlet pipes and disconnect it.
- Using a No. 5 hexagon, unscrew the 2 screws for fastening the ramp.
- Pull the ramp in the axial direction of the injector from the seat, remove the ramp towards the left side of the hood.
Note: follow the direction of travel of the vehicle.
Replacement cathode collector for VAZ 2110
- Unscrew the nut from the left intake manifold bracket and loosen the lower bolt.
- Remove the bracket from it.
- Perform the same operation with the right bracket and remove it.
- Unscrew the 2 nuts from the eye stud.
Removing the eye
- Unscrew the 3 nuts from the receiver bracket and remove it.
- Carefully remove the bushing from the intake manifold stud.
- Disconnect the exhaust air intake pipe and remove it from the lower intake air studs.
- Unscrew the top nut and loosen the bottom nut a little on the bar.
Note. It holds the antifreeze pump tubes for cooling. The bar at the bottom has a through slot; carefully remove it.
Replacement cat collector for VAZ 2110
- The intake manifold is mounted on studs, so you need to unscrew one nut on top and 2 on the side. To remove the exhaust manifold, you need to unscrew an additional 2 nuts. You need to carefully inspect the connection point, since 2 gaskets are installed between the manifold and the block head.
Note. When dismantling the intake manifold, pay attention to the gaskets. If the gasket burns out, antifreeze can get into the cylinder block. There may be holes drilled by antifreeze on the head of the blocks, and there may also be holes in the gasket.
Replacement cat collector for VAZ 2110
- Antifreeze may leak into valves and cylinders. In this case, you need to remove it from there using a syringe. Unscrew the spark plugs (see Replacing spark plugs on a VAZ 2110 on your own) and crank them with the starter to remove any antifreeze that gets there. If grooves are found on the surface, the collector must be replaced.
- At the bottom, the exhaust manifold is attached to the exhaust pipe. Then it is connected to the exhaust pipe. Unscrew the three bolts and disconnect the pipe. Remove the collector. You need to unscrew them from the inspection hole and first tap the heads. Use a metal brush to clean the nuts and threads.
- During assembly, replace all gaskets with new ones one by one. It is advisable to tighten the nuts during assembly using a special wrench. Also replace the injector O-rings with new ones.
Composition of the output unit
The exhaust system for a VAZ 2110 car consists of the following elements:
- Exhaust manifold;
- Lambda probe;
- Receiving type pipes;
- Neutralizer;
- Two mufflers: main type and additional.
Not all exhaust components are disassembled; some parts, such as the converter, as well as both mufflers, are replaced entirely.
Description of individual components
To make the structure of such an element as the discharge system clearer, it is necessary to give a detailed description of all components:
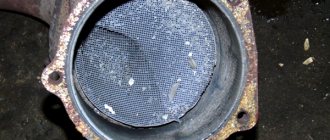
- Neutralizer. A unit designed for effective purification and suppression of emissions of harmful substances into the environment. When driving, a car produces substances such as non-combustible hydrocarbons, oxide compounds of nitrogen and carbon. The work of this system is aimed at eliminating them. The design itself is a combination of two ceramic-type components. The surface of these components is coated with special afterburning catalysts, which include rhodium, palladium and platinum. These substances make it possible to purify exhaust gases emitted into the environment by almost 100%;
- Lambda probe. It is a special sensor whose task is to control the composition and amount of fuel that enters the engine. The lambda probe thereby controls the purifier. If the lambda probe does not work properly, then the entire output assembly will quickly become unusable, after which it will have to be replaced;
- Reception pipe. Designed for forced removal of exhaust gases from the cylinders of a power unit. The pipe is made of stainless steel, and its fastening to the collector is carried out using special pins, of which there are four in total. The studs guarantee reliable fastening of the two outlet pipes and the element. In order to combine the exhaust pipe and the neutralizer, as well as an additional muffler, hinged fasteners are used;
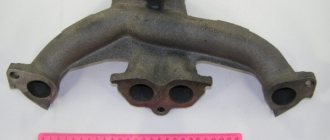
- An exhaust manifold. A component that is cast from pure cast iron. The manifold is secured with four studs in the exhaust pipe. Heat-resistant gaskets reinforced with metal are installed between the manifold and cylinder heads.
- Silencers. Necessary for effectively suppressing the exhaust rate of burnt gases. This is necessary in order to significantly reduce the noise level in a type of transport such as the VAZ 2110. The distribution device in this part of the unit is carried out as follows: the additional one is followed by the main one. These two components are connected to each other by clamps and sealing rings and are covered with a special casing on top.
Nuances of operation
There are some points that need to be taken into account when operating the VAZ 2110 system:
- Under no circumstances should the vehicle be refueled with leaded fuel, as this will cause damage. It is very sensitive to lead compounds;
- When operating a VAZ 2110 car, you also need to monitor the proper, precise operation of the ignition, since its poor-quality operation leads to the neutralizing part being removed from its working condition. Fuel that does not burn when a spark passes during ignition enters the converter and burns out there. For this reason, the ceramic coating of the component quickly deteriorates;
- Frequent malfunctions will sooner or later lead to complete or partial blockage of the output system, in turn to the failure of the engine and its repair or replacement will be required.
Troubleshooting
The operation of a machine is always associated with the occurrence of malfunctions in parts and mechanisms. If some parts become unusable, then they need to be replaced or repaired yourself.
To replace the additional muffler in the exhaust unit:
- unscrew the two bolts that secure the clamp, for this you need a 13mm wrench;
- remove the clamp itself;
- remove the ring;
- disconnect the additional suspension cushions;
- remove the unit.
After this, a replacement is made, it is mounted in place in the reverse order. These are basic troubleshooting repair steps.
In addition to replacing standard faulty components with the same ones, but only new ones, you can modify individual components of the exhaust system, or tune the entire assembly.
If you find an error, please select a piece of text and press Ctrl+Enter.
Replacement of intake manifold gaskets VAZ 2114 8 cl (Kalina, 2110)
It is recommended to replace the gaskets on the VAZ intake manifold after each removal. But I had to do this prematurely, as I discovered a significant air leak, which mainly manifested itself on a cold engine. Every cold start was accompanied by a terrible tripping.
In addition to the tripping when cold, there was a slight drop in speed when sharply pressing the gas pedal. This applies to both a cold and a hot engine.
A homemade smoke generator made from a cigarette helped me detect the air leak. A very simple and primitive contraption that has helped me out more than once.
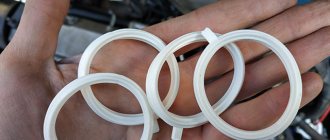
My car (Kalina 1.6 8 valves) has a plastic intake manifold (receiver). The same will be installed on all VAZ family cars with an 8-valve 1.6-liter engine (2114, 2110, etc.). 4 rubber rings act as gaskets. According to reviews, black rings last much longer than white ones. And I was convinced of this personally - these gaskets lasted for about six months and began to let air through. They felt like plastic to the touch. Unfortunately, I didn’t find black ones, so I’ll install white ones again. I hope these last longer.
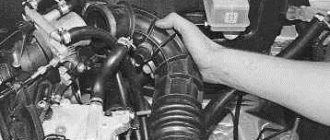
To remove the intake manifold (receiver), you must first unscrew the corrugation from the air filter, the throttle cable, and the small crankcase ventilation hoses. I will not remove the throttle and its heating.
The intake manifold is attached to 5 studs - one in the center, two on the sides. To unscrew them you will need a 13mm socket. After unscrewing the nuts, you need to remove the receiver itself from the studs and move it to the side. Remove the old gaskets and wipe the seats from oil and dirt. You also need to wipe the seat on the engine.
The manifold has special grooves for guides on the gaskets. The gaskets must be installed with the higher side in the plastic manifold. It is the guide that will prevent you from making mistakes.
I additionally coated the areas near the guides with sealant on the outside of the gasket. Because it felt like that was where the ring entered the groove the deepest. In addition, there was a place for air leaks on the old gaskets.
After all procedures, the intake manifold can be installed back. I couldn't find any information on how tightly to tighten the mounting nuts. I delayed it at my own peril and risk. The main thing is not to overtighten, as the manifold is plastic and can crack.
This is how I replaced the old intake manifold gaskets on my Kalina with new ones. There is no more air leakage, the engine stopped stalling when cold and began to behave much better when warm.
Signs of trouble
Exhaust manifold gasket
One of the main signs of a leak in the system is a “sporty” growling sound when the engine speed increases. This may be a symptom of various exhaust system problems. To check, it is better to take an assistant and go to a garage with a pit or to an overpass. Most often, you can determine by eye whether the problem lies in the muffler, resonator or exhaust.
Gasket wear may become apparent during planting. Open the hood and start the car - white or grayish smoke rising from the manifold during warm-up indicates a leak for this reason. VAZ car owners usually encounter this problem once every 3-4 years. When using low-quality spare parts and before. The solution may be to manufacture a custom-made steel gasket. It can last as long as the entire collector.
Service specialists, when attracting clients, like to tell scary stories about the explosion of the exhaust manifold on VAZ 2114 cars due to cracks. In reality this is nothing more than a myth. But the real problems are no less serious, so there is no point in putting off repairs.
A cracked exhaust manifold or worn gasket can cause your engine to run rough.
1) A lambda probe is installed in the exhaust manifold, which affects the operation of the injection system. Strong air suction disrupts the oxygen mass content in the exhaust; the lambda incorrectly adjusts the quality of the mixture, causing tripping, uneven idling, loss of power, and “black” spark plugs.
2) Another function is crankcase ventilation. Impaired air circulation causes disturbances in the operation of the gas distribution mechanism, increased wear of valves, the formation of carbon deposits on the pistons and other “joys”.
If increased noise and unpleasant odors during engine operation are combined with dirty work, the car needs urgent repairs.
Intake manifold removal process
Dismantling the intake manifold is carried out with the car cooled down for safety reasons. So, this operation can take about an hour and will require some knowledge of the car’s design, namely the injection system. So, let's consider the sequence of actions for dismantling the unit:
- We dismantle the throttle. To do this, it is not necessary to disconnect all the pipes and pipes; it is enough to disconnect the unit from the manifold and move it to the side. Of course, at the same time, it is still recommended to remove the throttle valve completely for cleaning.
- Disconnect the throttle cable from the intake manifold.
- Disconnect the wires from the ignition coils. This is easy to do; you just need to disconnect the connectors.
- Disconnect the camshaft position sensor wires.
- Disconnect the wiring harness from the absorber purge valve.
- Disconnect the brake booster hose from the intake manifold.
- Unscrew the clamp and disconnect the crankcase ventilation pipe.
- Unscrew the self-tapping screw securing the guide tube of the oil level indicator.
- We take out the dipstick along with the guide tube.
- Using a socket or a 10mm wrench, unscrew the nuts securing the intake module and the ignition coils of cylinders 1, 2 and 3.
- We dismantle the ignition coils of cylinders 1, 2 and 3.
- Now, you can unscrew the direct fastenings of the intake manifold to the cylinder head.
- Move forward and remove the manifold.
It is worth noting that installation of the intake manifold is carried out in the reverse order and does not require any additions or changes.
Video
Spare parts and tools
Before you replace a leaking or possibly clogged radiator, you need to choose a new one. Here you have space, it is quite possible that you will want a copper, DAAZ or Priorovsky one. But try to decide for yourself, look at reviews of different models on the forums, and only then buy.
Pay attention to the condition of the pipes; it is quite possible that they also need replacement. You will need more clamps, try not to limit yourself to the three recommended, as you know, a supply will not hurt.
You will need a Phillips screwdriver, preferably a short one
And also - tweezers, without them it is not easy to install the latches.
You will need a Phillips screwdriver, preferably a short one. And also - tweezers, without them it is not easy to install the latches.
conclusions
Dismantling the intake manifold of a 16-valve VAZ-2112 is quite easy and simple. Of course, it’s worth understanding at least a little about the design of the main power unit, but if desired, any car enthusiast can remove this unit.
If you find an error, please select a piece of text and press Ctrl+Enter.
We recommend reading:
Similar articles
Similar articles
Privacy Overview
This website uses cookies to improve your experience while you navigate through the website. Out of these cookies, the cookies that are categorized as necessary are stored on your browser as they are as essential for the working of basic functionalities of the website. We also use third-party cookies that help us analyze and understand how you use this website. These cookies will be stored in your browser only with your consent. You also have the option to opt-out of these cookies. But opting out of some of these cookies may have an effect on your browsing experience.
Replacing the exhaust manifold of a VAZ 2110 8 valves
We carry out the work when replacing manifold gaskets or when it is necessary to drill out broken exhaust manifold studs (the latter are often destroyed when the exhaust pipe is removed).
Drain the coolant (see Replacing the coolant).
Remove the carburetor (see Disassembling the carburetor).
Disconnect the coolant supply hose to the carburetor starter from the fitting located on the intake manifold.
We disconnect the exhaust pipe from the exhaust manifold of the VAZ 2112 and from the mounting bracket to the block (see Removing the exhaust pipe of VAZ-2110, -2111 engines).
Using a 22mm wrench, unscrew the nut securing the heat shield.
Remove the bracket for the VAZ 2111 throttle valve drive cable.
Using a 10mm wrench, unscrew the two nuts securing the heat shield of the VAZ 2112.
. and remove it.
Remove the wire from the oil pressure warning lamp sensor.
Using a 13mm wrench, unscrew the two nuts securing the hot air intake pipe and the eye.
Remove the hot air intake pipe.
. and eye VAZ 2110.
Using a “13” wrench, unscrew the six nuts securing the intake manifold of the VAZ 2110.
Having disconnected the hose of the vacuum brake booster and the hose of the electro-pneumatic heater valve, remove the intake manifold of the VAZ 2111.
Unscrew three more nuts.
. and remove the exhaust manifold of the VAZ 2112.
The joint is sealed with two gaskets.
We perform assembly in reverse order.
We clean the mating surfaces of the VAZ 2110 manifolds and heads and install new gaskets.
Tighten the manifold fastening nuts evenly.
silicone sealant
The restoration work took about an hour. For good access to the repair areas, it was necessary to remove the individual ignition coils. The sealant and a bottle of cleaner cost 300 rubles. The repeated test for air leaks after the seal had dried was successful - the speed stopped floating!
The nuts securing the catalytic collector to the Priora cylinder head are difficult to access. In addition, the collector flange is sealed with a metal-reinforced gasket. The sealing gasket must be replaced every time the connection is disassembled. Before removing the catalytic converter, it is necessary to remove the intake manifold - this will facilitate access to its mounting.
- 1. Remove the decorative engine cover (see “Removing and installing the decorative engine cover for the VAZ 2171”).
- 2. Remove the wire from the negative terminal of the battery.
- 3. Disconnect the exhaust pipe of the additional muffler from the catalytic collector by unscrewing the nuts securing the exhaust pipe flange to the catalytic collector flange and remove the exhaust pipe flange from the studs of the VAZ 2170 catalytic collector flange (see “Replacing the additional muffler”).
- 4. Remove the air filter (see “Removing and installing the air filter”).
5. Remove the air supply hose and three hoses of the crankcase ventilation system of the VAZ 2170 (see “Cleaning the crankcase ventilation system”).
6. Disconnect the four connectors of the ignition module wiring harness and move the harness to the side. Remove the ignition modules (see “Removing and installing ignition coils”).
7. Remove the throttle assembly.
8. Remove the intake manifold of the VAZ 2172 (see “Replacing the cylinder head cover gasket of the Lada Priora”).
9. Disconnect the wiring harness blocks of the control and diagnostic oxygen concentration sensors from the engine harness...
10. ...and disconnect the holders of the wiring harnesses of the control and diagnostic oxygen concentration sensors from the heat-insulating shield of the steering mechanism
11. Unscrew the three nuts securing the thermal insulation shield of the Lada Priora steering mechanism to the engine shield and remove the shield.
- 12. Unscrew the two nuts securing the water pump supply pipe bracket, unscrew the bolts securing the catalytic collector to its mounting bracket, unscrew the eight nuts securing the catalytic collector to the Priora cylinder head and remove the catalytic collector. Disconnecting the catenary collector from the cylinder head and troubleshooting it is described in detail in the subsection “Replacing the catenary collector gasket”.
- 13. Remove the sealing gasket of the catenary collector from the cylinder head studs.
- Be sure to replace the sealing gasket of the catalytic collector and inlet pipe with a new one every time you disassemble the connection.
- 14. Clean the flanges of the block head and catalytic collector from the remains of the old gasket and carbon deposits.
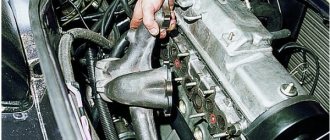
Rubber plugs in the Kalinovsky intake manifold: introduction
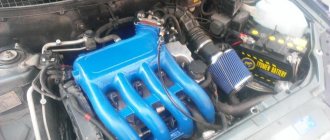
What do you think are those black “pipettes” circled in a fag-colored circle? Anyone who says that these are stubs will be right, but no one knows what these idiots are called. In the stores, they say no, but the sellers most obviously roll their eyes, either in surprise at the verbal construction “do you have plugs for the intake manifold receiver for the Lada Kalina?”, or sincerely amazed at the idiot who is looking for some reason original parts, instead of using some kind of silicone tube, as real pasans do on tachils rolled up in the trash. It’s worth mentioning here that these very original rubber bands plug holes for additional equipment in the receiver and they are made of such blatantly shitty rubber that they easily fail after a year or 15 thousand kilometers of operation - they crack lengthwise and the receiver begins to suck outside air bypassing air filter and sensors; The mixture therefore becomes leaner, and the engine is also choked with dust. Tough, in short. The destroyed plugs begin to hiss, grunt, hiss, and people around think that you have a turbine installed under the hood. The car may stop idling and jerk. How to determine that these are rubber bands and not something more serious? It’s very simple - you just need to stick your head into the engine compartment closer to the cabin (“look at the back of the engine, see the first picture”), or better yet, just remove the decorative plastic black engine cover and lean over it - I bet you’ll see two “droppers” - “massage” (gygygy) them with your finger, if the sound changes, then it’s them. In general, desperate to find anything, and also wanting to become really cool, I finally decided to do collective farm tuning. To do this, I need either some kind of vacuum hose from the “classics” (they say it’s suitable), or plugs for the brake bleeder fittings of any VAZ. The designs also inspire shock and awe when spoken out loud. Tomorrow or the day after tomorrow I’ll make a desperate attempt to go to VAZ-Avtodetal and if I don’t find the originals, which will fall off in a week anyway, I’ll finally do what I’ve fucking dreamed of for so long - I’ll collect pipes and plugs from the bleeder fittings. I'm happy. The report, of course, will be attached, and this sheet can certainly be considered a creative announcement of routine work. Haha.
How to remove the manifold of a VAZ 2110
VAZ - 2110 / 2111 / 2112
- 1. General information
- 2. Safety precautions
- 3. Fault diagnosis
- 4. Engine 4.1. Engine VAZ-2111
- 4.2. Engine VAZ-2110
- 4.3. Engine VAZ-2112
- 4.4. Changing the engine oil
- 4.5. Replacing the timing belt on VAZ-2110, -2111 engines
- 4.6. Replacing the timing belt on a VAZ-2112 engine
- 4.7. Adjusting thermal clearances in the valve mechanism of the VAZ-2110, -2111 engine
- 4.8. Replacement of valve lifters for VAZ-2112 engine
- 4.9. Removing the camshaft of VAZ-2110, -2111 engines
- 4.10. Replacement of valve oil seals for VAZ-2110, -2111 engines
- 4.11. Replacing oil seals on VAZ-2112 engine valves
- 4.12. Replacing the camshaft oil seal of VAZ-2110, -2111 engines
- 4.13. Replacing camshaft oil seals on a VAZ-2112 engine
- 4.14. Replacing the front engine crankshaft oil seal
- 4.15. Replacing the rear crankshaft oil seal
- 4.16. Removing the oil pressure warning lamp sensor on a VAZ-2111, -2110 engine
- 4.17. Removing the oil pressure warning lamp sensor in a VAZ-2112 engine
- 4.18. Removing the engine oil level sensor
- 4.19. Removing the receiver and collectors of the VAZ-2111 engine
- 4.20. Removing the receiver and intake manifold of the VAZ-2112 engine
- 4.21. Removing the exhaust manifold of a VAZ-2112 engine
- 4.22. Removing the intake and exhaust manifolds of the VAZ-2110 engine
- 4.23. Removing the housing of auxiliary units of the VAZ-2110 engine
- 4.24. Removing and disassembling the cylinder head of the VAZ-2111, -2110 engine
- 4.25. Removing and disassembling the cylinder head of the VAZ-2112 engine
- 4.26. Removing the oil pan
- 4.27. Removing the engine oil pickup
- 4.28. Removing and disassembling the engine oil pump
- 4.29. Dismantling the connecting rod and piston group (CPG) of an engine on a car
- 4.30. Removing the right power unit support
- 4.31. Removing the left power unit support
- 4.32. Removing the rear support of the power unit with the VAZ-2111, -2110 engine
- 4.33. Removing the front support of the power unit with the VAZ-2112 engine
- 4.34. Removing the rear support of the power unit with the VAZ-2112 engine
- 4.35. Removing the engine from the car
- 4.36. Engine disassembly and assembly
Characteristics of motors 2114
Since the release of the Lada Samara VAZ-2114, the technical characteristics of the gasoline drive have been constantly improved. Owners of domestic cars, in principle, do not have questions about what kind of oil to pour into the engine, since standard requirements apply for Zhiguli, Lada and Samara - 5W30 or 10W30.
In addition, you should know what kind of oil to use in transmission gears - the instructions from the AvtoVAZ manufacturer recommend using the GL-4 group of lubricants with a viscosity of 80W85 (mineral), 75W90T (synthetic) or 85W90 (semi-synthetic).
The technical characteristics of the engine are as follows:
| Characteristics | Engine modification | ||||
| 2111 | 21114 | 11183 | 21124 | 21126 | |
| Years of installation | 2003 – 2007 | 2003 – 2007 | 2007 – 2009 | 2009 – 2013 | 2009 – 2013 |
| Volume | 1500 cm3 (1.5 l) | 1596 cm3 (1.6 l) | 1596 cm3 (1.6 l) | 1599 cm3 (1.6 l) | 1597 cm3 (1.6 l) |
| Power | 56.4 kW (77 hp) | 59.5 kW (81.6 hp) | 59.5 kW (82 hp) | 65.5 kW (89.1 hp) | 72 kW (97.9 hp) |
| Torque moment | 115.7 Nm (3200 rpm) | 125 Nm (3000 rpm) | 120 Nm (3200 rpm) | 131 Nm (3700 rpm) | 145 Nm (4000 rpm) |
| Weight | 127.3 kg | 112 kg | 112 kg | 121 kg | 115 kg |
| Compression ratio | 9,8 | 9,6 | 9,6 | 10,3 | 11 |
| Nutrition | injector | ||||
| Engine diagram | Inline (L) | ||||
| Ignition | module | coil | coil | coil for each spark plug | |
| Number of cylinders | 4 | ||||
| Location of the first cylinder | TVE | ||||
| Number of valves on each cylinder | 2 | 2 | 2 | 4 | 4 |
| Cylinder head material | aluminum alloy | ||||
| Intake manifold | aluminum | plastic with receiver | |||
| An exhaust manifold | with catalyst | ||||
| Camshaft | 2110 | 2111 | 2112 | ||
| Cylinder diameter | 82 mm | ||||
| Piston stroke | 71 mm | 75.6 mm | |||
| Pistons | Yes | No | No | Yes | No |
| Valve bend | Yes | No | No | Yes | No |
| Crankshaft | 2112 | 11183 | |||
| Fuel | AI-95 | ||||
| Environmental standards | Euro 4 | Euro 2 – 4 | Euro 3 – 4 | ||
| Fuel consumption highway/combined cycle/city | 5,7/7,3/10 | 6/7,3/10,4 | 6/7,8/11 | 5/7/9,5 | 5,4/7,2/9,8 |
| Oil consumption per 1000 km | 0,7 | 0,5 | |||
| Engine oil for 2114 | 5W-30 and 10W-30 | ||||
| Engine oil volume | 4 l | 3.8 l | 3.5 l | 3.6 l | |
| Operating temperature | 95° | ||||
| Motor life | declared 150,000 km, real 250,000 km | ||||
| Adjustment of valves | washers between camshaft cams and tappets | hydraulic pushers | |||
| Cooling system | forced, antifreeze/antifreeze | ||||
| Coolant quantity | 7.8 l | ||||
| water pump | plastic impeller | ||||
| Candles for 2114 | A17DVRM, BPR6ES | AU17DVRM, BCPR6ES | |||
| Gap between spark plug electrodes | 1.1 mm | ||||
| Timing belt | length 698 – 1125 mm depending on attachments | ||||
| Cylinder operating order | 1-3-4-2 | ||||
| Air filter | Nitto, Knecht, Fram, WIX, Hengst | ||||
| Oil filter | Mann W914/2 | ||||
| Flywheel | 2110 | ||||
| Flywheel mounting bolts | M10x1.25 mm, length 26 mm | ||||
| Valve stem seals | code 90913-02090 inlet light code 90913-02088 exhaust dark | ||||
| Compression | from 14 bar | ||||
| XX speed | 750 – 800 | 800 – 850 | |||
| Tightening force of threaded connections | spark plug – 31 – 39 Nm flywheel – 61 – 87 Nm clutch bolt – 54 – 87 Nm bearing cap – 59 Nm (main) and 43 – 53 Nm (rod) cylinder head – four stages 20 Nm, 71 Nm + 90° + 90° |
For high-quality maintenance of internal combustion engines, the engine manufacturer issues a manual containing a description of the drive parameters, the frequency of replacing consumables and step-by-step repair operations. The same operating manual recommends the volume of oil in the gearboxes in the engine.