Autostart technology, previously used only on trucks in harsh climates, is now gaining popularity among owners of passenger cars such as the second generation Lada Kalina. This is due to the fact that the use of such technology ensures that the engine is automatically turned on at a given time and warmed up to the most optimal temperature; in addition, the car interior is also warmed up in parallel with the engine.
The automatic start device is a plastic block containing an electronic board with microcircuits (relays) that regulate certain sensors. Included with this module is a set of wires designed to connect the unit to the electrical wiring of Kalina 2.
Automatic start device
Due to the compact size of the device, it can be installed anywhere in the cabin where standard electrical wiring runs.
The autorun unit can have the following operating modes:
- automatic - the start time is set using a timer programmed based on the air temperature of the cabin or engine;
- remote – the launch is controlled by the car owner using an alarm key fob or mobile phone (SMS message, GPS command).
You can install autorun yourself. To do this, you will need an automatic start module, as well as an immobilizer bypass unit.
Elected position
Before each start, Lada Connect allows you to select the duration of engine operation - from five minutes to half an hour.
Before each start, Lada Connect allows you to select the duration of engine operation - from five minutes to half an hour.
Renault has a fixed engine operating time of 10 minutes. It is possible to add another 10 minutes, but only once - you won’t get the Renault to warm up for half an hour. There is a “frosty night” mode: up to five engine starts with an interval of two hours. It is only available for cars with a multimedia system; it cannot be programmed with the key.
In terms of work cycles, Lada is head and shoulders above. Warm-up duration is from 5 to 30 minutes, the choice can be made before each engine start. Combined with the ability to start the engine at an unlimited distance, you can ideally select the operating cycle so that you can get into an already warm interior in any weather. There are three automatic warm-up modes. The electronics can be configured to start the engine when the temperature in the cabin drops, when the battery is low, or by time and day of the week. All threshold values for degrees, volts and hours are set by the user. Amazing flexibility!
Two configurations and two schemes
In the “Norma” version, if it has a central locking system, you can use two control wires. Ground is supplied to one of them if the locks need to be opened, and to the second one if the locks need to be closed. The period of connection to ground should take 0.7 seconds, and most alarms have such a setting.
If we talk about the “Lux” configuration, the control wires will not help us here. The relay contacts built into the alarm will have to be connected to the breaks in the power cords. Despite all the complexity, there were no complaints about this scheme, and we will consider it right now.
What is auto start without alarm?
This popular option is implemented in the form of a key fob, which is familiar to many from signaling or opening doors. In fact, you only need to press a button or, alternatively, set the start time or the temperature at which it will operate. That is, when you arrive at the car, it will be completely ready for use, and you will not have to wait until the engine warms up.
Modern systems can operate in two modes:
- manual remote: involves activation by pressing a button on the key fob or on a smartphone; Perfect for those whose car is parked at a short distance (maximum 400 meters).
- automatic: ideal for cars parked at a great distance from the owner; programmed to start periodically (after a time interval, a specific time or air temperature).
Specifications
The alarm considered in the review has the following technical data:
- control frequency range - 433-434 MHz;
- number of control channels - 128;
- the range of action of the main communicator when issuing commands is 0.8 km, when receiving data on the state of the security system and the vehicle - 2 km;
- range of the auxiliary key fob - 15 m;
- type of power source of the head unit - on-board network with a voltage of 9-18 V;
- current consumption when the system is in security mode - no more than 20 mA;
- current consumption when connecting a GSM module - 33 mA;
- power consumption when connecting several auxiliary modules - 36 mA.
Tips for both cases
Before all this, we note that when connecting the relay to the power wiring, you cannot create a very long control pulse. Setting the value for more than a second can burn the actuators. Here we were talking about programming, but now let's talk about the electronic part. As is clear, before installation it is necessary to open the hood and disconnect the negative terminal.
It is not permissible to abuse this advice in any case.
As for installation, it will be better if the power wire taps are carried out by an auto electrician. With signal wiring, everything is simpler, but the rules will be similar in any case:
- It is not allowed for the cord to touch the insulation of iron parts. If the contact has space, use additional protection. For example, a heat-resistant tube placed over electrical tape is suitable;
- It is better to connect any power cables using twisting. Each twist space is painstakingly insulated.
- The cross-section of wires carrying significant current must be sufficient so that the conductor does not heat up. This is how you can protect yourself from unexpected consequences.
The last tip concerns power wiring. And the ability to create a twist is an entire art.
It is impossible to learn this art in one day.
When connecting any equipment, you should strive to include as few configurations as possible in the standard wiring.
There must remain the opportunity to create what follows: to return everything as it was. From time to time it happens that one or more characteristics of the signaling does not accept the value that is appropriate for the car. Then the alarm system is changed or its use is abandoned altogether. This must be taken into account.
Proper use of autorun
Compliance with the correct operation of the autostart will eliminate the occurrence of such unforeseen situations as the car moving independently. The sequence of using autostart for a manual gearbox Kalina 2:
- Engage neutral gear.
- Engage the handbrake (parking brake).
- Get out of the car and close all doors.
- Turn on the alarm.
- Activate engine autostart.
It often happens that car owners, when turning off the engine, leave the gear in gear. You will have to get used to this, since in this situation the autorun module simply does not activate. However, some manufacturers have found a solution to this very common problem: they equipped the device with “soft neutral” - a function that does not allow the engine to be turned off until the driver engages neutral gear.
Why are autostart systems not good in all cases?
- Perhaps, in this case there is one huge drawback - the very fact of having a running car in which its owner is not present. The fact is that at this moment it becomes extremely vulnerable to penetration by an attacker. Even if he doesn’t steal the car, he won’t miss the chance to remove the radio.
- In addition, do not forget about the significantly increased fuel consumption. And the point here is not only that the machine can start several times during the night. And the fact is that the engine starts and operates at the “optimal” speed mode. At the same time, it warms up quickly, but it also “eats” a lot of fuel.
- What else should you consider if you use car autostart? It can be difficult to bypass a standard immobilizer with your own hands, so if you have any difficulties, it is better to immediately contact an experienced specialist.
- Buy only those automatic start modules that completely eliminate the possibility of accidentally starting the engine. Simply put, the launch command should be given only after it has been confirmed in the application, via SMS, or by pressing some “tricky” key combination.
This is how the autostart module without an alarm works. As you noticed, its operating principle is not so complicated and requires a little knowledge of the electrical part of the car, and whether to install it with an alarm or not is your choice.
TOP expectations
Finally, how to choose autostart for a car without an alarm? The rating of this kind of systems distributes prizes as follows:
- Pantera SLK-868RS – fifth place, the ideal combination of price and quality.
- StarLine A91 – fourth place.
- Scher-Khan LOGICAR 1 – third place. Very good functionality, the module is relatively easy to install.
- Pantera SLK-675RS – second place. Excellent functionality and high reliability for quite reasonable money.
- And again StarLine: the A94 model is beyond any competition. Excellent functionality, reliability and ease of installation. And a price that is lower than competitors' offers.
Car autostart is a useful function in Russian vehicle operating conditions. Typically, auto start is installed as an additional option along with an alarm system.
p, blockquote 1,0,0,0,0 —>
p, blockquote 2,0,0,0,0 —>
If a car is purchased with an already installed alarm without autostart, in the case where the installed alarm model does not support an upgrade, and there is no desire to change it, you can use autonomous additional equipment to install an autostart system.
p, blockquote 3,0,0,0,0 —>
p, blockquote 4,0,0,0,0 —>
When operating cars in small towns or in other conditions, sometimes there is no need to install an alarm system, so there are cases when it is rational to install an autostart on the car without an alarm.
p, blockquote 5,0,0,0,0 —>
Installation of alarm system on Lada Kalina
Nowadays, any car owner tries to protect his property by installing alarms of different types and levels. Therefore, now we will tell you how to install an alarm system on a Lada Kalina with your own hands.
First, you need to disassemble the control column and remove the dashboard in order to get to the wires that suit us; I will attach a photo below.
We take an 18-pin connector, we don’t need as many wires there as there are.
1) 2 wires for turn signals 2) Trunk limit switch 3) Hood limit switch 4) Door limit switches (there will be a separate story about them because everything is very neglected there) 5) Plus 6) Accordingly, minus. 7) Handbrake and generator.
Closely
we read the annotation and take 2 wires that should go to the turn signals, and look into the wiring harness that goes straight to the tidy. There we look for blue and blue/dark and connect 2 wires from the alarm to them.
There, I mean in the same harness, the handbrake is connected, it is needed for autostart, minor theories: by lowering the handbrake the car stalls if there are no keys in the ignition, stopping the car and putting the handbrake on the car will not immediately stall, preparation for autostart, because just to turn it off, you first need to turn the key, turning off the ignition, then lift the handbrake, but later you won’t be able to start from autostart.
So. Let's continue with the handbrake. We find the brown/blue wire and connect the handbrake to it. It's simple.
The next step is to control the operation of the motor, I did it on the generator, in other words, when the machine starts up, voltage appears there, which indicates a successful start. We find the brown/white wire and connect to it. Everything needs to be soldered and perfectly insulated.
At this step, we leave the tidy space and go down to the threshold of the driver's door and to the BUS (glass unit control unit), it is located under the rear seat on the left.
We only need 2 wires in the threshold. Unlocking and locking doors. The minus of this system must be connected to a bolt in the body.
We find the pink/dark wire - it is responsible for unlocking the doors, connect to it with a suitable wire.
Next is pink/snow-white - locking the doors.
Be careful not to confuse it with reddish/black because they are very similar, for example, as I had, there was a slight lack of light and please, the wrong wire.
Here you can also take the hood switch, the snow-white/dark wire, but I didn’t take it, but took it under the rear seat, i.e. in BUS.
We have come to the same BUS and here we have a little more work to do, and specifically, let's start with the usual one, connect the trunk and hood end switch, both wires are snow-white/dark. How to distinguish them? The one that is responsible for the trunk is located on the very right edge if you look at the BUS so that the wires go straight to you. Let's connect to it. The hood wire comes out slightly to the left, but the main thing you just need to know is that for the trunk it is from the very edge, and then you can’t go wrong.
This is where the fun begins, to connect the door limit switches in such a way that you can relax the doors and arm them without waiting for the lamp to go out, then you need 3 diodes with a resistance of 1 Ohm, these are 1N4007, if my memory serves me correctly, I didn’t find them and for now I did it differently, if you have diodes, read on. If not, below I will explain how to create it differently.
There is one wire from the signaling to the door limit switches, and there are 3 of them in the BUS, for the front right, front left and rear. We take the wire from the signaling and branch it into 3 by soldering 3 small wires to it, a diode is soldered to the ends of these wires and then these wires go to the end switch of the front right door, it has a brown/reddish color.
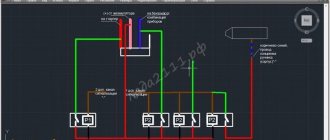
To the end of the front left door there is snow-white/blue and for the rear there is snow-white/reddish. The diagram of this connection is below.