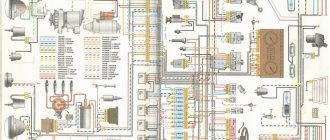
Connection diagram for fog lights VAZ-2170,71,72 Priora
Designations 1 — lighting control module; 2 — glove compartment lighting; 3 — glove compartment lighting switch; 4 — heater motor switch; 5 - battery;
Date of publication: 07/14/2014
Author: Dmitriev Alexander
© AutoService | Online store, Ekaterinburg
Hi all. Today at VAZ Repair another photo report on the installation of PTF. This time we will install fog lights on the Lada Priora at home. The work is not difficult, but requires certain knowledge and adherence to a sequence of actions.
I will not go into detail about what fog lights (FL) are and what they are needed for, anyone can read it on the net, as there are many detailed and clear explanations. I will only say that fog lights are not installed in all trim levels, so we will solve this problem with our own hands. Therefore, without unnecessary preambles, I propose to go directly to the process.
So, to install PTF on Priora you must have:
- Set of fog lights;
- Wires, corrugations, pads, adapters, relays and buttons;
- Shrink film, electrical tape;
- Pliers, a set of keys and screwdrivers.
Installation Guide
Before installing and connecting fog lights on Priora 2, weigh your strengths. If installing fog lights on a Priora 2 or restyling may cause difficulties, then it is better to contact an electrician. A specialist, like no one else, knows how to install headlights on a Priora and how to connect fog lights. If you decide to do everything yourself, then first prepare the necessary tool. To do this, you only need a set of keys and screwdrivers, as well as pliers (the author of the video about choosing fog optics for the Priora is the Simple Opinion channel).
Algorithm of actions
To ensure that installing fog lights on a Priora SE or 2 does not cause difficulties, simply follow the instructions:
- First you need to disconnect the battery, remove the negative terminal from it, and then disconnect the front bumper clips. Self-tapping screws for its dismantling are located on the sides, bottom and top. You need to unscrew them and remove the bumper.
- Next, you can move on to the stubs. The plugs are also fixed using self-tapping screws, but to unscrew them it will be more convenient to use a short screwdriver with a Phillips blade.
- Fog lights on Lada Priora 2 are mounted instead of previously removed plugs. To ensure that the lights are securely fixed, they can be secured using the same screws.
- After completing these steps, you need to find the longest cable in the PTF kit. This wire is connected to the left headlight, after which it is routed to the right headlight. And then the wire must be pulled from the battery side into the engine compartment.
- Using an AN 10 wrench, it is necessary to dismantle the expansion tanks in the engine compartment, which will interfere with the process. Having done this, using a 13mm wrench you will need to unscrew the fastenings of the windshield wiper blades. Eventually you will need to gain access to the left edge of the trim, and to do this you will need to remove the guard itself. When these steps are completed, the pipe can be moved to the side, and then loosen the clamp. The upholstery can then be completely removed.
- Your task is to lay and stretch the wires from the lights through the plug into the vehicle interior, and then secure them with a clamp. This clamp should be included in the kit for the PTF Priora 2.
- When the PTFs are installed on the restyled Priora, all elements are assembled in the reverse order. Don't forget to connect the wires to the crankcase protection screws.
How to replace a burnt out lamp
Let's start with replacing the lamps in the foglight of the Lada Priora. This is a simple matter, and there is absolutely no need to go to a service station because of such a trifle - everything can be done on your own. First of all, what lamps are installed in the PTF of this car? The manufacturer installs H11 type halogen lamps with a power of 55 W on both regular Priora and Priora Restyling (production since 2013).
Light bulbs in PTF Lada Priora of any modifications
In addition to, in fact, new lamps, we will need:
- Torx key T-30;
- socket wrench (head) 10;
- cotton gloves;
- inspection pit or overpass.
Removing the power unit mudguard
We drive the car into a pit or overpass. To get to the PTF of the Priora, you need to remove the engine mudguard or, as it is also called, the engine protection. To do this, use a T-30 wrench to unscrew the four screws that secure the mudguards to the engine mudguard. The photo shows two, the remaining two are on the other side of the mudguard.
Basic Setup Aspects
After the fog lights are installed, their luminous flux will need to be properly adjusted so that the operation of the optics is most effective. Adjustment of fog lights should be carried out in conditions that are closest to real ones. Therefore, make sure that there is a spare tire in the trunk, the tank itself is fully filled, and the tire pressure should be the same. In addition, for greater realism, a load weighing about two hundred kilograms can be placed in the car interior.
When all these conditions are met, you can begin adjustment. First of all, the vehicle must be placed on the most level surface, this will allow you to get the most accurate result. If this condition is not met, the adjustment will be incorrect. The setting is done in front of a wall or garage door, this is a prerequisite.
To begin the adjustment, measure the distance from the ground to the middle of the lantern. After this, you should draw a straight line on the wall or garage door that corresponds to the distance measured earlier. Having done this, you will need to draw another stripe - it should be 5 centimeters lower, while the first line can be erased. The anti-fog optics should be adjusted so that the upper limit of illumination is located on the horizontal strip that you draw on the network.
Adjustment
You managed to install the PTFs, but in order for them to perform their task, they must be configured. Place the Lada Priora on a flat surface. There should be a wall opposite the front bumper; motorists usually use a garage for this. Check the tire pressure - it should be the same.
Now you need to measure the distance from the ground to the middle of the headlight. On the wall, draw an even strip corresponding to the distance from the coating to the middle of the PTF. Draw another strip 5 cm below, the top one can be erased. The fog lights need to be adjusted so that the upper limit of the light is located on the horizontal line that we drew on the surface. As you can see, the headlight adjustment scheme is quite simple.
IMPORTANT! Before talking about how to connect fog lights, carefully read the comments to this article and the text of the article itself, most likely YOUR question has already been considered, several times. Also remember, the article was written more than 2 years ago, I don’t remember exactly how and what I connected, so questions of this plan will also be left unanswered, either in the comments or in a personal message. Thank you for your attention.
The idea of installing foglights was there from the very moment I bought the car, but since I hadn’t installed them on Priors before, moreover, I’ll say, I haven’t installed foglights anywhere at all, I had doubts. At first I wanted to take the car to a service center, I thought, let them put it there, I found out the prices, etc., etc., but I would have to pay about 2 thousand for the work, I think, no, it’s a little expensive. But the idea never left me. First, I purchased a set of wires for installing fog lights for a Priora with a button, this set rode with me for about a week, but a free minute finally turned up and I decided to install the button (for me the most difficult thing was to install the button in the interior and connect the wire to the relay because it was possible to scratch the so-called beard quite a bit), by the way, about the beard, it is held on by 6 self-tapping screws, 2 are screwed into where the radio connector is, 2 where the compartment with the inscription “OPEN” or without this inscription like mine and 2 more hidden under the ashtray, which will need to be removed, after they are unscrewed, the front panel is easily removed and the fog button is installed there according to the instructions that come with the kit (just in case, I checked all the wires with a multimeter so as not to mess up). After connecting the button, 1 single wire is output to the engine compartment on the relay, which is installed a little later. Next, to install the fog lights themselves, you need to remove the bumper. Don't be afraid, there's nothing complicated there. There is no need for a hole or overpass either; I did everything in my yard. First of all, unscrew the front protection nuts (there are 5 of them). Then, there, from below, we unscrew 3 screws on each side, which attach the bumper to the plastic mudguards. Then 2 more screws on the side of the front wheels. Next, we lift the hood and unscrew the Phillips screwdriver bolts that hold the bumper on top (they are in the photo on the sides of the yellow label with the inscription “WARNING”) With further movement we try to carefully bend the edges of the bumper from the fender, first on one side, then on the other, and voila , the bumper is in our hands) I bought the fog lights in advance on the market, it seems like they were from the Depo company, but in my subjective opinion, they are from China, only of good quality. To install them, you need to cut out the plugs on the bumper for the fog lights; it is better to do this carefully and slowly with a large stationery knife. Next, he screws each fog lamp onto 3 self-tapping screws, the main thing is to be careful not to confuse the bottom with the top. We conduct, connect the wires, again according to the diagram, connect the ground, here, by the way, I don’t recommend screwing screws into the body as written in the instructions, because the body already has a lot of holes or metal objects where you can screw the ground wire. After these manipulations, hold the bumper up, connect the fogs and put it in place in the reverse order. Then we connect all the wiring (the relay and the wire that was pulled from the button) according to the diagram, I took the plus and minus from the battery and enjoy the result.
Diagram of correct installation of fog lights
On Priora, fog lights are installed according to the same rules as any other car. Installation is carried out at a height of no more than half a meter from the level of the road surface. Low-mounted fog lights are out of the wet condensation zone and can actually significantly improve visibility. If you install PTFs on the roof of the trunk (as jeep owners often do), then they will turn out to be completely useless, especially during fog, rain, or a snow or dust storm. Therefore, the most effective way was and remains to install foglights under the bumper (for outdated metal structures) or directly into it (for new generation metal structures).
Installation of fog lights
The fog lights that you install on your Priora must meet not only all traffic regulations, but also UN standards. The latest changes clearly state that any fogs must distribute light at a wide angle and have a clearly defined upper border. The dispersion index should be seventy degrees horizontally. Only a device with such characteristics will create an anti-fog effect.
Most often, fog lights with a halogen illuminator inside are installed on the Priora. They are enough to ensure that the space thirty meters in front of the car is sufficiently illuminated in any weather.
What kind of light bulbs are in Prior's fog lights?
In the list we have given the most common models of the selected car brand. (Abbreviation PTF - fog lights)
| Brand | Lamp type | Base |
| 1113 Oka | Near | H4 |
| Further | H4 | |
| PTF | — | |
| 1117 Kalina | Near | H7 |
| Further | H1 | |
| PTF | H11 | |
| 1118 Kalina | Near | H7 |
| Further | H1 | |
| PTF | H11 | |
| 1119 Kalina | Near | H7 |
| Further | H1 | |
| PTF | H11 | |
| 2105 Zhiguli | Near | H4 |
| Further | H4 | |
| PTF | — | |
| 2106 Zhiguli | Near | H4 |
| Further | H4 | |
| PTF | — | |
| 2107 Zhiguli | Near | H4 |
| Further | H4 | |
| PTF | — | |
| 2108 Samara | Near | H4 |
| Further | H4 | |
| PTF | — | |
| 2109 Samara | Near | H4 |
| Further | H4 | |
| PTF | — | |
| 21099 Samara | Near | H4 |
| Further | H4 | |
| PTF | — | |
| 2110 | Near | H1 |
| Further | H1 | |
| PTF | H1/H3 | |
| 2111 | Near | H1 |
| Further | H1 | |
| PTF | H1/H3 | |
| 2112 | Near | H1 |
| Further | H1 | |
| PTF | H1/H3 | |
| 2113 Samara-2 | Near | H4 |
| Further | H4 | |
| PTF | H1/H3 | |
| 2114 Samara-2 | Near | H4 |
| Further | H4 | |
| PTF | H1/H3 | |
| 2115 Samara-2 | Near | H4 |
| Further | H4 | |
| PTF | H3 | |
| 21213 Niva | Near | H4 |
| Further | H4 | |
| PTF | — | |
| 21214 Niva | Near | H4 |
| Further | H4 | |
| PTF | — | |
| 2123 Chevrolet Niva in one low/high beam | Near | H4 |
| Further | H4 | |
| PTF | H3 | |
| 2123 Chevrolet Niva split low/high beam | Near | H7 |
| Further | H1 | |
| PTF | H3 | |
| 2131 Niva | Near | H4 |
| Further | H4 | |
| PTF | — | |
| 2170 Priora | Near | H7 |
| Further | H1 | |
| PTF | H11/H3 | |
| Granta | Near | H4 |
| Further | H4 | |
| PTF | H11 |
ATTENTION. This information is for informational purposes only.
There may be differences between the installed lamps in your car and in the table. To more accurately determine the lamp base, we recommend that you check in more detail in the manual for your car, or look at the lamp markings by directly pulling it out of the headlight. Some types of headlights have a marking (or sticker) on the housing of the headlight itself.
How to install and connect fog lights on a Priora
The climatic conditions of our country, unfortunately, are not the most suitable, and therefore most motorists have already become accustomed to such a phenomenon as morning or evening fog. A more optimal solution for Priora owners would be to install fog lights. Standard headlights are not always suitable due to the light curtain they create for both the car owner and other road users.
Connection diagram for fog lights
If the fog lights have already been replaced, and now you want to start connecting them, then first you need to fix their switches on the front panel of the car. To do this you need:
- Remove the decorative panel that obscures the steering column (turn all locks ninety degrees);
- Remove the plug located next to the clock equipment (under it you will see exactly the contacts to which you will need to connect the headlights);
- Connect contacts of shorter length with wires of the same color. A similar operation will also need to be carried out with the glass heating system.
PTF connection diagram
As a rule, any set of fog lights for Priora contains a detailed diagram of their connection installation, and therefore any motorist who reads it carefully can cope with this task. If you want to connect fog lights to the mounting block, then you will have to install a K-10 type relay, as well as replace or install fuses (two pieces).
Prices for headlights and work
Installing headlights in the showroom (where you buy a car) will cost 2,000 - 3,000 rubles, plus the price of fog lights is 2,600 rubles, which is much more expensive than in a store. Installation of fog lights in a car service center averages from 1,500 to 2,000 rubles. You can buy headlights yourself. It is not necessary to pay money for installation, because fog lights can be installed on your own.
The price of a set of fog lights varies from 1200 to 1800 rubles. For headlights you need to purchase a connection kit - 400 rubles.
Do-it-yourself PTF Priora installation
Do you want to install fog lights on a Priora instead of the standard front optics? Today, this can be done by every car enthusiast who has experience in servicing electrical systems. If the installation is carried out with your own hands, then the only cost can be attributed to the purchase of a PTF kit. After reading this material, the car enthusiast will learn how to dismantle old headlights and connect new fog optics. High-quality photographic materials and a diagram will help with this.
Fog lights in action
The maximum configuration of the Lada Priora comes with fog lights, so you don’t have to buy optics for other models. Buy a PTF kit in advance, which will cost about 2 thousand rubles. Also examine the dashboard for a button to turn on the fog lights. If it is not there, then you will need to purchase a kit with wires, a button and a relay. The kit also includes a diagram for installing fog lights.
Fog lights allow you to move safely in poor visibility conditions. In fog and rain, the flow of light is distributed along the entire road, which also helps other road users. The “base” does not have fog lights. The scheme is quite simple if you have already installed additional equipment on the Lada Priora.
Fog lamp models
Kirzhach and Bosch are not a death sentence, and if the light of these models does not suit you, there is a good choice from other manufacturers:
- Automotive lighting (Ryazan);
- Beam (Ryazan);
- DAAZ;
- Orion-7 (diode);
Made in China (lensed or diode). The Chinese also sell frames for the restyled version, which are installed instead of a plug and leave a hole exactly for the old-style foglights - on the pre-restyled Priora. A non-diode or non-lensed analogue of fog lights costs much less, but you shouldn’t rush into purchasing - bright white light does not always come with a long service life.
Installation of PTF
Priora needs to be driven into the inspection hole and checked whether all the necessary components for modernization are at hand:
- PTF and wiring kit.
- Pliers.
- Set of screwdrivers and keys.
Installing headlights
- We disconnect the negative terminal from the battery and move on to the front bumper fastenings - the screws are located on the top, bottom and side. Remove the Lada Priora bumper; Unscrew the marked fasteners and remove the front bumper
- Let's move on to the plugs. They are attached using several self-tapping screws; here it will be most convenient to work with a short Phillips screwdriver;
- It is necessary to place the fog lights in the places where the plugs were. For fastening, you can use self-tapping screws from the plugs; Remove the plugs and screw the fog lights in their place.
- Now we need to find the longest wire in the set. We connect it to the left headlight, and then to the right one and pull it from the battery side into the engine compartment;
- With the “tenth” key we dismantle both tanks of the Lada Priora, with the 13th key we unscrew the fastenings of the wipers;
- We need to get to the left edge of the upholstery, to do this we need to remove the protection. The hose must be moved to the side, loosen the clamp;
- Now the upholstery can be completely removed;
- Our task is to pull the headlight wiring through the plug into the Priora’s interior and secure the wires with the clamp that comes in the kit;
- We assemble Lada components in reverse order. Wires must be connected to the crankcase protection bolts.
Electrical connections in the cabin
- Under the steering column of the Lada, you need to remove the protective plastic - turn the three latches 90 degrees;
- Under the safety block you will see a self-tapping screw - unscrew it and pull out the block. The PTF kit includes instructions that contain a detailed connection diagram;
- Now let's move on to the central panel. Take out the plug and the button for turning on the heated rear window, you will find these elements to the left of the clock;
- Take the PTF button from the kit. The blue wire goes to the safety block, the rest need to be connected to the heating button - you can do this using the clamps that come in the kit. Here is the connection diagram:
- We need to install the PTF relay in the block. It is important here not to confuse: connect the wires coming from the hood to F18 and F17, also connect the yellow wire to these sockets, black and red go to A86 and A30, insert the fuses from F18, F17, connect the blue wire to A. Understand The diagram will help you with this. We connect the relay to the indicated sockets
Installation of PTF on Lada Priora is completed. All that remains is to assemble the parts and connect the negative terminal to the battery. The fog lights only work when the ignition is on. You should only install the dashboard covers when you are sure that the optics are working properly. All that remains is to adjust the headlights; for this, a standard scheme is used.
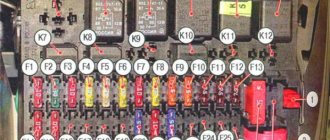
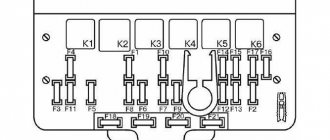
Location of Priora fuses under the hood
- F1 (30 A) – power supply fuse for the electronic engine control system (ECM);
- F2 (60 A) – fuse for the power supply circuit of the engine cooling system fan (power circuit), additional relay (ignition relay), rear window heating, electrical package controller;
- F3 (60 A) – fuse for the power supply circuit of the electric fan of the engine cooling system (relay control circuit), sound signal, alarm signal, ignition switch, instrument cluster, interior lighting, brake light, cigarette lighter;
- F4, F6 (60 A) – generator power circuit fuses;
- F5 (50 A) – fuse for the power supply circuit of the electromechanical power steering
Relay and fuse box for Halla air conditioner
- right electric fan power supply fuse (30 A);
- fuse for the power supply circuit of the left electric fan (30 A).
- right electric fan relay;
- additional relay (sequential activation of left and right electric fans);
- left electric fan relay;
- heater fan power supply fuse (40 A);
- compressor power supply fuse (15 A);
- heater fan relay;
- compressor relay.
Panasonic air conditioner relay and fuse box
- Heater fan maximum speed
- Right fan
- Fan sequential relay (low speed)
- Left fan
- Left fan fuse (low speed)
- Right fan
- Heater fan
- Compressor
- Heater fan
- Compressor
How to connect fog lights on Lada Priora?
When there is not much left in stock, you just have to disassemble everything and install the PTF, then put everything back together and enjoy the work done. Kidding :-).
- Let's start with the fact that we need to de-energize everything, to do this we remove the “-” terminal of the battery.
- Next, you need to remove the bumper; to do this, unscrew the screws that secure it one by one. The screws that need to be unscrewed are marked in the photo. After all the fasteners are unscrewed, carefully unclip the bumper from the latches and dismantle it completely.
- Next, take a screwdriver and remove the foglight plugs, which are attached with self-tapping screws.
- We prepare our fog lights and proceed to an important stage called “installation of fog lights.” We carefully place the PTFs in their regular places and secure them with the self-tapping screws that secured the plugs. Then we start laying the wiring. The wiring is routed from the inside of the bumper; it is advisable to use corrugated wire.
- The wires need to be pulled into the cabin in the GTZ area; to do this, we take out a special plug, under which the holes we need are hidden. For convenience, it is recommended to remove the frill along with the wipers, as well as the expansion tank with bracket.
- In the cabin, in order to extend and connect the fog lights, you should pull off the trim (sound insulation) and pull the wire into the cabin.
- When the wires are brought into the interior, you can start connecting. The diagram according to which it should be connected is usually included with the PTF kit, but just in case I decided to post the diagram.
- Connecting the fog lights to the button requires the removal of the central panel. When installing the PTF relay in the unit, it is important not to mix up the wires and follow the PTF connection diagram.
Installing fog lights on a Lada Priora is quite an extraordinary task and can be done by any car enthusiast. The only problem is the connection; as a rule, difficulties arise with it. However, if you follow the instructions and carefully study the connection diagram, then everything should work out. If difficulties arise during the connection, I recommend contacting an experienced electrician, he will easily help you for a minimal fee. Before final assembly, do not forget to check everything and make sure that the PTFs are working as they should.
That’s all for me, thank you for your attention and see you again at VAZ Repair! Bye!
I know, I know this topic has been discussed a million times, but let it be the first million!
WHO HAS ALREADY CONNECTED can still see what I encountered, whoever is just going to be sure to take a look, and you will also be able to book on your own!
To fog lights ( hereinafter referred to briefly as PTF
) a connection kit was immediately purchased
as well as Oraquard armor film
The PTF connection kit includes: Chips
for connecting H11 lamps, 2 pieces;
The wires
from the chips are long and even longer (
for the right PTF
);
Relay
, 4 pin;
PTF power
button
PTF power button
block No instructions.
Download the diagram
from the Internet and stomp into the car with her.
According to the diagram, everything is very clear, but when I took the PTF button block, my brain broke
Why were some of the wires plugged on it? And which ones are connected to each other?
Because of this, I was stuck in the car for a long time, not understanding what was happening.
Sometimes there are such moments when it’s better to let go, get some air, do something else, then the muse will overtake you and everything will work out.
After some time, I returned to the car, removed the chip from the button for heating the rear window and side mirrors, looked at the contacts, they are labeled the same: D,2,1,B, A, C
.
I looked at the diagram again. Contacts D
and
2
are connected to each other and go to the relay at
85
.
I have something else in the block from the kit, something is mixed up, something is connected to something. Contact C
is simply jammed with electrical tape (
black
) or pulled out of the block altogether.
contacts D
and
2
together and lead them from the center console to the mounting block.
the remaining contacts A, B, 1
(
we cut it in, strip off a small section of the wire and wind ours to it, we insulate everything well
) with the same contacts on the rear window heating button block.
Voila the button is connected! Next is the relay. Some people put the K10 relay under the hood, some in the mounting block in the regular place, and some I do.
The relay is above the mounting block, I took a small standard 4-pin relay for the PTF, and not the one from the kit (
since it was used for the compressor horn
).
85 contact
is our
D, 2
from the button
87 contact
is the fog lights, both left and right, the wires from them need to be led into the cabin:
Additional mounting block Priora
- F1 (15 A) – main relay and starter interlock circuit fuse;
- F2 (7.5 A) – fuse for the power supply circuit of the ECU (controller);
- F3 (15 A) – Priora fuel pump fuse;
- K1 – main relay;
- K2 is the place where the Priora fuel pump relay is located.
Attention!
The relay and fuse diagram may differ depending on the configuration and production date of the vehicle. Current diagrams of the mounting block are presented in the operating manual for the date of manufacture of the vehicle (download from the official website).
Let us remind you that on our website you can find detailed instructions for repairing the Lada Priora with your own hands.
Source
Relays and fuses
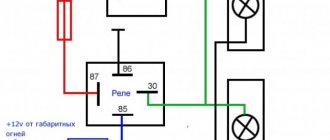
The PTF relay from Priora must be secured with an eyelet under any fastening nut so that the wires do not “dangle” and are not pulled under the hood too much. The relay has four contacts, which are labeled: 85, 86, 30 and 87.
- The 86th contact is connected to the negative side of the battery;
- The 30th contact is connected to the “plus” of the battery;
- The 87th contact is connected to the “plus” of the fog lamp;
- Pin 85 is connected to the button with a blue wire through the PTF fuse on the Priora.