Headlight hydrocorrector
Headlight hydrocorrector
Post by Micah » Jun 02, 2010, 11:13 pm
Re: Hydrocorrector headlights
Post by Moonlight » 03 Jun 2010, 15:44
Re: Hydrocorrector headlights
Post by Portada » 03 Jun 2010, 17:06
Re: Hydrocorrector headlights
Post by Micah » 03 Jun 2010, 18:19
Re: Hydrocorrector headlights
Post by WILFORINS » 03 Jun 2010, 18:38
Re: Hydrocorrector headlights
Post by simbir » 05 Jun 2010, 21:20
Re: Hydrocorrector headlights
Post by Portada » 05 Jun 2010, 22:01
Re: Hydrocorrector headlights
Post by ALK » 06 Jun 2010, 18:17
Who knows what's going on behind the fence of the zoo? ©
Re: Hydrocorrector headlights
Post by Micah » Jun 06, 2010, 7:00 p.m.
Re: Hydrocorrector headlights
Post by ALK » 07 Jun 2010, 07:47
Who knows what's going on behind the fence of the zoo? ©
Re: Hydrocorrector headlights
Post by Zhora » June 10, 2010, 4:06 pm
Re: Hydrocorrector headlights
Post by Sokolov » 10 Sep 2010, 10:10
Re: Hydrocorrector headlights
Post by ALK » Sep 10, 2010, 10:18 am
Who knows what's going on behind the fence of the zoo? ©
Re: Hydrocorrector headlights
Post by Wanderer » 14 Sep 2010, 16:31
Re: Hydrocorrector headlights
Post by fraer » Sep 14, 2010, 4:39 pm
Re: Hydrocorrector headlights
Post by ALK » 14 Sep 2010, 16:43
Who knows what's going on behind the fence of the zoo? ©
Re: Hydrocorrector headlights
Post by fraer » 14 Sep 2010, 20:08
Re: Hydrocorrector headlights
Post by ALK » 15 Sep 2010, 17:14
Who knows what's going on behind the fence of the zoo? ©
Re: Hydrocorrector headlights
Post by MNV » 15 Sep 2010, 18:14
Re: Hydrocorrector headlights
Post by fraer » 16 Sep 2010, 06:58
- International NIVA Club
- ↳ Test
- ↳ Welcome!
- ↳ Mutual assistance!
- ↳ For those who can help - Russia!
- ↳ For those who can provide assistance - Ukraine!
- ↳ Club Glade
- ↳ Club paraphernalia
- ↳ Meetings of teammates
- ↳ First Anniversary of the Club 2010
- ↳ Second Anniversary of the Club 2011
- ↳INC expedition 2011
- ↳ Project 2011
- ↳ Third Anniversary of the Club 2012
- ↳ Fourth Anniversary of the Club 2013
- ↳ INC expedition 2014
- ↳ We are 5 years old!
- ↳ Sixth Anniversary of the Club 2015
- ↳ Seventh Anniversary of the Club 2016
- ↳ Eighth Anniversary of the Club 2017
- ↳ Ninth Anniversary of the Club 2018
- ↳ Tenth Anniversary of the Club 2019
- ↳ Eleventh Anniversary of the Club 2020
- ↳ Affiliate program
- ↳ You are welcome
- Healthy
- ↳ A treasure trove of knowledge and experience.
- ↳ Navigation
- ↳ Radio communication
- ↳ Clothes and shoes
- ↳ Medicine
- ↳ Travel equipment
- ↳ Car tools and garage farming
- ↳ Means for increasing vehicle cross-country ability
- ↳ Alarm and security equipment
- ↳ Cottage and house in the village
- ↳ Do it yourself
- ↳Driving technique
- Auto - Equipment
- ↳ Technical section Lada NIVA Legend (Lada 4x4 Niva)
- ↳ General technical
- ↳ Body – Salon
- ↳ Tires – Wheels
- ↳ Engine - general questions
- ↳ Carburetor engine
- ↳ Injection engine
- ↳ Other engines
- ↳ Electrical equipment
- ↳Transmission
- ↳ Chassis
- ↳ Off-road
- ↳ Winch
- ↳ Car reports
- ↳Vehicle options
- ↳ Off-road gallery
- ↳Suicidelab
- ↳ Technical section NIVA 2123 (Chevrolet Niva)
- ↳ General technical
- ↳ Body – Salon
- ↳ Tires – Wheels
- ↳ Engine
- ↳ Electrical equipment
- ↳Transmission
- ↳ Chassis
- ↳ Off-road
- ↳Vehicle options.
- ↳ Consumables and expenses.
- ↳ Your question to an AvtoVAZ specialist
- ↳ Questions about purchasing and choosing a car
- ↳ Other cars
- ↳ Great Britain
- ↳ Germany
- ↳Italy
- ↳ China
- ↳ Korea
- ↳ Sov. Auto industry
- ↳ USA
- ↳ France
- ↳ Czech Republic
- ↳ Sweden
- ↳Japan
- ↳ Others
- ↳ Help and save
- Russia
- ↳ ( RU ) Travel, competitions, rides, off-road events
- ↳ (RU) Competitions
- ↳ ( RU ) Rides - Picnics
- ↳ ( RU ) Travel - Expeditions
- ↳ ( RU ) Treasure hunting
- ↳ (RU) Commercial trips
- ↳ ( RU ) Purchase - Sale, Exchange.
- ↳ Online store “NIVA SHOP”
- ↳ (RU) Services
- ↳ (RU) Legal issues
- ↳ (RU) Regional branch
- ↳ Moscow
- ↳ St. Petersburg
- ↳ Crimea
- ↳ Kazan
- Ukraine
- ↳ ( UA ) Travel, competitions, rides, off-road events
- ↳ (UA) Club events
- ↳ (UA) Competitions
- ↳ ( UA ) Rides - Picnics
- ↳ (UA) Travel - Expeditions
- ↳ (UA) Commercial trips
- ↳ (UA) Purchase - Sale, Exchange.
- ↳ (UA) Services
- ↳ (UA) Legal issues
- ↳ (UA) Regional branch
- Kyiv
- ↳ 48th parallel
- ↳ Odessa
- Kazakhstan
- ↳ (KZ) Travel, competitions, rides, off-road events
- ↳ (KZ) Purchase - Sale, Exchange.
- ↳ (KZ) Legal issues
- ↳ (KZ) Regional branch
- Belarus
- ↳ ( BY ) Travel, competitions, rides, off-road events
- ↳ ( BY ) Purchase - Sale, Exchange.
- ↳ ( BY ) Legal issues
- ↳ ( BY ) Regional branch
- About nothing and everything
- ↳ Hunting-fishing, berries-mushrooms
- ↳ Household chores
- ↳ Pets
- ↳ Home renovation
- ↳ Our children
- ↳In the kitchen
- ↳ Yin and Yang
- ↳Humor
- ↳ Congratulations!
- ↳ Smoking room
- ↳ Quote book
- List of forums
- Time zone: UTC+04:00
- Delete cookies
- Contact the administration
Powered by phpBB® Forum Software © phpBB Limited
Repair and adjustment of headlights of a VAZ-2121 car
The car has two round headlights. Headlight bulbs are double-filament (H4).
The voltage to the lamp filaments is supplied through the low and high beam relay type 113.3747, located under the instrument panel on the left side.
Relay characteristics: switching voltage at a temperature of (20±5)°C – no more than 8 V, winding resistance – (85±8.5) Ohm.
Voltage is supplied to the relay windings if the exterior lighting switch key is fully pressed (then the choice between low and high beams depends on the position of the headlight stalk switch) or regardless of the switch position - if the driver pulls the left steering column switch towards himself (the high beam headlights turn on ).
Some cars can be equipped with a hydraulic headlight corrector, designed to change the angle of the headlights depending on the vehicle load.
Removing and disassembling the headlight, replacing the lamp
Disconnect the negative cable from the battery.
Remove the radiator trim.
1. Using a Phillips screwdriver, loosen the three screws securing the rim of the optical element to the headlight body.
2. Turn the bezel counterclockwise and remove it.
3. Take out the optical element of the headlight and disconnect the block from the lamp.
4. Unclench the two ears of the wire holder,
5. take out the lamp. We take the lamp, suitable for use or new, only by the base, without touching the glass bulb
To remove the headlight housing in the engine compartment, disconnect the headlight wire block
7. Use a screwdriver to pry off the rubber plug of the mudguard, remove it and push the block into the resulting hole.
Disconnect the hydraulic corrector from the headlight
8. Using a Phillips screwdriver, unscrew the four screws securing the headlight housing to the body.
9. Remove the headlight housing. After installing the headlight on the car in the reverse order, we adjust it
Headlight adjustment
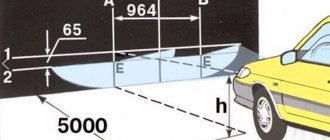
Select a flat horizontal area within the base of the car at a distance of 5 m from the screen - a light wall of a building, garage, etc.
You can use a sheet of plywood or hardboard measuring 1x2 m.
Fill up the car, put the tools and spare wheel in their original places, check the tire pressure on all wheels.
In the dark, place the car on the selected site perpendicular to the screen, the distance between the headlights and the screen should be 5 m.
Place an assistant in the driver's seat or place a 75 kgf load and slightly rock the car from the side to install the suspensions.
Measure the distance from the centers of the headlights to the floor, at this height draw a line on the screen, and 120 mm below it - a second one (if a headlight range control is installed, the second line is drawn 65 mm below the first).
Draw a vertical center line on the screen (the distances from it to the centers of the left and right headlights should be equal) and lines corresponding to the centers of the headlights.
Set the headlight range adjustment control (if equipped) to the minimum load position.
Cover one of the headlights with a piece of cardboard, plywood, etc.
Turn on low beam headlights.
Opposite the recesses in the rim of the optical element and the radiator grille are the headlight adjustment screws.
Use the adjusting screws to ensure that the upper boundary of the light spot (horizontal) coincides with the bottom line, and the point where the beam breaks (the point of intersection of the horizontal and inclined sections) coincides with the vertical line of the center of the headlight.
To adjust the headlight beam in the vertical plane, screws “C” and “D” are turned in the same direction and at the same number of turns.
The difference in revolutions of one screw without correction of the other should not exceed 3 revolutions.
In the horizontal plane, the headlights are also adjusted with screws “C” and “D”, but by rotating them in different directions.
For example, if one screw is turned one turn clockwise, then the second screw must be turned one turn counterclockwise.
Adjust the second headlight by covering the first one.
Use a Phillips screwdriver to turn the outer screw C for adjusting the light beam of the right headlight\
Use a Phillips screwdriver to turn the internal screw D for adjusting the light beam of the right headlight.
Removing the headlight hydraulic corrector
We disconnect the hydraulic corrector from the headlights and instrument panel when removing these components. We completely dismantle it for replacement.
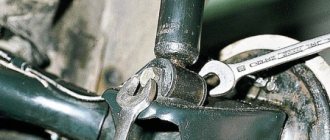
1. To disconnect the working cylinder of the hydraulic corrector from the headlight, press the latch and turn it counterclockwise
2. ...and remove the hydraulic corrector working cylinder from the headlight.
3. Having removed the rubber plug from the mudguard, we remove the working cylinder into the engine compartment.
Similarly, we remove and remove the working cylinder of the other headlight.
4. To remove the main cylinder of the hydraulic corrector in the cabin, pull it towards you and remove the control handle
5. Using a 21mm socket, unscrew the nut securing the master cylinder to the instrument panel
6. Remove the main cylinder of the hydraulic corrector from under the instrument panel
Having removed the plug from the front panel, we bring both working cylinders into the passenger compartment through the resulting hole.
We install the headlight hydraulic corrector in the reverse order.
Source: https://autoruk.ru/vaz-2121/elektrika-vaz-2121/zamena-i-regulirovka-far-avtomobilya-vaz-2121
What headlights to put on a car
Thanks to the headlights and all the optics of the car, in conditions of limited visibility, the route and all objects on it are perfectly visible; in the dark, you can always illuminate the interior and other necessary parts of the car, and convey to other drivers the necessary information about what maneuver the driver is going to perform and what is being done on the road. road. That is why a lot depends on the quality of the headlights of the VAZ 2121 Niva when driving, and each performs its own special function.
A wide variety of lamps can be used in headlights. These are gas discharge, which come in the following types:
- xenon - for low and high beam;
- tungsten - inexpensive and with low light intensity;
- halogen incandescent lamps, which are most common, serve as a source of low and high beam in the headlight.
But lately, drivers have preferred LED lamps, and not only for signaling functions, but increasingly as a source of head light. They are about 3 times brighter than halogen and xenon, and the light density is much better.
LED headlights are suitable for cars that have headlights of 7 inches, including the Niva.
The latest tuning headlights are easy to install, but over time, the need to replace the headlights of the VAZ 2131 inevitably arises, including the headlights for the Niva 21214.
Lately, more and more companies have been trying to boast excellent headlights on the automotive market.
But increasingly, VAZ 2131 drivers prefer headlights, which eliminate many problems that arise with headlights, and replacing them does not require much effort. These are wesem headlights with a 178mm reflector. They are bought and exchanged for standard ones.
They are perfect for models such as Niva 21214 and VAZ 2131 to adjust the head light or to replace standard optical elements. When purchasing wesem diode headlights, you will need to buy a lamp for it - 12 or 24 volts.
Wesem fog lenses. They have very clear boundaries of light - upper and lower, and this provides an excellent opportunity to configure them so as not to violate the rules of GOST, and not to blind drivers of oncoming cars with bright light. This optical element helps improve low beam. And even the appearance of the car immediately changes when such headlights appear on it.
A few words about adjusting the light on the stand
All vehicle operating instructions recommend making such adjustments on a special stand. However, in some cases this operation can be easily performed independently. In cases where body repairs were carried out to restore the geometry of the body, it is best to contact a service center and perform this procedure using a special stand.
The photo shows one of these stands. It is a stand that rotates freely in any direction. laser centering of the light beam, a glass lens with a lux meter, and a mirror for precise positioning are placed on it
For clarity, watch the video.
Hydrocorrector
In the article “Why the headlight range control does not work,” we examined the main malfunctions of the system, as well as the repair method by completely replacing all components of the system. However, in most cases the hydraulic corrector is perfectly repairable. In order for the hydraulic corrector to stop working normally, the loss of even a small amount of working fluid is sufficient. You can make up for the loss with regular antifreeze.
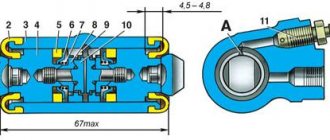
6 – knob for adjusting the light beam; 1 – main adjustment mechanism; 2 – working cylinders with a rod acting on the headlight reflector.
Features of operation
The new corrector will last a long time and will not need repairs for a long time if the replacement is done correctly. During operation, the corrector must be checked regarding the integrity of the pipeline. If a leak is detected, the entire set must be replaced again.
Depending on how loaded the vehicle is, the headlights can be directed higher or lower. To adjust the light flux, special devices are used - hydrocorrectors. If the car is loaded, the headlights should be turned down so that the flow of light is directed not upward, but onto the road. This ensures the necessary illumination of the road surface and prevents the driver of an oncoming car from being dazzled. In the case of a minimal vehicle load, when the rear part of the frame is raised, the headlights should be turned upward.
Tuning of optical elements of Niva 21214
In many cars, including those like the Niva 4x4, quite often it is necessary to replace only the glass on the headlight or the headlight reflector.
But if the contacts are completely burnt, and the headlight has acquired a cloudy color, then it must be changed completely. You can do the tuning yourself.
To do this, remove the headlight from the VAZ 2121 Niva, for which you need to remove the rim, and very carefully, so as not to damage it, remove the reflector. To do this, you will need to unscrew 3 screws and unscrew 4 bolts, then the housing can be easily removed. The steps are as follows:
- after the Niva tuning is completed, mandatory light adjustment is necessary, and it is advisable that this work be carried out by a specialist;
- if tuning of the VAZ 21214 Niva taillights was done, then you can connect them yourself;
- only first you need to examine the rear light; it must have a seal in the area where the body and body come into contact;
- if it is missing, a sealant is required.
Rear fog lights, after tuning has been done, are connected quite simply.
The plastic panels on the trunk are removed and the electrical connector is disconnected.
There is an optical element inside the body, and you need to unscrew the nuts that secure it. Install a new headlight by screwing it to the body. Now you need to connect the connector to the on-board electrical network.
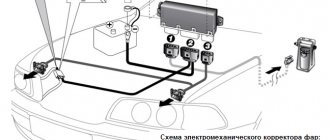
There is such an excellent device for the VAZ 21214 - an electric corrector for headlights. It is designed to change the angle of the light beam depending on the load of the machine. This optical element includes a regulator that fixes the position of the headlights, several mechanisms that contain O-rings, and electrical wires.
About the reasons for violation of regulations
Cars have properly adjusted headlights. Unfortunately, these settings are broken. There can be many reasons for this, for example:
- Violation of body geometry;
- Replacing headlights;
- Front suspension repair;
- Installation of other rubber on wheels.
The luminous flux of the headlights will be directed up or down, or even to the sides. Sometimes inappropriate and inept intervention by car owners leads to lighting problems. In any of these cases, you need to adjust the light.
Electric corrector
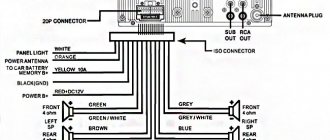
If, using methods for searching for defects in power wiring, you still cannot solve the problem of a faulty electromechanical corrector, you should start by diagnosing the gearmotor.
By assembling the circuit shown in the figure, you can check the smooth operation of the servo drive. If the gear motor does not respond to power supply, you can safely proceed to replacing or disassembling it. In most cases, the housing is secured with plastic latches. If the latches cannot be snapped off, they can be carefully cut off, and when installing part of the body, they can be joined with dichloroethane (special glue for plastic). The electric motors themselves fail extremely rarely, but they are also sold separately.
Electric corrector
On some domestic models, automakers have begun installing electric headlight range control units. This applies to both VAZ and GAZ models and so on. Some of them fit perfectly under the “stock” mounting points. You will only need to do the wiring and connect correctly.
- A slight modification of the electrical correctors is possible. This applies to both the control unit and the operating units installed in the headlights
- You need to have a little electrical knowledge to avoid short circuits and fires.
- Get rid of hydraulic system hemorrhoids forever
- You always receive a working headlight leveler
- If it fails, its repair is much simpler; you can not change the entire system, but only what is broken, that is, in parts
- The service life of an electric corrector is several times higher than that of a hydraulic one.
Here is a video of how the VAZ electric corrector was connected:
Draw your own conclusions. If you are interested in hydrocorrector repair or have questions, write in the comments. I will answer or write a new manul on a topic that interests you.
Source
Do-it-yourself headlight range control repair; video about hydraulic correctors «
Category: Car repair video
Vehicle characteristics: The dimensions of the car are as follows: length - 3143, width - 1100, height - 1219 mm. The wheelbase is 2380 mm. Ground clearance 150 mm. The car is equipped with a hybrid power unit. The 2-cylinder engine is equipped with a system that provides engine power output. There are 4 valves per cylinder. The diameter of one cylinder is 77 mm, the piston stroke is 76 mm. The engine crankshaft accelerates to 2000 rpm. Maximum torque is maintained up to 4000 rpm.
Posted by admin: at the request of Priscus
Watch the VIDEO about repairing the headlight hydrocorrector on a VAZ 21214.
Rating of a car owner named Zakhar: Comfort, number of bells and whistles.
Original name: . hydrocollator headlights ?? . 21214
Release date: 05/28/2022
Quality: HD DVD Remux
Laughter on topic: According to tour operators, during the season in Crimea there were five times more female vacationers than male vacationers. That’s why many women returned from Crimea unrested.
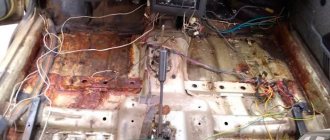
That's all. It's been about four months now - no signs of the seal breaking or the headlights going down. The adjustment margin remains. It's much more pleasant to drive than with plugs.
Best regards, Nicksh mailto: (home) https://www.tst.spb.ru
Let me edit it a little stylistically (at the “remove” level instead of “removed”) and post it on my page. Of course, under your nickname. I can send you a text to check with soap. Or edit it yourself and send it to me. If you have a page yourself, please post it on yours.
: I had a reason - liquid leaked out through the seals of the working cylinders, even drops of it were visible from the front in the cylinders. : I did this: 1) Removed the headlights and fender liners - you need access from both sides; : 2) Pulled out the slave cylinder - it is on a latch at the bottom of the housing; : 3) I cut off its hose (supply tube) as close to the fitting as possible (it’s still not possible to remove the hose without damage, and then it won’t hold on), sealed the hose itself with plasticine so that liquid wouldn’t leak out (according to my observations and the stories of friends, it’s flooded regular antifreeze); : 4) Pulled out the plastic retaining ring of the spring from the front, disassembled and washed the cylinder well, removed the remaining hose from the fitting; : 5) Lubricated the inner surface of the cylinder, the fitting and the rubber band with non-drying silicone ointment (I think a lot of things will do, just so that the rubber band and plastic are not damaged and are not wetted with antifreeze); : 6) I folded everything neatly, but without the spring and retaining ring, filled it with antifreeze using a medical syringe through the fitting so that the rod and rubber protruded almost to the end of the inner working surface of the cylinder (up to the step - about 2/3 of the full length of the cylinder, that would be enough and half the length); : 7) Turned the fitting upward, squeezed out a little liquid with air and filled it again (bleeding), removed the plastic piston rod, because there is nothing to keep him there yet; : I slightly turned the regulator on the shield to raise the headlights to squeeze the air out of the hose, slightly warmed up the cut end of the hose and quickly put it on the fitting, preferably immediately in the position in which it will stand, so as not to move the cooled end; : 9) I put back the piston rod, the spring and the retaining ring (I fiddled a fair bit, because it keeps trying to jump out, but you have to compress it almost until the coils are completely closed and carefully so as not to knock off the rubber collar into which the rod rests); : 10) Put everything in place and adjusted the headlight (the adjustment length was barely enough so as not to shine into the sky); : 11) A week later, the second headlight fell, I did the same with it, having already had experience, in an hour, along with disassembly and reassembly (I spent two hours on the first one with intermediate thoughts and drinking tea). : : That's all. It's been about four months now - no signs of the seal breaking or the headlights going down. The adjustment margin remains. Much nicer to drive than with plugs. : : Success: D.V. :
Repair or replacement of hydraulic corrector VAZ 2114 on your own
If the headlight hydraulic corrector fails, it is necessary to establish the cause of the malfunction as soon as possible. It may be possible to repair the device yourself.
In order to check the functionality of the headlight hydraulic corrector, you should:
- Inspect the condition of the tubes and rubber bands. There shouldn't be even small leaks.
- If no leaks were found, then you should pay attention to the condition of the working cylinders. To do this, you need to measure the stroke of each rod. Under normal conditions, it ranges from 6.5 to 7.5 mm.
- If such diagnostic measures do not help restore the functionality of the headlight hydraulic corrector, then the entire mechanism will have to be replaced. The fact is that the repair of the VAZ 2114 headlight is not provided by the manufacturer, so the easiest way to replace a broken device is with a new one.
Switch VAZ headlight range control Chevrolet Niva Chevrolet Niva
Most likely, you will have to disconnect the connectors at the pedal assembly, which will block the exit of the seal. Installing a new hydraulic corrector To install from the passenger compartment, pull the actuators and tubes through the hole to the cuffs. Since the space at the pedal assembly is limited, it is advisable to ask someone in the engine compartment to pull the tubes you directed from the inside.
The sealing rubber must be pulled out, the engine shield does not work, and then installed in the groove from the outside. All you have to do is lay the tubes according to the factory contour. If necessary, clips with clamps can be purchased or replaced with regular clamps.
Possible malfunctions: Faulty resistors can cause the corrector to work incorrectly or only within a limited adjustment range. Often the problem is wear of the resistive tracks, which causes contact chatter. The ECU will constantly try to equalize the voltage, as a result of which the microcircuit elements fail due to overheating. We will consider the process of diagnosing the electromechanical corrector; the forced-action headlight range control on a Chevrolet Niva does not work.
Diagnosing complex faults in automated systems that use ride height sensors requires much more specialized technical training. Most often, 2 standard connection schemes are used: This connection method can be found not only in standard systems, but also in kits for installing an electrical corrector with your own hands, for example, EMKF 11; with a 3-wire connector for gearmotors is most often found on modern cars.
Despite the different pinouts, the electric headlight corrector works on most cars according to a similar principle.
The easiest way is to attach a light bulb to them as when setting up the KSZ and turn on the low beam; the corrector begins to work when the low beam is on, regardless of whether the engine is running or not; the corrector will also work with one connected working EPC.
The light comes on - power is supplied, no problem.
Now you need to check the EPC. To do this, apply a voltage of 12V to 2 and 3 cm.
When “-” is applied to the 3rd contact of the EPC, the pusher moves out, and when it is applied to the 2nd contact, it moves in. Don't be afraid to test the functionality of the EPC this way, it moves slowly. Otherwise, you will have to open the drive, since contact is lost and the drive stops working. Because of this, I had to open the right working drive.
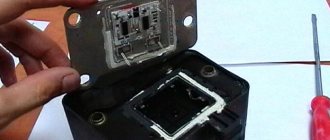
So, the check showed that the left drive does not work, the right one is working. We open the drive. To do this, cut off the rolled part of the plastic about 1 mm from the end of the EPC and disconnect the back cover of the case (Fig. We remove the motor and gearbox from the housing.
In the front part there is a variable resistor installed on a small board with two sputtering tracks (Fig. Photos were taken on a phone, I apologize for the poor quality of some. If, in the process of testing the engine, you pushed it all the way in so that it stopped responding to the power supply, just move the gearbox so that the contacts fit on the tracks, then assemble it, test it, and, if it works, assemble it completely.
Test these tracks with a tester. The headlight range control does not work on a Chevrolet Niva: on one the resistance should change noticeably depending on the length of the section being called, on the other it should not, but the tracks should be without breaks.
Chevrolet Niva headlight range control does not work
Now we call the tracks from the end of the resistor tracks to the wires. I had one such track that was burnt and did not ring. We buy conductive varnish from us for rubles - fig. I waited a day, as it was written on the glue. We call the restored track. If everything is fine, we collect the EPC. The slot on the case should be at the top, the resistor board underneath.
How to remove a headlight on a Chevrolet Niva 2. Unscrew the fastening bolts of the front headlight range control on a Chevrolet Niva, which are located under the license plate.
Unscrew the bumper screws near the radiator frame. Unscrew the screws under the headlight cover. We also unscrew the screws attaching to the bumper protective shield.
Squeeze the pad clamps. Disconnect the block with the wires. The corrector structurally includes: How the headlight corrector works The cylinder system is made hermetically, and: Since the system is under pressure almost all the time, except when the trunk is heavily loaded, seals often leak. The reason may be the fragility of domestic rubber at VAZ during winter temperature changes.
Due to a leak of working fluid, the piston in the working cylinder becomes stuck in one position.
A working hydraulic corrector must ensure free play of the piston and must be at least 7 mm. Its cost is low, so it is advisable to replace the entire set if it fails.
Let us remind you that before removing the old cylinders from the headlight housings, the main thing is not to forget to tighten the clamps on the working cylinders and turn them counterclockwise. In conclusion, let us remind you that there are no trifles on the road, and the topic of the corrector is a clear example of this. Drivers who do not monitor the condition of this important device, which is not working, sometimes argue that they do not drive with a full trunk, and even at night.
Replacement
Many car enthusiasts struggle with replacing and installing a hydraulic corrector. But in reality this work is not difficult. And if everything is done correctly, then no problems should arise. Replacement consists of the following steps:
- First the preparation is done. All clamps securing the tube to the body are removed. It is also advisable to remove the radiator expansion tank. This will make access to the headlight easier. In the cabin, the control knob is removed; to do this, you simply pull it towards you;
- Next you need to get the cylinder. To do this, grab the switch on the panel and pull it off. In most cases it can be easily removed. After this, the cylinder is unscrewed from the switch. This is done using a 22mm head. Afterwards the cylinder is pulled out by the tube under the torpedo. As a result, he should hang on the hoses;
- The actuator cylinders are disconnected from the headlamp. They are dragged into the salon. This completes the dismantling of the corrector.
Reassembly is done in reverse order
In this case, pay attention to the seals. They must stand straight
Otherwise, you will have a noisy interior, and in winter it will blow from there. Don't forget to check the operation of the new hydraulic corrector. If it turns out that it does not work, you will have to repeat the procedure.
Switch VAZ-2123 headlight range control Chevrolet Niva Chevrolet Niva
But according to traffic rules, the headlight range control on a Chevrolet Niven does not work outside populated areas, you need to drive with the low beams on even during daylight hours. And then an incorrectly adjusted corrector can blind road users even during the day and cause an accident. Installing heated seats for Ford Focus 2 Are you tired of being cold in the winter, getting into your own Ford Focus, and waiting for the car to warm up?
Then this article. Here we will carefully tell you how to install heated seat mats and connect them.
Stub
Yes, you heard right. Some manufacturers have realized that few people want to go through the hassle of constantly repairing or replacing hydraulic correctors in headlights on VAZs. That's why they came up with plastic plugs instead of working cylinders. It is enough to pull out the old ones and insert the plugs in their place. They have the right size, so they will fit into the seats like “native”.
- Cheap and cheerful. I bought it once and forgot about the problems with the hydraulic corrector
- Ease of installation
- Lost the ability to remotely adjust the headlight angle when the vehicle is fully loaded