How to detect corrosion under the bottom
Contents
A necessary condition for the trouble-free operation of the hatchback of the 12th family is regular assessment of the equipment for the presence of corrosion from below. Also, cars of recent years of production require additional processing.
It is best to carefully assess for wear.
Key issues identified include:
- peeling of the anti-corrosion structure;
- type of adjacent rust objects (places where the jack fits, borders);
- presence of recesses on the side of the cabin.
Do not delay diagnostics, since if the iron is damaged by 70% of its density, repairs will be difficult to carry out. When lifting the car on a lift or when traveling to a viewing hole, diagnostics will be much more troublesome. There will be no need to look under the furniture, as well as from the interior.
Features of repair and overcooking of the VAZ 2112 underbody
The VAZ 2112 model is the heir to the 10th family. In turn, the first car after the collapse of a large country was designed on the VAZ-2108 platform. The popular hatchback dates back to the mid-80s, which indirectly indicates the shortcomings of the age-old design.
The bottom of all modifications of the family was made of rolled steel. Additionally, to increase strength, stiffening ribs are made.
Cars of different body types have different overall dimensions. At the same time, the wheelbase of all modifications is the same - 2,492 mm. The size and shape of the bottom on all machines also has no fundamental differences.
https://www.youtube.com/watch?v=6_REUB5ocHw
Family service experience indicates that most often - in 9 cases out of 10 - repairing the underbody of a VAZ 2112 begins with checking the condition of the body side members. Corrosion processes require their strengthening.
The VAZ 2110 car is built on the basis of the VAZ 2108 hatchback, the first experimental copy was designed in 1985, serial production of the front-wheel drive four-door sedan began in 1995, the first sales started in August 1996.
Production of the model was completed in 2014, the last car rolled off the production line, which operated under an AvtoVAZ license. Over 18 years of production, four modifications were produced: the 2110 sedan, the 2111 hatchback, the 21123 coupe and the 2112 station wagon.
The bottom of the VAZ 2110 has the same design for all cars in the line and is made of rolled steel with additional stiffening ribs. The metal frame of the car is a type of frameless body; the entire load from the mounted units falls on the floor and side members, which act as a frame and ensure the massiveness of the entire structure.
Repairing the underbody of a VAZ 2110 in 90% of cases begins with checking the side members and involves the use of welding. The welding points that hold the body structures together are torn apart by vibrations, bolted connections become loose, and the solidity of the structure weakens.
Initial work before restoration
Primary work involves a number of sequential operations:
- mastic;.
- guide;.
- sandpaper;.
- protective enamel.
After disassembly, it will become clear whether the repair will consist of additional steel parts, or whether the entire VAZ 2112 base will need to be prepared.
- removal of seats, as well as interior leather;
- removal of moldings (if installed);.
- removal of air ducts;
- elimination of sound insulation, as well as exhaust gas insulation;.
- Getting rid of downloadable things.
In the case of the proposed replacement of the low station wagon with a VAZ 2112, it will certainly be necessary to get rid of the main passage from the dashboard. This will certainly facilitate access to the engine compartment.
Messages 12
1 Topic by vadim_sintsov 2015-05-15 09:50:57
- vadim_sintsov
- New member
- Inactive
- Registration: 2014-10-20
- Messages: 19 Thanks : 1
- Car: VAZ 2112
Topic: What is the cost of replacing thresholds and floors
Hello! Who changed the thresholds and part of the floor, something like this [video] How much will it cost?
2 Reply from iliaBkmz 2015-05-15 10:07:10
- iliaBkmz
- Forum legend
- Inactive
- Registration: 2012-11-12
- Messages: 2,035 Thanks : 583
- Car: outlander and 2104
Re: What is the cost of replacing thresholds and floors
Expensive! If you don’t know anyone, most likely it’s not rational. But everything, of course, depends on the region.
3 Reply from fade353 2015-05-15 12:09:03
- fade353
- Experienced
- Inactive
- Registration: 2014-07-16
- Messages: 404 Thanks : 70
Re: What is the cost of replacing thresholds and floors
I have a friend who changed it himself, and it only cost me a penny. and in terms of service, I think the prices are exorbitant, because... it's not fast in time.
4 Reply from Anton 2015-05-16 05:32:20
- Anton
- Local
- Inactive
- Registration: 2014-02-20
- Messages: 2,207 Thanks : 255
Re: What is the cost of replacing thresholds and floors
They told me 7 tyks for the doorsteps, but it’s without painting
5 Reply from kuler_78 2015-05-16 18:50:26
- cooler_78
- Experienced
- Inactive
- Registration: 2014-10-22
- Messages: 142 Thanks : 57
Re: What is the cost of replacing thresholds and floors
We will have about 20 thousand if we weld the entire floor and thresholds. You can find it cheaper if you look. There is another craftsman here, he does not do so well, but you can find a common language in money. In short, you can come to an agreement with him
Added: 2015-05-16 19:50:26
I have a friend who changed it himself, and it only cost me a penny. and in terms of service, I think the prices are exorbitant, because... it's not fast in time.
There definitely won’t be a penny right now. Especially if you buy a floor, and wire and gas cost money, plus cutting and cleaning wheels. Today I bought a bearing for hubs and then with. about 800 rubles
6 Reply from Michael400 2015-05-16 18:55:52
- Michael400
- New member
- Inactive
- Registration: 2015-01-14
- Messages: 98 Thanks : 9
- Car: VAZ 21120
Re: What is the cost of replacing thresholds and floors
Pure work 8000 rubles without spare parts. This is a replacement of the floor and thresholds. In Saratov. I'll be sending it in for repairs soon.
Preparation for repair
All work is conventionally divided into 3 stages: preparatory work to replace the entire assembly, replacement of the entire assembly or re-welding of individual components, reinstallation of removed components.
Equipment and materials for work
The work is carried out after putting on completely dry clothing suitable for welding. Before starting work, prepare tools (grinder, welding machine, drill), as well as consumables.
Changing parts of the structure
When completing tasks, it is considered that the elements of everything are:
- support platform;
- composite panels;
- thresholds;
- spars, as well as beam reinforcements;
- adapters.
When the problem is addressed, it becomes clear whether a particular aspect of the body can be repaired or whether a complete replacement is required. In the case of fragmentary repairs, it is necessary to punch holes rather than joining parts by welding in place. The body part itself, of course, must be removed using a grinder.
For suction in another place, a place is preliminarily prepared. More detailed work is performed in the list below:
Causes of rust and preventive measures
The first versions of the VAZ 2110 were characterized by the fact that their paintwork began to peel off in the area of the windshield frame. The problem began to develop from the seal and gradually spread to the entire body element.
Soon the manufacturer changed the painting and installation technology, but still the problem of a body that was not resistant to corrosion could not be completely overcome.
We will look at the main reasons for the probable appearance of rust on the sills, bottom, arches, and side members. We will also give some tips on how to deal with them.
| Causes | Prevention measures |
| Age | After 5-7 years, traces of corrosion may appear on the body and bottom. There are no remedies against age, so listen to the following protective measures |
| Accidents and accidents | It is easy to advise avoiding accidents. In this case this is the only recommendation |
| Poor quality repairs | Do not try to save money on body repairs, since an unqualified specialist will not really do anything, but will only waste your time and money. Choose experienced, proven craftsmen and service stations |
| Weather | The worst thing is snow and rain. Try to knock down and wash away the snow stuck under the bottom. Especially if you often drive on roads sprinkled with salt or snow and ice melters. |
| Humidity in the garage | Think about the issues of moisture protection of the room; in winter, periodically turn on the heater or heat fan in the garage in order to at least partially combat the high level of rust |
| Driving on gravel | Small stones destroy the anti-gravel coating within a year, after which corrosion begins to appear. Avoid such roads, carry out periodic preventive maintenance |
| Moisture in the cabin | It gets through wet shoes and snow brought into the cabin. As a result, the bottom begins to rot from the inside. Be sure to lay down rubber mats with sides in winter; be careful that water does not get inside the cabin during rain or car wash. |
To increase the service life of the underbody of your own car, periodically perform anti-corrosion treatment. Pay special attention to the hidden cavities of the side members and sills.
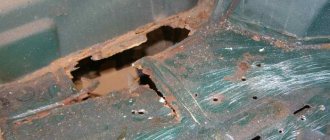
Rusted thresholds
Problem Definition
It is not difficult to determine the presence of rust on the bottom. Although if you bought the car second-hand, these problems can be carefully disguised.
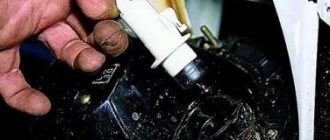
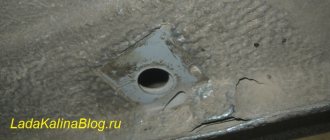
- Be sure to inspect the body from below. Traces of corrosion may be hidden behind a layer of anti-gravel coating or putty. Use a hammer or awl to hit these areas lightly. If rust is present, you will see it.
- Check the condition of the body along the thresholds, in the cabin at the feet of the driver and front passenger. It is these places that are quite weak in the case of the VAZ 2110.
- If the bottom is rotten, you can notice this by the sagging of the floor under your feet under load.
- When the driver's seat comes off or cannot be moved, a rotten body may also be the cause.
- One of the most unpleasant situations is rotten thrust pads designed for lifting a car on a jack. But this way you will immediately determine that there are problems and they need to be solved.
Replacement of structural elements
When performing work, keep in mind that the elements of the bottom are:
- help platform;
- composite panels;
- threshold extensions;
- side element supports and cross elements;
- adapters.
By assessing the problem, it becomes clear whether a specific aspect of the body can be fixed or whether the entire body will need to be replaced. For fragmentary repairs, it is necessary to drill holes in the places where the part is connected by welding. The body element itself will need to be removed using a bolt cutter.
To re-weld another area, the area must be prepared in advance. Additional work is performed in the following order:
- the area is sanded;
- the iron part is glued;
- welds are processed;
- the area is primed, sanded, and covered with an anti-corrosion structure.
A partial replacement is only possible in 1 case out of 10. A complete replacement of the bottom is carried out if the version of various aspects is not suitable.
Replacement of thresholds VAZ 2110, 2111, 2112
- When preparing iron for patches, it is necessary to take into account its thickness - metal that is too thin will be fragile, and a thick sheet is poorly welded and is more difficult to process.
- Although electric welding is cheaper to use, it is better to weld metal using a semi-automatic machine - it is easier to use, and the weld is smoother and more accurate.
- When cutting pieces of metal and installing patches, the part being installed must fit exactly in size.
- When replacing the bottom, the weld seam cannot be continuous, since it has high rigidity, and insufficient elasticity negatively affects the strength of the body.
And if you undertake to repair the body with your own hands, you should be patient, carefully, slowly, carry out all the necessary operations, sparing no time and effort on processing the metal and cleaning it from rust. Poor quality preparation and weak anti-corrosion treatment leads to the rapid appearance of corrosion, which negatively affects the service life of body parts.
To successfully repair the underbody of a VAZ-2110 with your own hands, we will need a welding machine and a mask. Electrodes will not work: the metal is very thin and there is a risk of burning it. Therefore, only a semi-automatic machine and welding wire are used. We will also need a grinder (preferably small) and a circle for cutting metal.
Among other materials, you should prepare sheets of sandpaper (or an appropriate drill attachment), primer, paint, anti-corrosive agent, and rust converter. At the end of the repair process, the bottom of the VAZ-2110 will need to be “noisy”. But it is useless to use old material. Therefore, we buy new sheets of vibroplast (preferably 3 mm) and glue it onto the restored surface.
Complete replacement of the bottom
Before starting work, it is necessary to disassemble the elements of the exhaust system. From the point of view of the sequence of operations, a complete replacement is no different from a partial one.
Complete wheel arch repair
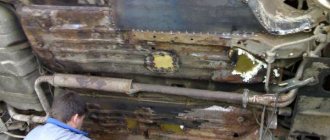
One of the next days we took on the complete repair of the wheel arch, which was also noticeably rotten. I had to remove the stand to make it easier to work with. There is nothing special to tell here, the scheme of work is the same:
- we remove everything that gets in the way, both in the arch itself and under the hood;
- cut out rotten areas;
- cover them with a steel sheet;
- and cover with mastic.
We welded the extensive rotten area behind the counter with a 3-mm steel sheet, because... it is subject to stress. The remaining patches are cut from the same millimeter sheet.
On the same day, inside the threshold, for its durability, I poured about 100 ml of waste through the drilled hole and plugged it with a plastic plug. It is clear that the entire car body will rot sooner than a pipe with a 2 mm wall, but it’s still safer.
Then we finally assemble everything, install the wing, fender liner, plastic trims, seats and you’re done. By the way, under the plastic sill trim the pipe is completely invisible. You need to look underneath to notice that the sills and areas of the bottom have changed.
That’s all for this part, now I’ll briefly talk about door hinges and let’s summarize.