The core plays the role of a magnetic field amplifier. After this, you can remove the device from the bracket by prying it with a slotted screwdriver. Good luck with the renovation! To remove the cylinder, you need to unfasten the front cover using a screwdriver. Drill out the retainer with a drill. If the latch cannot be fully pressed, you need to simultaneously slightly turn the key left and right, without turning it all the way. Installation of Central Locking on VAZ.Vlog
On the inside of the washer there are conductive contacts of these terminals, as well as a movable element that rotates under the influence of the lock mechanism. The moving part is located on the inside of the washer. There are two options here.
We performed similar actions when replacing the steering shaft. These reasons are caused by poor terminal contact on the VAZ, or by the fact that the starter takes a long time to start. After removal, it is recommended to mark the contact wires so that nothing is mixed up the next time you connect.
It is located on the lock body under the bracket. The lock in the steering column bracket is held in place by a latch - press it with an awl. Pull the key towards you to remove the lock. Ignition switch VAZ 2101 - 07. How to replace a chip.
Preparatory stage
To repair the door lock of a Zhiguli 2106, preliminary work is needed. They begin with checking the position of the hinges; if there is a slight distortion, there are uneven gaps, then it is recommended to adjust the position of the locking latch. This is the easiest way for the knot to begin closing quickly and correctly. Work order step by step:
- Outline the position of the latch with a pencil.
- Loosen the three screws, do not remove them.
- Move the pawl lock and check how the locking mechanism closes.
- Tighten the screws in the new position.
On a VAZ 2106, the retainer is attached to the side of the pillar with hex screws; for the work you will need an open-end wrench or an 8-size wrench.
If, after reinstalling the latch, the locking element of the door does not lock, it is necessary to repair or change the internal part of the mechanism; to do this, dismantle the door trim, the outer and inner handle, and check the rods.
What they say about us
Even if an unpleasant situation with a broken lock or lost keys occurred late at night, then in this case you should not panic. In this case, it will also be enough to call a specialist. Our service values its customers, so every order is processed as quickly as possible. .
Kiril Andreevich
I needed to open the lock, the master came to me very quickly, opened the lock efficiently and quickly, most importantly, very carefully and gave certain recommendations, we were very satisfied. An excellent master and a charming person. Thank him very much.
Eduard Petrovich
It was necessary to open the door due to the loss of the key. The master helped. I did everything quickly. He was friendly. I chose an even more accurate method than we previously discussed. Highest rating!
Sequencing
Door locks are controlled by an inside and outside handle. The opening mechanism is directly connected to the locking part by a steel drive. The outer handle has a lock insert. When you turn the key, the safety lock is activated, and pressing the handle again opens the door. On the interior side, the inner handle is connected to the locking part through a flexible cable.
For the rear doors there is a child safety lock in the design. The latch prevents the rear door from opening from the inside. To repair, you need to completely disassemble the door panel: dismantle the trim, pull out the part, make adjustments, repairs or replace the cylinder. The following tools will be required for the work:
- ratchet wrench;
- head at 8;
- Phillips and flat screwdriver;
- wooden, plastic wedge.
Dismantling the casing
The VAZ skin is a plywood or plastic card with stretched facing material. Before starting repairs, the glass must be raised all the way up. Dismantling the casing step by step:
- Using a flat screwdriver, pry off the decorative plug on the armrest mounting screw.
- Unscrew the three bolts securing the armrest and remove the part.
- Press the base of the window lift handle away from the trim, slide the socket and remove the flat trim.
- Pull out the handle and remove the socket.
- Using a screwdriver, use a screwdriver to pry the cover on the drive handle of the locking part, move it around under the cover, and remove the handle.
- Remove the door card with a screwdriver or a wooden wedge, unfastening the seven holders around the perimeter, and remove the trim.
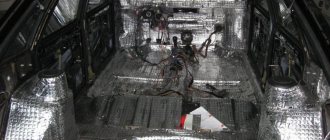
The internal door blocks on the VAZ 2106 are covered with protective film or sound insulation; the door leaf must be disconnected from below and lifted upward. This will open up access to the door cavity.
Instructions
Removing a faulty device
To properly remove, replace and connect all the necessary wires in accordance with the diagram, you will need to follow certain steps. To perform them you will need screwdrivers and an awl. If you don’t have an awl, then for these purposes you can use a long nail about 2 mm wide; a small screwdriver is also suitable for these purposes. Although the voltage in the vehicle's on-board network is harmless to humans, during removal there is a possibility of damage and short circuiting of the circuit wires, and this can cause damage to other equipment, remember this.
To properly remove the device, follow these steps:
- First of all, disconnect the battery.
- Then you need to turn the key in the lock 90 degrees so that it is in position 0, as can be seen in the photo. This is done on purpose so that the pin that secures the steering pulley from turning can fit into the secret part and does not interfere with the replacement process.
- The next stage of repair will be the removal of the plastic steering column lining. To do this, you need to unscrew the five bolts that secure the lower part of the cladding and the upper.
- Next, you need to lift the top part and pull it out. Then both parts, as can be seen from the photo, must be removed to the side.
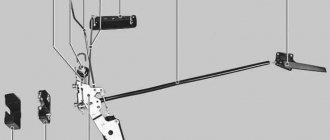
- The next stage of repair will be unscrewing the bolts securing the device according to the diagram. There are several of these screws, they are installed on the left and right sides of the switch. You also need to disconnect the wires from the group.
- Now you will need to find a small gap located on the left side of the device. An awl or screwdriver is installed into this slot, after which the latch itself is pressed.
- Next, you can dismantle the system from the clamps by prying it off with a screwdriver for subsequent repair or replacement.
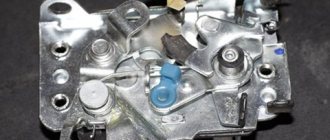
Unscrewing the bolts to the left and right of the switch, squeezing out the retainer with an awl
Replacing the contact group and installing the ignition switch
Now you can find out how, in accordance with the wire connection diagram shown in the photo, pinout and installation of a new group is carried out. As practice shows, it is this element that often causes malfunctions in the ignition switch. For correct pinout and connection in accordance with the diagram. First of all, you need to dismantle the spring ring, so the group can be removed by itself.
Dismantling the contact group on the VAZ 2106
Then it is necessary to install the new element to the system body so that the groove of the group is mounted on the rod as accurately as possible; after these steps, the group is fixed using the same spring.
After connecting the new component, you need to correctly install the lock itself; to do this, follow these steps:
- First, you need to install the key in the lock, and then, as we did above, turn it to 0.
- The fastener is clamped and the switch is installed in the latch.
- In accordance with the diagram for the VAZ 2106, the wires are installed and connected.
- Then the plastic lining is installed on the steering system; with the help of five screws, the two parts are securely fixed.
How to get to the mechanism
For VAZ classics, the design of the locks and mechanisms of the front and rear doors is almost the same. The only difference is that the drive of the locking part for the rear door has additional elements, the correction of which takes longer than when adjusting the front doors.
To dismantle it from the rear door of the VAZ, you will need a Phillips and flat-head screwdriver and a key size 8. The glass must be raised. Removal procedure step by step after removing the door card:
- Unscrew the lock button.
- Unscrew the locking rod bracket fastening nut and remove the washer.
- Unscrew the three fastening screws and remove the bracket.
- The bracket is removed from the door cavity along with the rods. For convenience, it is necessary to slightly bend the metal casing of the front linkage; do not bend the drive at a right angle.
- Remove the locking element from its place, unfasten the inner handle rod holder, remove the handle and drive.
- Using a screwdriver, remove the longitudinal drive hinge from the locking mechanism.
- Remove the retaining ring and disconnect the longitudinal drive from the locking rod bracket.
Installing the lock is carried out in the reverse order.
It is more convenient to adjust the correct position of the mechanisms when the bolts are not fully tightened.
Original patented locks on Zhiguli cannot be lubricated with oil, silicone lubricants, etc. Dirt from the mechanism is removed with technical gasoline. The unit is disassembled, the parts are rinsed and dried. When assembling the mechanism, the cams are lubricated with compounds containing flake graphite.
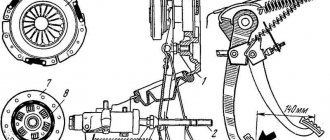
Front door lock device
Car locks are installed in the door cavity and fixed with two screws; the locking element is connected to the opening mechanism by rods. To reduce noise when opening and closing, high-density plastic coatings are installed on the ratchets, which reduces wear on the contact surface during operation. The design contains:
- retainer body;
- cracker spring, cracker;
- rotor;
- switch;
- traction: blocker, internal drive, switch;
- outside handle;
- levers: internal drive, blocker, external drive;
- lock button;
- ratchet;
- switch roller, central roller.
Cylinder locks or cylinders have become widespread. For the front doors, the locks can be combined with a common ignition key circuit.
Recommendations for selecting and replacing handles
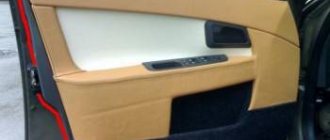
The standard front and rear door handles on VAZs can be replaced with non-original components, which are called Euro handles. After the repair, the doors begin to lock without effort; there is no need to slam or press on the part for the fuses or the main lock to work.
At the same time, drivers reinstall the lock, choosing silent models. Plastic components are used in the design of silent locking devices along with metal parts. During operation, plastic prevents metal joining, ensures silent operation of the mechanism and prevents rapid wear.
Installation of Euro handles is carried out in standard places; no additional drilling of holes is required during installation. Replacement is carried out after dismantling the casing. The part is installed with three screws. The average price of a set of 4 parts is from 1000 rubles.
When installing the Euro handle, it is necessary to loosen the fastening of the locks and check the tightness of the plastic latches, adjust the position of the handle stop and the ratchet.
Replacing the front door lock
If it is necessary to change the lock on the front door, the trim must first be dismantled and the glass must be raised all the way. Procedure for reinstallation step by step:
- Unscrew the two screws securing the rear gutter from the end.
- Lower the gutter, remove the tongue from the groove, and move the part to the side.
- Using a slotted screwdriver, disconnect the shutdown button rod and unfasten the outer handle rod.
- Using a size 8 wrench, unscrew the nut securing the groove, move away the plastic cover, and remove the part from engagement with the frame post.
- Unscrew the two fastening screws and push the handle inward.
- Remove three self-tapping screws or fastening screws.
- Remove the locking mechanism from the door panel along with the rods and the inside handle.
Installing a new lock is carried out in the reverse order.
When choosing a part, you must take into account that the mechanism for the right door is not suitable for installation on the left one. After reinstalling the parts, it is necessary to set up a clear opening mode and, if necessary, adjust the latch clamps.
Installation of door locks from VAZ 2114 to VAZ 2106
Some car enthusiasts take a more economical route and install silent locks from the VAZ 2114. This is done as follows:
- We saw off the “flag” of the lock.
- We dismantle the old locking mechanism of the “six” together with the connecting consoles and put it in the reserve area.
- Drill out the bottom door hole on the left. We apply the lock from the inner plane of the door, mark the drilling point where the lock sleeve of the upper fastening will be located. If necessary, we process the marking socket with a round file.
- We install the new locking unit in the landing position.
- We assemble the product. Perhaps the “chocolate” will interfere with assembly with its emphasis on the rack, but we’ll leave that for later.
- Using the same file, we adjust the right through hole from below, which will entail the correct operation of the door lock.
- We disconnect the outer lining of the product and slightly sharpen the 2 metal bushings at the end of the door, which are where the fasteners are installed.
- We sharpen the angle of fastening of the locking device, periodically checking the compliance of the angular values.
- We grind down the screw tops to tighten the locking device to a level below the plane, “flush”. Upon completion of the work, we assemble the locking mechanism. Next, we connect the rods to the lock handles.
- When closing the door and there is a problem with the protruding “chocolate”, it is necessary to make a high-quality adjustment of the locking device, after which we fix the screw connection.
- Using chalk marks, we determine the position of the screw connection when closing the car door.
- We drill the front plane of the rack, use a tap to apply an M 10 threaded connection along the hole with a step of “1”.
- Then we drill through holes in the front walls of the rack of the appropriate diameters, followed by cutting the internal threaded connection and installing the screw in the rack.
- We proceed to installing the lock drives and operating the device handles.
- We cut off the drive rod of the side-type handle from the removed device. We bend one end at a right angle, and bend the other into a ring configuration.
- We connect the internal action handle via a clamping cable.
After this, the VAZ 2106 locks will operate relatively silently.
Repair
Many owners of domestic cars are probably annoyed by the noisy closing of doors.
Often you have to slam them very hard, especially for one-year-old cars. In the video and article you will learn how to get rid of the problem with noisy closing doors of the VAZ 2106.
The factory lock on the driver's door is quite noisy. Things are even worse on the back door - it may not be closed the first time.
Refinement of the castle
The chocolate lock mechanism has been improved. First of all, the rings are ground off almost flush. The bolt is also modified, the thread is cut to the end. The mechanism mounting bolts were replaced so that the caps would not protrude from the mechanism.
In addition, the flag on the lock was cut off, which made more noise than sense. We will not install traction on the drive from the key. One spring was also removed, as it had a very large force.
Other improvements have also been made, details can be seen in the video.
Step-by-step instruction
1. Remove the trim
2. Remove the old lock
Open the fasteners and guide from the outside. Be careful not to break anything. You will also need to remove the handle.
3. Fit a new lock
You may need to increase the diameter of the bolt holes. This may not be the only change, so be prepared to tinker. A file is quite suitable for grinding off excess areas. The holes should be slightly oversized.
4. Set the door closing rod
First of all, remove the rubberized part from the old lock. Install it on the new spare part so that the rod goes into it and locks into place. At this point you may need to shorten the pull.
5. Install the rod on the outer handle
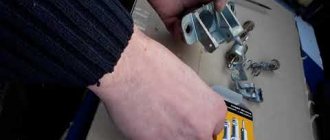
At this stage, you can make a special device of this type:
It will need to be bent and installed on the handle.
A rod is inserted into the outer hole. If the hole is larger and it falls out, then you can fix the rod on the other side using a plastic clamp. As a result, we get a fairly free and comfortable traction. 6. Place the guide on the glass
The guide will probably have to be shortened and modernized a little so that it does not interfere with the operation of the lock.
7. Install the electric drive rod and assemble the door
General practical information about the structure of the larva
In cylindrical designs of the locking mechanism, the cylinder most often fails. The part cannot be repaired; the cylinders are replaced only in pairs, simultaneously for the left and right doors. For the work you will need a flat narrow screwdriver and metal wire. Scheme for replacing the VAZ 2106 door lock cylinder:
- With the lock removed, remove the spring that releases the key in the cylinder by prying it with a screwdriver.
- Use a thin wire to press out the fixing rod.
- Remove the top ring, the cylinder is removed from the back of the lock.
- Replace the part and configure it.
In addition to replacing the cylinders on the front doors, it is recommended to change the locking elements on all elements and in the trunk lock so that it can be opened with one key.
The procedure for removing the outer door handle on a VAZ 2106
First, perform the following procedure: Removing the trim from the front door.
Next we need a head with an extension. The handle is secured from the inside with two nuts. First, unscrew its left side:
The second nut is in a more difficult to reach place, so you will have to gain access to it first. To do this, you need to unscrew the three bolts securing the door lock, as shown in the photo below:
Now from the inside we move the lock mechanism a little to the side so that we can put the head on the second nut securing the door handle:
After which, on the reverse (outer) side, the handle will be released, but will still be held on by the rod, which is attached to the lock cylinder.
To disconnect the door handle, you need to pull with medium force for up to three times until the rod comes off the hook of the cylinder:
That's all done, now the handle is disconnected from the VAZ 2106 door and is ready for replacement.
Installing the new one is done in reverse order. The price of a new such part is 170 rubles on average in all auto parts stores.
Setting the front left and right door locks
The adjustment begins with checking and reinstalling the lock latches. In 70% of cases, the doors stop locking and close the first time.
In other cases, the position of the handle is adjusted if the door does not open from the outside. To do this, you need to loosen the fastening screws, move the handle and bracket towards the front pillar. After adjustment, the screws are tightened.
On classic VAZ models, jamming and locking of the lock is often associated with stretched rods. The drives are removed, the tips are checked, and the creases are straightened.
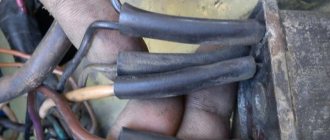
Contact systems
The oldest and most imperfect designs, despite this, a lot of cars still use them. Even stores sell contact groups. One advantage can be identified from contact systems - low cost. Otherwise, they only have disadvantages:
- A contact breaker installed in the body of the VAZ-2106 distributor switches high voltage. As a result, contacts often burn; the device must sometimes be cleaned.
- The same contact breaker experiences heavy loads and friction. Therefore, the resource is limited by the quality of the metal used and the time of its wear.
- During operation, the gap between the contacts changes, and it affects the ignition timing - this is one of the most important parameters of the operation of an internal combustion engine.
Despite its simplicity, the reliability of the mechanisms is very low. The system requires careful care and timely maintenance.