If a car engine is given the opportunity to “breathe” freely, i.e. create conditions for the unhindered release of exhaust gases, then, without a doubt, its efficiency and power will increase. But in this case, life in cities would become unbearable, and drivers would have to put in earplugs.
Exhaust systems are constantly being improved, they are assigned additional functions related to reducing toxicity and optimizing the fuel mixture. The VAZ 21099 is no exception - some, especially re-exported, cars of this model were already equipped with catalytic converters and λ-probes in the early 2000s. Why these innovations are needed - a little later, let's start the description with the design of the exhaust system on the carburetor VAZ 21099.
Replacing the muffler on a VAZ 2109 with your own hands
The exhaust system does not have a complex design or device at all. Its main task is to release exhaust gases. But it's not that simple. If you released exhaust gases into the atmosphere, the damage to nature would be enormous. Therefore, modern developments have been applied that allow gas to be purified before exiting, making them safer for the environment.
Bottom view
Let's study the exhaust system using the example of the VAZ 2109 model.
Exhaust system of injection engine of VAZ 2108, 2109, 21099 cars
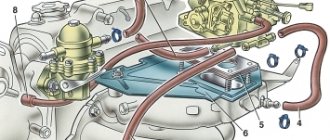
The exhaust gas exhaust system of the injection engine of VAZ 2108, 2109, 21099 cars consists of several parts: an exhaust manifold on the engine, a muffler exhaust pipe, an exhaust gas catalytic converter (ECM for EURO-2 standards), an additional muffler, and a main muffler. Some vehicles equipped with a CO potentiometer may not have a catalytic converter.
Features of the exhaust gas exhaust system of the injection engine of VAZ 2108, 2109, 21099 cars
The exhaust manifold is made of cast iron and is attached to the engine block head on six studs, through a gasket consisting of two symmetrical parts. The exhaust manifold flange is connected to the exhaust pipe flange with four studs and nuts. A heat-resistant metal-asbestos gasket is installed between the flanges.
The receiving pipe has a flange with two holes, two pipes and a gas receiver. An ECM oxygen sensor is installed on the exhaust pipe gas receiver. The mounting of the exhaust pipe and catalytic converter is hinged to reduce the transmission of vibrations to the body. The mobility and tightness of the connection is ensured by two springs installed under the coupling bolts instead of washers and a metal-graphite sealing ring with a spherical outer surface.
The catalytic converter has a flange with a concave spherical surface on the side of the connection with the exhaust pipe, and a flange with a convex spherical surface on the side of the additional muffler. A thermal protective metal screen is installed above the neutralizer. The connection between the neutralizer and the additional muffler is fixed.
An additional muffler (resonator) consists of a housing with a perforated pipe and partitions inside. The pipes of the additional muffler also have a flange on the neutralizer side, and a flared edge on the main muffler side. The outside of the optional muffler can be treated with aluminum to improve corrosion resistance.
The main muffler also consists of a housing with perforated pipes and partitions inside. The housing can be made of stainless steel to prevent corrosion. Two pipes are attached to the muffler body: on one side, flared, for connection with an additional muffler, on the other side, straight, for exhaust gases. The connection to the additional muffler is made through a metal ring and a two-piece clamp.
Both mufflers do not have welding points and are assembled by rolling parts to prevent corrosion.
Diagram of the exhaust system of the injection engine of VAZ 2108, 2109, 21099 cars
Notes and additions
— On VAZ 2108, 2109, 21099 cars without a catalytic converter, the exhaust pipe had a socket instead of a flange for connection with an additional muffler, the pipe of which also had a socket (flared edge). The connection was made through a metal ring and a two-piece clamp.
Possible differences in the exhaust system on injection VAZ 21099
On injection engines, the exhaust system without feedback has a device absolutely identical to the scheme described above, but cars exported were distinguished by the presence of an oxygen sensor (λ-probe) and (not always) a catalytic converter.
The owner of such a car was often unaware of such changes in the design until problems with the exhaust system appeared.
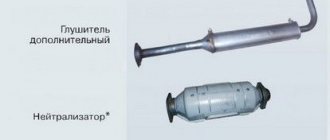
The oxygen sensor “crashes” into the exhaust pipe (Fig. above). It determines the concentration of unburned oxygen in the exhaust gases, which serves as a criterion for assessing the efficiency of combustion of the air-fuel mixture. The ECU, after processing the DC data, changes the control signal to the injectors in accordance with them, changing the amount of fuel injected.
The catalyst (Fig. below) is installed after the exhaust pipe and serves to reduce exhaust toxicity by burning carbon monoxide. Unlike the resonator, it has a flange connection with the receiving pipe:
Low-quality fuel causes rapid “clogging” of the catalyst cells, which creates excessive resistance to the movement of gases and leads to loss of engine power. For this reason, many owners replace it with a simple insert into the exhaust system, or destroy and shake out the ceramic. True, after this you have to make changes to the ECU software, i.e. do a flashing.
Main malfunctions of VAZ 2109 and 2108 mufflers
There are several typical muffler breakdowns that owners of VAZ 2109 and VAZ 2108 cars encounter:
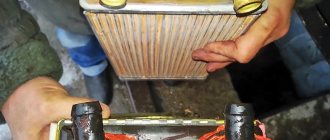
- Holes appear in the main muffler housing. Due to high temperatures accompanied by strong vibration, the case simply burns out. The cause can be either thermal or chemical corrosion. The problem is solved by applying a patch and subsequent welding of the damaged body;
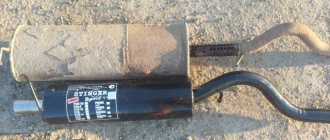
The VAZ 2109 muffler burned out due to thermal corrosion
Old VAZ 2108 muffler resonator baffles removed
Muffler pipe of a VAZ 2109, broken at the suspension and knocking on the bottom of the car
DIY exhaust system repair
Removing/installing the main muffler
To perform this work, we will need the following tools: a fairly deep 13mm socket, a ratchet wrench, and a 13mm spanner. We carry out the work on an overpass or inspection hole. An important point: to ensure safety, any work on the exhaust system should be carried out only after all parts have completely cooled. By the way, this rule should be followed during any repair, regardless of whether we are talking about the exhaust system of a VAZ 2106, or the exhaust system of any more modern VAZ cars
Well, let's proceed directly to the process of removing the main muffler. First of all, we need to disconnect the main muffler from the resonator.
To do this, you need to unscrew the bolt of the clamp: use a spanner to hold the nut from turning, and use a ratchet to unscrew the bolt itself. If the fastener is heavily oxidized before dismantling, you can treat it with VD-40.
After removing the bolt, disconnect the clamp and remove it. The main muffler is now completely disconnected from the resonator.
Next, remove the front part of the muffler from the front rubber suspension. Then we remove it from the rear suspensions and take it out. That's all. We install the new muffler in the reverse order of removal.
Replacing an additional muffler
The work process looks like this:
1. Unscrew the clamp connecting the additional muffler to the main one, remove the bolts and remove it;
2. Disconnect the additional muffler from the catalyst. To do this, we need two spanners: with one we hold the nuts from turning, and with the other we unscrew the bolts;
3. After the inlet and outlet pipes are disconnected, slightly lift the muffler and disconnect it from the rubber hangers. If you cannot disconnect the pendants manually, pry them off with a screwdriver.
Installing a new part is carried out in the reverse order.
Replacing the catalytic converter
The catalytic converter fails quite rarely, however, it still happens, especially after a very long period of use of the car. To remove a catalyst that has become unusable, you will need two 13mm spanners.
An important point: during its operation, the neutralizer heats up to a temperature of more than 600 °C. That is why it cools down a little longer than other elements of the exhaust system. Be sure to wait until it cools completely before starting work.
First, we unscrew the bolts securing the catalyst to the additional muffler: with one key we hold the bolts from turning, and with the second we unscrew the nuts. Remove the bolts and washers.
Similarly, unscrew the bolts that secure the catalyst to the exhaust pipe. Holding the part, remove the bolts with spring washers. We remove the catalyst from under the car.
How to make a forward flow with your own hands
A good direct-flow system produced by sports car manufacturers costs serious money, and the desire to make a direct-flow system yourself is quite understandable.
If you look at such accessories in detail, you will notice that they are a standard exhaust outlet with a modified design - smoothed bends and a small number of welds. Due to this structure of the exhaust system, it becomes easier for the car to cope with the emission of exhaust gases into the atmosphere. Making a forward flow with your own hands is not as difficult as installing it on a car, but you should understand that such interference in the design of the car has its own effect on different models. Most often, a homemade direct-flow system is installed on “weekend cars” that were purchased in order to conduct various experiments on them.
To make a direct flow yourself, you will need: a metal pipe with a wall thickness of at least 3 millimeters, a welding machine, a drill, a grinder (for cutting metal), stainless steel (metal sponges for washing dishes are most often used - about 50 pieces).
The process of self-production of direct flow is as follows:
- It is necessary to remove the installed muffler from the car and open the resonator. To do this, take a grinder and make a hole along the entire length of the resonator, and then spread the metal sheets to the sides, as if opening a tin can;
- After this, you will see all the insides of the resonator, which consists of two parts of a pipe and several stiffeners. All this has to be cut out of the resonator “to zero” so that its metal shell remains directly. The most convenient way to cut is with a grinder, but be prepared for the fact that it will take a lot of time. When removing pieces of pipes, leave 3-4 centimeters on each side to make it easier to weld modified exhaust options later;
- Next, we take a pipe of the same diameter as the pipes remaining sticking out in the resonator on both sides. We cut it so that it is long enough to be installed in the resonator between the cut pieces and welded using a welding machine. It is important to remember the rule here: “Measure twice, cut once.” If you change it incorrectly and the cut pipe size turns out to be shorter in length than necessary, you will have to cut a new piece - it is prohibited to fold this part from several pieces of pipe;
- When the pipe of the required length is cut, we must begin to modernize it. To do this, take a small diameter drill and make a lot of holes in this piece of pipe. At the same time, leave 3-4 centimeters of pipe on each side so that reliable welding can be ensured. If your drill cannot handle the pipe, you can use a grinder and make many cuts on the pipe every 1.5-2 centimeters.
- After this, it is necessary to weld the holey piece of pipe onto the parts of the pipes that remain sticking out in the resonator;
- When the piece of pipe is securely welded, it is necessary to fill the entire resonator with mesh stainless steel. To do this, take 50 purchased metal dishwashing sponges and start placing them in the resonator, filling all the free space.
Attention: some sponges may come with improvised “hooks” made of paper, plastic or fabric. Such elements must be removed from the metal before placing it in the resonator.
- Next, close the resonator and weld the lid securely;
- At this point, creating a direct flow with your own hands can be considered complete. All that remains is to install the car muffler in place.
Tuning the exhaust system of VAZ 2109 (099)
For the most part, tuning the exhaust system on cars of the VAZ 2109 model range involves installing a direct-flow system instead of the standard one. This is exactly what we will talk about. But, first, let’s briefly examine the theoretical side of the issue.
A few words about the theory of direct flow for the VAZ 2109
It is known that exhaust gas backpressure occurs behind the exhaust manifold. This pressure interferes with the increase in power of the power unit, and therefore it must be reduced as much as possible. In other words: if you reduce the level of back pressure, the efficiency of exhaust gas emission from the combustion chamber will significantly increase, which will accordingly allow a larger volume of fuel mixture to be pumped into it. In turn, the more fuel mixture enters the cylinder, the more power it can develop.
The main objective of a direct-flow system is to minimize output losses. Thus, due to the “forward flow”, the car reacts much faster when the gas pedal is applied and has greater torque.
Design features of a direct-flow muffler
Today, the market for tuned auto parts offers a fairly large assortment of various direct-flow mufflers for the VAZ 2109. Moreover, the design of most of them is the same.
The main element of such a muffler is a perforated pipe. Thanks to perforation, incoming exhaust gases expand quite effectively in the muffler housing (“barrel”). Due to this, their faster removal is achieved.
An interesting point: a really high-quality tuning muffler for the VAZ 21099 can be more than 80% of a straight pipe in total length. That is, if such a muffler was installed on your car, the resistance of the exhaust system would be only 10% greater than if you drove without a muffler at all.
Pipes for modified exhaust
Of course, one upgraded muffler is not enough to create an effective direct-flow system. In particular, in addition to the muffler, appropriate pipes must also be used. Such pipes must be of a sufficiently large diameter so that they can pass the maximum volume of gases with minimum resistance.
Shoots in the exhaust pipe, what should I do?
Often, the owners of the "nine" do not know why the exhaust pipe is firing. This is due to an unregulated cold running system. If there is an excess of the appropriate mixture, the engine starts with shots in the muffler. An increase in the level of the working mixture is associated with a faulty supply valve.
When the main jet becomes clogged, the fuel mixture becomes lean. The engine starts with a popping sound. If the car is put into driving mode, then the vehicle will not be able to gain the required speed for subsequent movement. The jet becomes clogged for the following reasons:
- air suction;
- the adjustment of the idle fuel quality screw is broken;
- suction of air masses.
In this case, the VAZ engine overheats and fuel consumption increases. The water in the radiator begins to boil. In such a situation, for carburetor 21099, shots appear in the carburetor.
If the economizer valve is turned on first, the fuel system will become richer prematurely. The speed of the car will be negligible. The engine, working under heavy load, contributes to the appearance of shots in the exhaust pipe.
Design features of the part
- Dissipative. This device has a simple design and effectively dampens noise waves. Among the disadvantages of such a unit, auto mechanics highlight the lack of environmental friendliness.
- Reactive. The operating principle of this device is the addition and mutual elimination of sound waves.
- Combined. The direct-flow unit minimizes power loss, and the labyrinth unit improves sound damping.
Experts include the reasons for dismantling the old and installing a new unit of this type:
Signs by which a car enthusiast can understand that the muffler needs to be replaced:
Before you begin replacing the muffler, you will need to select one of the above-described types of this unit. VAZ 21099 car owners often buy a tuned model.
Next, you need to unscrew the ground nut and remove the wire from the stud. Then remove the nuts that secure the supply pipe of the cooling system. The seal gasket should be replaced and the nuts securing the exhaust manifold should be unscrewed. Then disconnect the last manifold and remove the corresponding gasket.
Design features
The design of the exhaust system is the same for almost all Russian cars. The example with the VAZ 2109 is typical.
Schematically, the exhaust gas exhaust system for this car looks like this:
- Reception pipe. A special probe is installed in it; the device is capable of monitoring and analyzing the composition of the mixture entering the cylinder block based on the composition of the exhaust gases.
- Next comes the catalyst. He is precisely engaged in reducing the harmfulness of exhaust gases to a minimum.
- An additional muffler is attached to the catalyst using a special clamp. The task of this muffler is to be, as they say, on the front line and take the brunt of the noise impact.
- Well, the last element is the main muffler. It is attached to the additional one using the same clamp.
If you look at the assembled VAZ 2109 exhaust system, it is initially in a suspended state. It is held in place by rubber mounting hangers, which, in turn, are screwed into the bottom of the car.
About repairs
Some owners resort to muffler repair. But it must be said that such measures, if not useless, are at least temporary. The fact is that gases can break through not only outside the muffler, but also inside. That is, after installing the patch, the exhaust sound will not change. The cost of a new muffler for a “nine” is now about a thousand rubles. And it will last much longer than the old repaired one.
The car muffler has failed, what to do?
There are situations when the muffler burns out or even falls off. In this case there are two options:
- The VAZ 2109 muffler is being replaced;
- old one is being repaired.
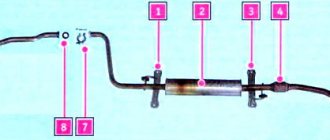
General view of the exhaust gas removal system
Positions: 1- exhaust pipe; 2 – resonator; 3 – main muffler.
Installing a new muffler
The work is carried out on an overpass or inspection pit. Before replacing elements of the exhaust gas exhaust system, it is necessary to secure the vehicle with thrust bars, placing them under the rear wheels. To replace the muffler you will need:
- new muffler;
- liquid for removing scale on connecting fasteners WD40;
- keys for “13” - two pieces;
- extension for key.
The order in which the muffler is replaced on a VAZ 2109:
- Unscrew the nuts securing the muffler pipe clamp to the resonator pipe.
- The clamp is removed.
- The pipe is disconnected and the sealing ring is removed.
- The rubber suspension cushions are removed. To do this, the muffler must be raised.
- The muffler is lowered to the ground and pulled out from under the car.
- The new muffler is installed in the reverse order in which the old muffler was removed.
Tip: When installing a new muffler, it is best to replace the o-rings with new ones. This will ensure a tight connection.
How to replace the muffler yourself can be clearly seen in the video.
Installing a new resonator
- The resonator pipe is disconnected from the receiving pipe after the clamp is loosened.
- It is removed from the rubber cushions when the device is lifted up.
- In the reverse order in which the old resonator was removed, a new one is installed.
- Under the bottom of the car, the nuts securing the exhaust pipe to the bracket are unscrewed. The bolts securing the bracket to the car body are unscrewed, which is then removed.
Installing a new exhaust pipe
Detaching the bracket from the body
- The exhaust pipe is freed from its attachment to the exhaust manifold.
- The exhaust pipe of the muffler is disconnected from the resonator pipe.
- The sealing ring is removed.
Removing the O-ring
- The exhaust pipe of the muffler is removed.
- The muffler exhaust pipe is installed in the reverse order of removal. The tightening torque for the nuts securing the pipe to the manifold is from 2.1 to 2.6 kgf/m.
Tip: It is better to apply a thin layer of exhaust gas system sealant to the pipe joints before installing them on external surfaces.
When dismantling and installing a new muffler, the places where the coolant leaks are clearly visible. These may be deteriorated, rusty plugs. In this case, it is necessary to replace the VAZ 2109 plugs. The engine parts are most susceptible to wear. Therefore, first of all, you need to replace the plugs on the VAZ 2109 cylinder block.
DIY exhaust system repair
Removing/installing the main muffler
To perform this work, we will need the following tools: a fairly deep 13mm socket, a ratchet wrench, and a 13mm spanner. We carry out the work on an overpass or inspection hole. An important point: to ensure safety, any work on the exhaust system should be carried out only after all parts have completely cooled. By the way, this rule should be followed during any repair, regardless of whether we are talking about the exhaust system of a VAZ 2106 or the exhaust system of any more modern VAZ cars
Well, let's proceed directly to the process of removing the main muffler. First of all, we need to disconnect the main muffler from the resonator.
To do this, you need to unscrew the bolt of the clamp: use a spanner to hold the nut from turning, and use a ratchet to unscrew the bolt itself. If the fastener is heavily oxidized before dismantling, you can treat it with VD-40.
After removing the bolt, disconnect the clamp and remove it. The main muffler is now completely disconnected from the resonator.
Next, remove the front part of the muffler from the front rubber suspension. Then we remove it from the rear suspensions and take it out. That's all. We install the new muffler in the reverse order of removal.
Replacing an additional muffler
The work process looks like this:
1. Unscrew the clamp connecting the additional muffler to the main one, remove the bolts and remove it;
How to replace?
Based on the above, we can conclude that the best muffler repair is to replace it. This statement is also relevant for other parts of the VAZ-2109 exhaust system. The muffler is replaced with an inspection hole, a 13mm spanner and a socket of the same size. All actions are performed step by step:
- The car is driven into the inspection hole and put into gear.
- The main muffler is disconnected from the resonator. To do this you need to find a clamp. Use a spanner to tighten the fastening nut (to prevent twisting). At this time, the bolt is unscrewed with a ratchet.
- Afterwards, the fasteners are removed and the elements of the exhaust system are disconnected. The clamp is reusable, so we will put it back.
- Carefully remove the front part of the muffler from the rubber “cushion”, through which the part is attached to the body. Then the same operation is done with the front “pillows”.
- If the muffler is stuck to the resonator pipe, it can be rotated counterclockwise and back. This makes it easier to remove the muffler.
- The new element is installed in the reverse order.
Please note that rubber pads may be torn. It's better to buy a spare set. On the “nines” they are very flimsy. It is advisable to install pillows made of durable material (for example, polyurethane). This will not affect comfort (there will be no more vibrations), but the resource is at least twice as long.
Read also: Alarm tomahawk instructions 434 mhz
Which muffler is better for the VAZ 2109?
Which muffler is better for the VAZ 2109?
You want to replace the muffler on a VAZ 2109, which one is best to buy and install in such a situation? The answer to this question would seem to be simple. However, there are a lot of options, both among standard, standard mufflers, and among alternative, direct-flow products. Let's first consider the option of standard mufflers that are on the market, how much does a muffler cost on a VAZ 2109, how much does a resonator cost on a VAZ 2109, and also how much does a front exhaust pipe cost on a VAZ 2109? We will analyze all the listed details according to the ratio of quality and price. First, let's look at the standard exhaust parts.
Which muffler should I put on a standard VAZ 2109?
Our market contains products from different manufacturers, both domestic and foreign (Europe, Russia). They have different prices, as well as different workmanship. You can make a muffler for a VAZ 2109 using any option, but the result will differ in terms of the service life of the spare part.
Which muffler to buy for VAZ 2109:
- made of black steel, thin-walled (lighter in weight than a standard muffler), the cheapest option, but also a service life of 2 months to 1 year;
- made of standard black steel, the most common version of domestic manufacturers. For such a muffler on a VAZ 2109, the price will range from 13 to 24 USD. in dollar equivalent, the service life of such models is 1 - 3 years (depending on the intensity of use of the car and the quality of the steel from which the muffler is made);
- made of galvanized steel from Ukrainian companies. The issue price is around 24 USD. If you choose a muffler for a VAZ 2109 of this type, it will last slightly longer than the standard version due to corrosion protection;
- made of aluminized steel made in Europe. The issue price is from 24 USD, which is approximately equal to our prices. The service life of the muffler is on average 3 years;
- stainless steel - a more expensive and durable option. How much a VAZ 2109 stainless steel muffler costs depends on the thickness and quality of the steel; the price is 2-3 times higher than the standard version. (Aluminized steel is often passed off as stainless steel; don’t get burned by this, these are fundamentally different types of anti-corrosion protection in terms of durability).
The following muffler options are available on the market.
And it’s up to you to decide which muffler 2109 is better to install, a more budget-friendly and simpler option, or one with higher price and quality. If you follow the same logic, then you can determine for yourself which resonator is better for the VAZ 2109. Muffler manufacturers also make resonators of the same quality and in the same price category. And lastly, how much the VAZ 2109 muffler costs depends on its design, rolled-on or welded. Sunset options are most often slightly more expensive than welded ones, although the quality of the materials from which they are made is the same.
Now let’s consider the option of how to make a forward flow on a nine and which forward flow is better to install on a VAZ 2109?
Pros and cons of installing direct flow on a car
Installing a direct-flow system has both pros and cons. Each motorist decides for himself how appropriate it is to modify the car muffler in favor of direct flow.
Pros of direct flow:
- If a pipe with a slightly larger diameter than originally installed is welded on, it is possible to increase the exhaust gas throughput. An increase in airflow leads to an increase in engine power, up to 15%;
- Increasing the service life of the muffler. Most often, the muffler “from the factory” is not made from the best materials, but with such a modification, the motorist can use good pipes, even titanium options. If you want to increase the “lifetime of the pipes,” then after welding the resonator, you need to remove the end of the muffler with a grinder and solder a new pipe in its place, having thoroughly cleaned and primed it in advance.
Disadvantages of forward flow:
- Increased noise. Many car enthusiasts consider this parameter a plus and install the direct flow with their own hands solely for the purpose of increasing the “rumble” of the car when driving;
- Reducing the vehicle's ground clearance if pipes of larger diameter are welded onto the muffler;
- Problems during maintenance. Increased noise and the absence of a catalyst will lead to problems during maintenance;
The method of installing a direct flow with your own hands, described in this article, can be called “collective farm”. In professional racing cars, the direct-flow system is much more complex and is designed primarily to improve engine performance. At the same time, such a forward flow is unlikely to bring much benefit, only changing the sound of the car, which, in most cases, is the goal of independent tuning.
Materials and tools for manufacturing: - pipe, diameter is selected depending on the brand of car (VAZ usually has a diameter of 52 cm); — welding; — grinder and discs for cutting metal; — iron sponges for washing dishes (50-100 pcs.).
The manufacturing process of a direct-flow muffler based on a standard one:
Step one. Removing the muffler
First of all, you need to remove the muffler from the car. A VAZ car is considered as an example. Next, take a grinder and cut out a piece in it, as can be seen in the photo. Subsequently, all the insides of the standard muffler are dismantled.
According to the author, at engine speeds of 2500-3000 rpm, the engine sound is not audible in the cabin. At higher speeds the sound is already audible, but it is not as bassy as that of the “can”. From the outside, this muffler looks like a standard one, but is slightly longer.
Another way to make a direct-flow muffler
There is another option to make a direct-flow muffler, here only individual elements are used. Most often, two schemes for manufacturing such mufflers are used. Diagram No. 1 shows a reverse flow exhaust, and diagram No. 2 shows how a sports direct-flow muffler works. This muffler will be made exactly of this type.
The photo shows another similar direct flow with your own hands
The muffler is an element of the engine exhaust system. Its presence does not depend on the type of fuel the engine runs on - gasoline, diesel fuel or methane. The muffler dampens sound vibrations, helps attenuate, subside and resonantly reduce sound waves from engine exhaust. Interlocutors will not be able to communicate around a running engine without a muffler. The noise of the engine will drown out their speech. Nevertheless, many car owners dream of remaking the exhaust system and making it forward-flowing. Some people can create it with their own hands.