Preparing for work
Pumping will not be effective unless you first carry out a number of preparatory measures to prepare the system for intervention:
- Check the amount of brake fluid in the conservator tank. It should be at the maximum level. If necessary, add more until the level reaches maximum.
- Prepare a clean plastic container in which to place some brake fluid.
- Take a hose whose diameter is equal to the size of the brake fittings. It must be of sufficient length.
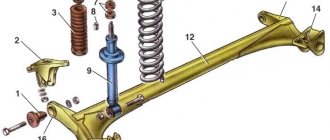
- If you have placed the car on jacks or a special lift, then you need to insert a flat-head screwdriver between the piston and the plate. This technique will help you block the pressure regulator.
- Loosen the fittings slightly.
One of the most important recommendations is to have an assistant to carry out the work. This could be any person, even those who do not understand car repair issues. He has a simple job to do.
Bleeding brakes on a VAZ 2022, preparation and sequence of actions
Bleeding the VAZ 2109 brakes is carried out in a sequence strictly determined by the design features, namely:
- Rear right wheel (farthest wheel in the system);
- Front left (connected by the system to the already pumped rear right wheel);
- Rear left;
- Front right.
The sequence is this way because of the diagonal placement of the contours. All steps must be completed when pumping along the full circuit. You can only upgrade one at a time.
To work you will need:
Note. Brake fluid is quite aggressive; it should not come into contact with the skin and should be washed off immediately. It is also undesirable for it to come into contact with plastic parts, wires, or in the eyes; TJ vapors are poisonous.
Preparing to bleed the brakes
To properly bleed the brakes on a VAZ 2109, as necessary, you will need competent preparation according to the following scheme:
Be sure to check the system for leaks and inspect all pipelines and parts. The machine is installed on a pit or raised with a jack. Tubes, connections, hoses must be carefully cleaned with a rag, then press the brake several times and secure. When inspecting, connections and hoses must not be wet. Detected leaks are eliminated by tightening the fasteners or replacing problematic parts.- Make sure that the fluid level in the tank is maximum; if not, top up. The level will have to be checked after bleeding each mechanism, otherwise air will enter the system again.
- Pour a little liquid into the draining container so that the bubbles escaping from the system are visible.
- The fittings must be loosened before starting work.
- You also need to remember that the VAZ 2109 has a rear wheel drive pressure regulator. When pumping, it is necessary to create high pressure in the system. To prevent the regulator from blocking the flow of fluid to the rear wheels, when working without a pit, on a jack, you need to open its valve and keep it in this form until the end of work. To do this, it is enough to install, for example, a flat screwdriver between the plate and the regulator rod, pushing the rod all the way. The screwdriver is removed upon completion of work.
It is more convenient to pump the brakes on a VAZ 2109 with two people; if you work independently, the cost of brake fluid, time, and effort will increase, but it is possible to cope with the task.
How to bleed the brakes on a VAZ 2109, working together
If you have a partner (no qualifications are required from him), the action plan is as follows:
- The driving partner creates the required pressure in the system by depressing the brake pedal (5-9 presses are needed), then holds the pedal in the lower position until the bleeding is completed.
- The one under the car puts a hose on the fitting of the right rear cylinder and completely releases the fitting so that the liquid flows. The end of the hose must first be lowered into a container for draining. By the bubbles in the liquid you can judge the state of the system and notice when all the air has been removed.
- After complete cleaning, the fitting is tightened and the pedal is released, you can move to the next wheel, the diagram is the same, the front left wheel.
- The level of brake fluid in the reservoir will decrease as pumping progresses and will need to be restored to the maximum level.
- After bleeding along a full (or one, as necessary) circuit, the fittings must be finally tightened and the protective caps must be put on.
If you have to work independently, the scheme and sequence of actions are almost the same. You can press the pedal yourself, or you can use an aerator (price up to 150 rubles).
- The aerator adapter is connected to the pump, possibly with an inflated tire;
- The required wheel is removed from the jacked up car;
- Instead of its own lid, the aerator lid is screwed onto the tank;
- After loosening the fitting, pumping is performed according to the general scheme.
When pumping in this way, the wheel spool is used instead of a compressor, and in extreme cases, the brake is squeezed out and pressed down with a stone until the pumping is complete.
How to carry out repairs with an assistant
Getting the job done right is not difficult if you find someone to help you. Bleeding is performed according to the instructions:
- To create pressure in the system, the assistant must press the brake pedal about 9 times at short intervals. After the last press, it must be pushed into the floor and not released.
- At the same time, place the hose on the loosened cylinder fitting. This will allow air to escape from the system.
- The end of the hose is placed in a prepared container with brake fluid. If you do everything correctly, its level will begin to rise, as it will begin to leave the circuit along with the air.
- Bubbles will tell you that air is escaping. As soon as they stop appearing, the air lock has left the system.
- Tighten the fitting and again ask an assistant to pump the system using the pedal about 9 times at short intervals. After completing the work, return the fitting caps to their place.
Bleeding the brakes of VAZ 2108, 2109, 21099 cars
Before carrying out work on pumping the brake system, you should remember some of its features for front-wheel drive VAZ passenger cars. The brake system of VAZ 2108, 2109, 21099 cars is hydraulic, has two circuits: right rear wheel - front left, left rear - front right.
Brake system of VAZ 2108, 2109, 21099 cars
Bleeding the brakes should start from the right rear wheel. A sign of airiness in the brake system is a decrease in braking efficiency when you press the brake pedal. Bleeding the brake system on VAZ 2108, 2109, 21099 vehicles must be carried out after repairing or replacing its elements, replacing the brake fluid (according to the regulations, once every five years).
Required tools and materials
- a special wrench for unscrewing the fittings on the brake cylinders
- 8 mm spanner
— container (0.5 l) for brake fluid
- rubber tube (50-70 cm), preferably transparent
Preparatory work
- put the car in a pit
If we are bleeding the brakes without a hole on a flat surface, with the wheels removed, it is necessary to open the pressure regulator valve (sorcerer), otherwise, when the rear wheels are suspended, it will block the passage of brake fluid into the brake cylinders of the rear wheels. To do this, we insert a slotted screwdriver between the lever and the plate, forcing the pressure regulator rod into place.
- install chocks under the wheels
— open the brake fluid reservoir cap and fill it to the brim
When bleeding the brakes, make sure that the level in the reservoir does not drop to the min mark; if necessary, add brake fluid to it.
Bleeding the brakes of VAZ 2108, 2109, 21099 cars
— Clean the fitting on the brake cylinder of the rear right wheel from dirt
— Remove the protective cap from it
— We put a special wrench or 8 mm socket wrench on the fitting
— We put one end of the rubber tube on the fitting, lower the other end into a container with brake fluid
Fill it at least by a third.
Bleeding the rear brakes on a VAZ 2108, 2109, 21099
— An assistant must slowly press the brake pedal 5-6 times to create pressure in the system and hold it pressed
— Unscrew the fitting on the brake cylinder approximately half a turn
We observe how the brake fluid with air bubbles comes out of the tube into the container. After it stops coming out:
— We wrap the bleeder fitting
- Repeat the procedure again
The assistant again presses the brake pedal several times and holds it down, unscrew the fitting half a turn, the fluid flows out for a while.
Do not forget to add brake fluid to the reservoir, as the level in it will constantly drop.
— We carry out bleeding until the brake fluid stops coming out along with air bubbles, and only brake fluid comes out
Then we finally tighten the fitting.
We repeat a similar procedure sequentially for the front left wheel, rear left, front right.
Notes and additions
— After bleeding the brakes on a VAZ 2108, 2109, 21099, press the brake pedal and check the operation of the hydraulic drive. If the pedal is “soft” and drops below its normal operating position (when pressed, it travels more than half the distance to the floor), we check the serviceability (tightness) of the brake system elements and carry out bleeding again.
— In addition to putting the car’s working brake system in order, once every 15,000 km the parking brake system (handbrake) of VAZ 2108, 2109, 21099 vehicles should be checked and adjusted.
What to do if there is no one to help
It is not always possible to pump the brakes with 4 hands, so manufacturers came up with an aerator. It is sold in all auto stores and markets. The cost of this special device does not exceed 200 rubles, but it will help you bleed the brake system at any convenient time.
If you don’t have time to look for the right device, you can create pressure in the system using a regular wheel. Connect the chamber valve to the expansion tank for the brake fluid. Raise the side of the car to be repaired and open the bleeder fitting. Install the aerator and unscrew the wheel chamber nipple, wait until liquid begins to come out of the system.
If you have a compressor, you can use it instead of a wheel. In this case, pumping will be more effective. When doing the work yourself, you need to monitor the system and remove pressure from it in a timely manner.
Why pump
Bleeding is a frequently carried out measure aimed at restoring and increasing the efficiency of the braking system.
It is necessary to pump the brakes after any intervention in the design of the brake system - repair, replacement of components, change of brake fluid, cylinders, vacuum booster, etc. Bleeding allows you to remove air that has entered there from the line.
If air is in the system, at some point (as practice shows, this always turns out to be the most inopportune moment) the pedal simply will not respond to pressure. Therefore, you will not be able to slow down or stop the car. And this despite the fact that you have new brakes after replacement.
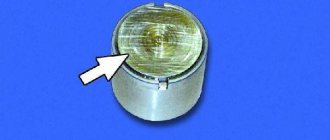
Tank with TJ
How to check the result of your work
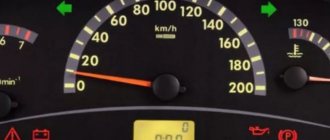
Find a clear, dry section of paved road to check the brake bleeding. You need to accelerate to 40 kilometers per hour, and then press the brake pedal and do not release it until it comes to a complete stop. Take a tape measure and measure the resulting braking distance - its beginning will be clearly visible on the asphalt. If the brakes work as they should, the length should be 12.2 meters.
Checking the brake system
VAZ 2109 bleed the brakes
Before starting this work, it is necessary to check the entire system for its tightness. To do this, place the car in a garage with an inspection hole. Carefully clean the joints of rubber hoses and pipelines from accumulated dirt.
Note: do not use sharp objects, do not strike.
You need to clean it carefully - take a rag with your hands, rotate it up and down, clean one side, then the other. After this, you need to make several presses on the pedal, put a load on it or stop it with something else. Necessary:
- Go down into the pit.
- Inspect the connections and the quality of the hoses themselves.
- The joints must be dry.
- If liquid has leaked, then use gentle movements and a special wrench to tighten the connections.
Note: tightening must be done smoothly without sudden movements. Tightening the tube connections is carried out with two wrenches and they need to be installed on the two parts being connected.
- Inspect the places where the pipes are attached to the car body; if they break, make new fastenings if possible. Install them in certain parts of the body.
VAZ 2109 bleeding the brake system
- Securely secure the tubes.
- Visually assess the suitability of the rubber hoses; they should not have ruptures in the upper shell or cracks.
Premature damage to rubber hoses can occur due to:
- drainage of mineral oils and grease onto them;
- as well as mechanical damage.
According to the technical specifications of the manufacturer, hoses must be changed after 150,000 km or after five years of operation of the vehicle. Upon completion of the inspection of the condition of the system from the inspection hole, under the body of the vases, it is necessary to inspect all joints for tightness. This is also done under the hood, in the engine part. In addition, it is necessary to check the fluid level in the master cylinder reservoir. If necessary, the level must be increased to the maximum level.
Preliminary activities
By properly preparing for the upcoming brake system bleeding, you can seriously save on car service costs. Watch the video, read our instructions to gain the necessary experience and upgrade the vehicle yourself
Among the preliminary activities, we highlight the following.
Leveling up
Now let’s proceed directly to bleeding the brake system of your VAZ 2109. By following certain instructions and observing the sequence of actions, you will be able to complete the task more easily with four hands.
During the pumping process, the coolant will gradually come out of the expansion tank. As the quantity decreases, do not forget to fill it with new composition. It is not worth pouring fuel fluid from the container for pumping, since, as you remember, there are air bubbles there.
Having completed the procedure for bleeding the brake system, tighten the fittings and put the caps on them.
Pads
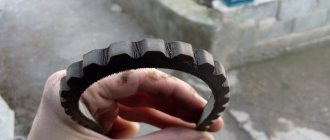
When braking, a grinding noise is heard from the front wheels. Most often this happens due to worn pads. This consumable consists of a metal base and a friction lining. It is this pad that stops the car by friction against the disc. During operation, the friction material gradually wears off. When it is completely erased, the base begins to rub against the disc. This is what causes the grinding noise. Sometimes, when the pads are worn too much, the caliper working cylinders can be squeezed out and jam. This leads to increased wear of the brake discs, even to the point of cutting them off. Therefore, you should not delay replacing the pads. Be sure to change consumables on both sides
Also pay attention to other components of the brake mechanism
This is especially important if the pads wear unevenly. When choosing components, it is advisable to use “original” pads
If you purchase non-original spare parts, make sure that they can be installed correctly. Incorrect installation may cause grinding noise in the future. Sometimes a pad can break due to various reasons. Most often, the reason is their low quality. The linings crumble very often. The sharp edges resulting from this scratch the disc. Therefore, the disc must be polished when such a problem is identified. Buy spare parts only from reliable places, be sure to ask for certificates. If you had to brake suddenly and then a grinding noise started, the pads may be burnt. Remove carbon deposits from the pads with fine sandpaper. Article on the topic “Replacing brake discs and pads with your own hands”
When choosing components, it is advisable to use “original” pads. If you purchase non-original spare parts, make sure that they can be installed correctly. Incorrect installation may cause grinding noise in the future. Sometimes a pad can break due to various reasons. Most often, the reason is their low quality. The linings crumble very often. The sharp edges resulting from this scratch the disc. Therefore, the disc must be polished when such a problem is identified. Buy spare parts only from reliable places, be sure to ask for certificates. If you had to brake suddenly and then a grinding noise started, the pads may be burnt. Remove carbon deposits from the pads with fine sandpaper. Article on the topic “Replacing brake discs and pads with your own hands.”