Support bearings are designed to reduce body loads transmitted from the vehicle wheels through the shock absorber struts.
They are components of the upper supports of the front shock absorbers. The support bearings are located in the upper inner surface of the “cups” located in the engine compartment above each of the wheels.
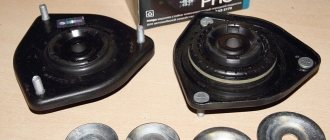
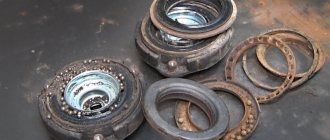
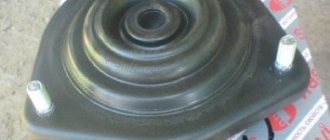
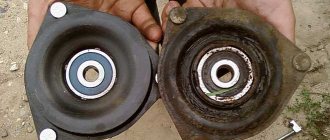
The design of the standard support bearing of the VAZ 2110 consists of the bearing itself (a thick rubber separator with steel balls built into it) and two protective rubber gaskets.
Front strut replacement tool
In order for the work to be completed successfully and quickly, you need to prepare some tools:
- A set of keys or socket heads with a diameter from “10” to “27”.
- Collar.
- Jack.
- Wheel chocks.
- WD-40 lubricant.
Preparatory work
Before you begin directly to work, you need to prepare your workplace and car.
- First of all, place the car on a flat surface.
- For maximum reliability, we place wheel chocks under the rear wheels.
- We tear off all the bolts securing the front wheels.
Step-by-step process for replacing front struts
We have already written in more detail about replacing rear shock absorber struts.
If you only have one rack out of order, you will still have to change a couple anyway, so the order in which the work is performed does not matter.
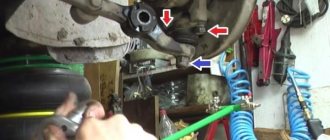
- First of all, we lift the hood and, using a special device for fixing the rod and key at “19”, engage the nut securing the support to the rack and turn it. When the fastening becomes loose, do not unscrew it completely.
- Using a key set to “13”, unscrew the 3 bolts that are located on the upper glass.
- Next, we use a jack to hang the wheel and fix it in this position.
- We remove the brake hose, which is attached to the strut knuckle itself, from the place of fixation and remove it in any direction.
- We inspect all connections, including the steering tip, steering knuckle and the rack itself for signs of corrosion; it is best to treat these places with lubricant. This is done so that all soured parts can be easily torn off.
- After a short amount of time until the lubricant penetrates into all deep places, you can continue working.
- Having disconnected the cotter pin and unscrewed the nut from the steering end using a pry bar and a hammer, we remove it from the place of fixation.
- Using the heads at “17” and “19” we begin to unscrew the two bolts that secure the strut to the steering knuckle.
- When the nuts are unscrewed, problems may arise with further dismantling of the main bolts. Since they stick strongly, they may need to be exposed to excessive amounts of lubricant or liquid wrench. In order to knock them out of their seats, you can use a bolt with a smaller diameter.
- If all fastening elements are unscrewed, all that remains is to completely unscrew all three bolts located on the upper cup.
- Until the strut is disconnected from the steering knuckle, do not completely unscrew one of the three bolts on the cup. And we turn it completely only when the stand is in the hands and completely under control.
- The racks should be disassembled first, starting with the ties. The springs should be tightened carefully, eliminating the possibility of their breaking.
- If the stand no longer rests against the support, this will mean that it is already under sufficient tension.
- Now you can dismantle the support fastening nut and, accordingly, the support itself.
- When the support is dismantled, remove the spring itself.
- Now all that remains is to remove the boot and bump stop from the strut rod. (Although you don’t have to do this if all the spare parts are new).
At this stage, work on dismantling the front pillar of the VAZ-2112 can be considered complete.
Assembly procedure
First of all, we install the boot and bumper on the new rack.
If you plan to install sound insulators, we will install them.
We put on the spring
Please note that its main part must fit exactly into a special recess located on the rack cartridge.
Using a new support and support bearing, you need to fix it on the rod itself using a nut.
Make sure that the part of the spring on top is always in place where it is fixed and that there are no distortions or bevels.
When everything has been diagnosed, you can remove all the ties and begin installing it on the car.
Next, we carry out all the work in exactly the reverse order, starting with the cup nuts in the engine compartment.
When fixing the strut to the steering knuckle, it is best to use new bolts of the same diameter with completely new nuts. Please note that after carrying out this work, you must definitely visit a car service center to carry out wheel alignment work on the car.
Please note that after carrying out this work, it is necessary to visit a car service center to carry out wheel alignment work on the car.
Tuning VAZ 2113—2115 cars
Front-wheel drive cars VAZ 2113, 2114 and 2115 are usually equipped with a sports suspension. It improves stability and controllability while driving:
- To begin with, we are modifying the front struts, turning them from oil-filled to gas-oil-filled. This is done by pumping gas into the working chamber. Thanks to this, the rod will automatically return to its original position after immersion;
- to protect yourself from the spring flying out while moving, we limit the stroke of the rod;
- standard rods can be replaced with “kailovers” - sports racks. They will make it possible to sit the car lower. This will give it stability. In this case, shortened springs are used, which helps to minimize the level of car roll when cornering;
- the above-described wishbones. They will provide improved car handling, precise suspension tuning and increased castor.
This is how we tune the suspension of models of the 2113-2115 group with our own hands, making it sporty. This improves handling, reduces roll, and increases your safety on the road while the car is moving.
Replacement
Having decided on the choice of racks, collect a set of tools that will be useful to you when replacing them:
- Slotted screwdrivers;
- Key for holding the shock absorber rod;
- Open-end and ring wrenches sizes 6-22;
- Heads for 12-22;
- Tie rod end ball pin remover;
- Device for compressing springs on the front struts;
- The almighty solvent WD40.
We begin the replacement process itself.
- Unscrew the nut that secures the upper shock absorber mounts to the body cup (in the engine compartment).
- Release the upper supports.
- Remove the outer tie rod ends. This is where your special puller will come in handy.
- Remove the bolts that secure the lower part of the strut from the steering knuckle.
- Remove the stand.
- Disassemble and reassemble it.
- Perform the reassembly process.
We should talk about disassembly and assembly in more detail:
- Start by removing the top stem nut. This can only be done with a specialized key for 6;
- Armed with another device to hold the strut spring, release the rod of your shock absorber;
- Next, the upper support is released, which is held on by three nuts on top of the body cup;
- Be sure to disconnect the outer tie rod end from your strut before working on the lower mount;
- It’s not uncommon for a ball pin to become stuck, so be sure to use a remover or a product for all occasions - WD40;
- Once the stand is free, remove it. Replace with a new one and perform the process of reassembling the element. Be careful with the front pillar boot of your VAZ 2110. Try not to damage the component. If it is in poor condition, it is recommended to replace it immediately;
- There should also be no problems with the front strut brace of the VAZ 2110;
- Be sure to adjust the wheel alignment after you have made certain adjustments to the suspension design.
It is noteworthy that replacing the rear struts does not have any effect on the wheel alignment, but when changing the front shock absorbers, significant changes can occur.
The work is fraught with certain difficulties, but doing it even with your own hands without the help of specialists is not as difficult as it seems at first glance. Try to be careful, follow the sequence of steps and choose only high-quality replacement parts. The better the quality of the new front strut, the longer you can drive your “ten”, forgetting about this problem.
https://youtube.com/watch?v=S4mHSyZI8fo
Suspension tuning on VAZ cars
Very often, owners of VAZ cars try to make various kinds of improvements to their design in order to improve their performance characteristics. These are various changes in the design of the engine, brake system, gearbox, bumper, wheels, etc.
Among all these modifications, tuning the VAZ suspension occupies a special place - it is one of the determining factors in handling, driving performance and road safety.
To improve the suspension, you can seek help from car service specialists or do all the work yourself. This will help you reduce financial expenses and do everything as you see fit. Let's look at some improvement opportunities in various VAZ car models.
Tuning the suspension of a VAZ 2109 car
Knocking in the racks
If the VAZ-2112 has already traveled 30,000 thousand kilometers, you are probably faced with the problem of some knocking in the rear pillars. There can be a lot of reasons for this, and no one can accurately determine which of them was a consequence of the sounds in your car.
- If you hear a characteristic knocking sound in the rear pillar while driving over uneven roads, the shock absorbers are most likely due to deterioration and should be replaced as soon as possible.
- Wear on the rear suspension struts is also the main cause of problems with the car's rear strut.
- A sagging spring is also a cause and requires replacement.
- Severe wear of the bushings that were mounted in the lugs.
- Problems with the compression stroke of the car's rear strut.
- Problems with axis coaxiality due to possible deformation.
In a VAZ-2112 car, replacing rear struts without spring tensioners cannot be properly adjusted. To better identify the problem, empty the trunk of any cargo. If you nevertheless decide to replace the rear struts, the price that you will see on the car markets will pleasantly please you, since it is much cheaper than the prices for a new generation foreign car.
Rear beam stabilizer bar
The element's purpose is to reduce the lateral roll of the car, improve the interaction of the wheels with the road surface when cornering, as well as distribute the load between the rear shock absorbers when one of the wheels drives over uneven surfaces.
The fact is that when you hit deep potholes, extremely strong suspension occurs, often causing the rear shock absorber strut rod to be pulled out.
When working in compression, the shock absorber, on the contrary, is overly susceptible to breakdown, which seriously affects its durability.
This does not happen with amplification. The resulting force is distributed between both wheels with an approximate ratio of 3 to 2, which has a positive effect on the quality of control and the reliability of the suspension elements.
The stabilization bar is installed directly on the rear beam of front-wheel drive models of domestic VAZ and other cars.
Installing a beam reinforcement should not cause any problems for most drivers. To do this, you need to use a trestle or inspection hole, and then fasten the rod to the beam according to the instructions.
The only difficulty that may arise is the need to drill eight holes in the beam housing.
Selection of new parts
Before changing the racks on the VAZ “tenth” model, you must first purchase new elements. It can be quite difficult to choose them from a wide range of products from different manufacturers offered by car dealerships. You are unlikely to find inexpensive parts of good quality; what is offered for sale under the VAZ brand will last half as long as factory shock absorbers. Hence the recommendation: consider options from famous brands, provided that they are not fake:
- Monroe;
- Kayaba;
- Sachs;
- Bilstein.
Among the Russian manufacturers, the products of the Samara SS 20 plant have performed well; reviews from car enthusiasts about them are generally positive. When you plan to replace front shock absorbers, in addition to choosing a manufacturer, you need to think about the type of struts. There are traditional oil and gas-oil models, and the latter are significantly more expensive and a little tougher. But they behave confidently on the road and last longer. Oil models run smoother and are more suitable for those who like a comfortable ride.
Types of support bearings
The bearing must perform angular contact functions, and the more accurately it does this, the longer the car will retain its handling characteristics. Therefore, many different designs have been developed; there is no single one yet.
Bearings according to their structural organization can be divided into:
- by the nature of the rolling body - ball and roller;
- bearings with removable outer or inner races;
- integrated angular contact bearings of non-separable type;
- bearings without cages, which are a powerful cage with built-in rolling elements; the support flanges act as tracks.
During assembly, a supply of lubricant is placed in the bearing, but its operating conditions are such that it is not enough for a long time.
The role of the front pillar in the VAZ 2112 car
The main suspension component of any car is the shock absorber struts. Their main purpose is to dampen car body vibrations and ensure sufficient traction of the wheels with the road surface when driving. The manufacturer offers a service life for each machine component. The instructions recommend replacing the front shock absorber strut after an average of 30 - 40 thousand kilometers. What indicates the need to replace the front struts:
- From the side of the damaged rack, the vibration of the body on the “comb” increases.
- Steering wheel wobble appears.
- The car is moving away from straightness.
- When turning, the car inexplicably skids.
- The braking distance increases.
- Abnormal operation of the shock absorber strut valves is indicated by a knocking sound.
- Oil may leak out and its characteristic smudges may appear.
All these faults must be eliminated; further operation of the suspension is not advisable. This can lead to negative consequences:
- Failure of the front support bearing struts.
- Increased uneven tire wear. The wheels “jump” when the car moves, which breaks the hub bearings, the price of which is quite high.
- An increase in braking distance, which is associated with the safety of using a car, when a split second decides a person’s fate.
- Reduced service life of brake pads, which affects vehicle safety and increases the cost of frequent replacement of parts.
Tip: The driver needs to regularly listen to how the suspension works. The appearance of a knock indicates that the car has a fault in the front pillar, which requires urgent replacement or repair.
Types of shock absorber struts
The type of road surface and its quality determines the use of different racks. The style with which the car is driven also plays a role. So:
Comfortable movement in the city and beyond is ensured by hydraulic or oil front struts of the VAZ 2112 - the cheapest and with small dimensions. Although they have sufficient advantages, they have a number of disadvantages:
The presence of an air mixture in the chambers for compensation: if the level is low, the shock absorber efficiency is zero. Creates unreliability of devices and excess air; Frequent and sudden movement of the piston when the car is moving on a dirt road can provoke the formation of cavitation bubbles, which leads to foaming of the oil; Poor heat dissipation.
- Gas front struts have greater rigidity when driving at high speeds and under increased load. But, the increased shock load reduces the comfort of movement for the driver and passengers. For the VAZ 2112, the front gas strut differs and has an increased cost.
- Double-pipe gas-filled struts are a compromise between gas and oil devices. They have sufficient softness and perform well when driving over rough terrain at high speed. With low pressure, the gas pressure prevents oil from boiling and effectively dampens vibrations. This type is the most reliable and durable device.
Causes of front shock absorber malfunctions
When one or both A-pillars fail, the vehicle's behavior changes and the following problems may occur:
- Increased vibration of the body, more often on uneven roads and more on the side where the strut is damaged.
- You can feel a beating in the steering wheel.
- The car leaves the straight path.
- When entering a turn, a skid may occur.
- The braking distance will be increased.
- When driving on an uneven surface, knocking noises will appear in the strut - this will indicate a malfunction of the internal parts of the strut.
- The presence of oil traces on the shock absorber will indicate the presence of depressurization of the strut.
The presence of such symptoms will indicate improper operation of any of the elements of the front suspension, and further operation of the vehicle with such defects is undesirable.
Methods for identifying faulty front struts
Of course, the most effective and best way to check the front suspension is to check the car on a diagnostic stand, because this is the only way to most effectively simulate the behavior of the suspension on uneven terrain. A detailed printout will provide the most accurate indication of the condition of the racks.
Results of bench tests of front shock absorber struts
Rocking racks is a myth!
Note! There is a myth among a large number of car enthusiasts that if you rock the car from a certain side and if after 2-3 rocking motions it stops oscillating, then the strut is working properly. Unfortunately, this test is false and misleading, since even with minimally good shock absorbers the car will not sway in free motion. That is why such a test is so popular among most car enthusiasts and increasingly misleads a large number of garage technicians.
Visual inspection
There was clearly something wrong here. And don’t go to a fortune teller!
The most effective way to diagnose a rack is its visual inspection . Since the presence of even the slightest oil leak will indicate its failure. Because the rod works by moving up and down, oil will still leak out of the rod, affecting performance.
A dry strut is also not a guarantee of serviceability, since damage to the strut valves does not lead to oil leakage.
Drawing a conclusion from all of the above, we can confidently say that the best way to diagnose the performance of racks will be its visual and operational diagnostics. So, if there is even the slightest knock during its operation, then you can judge with a high degree of probability that it is malfunctioning. The same applies to the change in the behavior of the car when it began to turn unstably.
Work order
Before deciding how to change the front shock absorbers, you need to thoroughly prepare. An inspection ditch is not required here; in good weather, everything can be done outside, on a flat concrete platform. Replacement of racks is carried out using the following tools:
- standard set of open-end wrenches and sockets with sizes from 6 to 22 mm;
- plumbing tools - hammer, screwdriver, pliers;
- jack complete with wheel wrench;
- puller for squeezing out ball joints and pins;
- a pair of pin-shaped clamps with grips for compressing springs;
- rags and cloth gloves.
The specified set of tools and the algorithm for performing the work are suitable for all models of the “tenth” Zhiguli family, including the VAZ 2112. To change the struts on the VAZ 2110, you should park the car on the site, fix its wheels and lift it with a jack from the required side. Then remove the front wheel, open the hood and follow this algorithm:
- Disassembly begins in the engine compartment. The shock absorber rod must be freed from the protective cap (if there is one) and the 3 nuts must be loosened with a 14 mm wrench.
- There is a round rod with a groove or a tetrahedral one measuring 6 mm. In the first case, a powerful slotted screwdriver is inserted into the groove; in the second, the rod must be held with a key. Loosen and unscrew the 19 mm fastening nut.
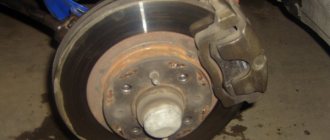
- For further disassembly you need to move under the wheel arch. There, you need to remove the brake fluid hose from the groove in the strut, and then unscrew the 2 nuts securing it to the steering knuckle. The remaining bolts should be knocked out of the holes by hitting them with a hammer through a soft metal guide.
- Remove the cotter pin from the nut holding the steering rod ball pin, having first straightened its ends. Unscrew the nut and use a puller to press the pin out of the seat in the rack bracket.
- Finally unscrew the 3 nuts located under the hood and holding the assembly suspended. Now the shock absorber along with the spring can be removed from the car.
It is recommended to treat stuck threaded connections with WD-40 aerosol lubricant before unscrewing. It is more convenient to do the remaining work in a vice with copper or aluminum pads, but you can do without them. Further replacement of the front struts of a VAZ (“tens”) consists of compressing the springs with clamps and final disassembly of the unit in order to remove the faulty shock absorber. To do this, you will have to remove the cup, support, boot and compression stroke buffer.
When disassembling, pay attention to the condition of the support bearing and replace it if necessary. After this, you can install the new stand on the machine in reverse order.
If the parts were changed after an impact on the suspension, then the procedure is mandatory.
Preparing the tools
In this article, we will look at how the support bearings of a VAZ 2110 are replaced without a mandatory wheel alignment, a process that requires special equipment and a stand.
Replacing support bearings on a VAZ 2110
First of all, before making a replacement, you need to arm yourself with the following tools:
- A special device that helps tighten the springs and unscrew the strut nuts;
- A special puller designed for removing the steering tip;
- A set of standard wrenches - wrenches or caps;
- Mount;
- Hammer;
- By lift.
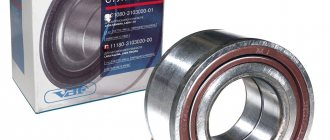
Note. Needless to say, you also need to stock up on a new support bearing. In addition, the help of an assistant in this work will not hurt.
Choosing which ones to buy
It is impossible to say unequivocally which front struts are best to choose for the VAZ 2110. Some choose factory ones because they are not rigid enough for them, others prefer analogues for their softer and more comfortable behavior.
Some people even want to install a sports version of the struts on their “top ten”, since they are the stiffest and the springs are the thickest.
Sports
Focus on what you want to get out of driving. But from the point of view of manufacturers, Samara CC20 devices have proven themselves to be excellent. If necessary, you can figure out how to pump up such racks.
The choice is between oil and gas (gas-oil, actually). The former are more affordable from a financial point of view, but they do not have such a wide temperature range, which is why the shock absorbers become stiffer in winter.
Gas analogues have a more complex design, a high price, but an excellent “tenacity” indicator.
Among the manufacturers, in addition to CC20, the following manufacturing companies can be distinguished:
- KONI
- Sachs
- Kayaba
- Monroe
- Brillstein.
All of them have approximately the same devices, so there should be no problems with selecting suitable parts.
Basic faults
When a support bearing fails, a knock resembling dull blows appears in the front part of the car in the area of the pillars. Most often, such symptoms are observed when driving over uneven surfaces.
A knock indicates that the bearing has ceased to cope with its duties due to a violation of its integrity. This is caused by the destruction of its structure due to:
- exceeding the recommended resource;
- excessive dynamic loads;
- dirt and moisture getting inside the bearing.
However, knocking in the area of the racks may have other causes. To check the bearings and make sure that they are the ones knocking, lift the hood of the car, remove the cover of the supposed “glass”, and place your palm on the upper shock absorber support.
Rock the car up and down. If at the same time you hear the same knock and feel the corresponding vibration with your hand, immediately replace the bearing.
Step-by-step replacement of rear shock absorber struts on a VAZ 2110
To replace the rear shock absorber struts on a VAZ 2110, you should use the instructions below.
Remove the plug from the stand glass. Behind it is the rod fastening nut.
- Liberally coat the work area with penetrating lubricant.
- Unscrew the nut. In this case, you should avoid turning the rod by holding it with a special key.
- Remove the nut.
- Remove the rubber pad.
- Switch on any gear.
- Place wheel chocks under the front wheels.
- Jack up the rear of the car.
- Unscrew the wheel mount and remove it. It is prohibited to carry out work on a machine suspended only on a jack. If the car owner does not have any support, then the removed wheel should be supported.
- Unscrew the nut of the lower shock absorber strut mounting.
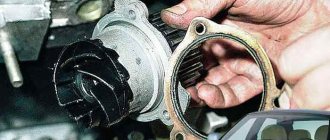
Shock absorber strut lower mounting bolt.
Press the stand out of its seat.
Disassemble the dismantled unit
- Carry out troubleshooting.
- Replace the failed elements and assemble the module.
- Reinstall everything in reverse order.
Check wheel alignment and camber and adjust if necessary.
- www.vazzz.ru
- autorn.ru
- luxvaz.ru
- zapchasti.expert
Tuning of VAZ 2110—2112 cars
This group of machines can be improved according to the same scheme as described above. Or go the other way - install a more functional suspension with your own hands, for example, from Priora.
This suspension is much stiffer, the steering wheel responds better to the driver, and it feels composed and clear. All the advantages are especially noticeable when passing through holes and depressions while the car is moving. The front end becomes a couple of centimeters higher.
Some, however, on the contrary, put the suspension from the VAZ 2110 on the Priora: for different car enthusiasts there are different preferences. It is impossible to come up with any statement that everyone will agree with 100%.
Video of replacing front struts, springs, supports and bearings on a VAZ 2110-2112
To watch the video in high quality, click on the gear icon in the bottom right, and select HD 1080.
This review was made using the example of the 2110, which I once had for analysis. I think that everything is shown clearly. As for installing new suspension elements, I personally recommend installing original factory spare parts produced by AvtoVAZ. And this only applies to the VAZ 2110, since the factory suspension has proven itself quite well.
I do not support any underestimations and other experiments, although I do not particularly criticize them: as they say, “it depends on the taste and color...”. But personal experience has shown that underestimation is a loss of comfort during city driving, and all road irregularities will constantly fall on the fifth point. It is also worth noting that many manufacturers of shortened suspension elements highly recommend installing short springs only in pairs with equally short struts. That is, you should not install shortened springs on factory-length racks, even if the length is only 30 or 50 mm shorter.
In this case, the spring will be in a constantly relaxed state, which will negatively affect the efficiency of the suspension and will also lead to unwanted sounds from the front struts.
Also, a significant role should be given to the tightening torques of threaded connections when installing new elements. For example, the nuts securing the upper strut support to the car body should be tightened with a force of no more than 19.6–24.2 N*m.
The photo above shows an example of Kalina, but the meaning is not lost in any way.
The same should be said about the other connections. The mounting of the strut to the steering knuckle is 77.5–96.1 N*m. And the nut securing the tip to the stand is tightened with a torque of 27.05–33.42 N*m.
As for the symptoms of malfunction of supports, bearings and springs, they can be different. For example, when you turn the steering wheel, you hear a grinding or even crunching sound, and this is pronounced even when the car is parked - most likely this indicates a failure of the support bearings. Also, if they are worn out enough, a knock may appear from the top of the rack - more precisely from the support.
Over time, springs may lose their properties and sag during prolonged or overly loaded use. This leads to a loss of suspension efficiency, sagging of the car, and there is a high probability that the wheels, when driving on uneven roads, will begin to catch on the fender liners, which even happened on one of my cars.
When to change
The service life of standard bearings for the VAZ 2110 is 100 thousand km, but given the state of our roads, it is better not to take risks and change the bearings after no more than 50 thousand km or 2-3 years of operation, especially if they are no longer factory.
Also, support bearings must be immediately replaced when their malfunction is diagnosed. Otherwise, in addition to the body, the supports themselves and the shock absorber struts will suffer.
It is recommended to replace two support bearings at once.
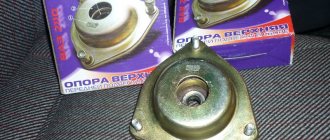
The cheapest support for the “ten” costs about 300 rubles . A good alternative to the original bearing models are products from other manufacturers, such as SS-20, ASOMI, TRACK or FENOX ( up to 800 rubles per piece ). They may have a modified design designed to meet certain consumer requirements.
You can also buy the entire upper support assembly. This will cost approximately 1200-3000 rubles per unit .
The cost of replacing one prop at a service station is about 500 rubles.
Rear pillar replacement instructions
If you take a closer look at the structure of the front and rear struts, you will see that this is a nodal mount - a kind of device for the interaction of springs and shock absorbers in a bilateral form. Replacing the rear struts on a VAZ-2112 with your own hands is not a very complicated process, but you must carry out a number of steps, as well as have special keys and everything necessary for the work.
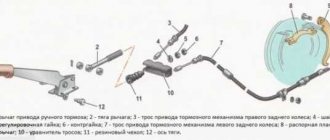
Manipulations for removing the rear pillar:
- In the area of the stern fastening arches, dismantle the spare parts.
- Prepare the car seat located at the rear for removal, remove all fasteners and belts.
- Use a special key to unscrew the rod fasteners.
- Raise the car on a lift.
- Remove the lower mount.
- Remove the stand from the mounting socket.
When you have finished removing the necessary elements and removed the desired part, proceed to the next replacement step. Now you need to generate a stroke compression buffer system, remove the protective cover, bushing, support washer, spring and shock absorbers.
Suspension tuning for VAZ 2108—2109
The "eight" and "nine" have essentially the same improvement methods as in the previous section. We recommend making the following changes yourself:
- install a stabilizer bar from a VAZ 2110 - it will help reduce roll when cornering;
- install Plaza gas shock absorbers at the front;
- make negative wheel camber;
- increase the pitch angle of the wheels at the front of the car.
This will help improve the performance and handling of your car.
Tuning the suspension of the VAZ 2109
Choosing the best front strut
The best front struts for the VAZ 2112 are produced by the Japanese company Kayaba. By installing Kayaba front struts on a VAZ 2112, the car enthusiast provides himself with maximum comfort and low vehicle noise when driving at low speeds. Even at high speeds, optimal shock absorption and a high level of safety are ensured. The best front struts for the VAZ 2112 do not create any problems when replacing parts. The strut can be changed easily and quickly, which reduces the time required to repair the shock absorber. Very often, the quality of shock absorbers can be improved if a stretcher is installed on the front struts on the VAZ 2112. In this case:
- Increases accuracy when driving a car when cornering.
- The machine's stability increases when moving in a straight line.
- Deformation of the body is reduced when the car is driven on dirt roads and on turns, which leads to a reduction in the appearance of cracks on the body.
If you do all the work efficiently and without haste, then you won’t have to redo it for a long time. Also on our resource you can find out how to replace the rear struts.
What happens if you don't change the racks?
If you continue driving without replacing the struts, you will have to repair the entire suspension
Below we will describe to you several reasons that directly indicate what will happen to the car if the front struts are not repaired in time:
- During the first 2-3 thousand kilometers with faulty shock absorbers, the support bearings on the front struts can be broken.
- When the struts are faulty, wheel balancing is also disrupted over time and tires begin to wear unevenly, and hub bearings break.
Braking
Braking demonstration on new and old struts
- Since the braking distance becomes longer and increases, this directly affects the safety of the vehicle. Since even one extra meter of braking distance can lead to a traffic accident.
- Braking on faulty struts leads to a decrease in the service life of the brake pads, as well as their uneven wear. As you might guess, this directly depends on traffic safety.
All these malfunctions can significantly damage the condition of the entire front suspension system as a whole, and this can already hit the overall budget. However, there are ways in which you can reliably determine the working condition of your shock absorbers.
Selection of parts and necessary tools
Before you start directly replacing silent blocks, it is important to properly prepare for it. There are few recommendations specifically for choosing new parts.
The auto parts market is simply filled with silent blocks from different manufacturers, mostly they are all quite good. The only thing you can do to make a better choice of new parts is to consult with auto mechanics in your area. The main thing is that the new vibration isolators fit completely.
For repair work you will need the following things:
- new silent blocks;
- a set of spanners and socket wrenches (required sizes 17, 19, 24);
- a hammer, a vice or a special puller (also known as a “press presser”) for vibration isolators;
- any lubricant, WD-40 is most convenient;
- inspection hole (lift);
- jack.
Important! Despite the complexity of replacing silent blocks, it is necessary to have at least basic repair skills. Therefore, objectively weigh your strengths before replacing and decide whether you can do it.
Replacing suspension silent blocks with your own hands
The suspension silent blocks on the VAZ-2112 are located in the arms of both the rear beam and the front one. It is advisable to replace them comprehensively. The replacement process is approximately the same on both the rear and front parts of the suspension. Below are instructions for both cases.
Front control arms
Replacing front control arm silent blocks on a VAZ-2112 is the following process:
- First of all, the car must be placed above the inspection hole or use a lift. Then remove the engine compartment protection represented by the casing.
- After this, the nuts securing the front arms are unscrewed, then the stabilizers, all this is done with a 17 wrench.
- After loosening the nuts securing the required wheel, you need to jack up the car and remove it completely.
- Use a 24mm wrench to unscrew the nut on the extension. Then unscrew the fastening bolts of the ball joint and dismantle it.
- Next, the suspension arm is completely released.
- It is necessary to remove the old silent blocks from the removed lever with a hammer or puller. After this, clean the seat from rust and dirt, lubricating the surface with a thin layer of lubricant. You can make your own puller. It will be especially useful when you want to replace the silent block without removing the lever.
- Having pressed the new silent blocks into the mounting groove with a vice or a puller, you need to assemble everything in the reverse order.
- Ready.
Important! Many car enthusiasts do not press out silent blocks, but burn them out, which is extremely wrong. During heat treatment, the quality of the metal from which the lever is made seriously changes for the worse.
Replacing silent blocks in the rear beam
Replacing the rear silent blocks is done as follows:
- Again, the car must be driven into a viewing hole or raised on a lift.
- Then, taking a 19mm wrench, you need to disconnect the rear beam from the bracket by unscrewing the nuts securing it.
- After this, the bolt freed from the nut should be removed, and a wooden beam the size of a brick should be inserted between the beam and the body.
- Then the silent block is knocked out with a hammer or puller, and the freed groove is cleaned and lubricated.
- Next, a new silent block is pressed into the mounting groove.
- The last step is to assemble the entire structure back.
Important! After carrying out measures to replace silent blocks (both front and rear), it is very important to do a wheel alignment.
Posts 1 page 1 of 1
Share12009-03-06 17:09:52
- Author: [email protected]
- From: Russia
- Registered: 2009-03-05
- Invitations: 0
- Posts: 80
- Respect: [+0/-0]
- Positive: [+0/-0]
- Gender: Male
- Spent on the forum: 1 day 3 hours
- Last visit: 2014-05-31 22:19:27
Much has been written about spacers (braces), amplifiers, stabilizers and other hardware.
Anyone who wants to find at least a bit of information just needs to turn back a couple of pages of the topic and find nirvana for themselves! Believe me, it's true. everything has a benefit and each piece of iron is good in its own way - a proven fact, but +10 kg of rods and pipes will not make a kick-ass mobile out of 12. This requires complex installations! Why am I all this, and to the fact that not everyone and does not always understand what is needed and what a person really needs from a car, and how to get it. I’ll try to help you understand this issue, having a skill on this topic + theory/practice in this matter.
GIVEN: VAZ 2112 body, steel, load-bearing, welded, hatchback type. “+” Compared to the 2110, the rear end has a more finished look, which gives a little more torsional rigidity, but the downside is noise in the cabin. relative riding comfort thanks to the soft body.
“_” compared to the 2110, there is no rear window embedded in the body, it gives rigidity, but in comparison, the sedan body is quite a bit softer than the hatch. The results of torsion measurements were on the forum. the quality of materials and steel is far from perfect, and the simplicity of the profiles and the entire body in general does not allow making it wobble and spin noticeably less with little effort. weak engine shield, front suspension cups are too loose and loose. weak floor of the body, sills and roof support frame. in a word, hello from the 80s!
This is precisely why bodies of the tenth family are not liked in sports, to put it mildly. Let's add to this a high center of gravity and a suspension built for dirt roads. we'll get anything we want, just not the source code for sports.
SOLUTION: not everything is so bad, for some people things are even worse. in the presence of all the “yellow pieces of iron”, the average person will only need to change the behavior of the car on the road, and if you want more, then hit the welding machine and go straight to the scrap heap with a grinder. then to the garage. you just need to know where and how to cook/strengthen.
this was the introductory part.
TOTAL: with a modest budget, the bucket is transformed. in a bucket with yellow pieces of iron. how do they work and what do they do?!
— front strut strut: reduces the movement of the front suspension cups in a plane perpendicular to the axis of the car. The sensitivity increases a little and the car begins to steer in turns, in those modes when it will slide a little more. Some noise goes away and the fetish itself is simply pleasant. independent tests have shown that the gain in passing measured sections of the route is not so great. vibration on the body increases, etc. In general, if you just go to the country, to the store and to work, then you don’t need it. however, like all the following.
-rear strut: placed on the rear ammo mounting cups. reduces vibrations in the rear. There is an increase in rigidity, it removes the roll a little (the rigidity increases a little). I don’t recommend options with plastic elements, it’s not serious, you understand.
-power steering rack: cures the scourge of tenth bodies - a weak engine shield. transverse movements are reduced by five times, longitudinal movements by two. "0" appears. Just pls in general.
-body strengthener: placed in the rear of the car, cures the second scourge of tenth bodies - weak rear. Upon arrival, it’s even better than just a spacer for the rear glasses. The best option is with diagonal pipes and with fastenings directly to the wing, and not through the stock corner of the plastic sidewalls.
-lower arm spacer: designed to reduce lateral movements of the lower arm fastenings to the body, reducing stress concentration in this area of the body. body rigidity increases and, as a result, handling improves, within reasonable limits naturally.
-front stabilizer: as a rule, it is simply of a larger diameter compared to the stock one. In addition to the diameter, the material from which the stub is made and the way it was bent are important. It is preferable to use steel used in stock, rather than raw meat and other products. reduces body roll when cornering and increases stability at high speeds. The flip side of the coin is increased understeer.
-rear stabilizer: unlike the front, it is not included in the design of the stock car. This is why this device is the subject of controversy and there are many reasons for this. There are two types of stubs: overhead and welded. the second is preferable, but requires a welding machine and straight hands. the first is simply installed on the beam using clamps. a very complex design with its own problems. the action of Z,S is akin to the front, only with an emphasis on the “back”. those. reduces roll, etc., BUT thanks to it the rear part is more easily steered into a skid, sometimes too easily and unpredictably. although everything is curable, this is the crown of the head for the next FAK.
LET'S SUM UP ALL: Body strengtheners are useful and actually work. Suspension boosters are a more delicate matter and require an integrated approach, including the selection and replacement of springs and shock absorbers. everything should work harmoniously, we are engaged in tuning, and not attaching reflectors to tractors!