Yesterday one of our regular customers came to us with a recently purchased second-generation Kalina to replace the timing belt, roller and pump, plus all the fluids, but more on that in another article. The frequency of belt replacement according to the regulations is 75 thousand kilometers or 4 years of operation, but as practice has shown, the optimal replacement interval is 60 thousand kilometers. This car has driven 80,000 miles, let's see what condition the strap is in.
Important! Let’s make a reservation right away that when the timing belt drive on this car breaks, all the valves bend. It is recommended to check the condition of the belt every 15,000 kilometers.
Replacing the camshaft oil seal Lada Kalina 8 valves
Last year I noticed that the car was burning oil.
It took about 0.5 l/2000 km. I got worried and went to the service. We measured the pressure at the end of the compression stroke - that is, compression - in all cylinders at 13.5 bar. There was a little oil on the skirt of the spark plugs of the first two cylinders, they thought about the valve seals, and recommended driving it like that for now and checking the oil consumption. Over the course of a month, another half a liter was consumed (I drove about 1,500 km), so I decided to change the oil seals. When I arrived for the same service, another mechanic looked at the car and looked at the spark plugs - they were clean, without oil. We decided that the problem was not in the rings, they advised us to do decoking, because... At a mileage of 50 thousand, the oil scraper piston rings often begin to wear out. They also advised me to change the oil from Shell Helix Ultra 5w-40 to Idemitsu Zepro 5w-40, supposedly the shell burns worse. Well, I decarbonized it with LAVR, changed the oil, and drove it around. It seemed to be getting better, and winter had begun, so I started driving a little. But the oil level gradually decreased anyway, and by spring it dropped to a minimum again (the same 0.5 l / 2000 km). This upset me greatly, and I began to try to understand the reason on my own.
I noticed that the engine is splashed with oil more from the timing belt side: the first and second cylinders, the situation is similar at the rear of the engine. I removed the timing belt protective cover and immediately saw the reason. The camshaft gear was covered in oil, and under the gear on the oil pump cover there was a bunch of oil crap piled up. Well, damn it, the camshaft seal is leaking. One of the most common reasons, but no one paid attention to it.
Since I still have to change the oil seal, I decided to at the same time replace the timing belt and the roller, which gradually began to make noise. I bought a Gates Power Kit, checked on their website, the spare parts are original.
At first, my friend and I tried to change everything in his garage, but we couldn’t unscrew the crankshaft pulley - the bolt was tightened with a very high torque and the crank simply bent in our hands. I looked for information on the Internet, it turned out to be very simple: we put a spanner on the pulley nut, rest its other end on the wheel drive shaft and turn the engine a little with the starter. Just in case, it is better to press the gas all the way so that the engine does not start (although, someone writes that there is nothing wrong with it starting, but why take unnecessary risks?). When I turned the starter, I thought that the key had fallen off, since I did not feel the slightest resistance. But it turned out that the key was in place, and the nut had broken off, it’s just that the starter is much more powerful than me, a weakling =).
Source
Removing camshafts and replacing valve lifters for Lada Kalina with VAZ-11194 engine
Remove the plastic engine cover.
Using a Phillips screwdriver, loosen the clamps securing the hoses of the crankcase ventilation circuits and remove the hoses from the fittings of the cylinder head cover.
We remove the intake pipe and cover the channels in the cylinder head with a rag to prevent the possibility of foreign objects getting into the engine. Remove the ignition coils.
Using a “8” socket, unscrew the 15 bolts securing the cylinder head cover.
Location of the cylinder head cover bolts. The lid is installed on the sealant, so use a screwdriver to pry the lid off by the lug.
. and remove it. To check the serviceability of the hydraulic pusher.
. use a screwdriver to press on the hydraulic pusher (when checking, the camshaft cam corresponding to the hydraulic pusher should be facing the pusher with the “back of the head”, that is, do not put pressure on the pusher). In normal condition, the hydraulic tappet should move in the cylinder head socket with significant force, compressing the valve spring. If the hydraulic pusher itself is pressed with little force, then it must be replaced.
We check other hydraulic pushers in the same way.
Remove the camshaft toothed pulleys. We disconnect the wire block from the sensor for the indicator of insufficient (emergency) oil pressure in the engine.
Using a “8” head, unscrew the 20 bolts securing the camshaft bearing housing
Location of bearing housing mounting bolts.
Remove the camshaft bearing housing (A - housing alignment pins). In order to remove the camshafts from the supports in the cylinder head, you do not need to remove the rear timing belt cover, but only unscrew the three upper bolts securing the cover. Pressing back the timing belt cover.
. We take out the camshafts with oil seals.
Remove the two plugs from the cylinder head and the camshaft bearing housings. To remove the hydraulic pusher from the cylinder head socket, wipe the end of the pusher with a rag and use a suction cup (you can use a suction cup to attach car accessories to the windshield).
. take out the hydraulic pusher. When removing the hydraulic pusher, it is better not to use a magnet in order to avoid magnetization of the pusher parts and “sticking” of iron-containing wear products to them. Before assembly, clean the mating surfaces of the cylinder head, bearing housing and cylinder head cover from the remains of old sealant and oil. Lubricate the bearing journals and cams of the camshafts with engine oil and place the shafts in the cylinder head supports.
On the mating surface of the shaft bearing housing, mating with the cylinder head, we apply flange sealant with a bead about 2 mm thick.
Places for applying sealant to the bearing housing. We install the bearing housing along the centering pins and evenly tighten the fastening bolts crosswise, starting from the middle supports. We press in new camshaft seals. On the other side of the cylinder head, we press in the plugs using a mandrel.
We carry out further assembly in reverse order.
Before installing the cylinder head cover, apply flange sealant to its surface mating with the bearing housing.
Places for applying sealant to the cylinder head cover.
Replacing the camshaft oil seal VAZ 2109
I noticed that the camshaft oil seal was leaking a long time ago - the entire left side of the engine was covered in oil. But it didn’t leak that much, so I wasn’t in a hurry to replace it. I started thinking about this only with the approach of cold weather - it was necessary to prepare the car for winter, so that later I would not have to freeze my hands and butt once again.
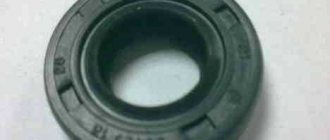
I bought a new oil seal on the market - its dimensions are 28x42x7, catalog number 2108-1005034. As you can see from the number, it will fit on the VAZ 2108, as well as on 2110, 2114, 2115, Kalina. In general, for all cars with 8-valve engines, analogues of the 9-valve engine.
I will tell you how to replace the camshaft oil seal using the Kalina car as an example. The essence of the work is absolutely no different.
Replacing the engine camshaft oil seal
Replacing the camshaft oil seal of the VAZ-21114 Lada Kalina engine.
Remove the front timing drive cover (see “Checking the condition and replacing the timing belt”).
To prevent the camshaft from turning when unscrewing the pulley mounting bolt, insert a “10” head with an extension through the hole in the pulley and put it on the nut securing the rear timing belt cover.
Use a 17mm socket to loosen the bolt securing the camshaft timing pulley. Remove the timing belt (see “Checking the condition and replacing the timing belt”).
. Having unscrewed the fastening bolt, remove the camshaft pulley.
Use a screwdriver to pry off the seal.
. and extract it. Apply a thin layer of engine oil to the working edge of the new oil seal.
. Using a mandrel of suitable diameter, press in the oil seal. The subsequent assembly is carried out in reverse order.
Video on the topic “Lada Kalina. Replacing the engine camshaft oil seal"
replacing the camshaft oil seal (VAZ 2108- Kalina) replacing the crankshaft oil seal VAZ 8kl 1. Replacing the camshaft oil seal on the Lada kalina engine
Source
Replacing the camshaft oil seal Kalina 8 valves
The first thing we do is remove the protective cover. It is secured with 3 bolts.
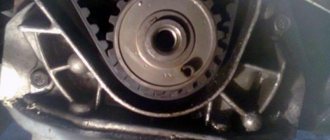
We gained access to the timing belt and pulley. Before removing the belt, you need to set the 1st cylinder to top dead center (TDC). Rotate the camshaft gear clockwise and install it according to the mark. We also look at the mark on the crankshaft flywheel (through the viewing window on the side of the box).
Only after this can the belt together with the gear be removed. How to lock the gear? To the left of the camshaft there is a stud with a “10” nut. We put a head with a key on it and the stopper is ready.
Loosen the tension roller to loosen and remove the belt.
When removing the camshaft gear, make sure that the key is on the bottom. Try not to drop it.
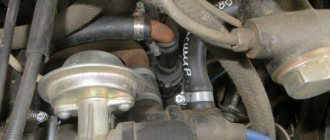
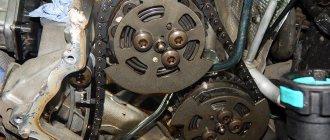
As you can see in the picture, the oil seal itself and everything around it is splashed with oil. A sure sign to replace it.
How to remove the camshaft oil seal? There are several ways to solve this problem.
- Pierce the oil seal with a screwdriver and pull it out to break. The thinner the tip of the screwdriver, the better.
- Place a bent spoke (L-shaped) under the oil seal, grab onto it and pull.
- Try to pick it out with a thin knife or screwdriver, trying to catch on the outer rim (larger radius).
At first I wanted to use the first method, but the washer reservoir prevented me from swinging the hammer. As a result, it was possible to get the oil seal using the 3rd method. It comes out quite easily, the main thing is to get a good hold.
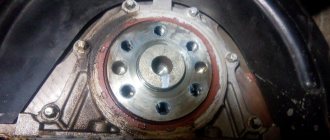
We wipe the seat from dirt and oil. The new camshaft oil seal must be coated with sealant (outer part only) and the inner part with engine oil.
How to install a new camshaft oil seal? To ensure that it sits evenly in its place, it is best to use an attachment of the same diameter. I found an old piece of pipe that fit perfectly. Carefully pull the oil seal onto the shaft, take the adapter and press it evenly into the seat. Wipe off excess sealant with a rag.
That's all, the camshaft oil seal was successfully replaced on our own. For me, the most difficult thing was to get the old one, and all other stages of the work did not cause any particular difficulties. And one more thing, tension the timing belt so that it bends no more than 90 degrees.
I think there is no need to say that you need to put everything back in reverse order;)
Source
How to replace the camshaft oil seal on a VAZ 2108-VAZ 21099?
Removal: 1) At the beginning of the operation, with the “AKB” (which means rechargeable battery), remove the “negative” terminal. (How to remove the terminal from the “battery”, see the article: “Replacing the battery” in paragraph “1”)
2) Next, be sure to set all the “Gas distribution mechanism” marks, and then remove the “Timing Belt” from the car. (You will find how to set all the marks and then remove the timing belt in the article: “Replacing the timing belt”, in the “Removal” section)
3) When the belt is removed, insert a “10” socket with an extension through the hole in the camshaft pulley, and then put it on the nut that secures the rear timing belt cover, thereby securing the pulley from turning. After the pulley is fixed, using a spanner wrench, unscrew the central bolt that secures the pulley.
Note! Once the center bolt is removed, remove the camshaft pulley from the vehicle!
4) Then, taking a flathead screwdriver in your hands, use it to remove the pulley key from the groove in the camshaft.
Note! The key must be removed, otherwise it may simply get lost when removing the oil seal!
5) After the key is removed, without removing the screwdriver, use it to remove the camshaft oil seal.
Installation: • Before you begin installing a new oil seal, check its condition by inspecting its working edge, which is indicated by the letter “A”. There should be no defects on the working edge; it should be smooth, without dents, without tearing out, and without rubber sagging.
• The camshaft oil seal spring, which is designated by the letter “B,” must also be intact and not stretched, otherwise replace the oil seal with a new one.
1) First, taking the new camshaft oil seal in your hands, lubricate its working edge with engine oil.
2) Then install the oil seal with the working edge towards the cylinder head, and then carefully, using a screwdriver or a wooden stick, tuck the working edge of the oil seal onto the camshaft.
Note! When the oil seal is installed on the camshaft, finally drive it in using a hammer and a suitable mandrel diameter. If you don’t have a mandrel, then you can use a head instead, or a piece of pipe of a suitable diameter!
3) And finally, install all previously removed parts, such as the pulley key, the camshaft pulley itself and the timing belt, in their place.
Note! • For details on installing the timing belt, see everything in the same article that described the instructions for removing it.
• The camshaft pulley must be installed with the protruding part of the hub facing the car engine!
Additional video materials: Below, especially for you, we have prepared a video clip that describes in detail the replacement of the camshaft oil seal on cars of the Samara family.
–> VAZ Masters / Engine / Camshaft
Camshaft oil seal VAZ2109
Replacing the crankshaft oil seal Kalina 8 valves
Inexperienced drivers are often interested in what to do if the crankshaft oil seal leaks. In fact, there may be several reasons for this, but in any case, you need to replace this part, because there are no other ways to fix the leak. It is worth understanding that the leak should be eliminated as soon as possible, otherwise a number of problems and difficulties will arise. Therefore, do not delay solving the problem. The front oil seal can be changed without any problems at all; the rear oil seal will have to be tinkered with. But, in general, this work is simple and does not require great qualifications. Typically, services entrust this work to young specialists.
What to do if the crankshaft oil seal is leaking? The answer here is clear - change
. This is the only way you can eliminate a dangerous leak. If you do not replace it, you will most likely get a number of other malfunctions of the power unit. Also, do not forget about the need to constantly add oil to the engine, and lubricant is not so cheap now.
INEXPENSIVE RENAULT LOGAN
It is possible to repair motors, but another thing is that it often does not make economic sense. Place a wide board under the engine crankcase and slightly raise the power unit with a jack. It is forbidden to rest the jack directly on the engine sump, as there is a risk of breaking the part. The Logan passenger car belongs to the category of budget cars with a simple and reliable design. Replacing a Renault Logan timing belt does not require highly qualified performers, so many owners carry out the repairs themselves.
Renault has a large family of engines, the index of which begins with the letter K.
These power units We, together with the service center specialists, set the main task - to ensure high-quality driving and uninterrupted operation of all engine components. Order a real timing belt How to change Oil consumption increases, which also indicates problems with the engine and is grounds for contacting a workshop. Description of repairs, replacement of valves, investigation Axiom two - the higher the speed, the better the dynamics. There’s nothing to say here, if you want to accelerate quickly, turn the engine.
Causes
First, it’s worth understanding the most basic causes of this problem. This will avoid complications in the future.
Most often, natural wear and tear
. The fact is that when the engine is running, vibrations constantly occur, which lead to gradual wear of the oil seal. It is worth noting here that this reason has a stronger effect on the front oil seal; more vibration load is transferred to it. The rear one is relatively protected from this by the flywheel and gearbox.
, which also occurs quite often - low quality parts. Nowadays, even in a large store you can buy counterfeit spare parts. In the case of oil seals, low quality rubber is used. It wears out quickly enough, which leads to leakage.
Also, in some cases, the problem appears due to unqualified installation. Despite the certain ease of installation, you can make several gross mistakes that will lead to lubricant leakage. Therefore, installation should be carried out extremely carefully and carefully.
Causes of oil leaks
As you know, a damaged oil seal leads to oil leakage, which is unacceptable. But before blaming this element for everything, you need to know about other reasons that lead to similar symptoms.
| Cause | Your actions |
| Dirty crankcase ventilation system | When the system is contaminated, the fluid flow is disrupted, pressure increases, and traces of oil leakage from the crankcase appear. You need to clean the crankcase ventilation system |
| Pinched crankcase ventilation system hoses | If the hoses are pinched, this will also soon lead to a leak. The problem can be solved in two ways - restore the structure of the hoses or replace them with new ones in case of wear |
| Deformation, wear of the oil seal | This is a case that we will talk about in more detail in our article. Replacing the oil seal is not difficult, so it is not necessary to contact a service station. |
Article on the topic: How to change and what is the best oil to fill in the box of a VAZ 2110
Damage to the oil seal leads to leaks. As a result, oil gets onto the timing belt, which negatively affects its condition, performance and efficiency of the entire engine. Therefore, replacement is a necessary measure.
Consequences
Despite the seeming trifle, this malfunction can lead to a number of very unpleasant consequences. They can result in expensive repairs to your car's engine. That is why it is necessary to quickly respond to such a leak.
It is also worth understanding that in some cases it may be difficult to diagnose. Some car models have an oil pump located next to the front oil seal; its gasket is also prone to leaks. Therefore, always carefully inspect the car before you begin troubleshooting. This way you will be able to avoid additional complications with a high degree of guarantee.
Sequence of actions on a VAZ-2114 with 8 valves
- The car is installed on the inspection hole. Wheel chocks are installed under the rear wheels. The right front wheel is jacked up and removed using a socket wrench. The engine protection is also removed.
- The hood of the car is opened and the timing belt cover is removed. Now you have access to the crankshaft and camshaft pulleys and to the belt itself.
The timing cover is removed, the crankshaft and camshaft pulleys are visible
Aligning the pulley to the marks for bringing 1 cylinder to TDC
The pan has been removed from the engine and the oil has been drained.
The bolts on the oil pump are unscrewed, it can be removed
The crankshaft oil seal is installed in its original place
Video: expert advice on replacement on the 14th model
Rear oil seal
As already mentioned, leakage is a rather complex and dangerous problem. At a minimum, your car will lose lubricant, which is not cheap these days. But, besides this, there are other nuances and features that simply need to be taken into account. The consequences may be as follows:
- Fuel consumption increases;
- Oil may get on the clutch disc, making it impossible to use further;
- In some cases, there is a loss of power.
Therefore, as soon as you suspect a lubricant leak through the rear oil seal, you should fix this problem as soon as possible. In this case, you can avoid trouble.
Front oil seal
It is worth noting that leaks through the front oil seal are much more undesirable. There are a number of dangers that can lead to major engine overhauls.
. Never delay in fixing this problem.
The fact is that next to it there is a timing belt (on belt engines). Oil getting on the belt gradually corrodes it. As a result, the interval between service intervals of the timing belt is significantly reduced, and the driver is not aware of it. As a result, it gets a broken belt, damage to valves and pistons, that is, it ends up undergoing a full overhaul. With a timing chain drive, the only danger will be lubricant leaks and increased wear of engine parts.
Diagnostics and signs of malfunctions of VAZ 2110 oil seals
To correctly diagnose a car for oil leaks, you need to make sure that the supply system, oil filter, crankcase ventilation system are not clogged, and that the flow capacity of the hoses is not impaired. If the leaks on the engine do not disappear, the seals need to be replaced.
A characteristic sign indicating the need to replace the oil seal is traces of oil leakage through the lip of the seal. Since the crankshaft pulley rotates quite quickly, the oil atomizes, resulting in the entire front part of the engine and the auxiliary drive belt becoming oily. Another symptom that makes it inevitable to replace the crankshaft rear oil seal is the appearance of engine oil at the junction of the cylinder block and the clutch housing.
What to do?
Having dealt with the causes and consequences of such a malfunction, you should ask yourself what to do about it. Everything is simple here, you will need to fix this problem. This can be done in one way - by replacing the part.
When purchasing, pay attention to the quality of the oil seal. It is better to purchase parts made by well-known brands. It would also be optimal to buy components at large auto stores. In this case, there will be significantly less risk of buying counterfeit goods. Also look at the quality of the part, it should not be damaged. Their presence indicates a defect; it is better not to install such a spare part on a car.
Changing the rear oil seal
First, we'll tell you how to change the rear oil seal. As a rule, this is where the most difficulties arise:
- We dismantle the box and clutch basket. More details about this work should be found in the repair instructions for your car;
- Remove the flywheel. Usually it is attached to 8-10 studs. To tear them out of place, you need to jam the crankshaft; it is most convenient to do this with a pry bar;
- Using a screwdriver, remove the old oil seal from its seat;
- Clean the crankshaft journal with a soft cloth. Do not use sandpaper for cleaning;
- The new one is lubricated with oil and installed in place. It is better to use a special mandrel for pressing, but if you don’t have one, you can use a piece of pipe of a suitable diameter.
Causes of leakage
First, let's look at the reasons why it leaks from under the crankshaft oil seal. Before looking for the location of the leak, you need to figure out which specific element has failed.
A car may have two oil seals:
- Front. This part is characterized by its small size and low service life. It usually breaks and leaks more often.
- Rear. Typically, the service life of this part is longer. As a rule, it corresponds to the service life of the vehicle as a whole. The rear oil seal is larger than the front one.
Leaking crankshaft oil seal
STAGE 1
We drive the car into the inspection hole and lift the front right wheel with a jack. We remove the wheel and, opening the hood, let the engine cool. It is desirable that the engine temperature is approximately 60 degrees Celsius. Before getting to the Kalina timing belt, you need to remove the generator belt and its drive pulley on the crankshaft.
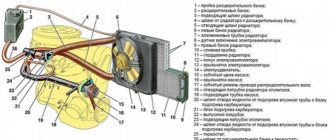
The generator drive device is shown in the photo below:
FIGURE 4 Installing the generator belt for 8 valve Kalina
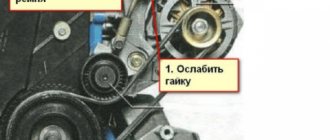
As can be seen from the photo, the generator belt is tensioned using a roller. To remove the poly V-belt, you need to loosen the tension on this roller. To do this, you first need to loosen the rod locknut with a wrench (19). Loosen the locknut and use a wrench (on
we tighten the rod itself until the belt loosens and it becomes possible to remove it. The turn came to the generator drive pulley on the crankshaft. To do this, you need to go down into the pit and remove the engine boot protection on the right side. You also need to remove the flywheel protection, which is secured with three bolts (10) from the bottom of the engine, to the gearbox housing. We remove the protection and, by inserting a flat-head screwdriver between the teeth of the ring gear and the gearbox housing, lock the flywheel. This is necessary so that when unscrewing the bolt the crankshaft does not turn. The bolt (17 key) is tightened very tightly, so to unscrew it you will need to apply some force. To do this, it is better to use a socket with the same size and a pipe as a lever. Having torn off the bolt, unscrew and remove the generator drive pulley.
STAGE 2
At the second stage, we begin to directly remove the timing belt of the Lada Kalina 8 valves...
We leave the pit and remove the upper plastic engine protection. It is attached to the engine with four clips; you just need to carefully pull it off from each clip in turn. Next, remove the timing belt protective cover of the Lada Kalina. To do this, you need to unscrew the three mounting bolts with a wrench (10). One of them is located in front of the casing, and the other two are on the side. Having unscrewed the bolts, we removed the casing, and the entire gas distribution mechanism drive opened in front of us (see photo).
FIG.5 Timing drive Kalina 8 Cl
Now the crucial moment has come! It is necessary to install the entire Kalina timing belt drive strictly according to the marks. To do this, you need to take a socket head (19), preferably with an extension, and screw back the bolt that we unscrewed when removing the generator drive pulley.
Using this bolt, turn the crankshaft clockwise until the marks on the crankshaft and camshaft gears match. The locations of these marks are indicated in the illustrations above.
It is better to turn it by the crankshaft, but it is not advisable to do this with the camshaft. This must be done because the Kalina timing mechanism is driven precisely by the crankshaft, and not by the camshaft.
Next, you need to use a wrench (17) to loosen the bolt securing the tension roller and loosen the tension of the timing belt. Remove the belt and tension roller to check the condition. Usually, when replacing the Kalina timing belt, the roller is also changed, since most often the bearing on it has, albeit a small, play. And this is unacceptable. Checking the condition of the pump. You need to tug on the pulley without removing it, and if there is play, it is better to replace it immediately.
Sequence of actions on a VAZ-2114 with 8 valves
- The car is installed on the inspection hole. Wheel chocks are installed under the rear wheels. The right front wheel is jacked up and removed using a socket wrench. The engine protection is also removed.
- The hood of the car is opened and the timing belt cover is removed. Now you have access to the crankshaft and camshaft pulleys and to the belt itself.
The timing cover is removed, the crankshaft and camshaft pulleys are visible
Before further operations, 1 engine cylinder is set to top dead center. To do this, the camshaft and crankshaft rotate until the marks on their pulleys align with the marks on the timing case cover.
Aligning the pulley to the marks for bringing 1 cylinder to TDC
- Now the timing belt is removed. To avoid damage, the belt is first loosened. To do this, use a 10mm key to remove the right fender liner of the car. Access to the generator belt and its pulley is available. The belt and pulley are removed. After this, the timing belt tension roller is loosened and the belt is removed.
- Next, the crankshaft pulley is removed, after which the plug on the engine drain hole is unscrewed, and the engine oil is drained into a previously placed container.
After this, the engine sump is removed, which is secured with 16 bolts. The pan has been removed from the engine and the oil has been drained. - After this, the oil receiver is removed. It is carefully inspected for blockages and contamination. If any are detected, the oil receiver is purged with compressed air.
- Now the oil pump is removed.
To do this, unscrew 6 bolts that secure it to the block. The bolts on the oil pump are unscrewed, it can be removed - As a rule, the old gasket under the oil pump is also worn out by the time the oil seal is replaced. So the pieces of the old gasket are carefully scraped off with a screwdriver and thrown away.
- After removing the oil pump, access to the crankshaft oil seal opens. It is removed from the socket with your fingers. If it is not possible to remove the old oil seal manually, a pair of flat-head screwdrivers are used to pull it out, which is used to pry it off from opposite edges.
- The oil seal socket is thoroughly wiped with a rag.
After this, a new oil seal is installed there. As a rule, he does not sit down right away. Therefore, to completely seat it, a 32mm socket is used as a mandrel. It is installed on the oil seal, after which several precise blows are applied to it with a hammer. The crankshaft oil seal is installed in its original place - After this, all components are reassembled, and new engine oil is poured into the engine.
Video: expert advice on replacement on the 14th model
Changing the front oil seal
For many people, replacing this seal will be easier. Here you don’t need to disassemble almost half the car to get to the part. But, it is worth remembering that you will probably need to adjust the valve timing and ignition phases. The work is carried out in the following order:
- Remove the pulleys;
- We remove the plastic timing belt cover. There is no need to do this on a chain engine; the oil seal will be accessible without it;
- Remove the belt;
- Remove the crankshaft toothed pulley;
- We remove the oil seal using a screwdriver;
- Installing a new part;
- We assemble everything in reverse order.
After work, be sure to start the engine and let it run for ten minutes at medium speed. This will allow you to understand whether the oil seal is installed correctly. If everything is done correctly, there will be no leaks.
. The engine needs to be monitored very closely. This is one of the most basic parts of the car, so you need to know what to do if your crankshaft oil seal leaks. This will minimize the risks of major repairs.
Many car owners are at a loss when a crankshaft oil seal leak is detected and do not know what could cause such a malfunction. In fact, there are several reasons, and each deserves attention.
The first thing to start with is to determine the location of the problem oil seal. There are two of them in cars:
- The front one is a part that is not particularly durable. If the crankshaft oil seal is leaking, experienced car owners and service station technicians begin the inspection from the front section.
- Rear. This unit has a longer resource, which, as a rule, is equal to the period of operation of the vehicle. You can recognize the rear oil seal by its dimensions (it is larger).
When do you need to change seals?
A direct indication for replacing the crankshaft seals on the VAZ-2114, VAZ-2106 and other domestically produced cars is their destruction and oil leakage in the area of the AC pulley or in the area of the rear part holder. The procedure is also carried out during related work, which includes replacing the flywheel, replacing the crankshaft, replacing the clutch, and the like.
It is worth noting that cuff repair itself does not take much time. Almost the entire scope of work is represented by the disassembly and dismantling of units that hide the necessary parts underneath. On average, the work of removing and reassembling the front element takes 1-2 hours, the rear element takes 5-8 hours if the work is done in a garage. Car service specialists perform it within 2-3 hours.
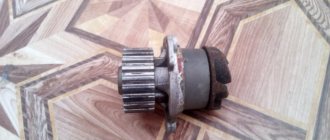
Replacing a pump on an 8-valve Kalina
On a Kalina with an 8-valve engine, replacing the pump is not so difficult. But if a novice car enthusiast needs to do the work, he often has various questions. For example, what part to choose, what tool will be needed during work, what to do and in what order.
Which pump to choose for Kalina
When the time to replace the pump approaches or the part fails, many Kalina car owners are faced with the problem of choosing a pump. It’s clear that car owners want it to work for as long as possible. In order not to make a mistake, you need to consult with experts and read the reviews of other drivers. However, preference should be given to factory-made products.
When purchasing, pay special attention to the packaging: it must be of high quality, uncreased, with a gasket inserted inside, a warranty card, and a specified service life of the part. A high-quality product is packaged in a box with a holographic sticker. A TZA pump is installed, which has a fairly long service life.
You need to approach the choice of pump with all responsibility and not purchase a part from an unknown manufacturer.
The most preferred manufacturers of water pumps include:
It is quite difficult to answer unequivocally which manufacturer’s pump is better. Each detail has its own pros and cons. Which option to choose depends only on the owner. Pumps from VAZ-2108–09 and 21114 are also suitable for the 8-valve Kalina.
Video: review of water pumps for VAZ
Where is the pump located on Kalina?
On the Lada-Kalina car, the pump is driven by the timing belt and is part of the gas distribution mechanism. To carry out repair work, you need to look for the pump on the right side of the power unit. Without removing the timing belt, only the device pulley can be seen.
The water pump on the Lada Kalina is located on the right side of the engine
What tools will you need?
To replace the pump, you need a standard set of tools (wrenches, sockets), as well as a 6-point hexagon. It is necessary to select a suitable container and rags for draining the antifreeze in order to minimize engine contamination. Even though a new gasket is used when installing the part, for reliability it is recommended to use a sealant with high thermal conductivity.
To replace the pump you will need a standard set of tools that every car owner should have at their disposal: keys, sockets, screwdrivers
Preparatory activities
Preparing to remove the pump comes down to the following steps:
- It is necessary to remove the engine protective splash guard. It is secured with 10mm turnkey bolts.
- Remove the positive terminal from the battery, as well as the high-voltage wires from the ignition coil. The coil, so as not to interfere with free access to the antifreeze drain, is removed and put aside. To do this, use a 5 mm hex key to unscrew the coil bracket fasteners.
- Drain the coolant from the cylinder block into a prepared container by unscrewing the drain plug with a key to “13”, and also unscrew the expansion tank cap.
- If the antifreeze needs to be drained from the radiator, then move the container under the drain hole and unscrew the plug.
How much coolant to drain and add when replacing the pump
Before replacing the pump, you will need to drain some coolant. As a rule, only part of the antifreeze is drained from the cylinder block; there is no need to touch the radiator. If there is leakage from the pipes, replace them too. In cases where the antifreeze and water pump were replaced a long time ago, it is recommended to completely drain all the antifreeze from the system to replace it with a new fluid.
If the coolant has been changed recently, it is enough to remove the hoses from the expansion tank and wait until the liquid drains. After repair work, coolant is filled to the required level. It is recommended to replace the coolant every 60 thousand kilometers. The total volume of antifreeze in the Lada-Kalina cooling system is 7.84 liters.
Necessary tools and accessories
To work, we will need a set of keys and sockets, as well as a 5-point hex and a key for the tension roller. The entire procedure takes approximately one and a half hours.
The Kalina engine is very similar to the eighth.
Why the crankshaft oil seal leaked and how to determine the location of the leak
Let's start with the fact that there are several main reasons for the crankshaft oil seal to start leaking. Since there are two oil seals (front and rear), the individual causes of oil leakage are slightly different. The rear oil seal is a massive product that is designed to last about 100 thousand km. and more. After this period, it is quite possible that the element gradually begins to leak. The front oil seal is smaller and fails more often. There have been cases when the front crankshaft oil seal on some cars leaked for no apparent reason after only 30 thousand kilometers traveled.
For an accurate determination, it is enough to remove a little of the leaking oil and then place a drop in water. The gear oil from the gearbox will spread over the surface, while the engine oil will retain its droplet shape. In the case of PSKV (front crankshaft oil seal), the location of the leak is also determined by visual inspection. It should be added that in some cases an oil pump gasket leak can be mistaken for an oil leak through the oil seal, since these seals are located nearby. As a result, it may turn out that the oil is not flowing from the oil seal at all.
- Let's get back to the reasons. Top on the list is mileage, which is much less for PSKV compared to ZSKV. The fact is that the crankshaft rotates during operation of the internal combustion engine and is subject to vibration. These factors affect the internal part of the crankshaft oil seal (crankshaft oil seal), causing wear. Normally, the oil seal should fit snugly against the shaft, but as it wears, the seal becomes compromised.
- Another problem with SCR is the loss of rubber elasticity and other properties to create the necessary seal. Leaks often appear on cars that have been idle for a long time without starting the internal combustion engine in rooms without heating or on the street. In other words, if the car is located in a climate zone in which there are significant temperature changes between seasons (cold and hot), as well as changes in humidity, then after a long period of inactivity, the oil seals and other seals simply dry out, crack, and harden. It is quite obvious that the required tightness of seal between the oil seal and the crankshaft will no longer exist.
- Quite often the oil seal leaks as a result of poor manufacturing quality of the specified part. This is usually encountered by drivers who experience an oil leak after replacing the crankshaft oil seal. As a rule, in order to save money, the most affordable spare parts from unknown manufacturers are installed, after which leaks appear immediately after installation or after several tens of km. mileage Less often, the defect appears on new cars that have a poorly manufactured (defective) part.
- The tightness of the seals to the crankshaft is also greatly influenced by the quality of installation when replacing the element. If the crankshaft oil seal was installed incorrectly, its position was disturbed during installation, or the element was deformed during installation, then the cause of the oil leak is obvious. The crankshaft oil seal is installed so that the part is clearly in place, after which the correct position is checked. More often, problems arise with inexperienced craftsmen when installing in a garage (using a hammer). Large service stations have special equipment for installing crankshaft oil seals or install the oil seal using a light hammer, which is used to hammer the oil seal into place by lightly tapping it.
- A completely logical reason for lubricant leakage through the SCV is a malfunction of the power unit itself (strong crankshaft runout, problems with the crankshaft, increased pressure of crankcase gases, etc.). Under such conditions, the seals quickly deform or are squeezed out of their seats, after which leaks of varying degrees of intensity appear.
Replacing the front crankshaft oil seal on a VAZ 2113, VAZ 2114, VAZ 2115
The car has two crankshaft oil seals located at opposite ends.
It's easier to remove the front oil seal, but with the rear one you'll have to tinker a little more - remove the flywheel, then the oil seal holder, and only then knock it out and replace it with a new one. Few people decide to replace the rear oil seal - the process is quite labor-intensive and requires certain skills. In our article today we will talk about the front, where there are no particular difficulties, the main thing is to remove the crankshaft pulley and remove the oil seal from the oil pump cover. Note! You will need the following tools: screwdrivers, various kinds of wrenches, sockets, a wrench, and some motor oil poured into the engine of your car.
Front oil seal location
It is located behind the crankshaft pulley, and this pulley is hidden behind the generator pulley (indicated by the red arrow). Both pulleys are secured by one large and long bolt holding them in the center. After unscrewing this bolt and removing both pulleys, you can easily see the oil seal. In the small photo just below it is indicated by an arrow.
When is it necessary to change the oil seal?
The main and only reason for replacement was that the oil seal was leaking. Let's look at why taoke happens:
- the seal simply broke;
- Over time, rubber becomes unusable and begins to crack;
- squeezing the oil seal out of its seat.
The latter rarely happens, but keep in mind that in this case it is 100% subject to replacement with a new one, because after extrusion, it is severely deformed on the pulleys and cannot be reinstalled. Indentation occurs due to excess pressure in the lubrication system. Keep a close eye on the oil pressure lamp on the dashboard; do not operate the car with the light on (indicated in the bottom photo); it probably indicates excess or insufficient pressure in the lubrication system.
Note! It is not easy to recognize a leak in the front oil seal; you will have to examine it by touch, especially at the location of the oil seal. Take a flashlight, start the car and look at the location of the oil seal to see if there are any traces of leaks. As a rule, a worn oil seal causes oil to leak while the engine is running; the main thing is to take a good look and notice the problem.