Experienced owners of VAZ 2101-07 cars know that costly repairs or complete replacement of the engine can only be avoided if all mechanisms are carefully taken care of.
The VAZ 2101 oil seal is an inexpensive, but very important part. It is not only used to seal joints, but also prevents the leakage of working fluid. If you install a low-quality reinforced cuff or do not change it in time, the element will leak. Often car owners do not notice this, so there is a risk of failure of the unit where this oil seal is installed.
It is always cheaper to buy a new seal on time than to repair or completely replace a specific unit later. Our company builds trusting relationships with clients. It is in our interests to provide the client with a suitable rubber product, which will be distinguished not only by its suitable size, but also by the high quality of the material.
Front crankshaft oil seal VAZ 2109 dimensions
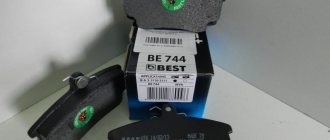
The front crankshaft and camshaft oil seal 28x42x7 mm is used on VAZ 2108, 2109, 2110-2112, 2113, 2114, 2115, LADA 2170 Priora, LADA 1118 Kalina cars.
Installation diagram of the crankshaft oil seal, camshaft VAZ (size 28x42x7)
We hope that you will positively evaluate cooperation with us and become our regular customer!
View VAZ spare parts by catalog groups
This product is found by search: VAZ oil seal | crankshaft oil seal VAZ | oil seal 28x42x7 | camshaft oil seal VAZ | oil seal VAZ 2108 | oil seal VAZ 2109.
Greetings to all readers on the RtiIvaz.ru blog. The page shows photographs of crankshaft oil seals as a set for the gearbox of a family of classic rear-wheel drive cars, as well as gearboxes of front-wheel drive eights and a dozen VAZs. The cuff of the rear gearbox, also called the rear axle, is installed in rear-wheel drive “Classic” cars.
In fact, there are many of them different in shape, size, and purpose. Some hold oil, antifreeze or antifreeze, others hold air, water pressure, all are designed to protect car parts from dirt, dust and other factors.
For example, the crankshaft seal and the camshaft keep oil from flowing between the joints of the camshaft journal and the seat of the engine block. The same role is played by the cuffs of the gearbox, gearbox, and axle shaft. The hub is protected from dirty water and dust from leaking antifreeze or antifreeze into the pump.
You can list the role of the purpose of car oil seals, I will only say one thing without them in our age of mechanical engineering. Someday they may disappear in a car, but this is already on the verge of fantasy when the car becomes something like a flying saucer “UFO”. In the meantime, we will think about these photo seals and where to use them.
Let's look at a photo of crankshaft cuffs for VAZ 2108 car engines; 2109; 2113; 2114; 2115; 2110; 2111; 2112; 2170; 1118 and 1111 "Oka".
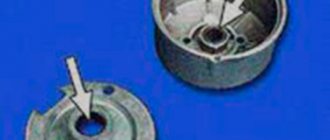
The set includes three seals, two small and one large. Of the small ones, one goes to the front camshaft cover, the other small one goes to the front crankshaft of VAZ 2108 cars; 2109; 2113; 2114; 2115; 2112; 2115; 2170; 1118 and 1111 "Oka". The large rear one is located in the engine crankshaft on the clutch side.
- 2108-1005034 size: 28x42x7 2 pieces (front small ones numbered 2 and 3).
- 2108-1005160 size: 80x100x10 1 piece (large rear one under number 1).
That's all about the rubber cuffs (RTI) of the VAZ 2108 car engine.
Next photo is the crankshaft oil seals for Lada 2101-2107:
Let's look at a photo of crankshaft cuffs for VAZ 2101-2107 car engines.
The set includes two seals, one small and one large. The small one from the front engine cover is large from the rear one.
- 2101-1005034-02 size 40x56x7.5 1 piece (front small number 2).
- 2101-1005160-02 size: 70x90x10 1 piece (rear large number 3).
That's all about the VAZ-2101-2107 engine oil seals.
Next is a photo of the gearbox cuff for Lada 2101-2107:
Diagnostics
Reasons for failure of crankshaft oil seals
Since oil drips are the first and main sign of wear on the crankshaft seals, they also tell us that the tightness of the engine lubrication system is compromised. Therefore, at the beginning of troubleshooting, we will have to make sure that it is the sealing collars that are causing the oil leak:
- First, we check the oil level in the engine (there is no need to rely entirely on sensors), top up if necessary and check every day until we find out the cause of the leaks;
- We check the crankcase ventilation system in the engine (clogged ventilation contributes to the accumulation of crankcase gases which, in turn, push oil through the sealing cuffs);
- Check the oil pipe hoses for kinks;
- We check the pressure in the lubrication system.
As a rule, replacing the crankshaft oil seal on a VAZ 2109 is a rather labor-intensive procedure, however, it can be done with your own hands. Therefore, before replacing the crankshaft oil seal of the VAZ 2109, we need to know the reasons why it fails in order to delay this unpleasant moment as long as possible. There are several reasons for the destruction of oil seals:
- First of all, this is, of course, its natural wear and aging (coarsening) of rubber;
- Due to improper installation and, as a rule, internal stresses, cracks appear on the working surface of the cuff;
- Mechanical damage;
- Poor quality tires (fake).
Advice! When purchasing new oil seals, check their working surface, namely the edge, for its sharpness - the sharper it is, the longer the seal will work. In this case, the edge should be smooth and elastic.
Replacing crankshaft oil seals on a VAZ 2109
It should be noted that most often the front radial crankshaft cuff is the first to fail, since it is more exposed to the external environment (dust, sand, dirt) and vibration loads from the car engine. And although the rear oil seal is in more favorable conditions, it is advisable to change the oil seals as a set, since their working life is almost the same.
Signs of wear of the crankshaft seals and its consequences
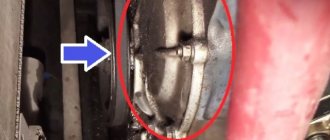
Replacing the front crankshaft oil seal of a VAZ 2109 is relevant if oil leaks appear on the front cover of the engine block, in the area of the crankshaft pulley, which become more and more progressive as the “disease” develops. Since it is practically impossible to see the beginning of wear of the rear oil seal, replacing the rear crankshaft oil seal on a VAZ 2109 takes place if, when the car is moving, clutch slipping is observed, which is caused by the leaked oil spraying onto the clutch basket and onto its release plate as well. If you notice at least one of the listed signs on your car, then I would not advise you to delay the repair procedure, since the price of a new repair kit is not comparable to the cost of engine repair. What does the engine have to do with it, you ask? The thing is that leaks of lubricating fluids lead to their uneven distribution to the mating surfaces, which is fraught with possible oil starvation of individual engine parts. In the first category of risk of oil shortage is the engine crankshaft itself, which manifests itself in scuffing on its working surface.
Reasons for replacing the engine oil seal in a VAZ 2109
VAZ 2109 oil seals should be replaced every 45-55,000 km; they last less than in foreign cars, but they have about the same problems. The main reason for replacing the oil seal is time. So, over time, the components become loose and relax, which leads to oil leaks and, accordingly, to a loss of engine performance. Untimely replacement of the oil seal may be a consequence of the following causes of premature wear:
- Oil change not on time;
- Inaccurate repairs;
- Engine overheating, which is a common occurrence in the VAZ 2109.
The most common reasons for premature replacement of oil seals are untimely oil changes and overheating. The VAZ 2109 is a rather old car and all the components in it are and were manufactured according to rather old principles. The oil change in this car should be carried out not every 7500 km, but every 5000 km. This is due to some carelessness in the manufacture of parts, which entails rapid wear without new engine oil. Changing the oil so often is necessary in order to remove metal particles from the engine, which reduce performance and wear out the engine.
Overheating in the VAZ 2109 is common, this is due to the low power of the engines, from which the owners try to squeeze the maximum and even more. When overheated, the rubber (rubber) from which the inner part of the oil seal is made changes its structure and weakens, allowing oil to leak out.
Causes of crankshaft oil seal failure
Traces of oil drips are the main and main sign that indicates wear of the crankshaft oil seal. The presence of traces of oil indicates that the tightness of the engine lubrication system has been compromised.
Oil seals can be destroyed under the influence of several factors:
- Natural wear and tear, aging of the rubber used for the manufacture of crankshaft oil seals;
- Incorrect installation, which led to premature wear and loss of functionality. This usually happens during repairs at dubious service stations or when an inexperienced car owner does the replacement with his own hands;
- Mechanical damage to the element;
- Use of a defective, counterfeit oil seal.
The blame should not always be placed solely on the cuffs, which come in front and back. Before you suspect seals, make sure that other potential causes are not to blame.
Checking the condition of the crankshaft oil seal
By checking all elements of the lubrication system, you can make sure that the cause really lies in worn out, deformed oil seals. And then they can be replaced with new elements.
| Object to be checked | Peculiarities |
| Engine oil level | Oil can leave the system for various reasons, including the oil seal. Therefore, it is recommended to be patient and check the level every day, adding a little oil while actively maintaining it. The sensors do not always work correctly, so you need to make sure that there is no pressure violation yourself |
| Crankcase ventilation system | If the ventilation system is clogged, this will lead to active accumulation of crankcase gas. By creating pressure, it pushes the oil through the seals. In this case, simply replacing the cuff will not do anything, since it will be necessary to clean the ventilation |
| Oil hoses | They can bend, become deformed, or crack. As a result, oil comes out and the engine loses lubricant. |
| Lubrication system pressure | If the pressure increases, it causes oil to be pushed out through all sorts of passages. There are quite a few reasons for an increase in pressure, so check why exactly this indicator is increasing |
If problems are detected with the crankshaft seals, the only correct solution is to replace them.
Preparatory work
In order to start replacing the crankshaft oil seal, you need to collect the appropriate set of tools, including:
- Spanners of different solutions;
- Screwdrivers of different diameters;
- Rags;
- Bucket to drain engine oil;
- Hammer;
- The diameter of the mandrels coincides with the diameter of the oil seals.
Before starting the main work, you need to do the following:
- De-energize the car, or rather the engine compartment, separating the wires from the battery;
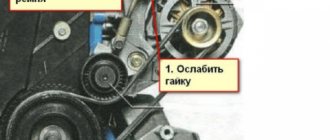
- After this, it is necessary to loosen the bolts that are attached to the generator compartment, then remove the belt; The field drains the oil into a bucket;
- The engine protective cover and oil pan are removed;
- The toothed belt driving the camshaft is dismantled.
Replacing the front crankshaft oil seal VAZ 2109
Replacing the front crankshaft oil seal on a VAZ 2109 is faster than in foreign cars. So, after the preparatory work, you can begin the main work. It is worth noting that the main work lasts 4-5 hours, depending on the dexterity of the person who carries it out. So, after preparation, you should perform the following steps:
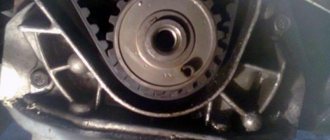
- The pulley is removed from the crankshaft;
- Using two flat-head screwdrivers, you need to pull the pulley off the camshaft;
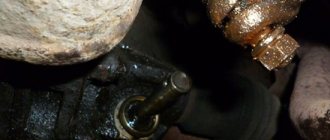
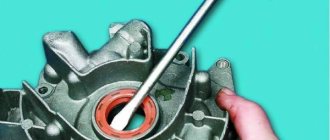
- After the above procedures, you need to remove the key, but only if it does not hold well (indicated by an arrow in the photo).
Next you need to remove the oil receiver: unscrew the bolts attached to the oil receiver cover and the fixing bolt connecting the oil receiver and the pump, after which the pump can be easily and quickly removed. The final step is to unscrew the 6 bolts, after which you can pry up the housing and pull out the pump.
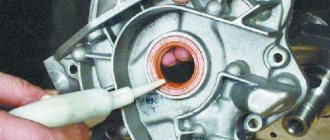
After this, you need to pry off the old oil seal, pull it out, clean the place where it is fixed with gasoline and install a new oil seal. The new oil seal must be lubricated with oil and installed in place of the old oil seal. The place also needs to be lubricated with oil. The working edge of the oil seal should point inward. Next, you need to correctly install the pump and all other elements. If installed incorrectly, you can damage the components of the car and cost a pretty penny.
How to replace the front cuff
Regardless of whether your VAZ-2109 has a carburetor or is driven by an injector, the work of replacing oil seals follows the same principle. The front oil seal wears out the fastest. It is easier to change, since it does not require dismantling the clutch system.
To carry out the work you will need to have on hand:
- standard sets of keys and screwdrivers;
- clean container;
- rags.
Since the work is carried out on the engine, disconnect it from the power system - remove the negative terminal from the battery. If you are not confident in your abilities, watch the video instructions in advance.
After such preliminary preparation, you can begin work on replacing the front oil seal:
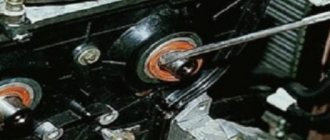
- Loosen the generator mounting bolts.
- Remove the belt drive.
- Drain the engine oil into a prepared container.
- Remove the protective casing from the power unit.
- Remove the oil pan.
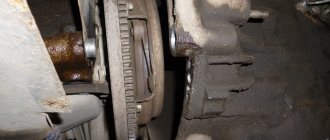
- Gently and carefully remove the belt from the camshaft. Make sure that the crankshaft or camshaft does not rotate while removing the belt. Otherwise, the pistons will hit the valves and deform them. This will result in the need to install new valves.
- Using two screwdrivers, remove the crankshaft pulley.
- Remove the key.
- Find the 2 oil pickup bolts, unscrew them and remove this unit.
- The oil pump is held in place by 6 bolts, remove them before removing this unit.
- Use a flathead screwdriver to remove the old seal from the crankshaft. It is important that it has a fairly impressive size and is made of durable metal. Otherwise, the blade of the screwdriver may break off while performing this procedure. Remember that work with the shafts must be carried out carefully, avoiding rotation.
Clean the oil seal location and lubricate it.- Place the cuff, tucking its working part inward.
- Crimping is carried out using a frame of the required diameter.
- Wash the oil pump cover with gasoline and return it to its place.
- Starting with the oil pump, reassemble the mechanism in reverse order.
The final stage is the return of oil to the mechanism. If it is dark enough, then it is best to replace the lubricant with a new one. If you don't have time to do a complete disassembly, you can do without cleaning the oil pump cover. However, it is better to spend time servicing it, so as not to disassemble these units again later. The same can be said about preventative oil changes. If you pour a new compound into the power unit during repairs, the performance of the car will only improve.
Replacing the rear crankshaft oil seal of a VAZ 2109
Replacing the rear oil seal on a VAZ 2109 is a more complicated procedure, but doable. The main condition is not haste, but thoughtfulness in all replacement decisions. The processes for preparing for replacement are still the same; for the replacement process you need to perform the following manipulations:
- Remove the flywheel and rear shield of the clutch housing;
- Remove the clutch; this must be done extremely carefully and delicately, so as not to disturb the structure of the mechanisms;
- Next, you should dismantle the gearbox;
- Using a socket wrench, you need to unscrew all the oil seal mounting bolts from the back (you need to place the holder on the surface and use a mandrel and a hammer to knock out the oil seal);
- The holder should be wiped clean of dirt and checked for chips, cracks or worn areas;
- Next, you need to take a new oil seal and install it in the holder, after cleaning it dry, and then treat it with engine oil.
It is possible to make replacements according to this instruction only if it is used as an addition to the knowledge acquired earlier; it is not worth using it for the first replacement process, since many explanatory points are missed in the details. In general, for a high-quality replacement of the oil seal, you should contact a service station, where in a few minutes all oil seals will be replaced.
Source