In this article we will talk about such an unpleasant phenomenon as oil leakage from the gearbox due to a failed gearbox rod seal. Replacing the VAZ 2108-2109 gearbox seal can be done in two ways; in the first case, it is necessary to dismantle the box, in the second, the replacement is carried out directly on the car.
Today I will tell you how to replace the stem box seal without removing the gearbox. Perhaps the first option is more suitable for someone, but in my opinion there is no point in removing the box if everything can be done without removing it. In addition, the method that I will tell you about today is faster and simpler.
Self-diagnosis.
Signs indicating the need to replace the gearbox seal are most often oil traces that remain on the asphalt after the car has been parked for a long time. Before replacing the gearbox seal, you should make sure that this is the problem, since oil leaks are often caused by a poorly tightened oil filter. The danger of untimely detection of a problem associated with the oil seal and oil leakage is fraught with serious problems; if the oil leaves the box, and you do not detect this in time, then instead of replacing the box seal, you will have to change the box. To prevent this, it is necessary to regularly check the oil and constantly monitor its level both in the gearbox and in the engine. A faulty oil seal can make itself known by a characteristic crunch that occurs when switching certain speeds.
Causes of clutch oiling
The reason for oily clutch is a leak of the crankshaft rear oil seal or the gearbox input shaft oil seal. Transmission and engine oils have different smells. Therefore, an experienced car enthusiast can recognize by the smell of oil which of the seals has failed and requires replacement. In this case, you will have to remove the gearbox from the car.
Replacing the input shaft oil seal
- To remove the box, remove the CV joints as described above.
- Instead of one of the CV joints, we insert an old one or a special plug to prevent the differential from falling apart.
- We unscrew the fastening bolts (there are three of them) and remove the clutch housing shield.
- Loosen the bolts and nuts securing the clutch housing to the block.
- We place suitable wooden blocks located in the area of the strut supports on the wing flanges and install a cross beam on them to hang the engine.
Warning: The beam rests solely on the wing flanges! Otherwise, you risk denting the body.
- We attach the engine to the beam using a long bolt with a hook.
- A strong rope or wire is also suitable for this.
We hook the engine by the eye to the beam. The beam rests only on the wing flanges
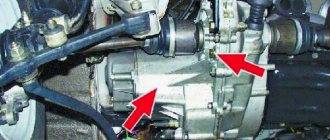
- Unscrew the two nuts securing the rear engine mount to the body.
- Unscrew the nut and take out the left support bolt.
- Unscrew the three nuts securing the left engine mount to the gearbox and remove the mount.
Unscrew the three nuts securing the left support to the gearbox
- We finally unscrew the bolts (three pieces) and the nut (on the back of the gearbox).
- When removing the gearbox from a VAZ 2109, we first move it horizontally away from the engine to remove the input shaft from the clutch discs.
- Be careful not to damage the clutch spring petals.
- Remove the clutch release bearing.
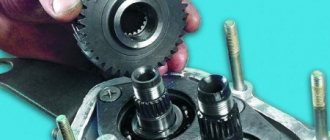
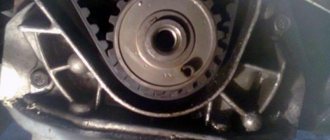
- We unscrew the three bolts securing the guide bushing (there are spring washers under the bolts).
- Remove the guide sleeve.
We unscrew the bolts that secure the guide sleeve. After removing the bushing we take out the oil seal
- Using a suitable wire hook, remove the oil seal from the gearbox.
- We press in a new one using a mandrel of suitable diameter.
- The working edge is directed inside the gearbox.
Tip: Before installing the gearbox on a VAZ 2109, it is recommended to lubricate the outside surface of the guide bushing and splines of the input shaft, as well as the release bearing, with grease. Align the clutch driven disc using a special drift (an old input shaft with good splines will do)
- We install a gearbox on the car.
- Before attaching the front wheel drives, we replace the retaining rings at the ends of the inner CV joints.
- Otherwise, there is a possibility that the drives will jump out of the gearbox when the vehicle is moving.
- We finally tighten the nut that secures the brace to the lever on the loaded suspension while the car is already on the ground.
- Change the oil in the gearbox (see VAZ 2109 changing gearbox oil - do it right).
Replacing the VAZ 2108-2109 gearbox seal will require you to have the following tools:
- Keys for “10”, “13”;
- Awl;
- A slotted screwdriver in the shape of a crochet hook or something similar;
- Plastic stopper.
The work is carried out on a lift or inspection pit. If you don't have either, a cheap alternative is two spare tires laid flat. Take two stronger boards and drive out onto an impromptu hill.
Attention! When driving into a pit or any other device for repair, take care of your own safety - secure the car using wheel chocks and a handbrake.
Where is the gearbox seal located and what is it needed for?
In the VAZ 2109, the gearbox oil seal is located in the clutch housing. To get to it, you will have to disassemble the gearbox. The oil seal is designed to seal the gearbox housing by sealing the gaps between the stationary body of the gearbox and the rotating drive shaft.
The main indicator that indicates the necessary replacement of the gearbox seal is oil stains on the asphalt after the car has been parked for a long time. It should be understood that there are many reasons for the defect (for example, the oil filter is not screwed in completely). Symptoms of a faulty gearbox seal. A seal that is not replaced in time threatens oil leakage from the gearbox, which in turn cannot operate properly at a minimum oil level.
Tools required to replace the gearbox seal:
- a slotted screwdriver resembling a crochet hook;
- keys in sizes “10” and “13”;
- puller for removing ball joints;
- awl;
- mount;
- mandrel of the required size;
- empty canister for draining oil from the gearbox.
To replace the oil seal, place the car in an inspection hole or on
lift, secure the car with wheel chocks and place it on
How to replace the gearbox rod seal of a VAZ 2108-2109 - step-by-step instructions.
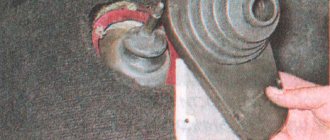
1. Get to the box stem; it is covered with a rubber boot. If the oil seal is faulty, then it will be very easy to find it by the characteristic oil stain, see photo.
2. Bend down the wide part of the boot; under it there is a cardan attached to the rod.
3. To gain access to the oil seal, you need to disconnect this universal joint from the rod and gear shift lever. To do this, use the key at “13”.
4. Unscrew the nut completely, this will loosen the connection between the cardan and the lever.
5. Remove the lever from the cardan, thereby engaging 1st or 3rd gear.
6. Disconnect the cardan from the rod using a key set to “10”; to do this, move the lever to the side.
7. Remove the cardan.
8. Next, remove the rubber boot, after which you will see the very reason for the repair - the gearbox rod oil seal. The oil seal is located in the recess - this is where the rod enters the box. It is impossible to remove the box seal without using a special tool, so take an awl and get to work. As an option, you can use a self-tapping screw, the principle is simple - you need to screw in the self-tapping screw and “uncork” the stem seal as if with a corkscrew.
9. Once the old rod seal is removed, you can begin replacement.
10. Before replacing the VAZ 2108-2109 oil seal, you need to thoroughly clean the seat from oil, sand and other dirt.
11. If everything is ready, press the new box seal into the seat.
12. Replacing the VAZ 2108 gearbox seal is easier using a plastic bottle cap. This is done as follows: the inner part of the plug is cut out and a new oil seal is installed through it. I, for example, managed without her; in short, it was the boss’s business.
13. After installing the new rod seal, begin assembly; it is done in the reverse order.
How to recognize a malfunction?
There are only two ways to diagnose a problem.
- The first is that an oil stain forms under the car after a long period of parking, which clearly indicates an oil leak from the gearbox . Unfortunately, many drivers blame this problem on poor tightening of the oil filter.
- The second method is a visual inspection of the checkpoint on an inspection pit or overpass. In the place where the oil seal is installed, you can see oil stains, which indicate that the oil seal needs to be replaced.
If you do not change this part in time, there is a possibility that the oil will completely come out of the gearbox, and then the entire mechanism will run dry. In this case, you will have to carry out a major overhaul of the gearbox or even replace it, which will cost much more. It is strongly recommended to immediately change the painful node after detecting a malfunction.
Important points!
Sometimes, after replacing the gearbox seal or similar work related to fastening the cardan and gearshift lever, the rocker in the cabin moves greatly, which in some cases makes it impossible to switch some speeds. The problem lies in the mounting screw at “13”, it connects the cardan and the gearshift lever. Few people know that this screw is not only a fastening screw, but also an adjustment screw, so upon completion of work, check the position of the lever and, if necessary, adjust its position. Only after this can you safely collect all the tools and go wash your hands.
After assembly, check the oil level, top up if necessary, then you can check the operation. Do a few laps and make sure nothing is leaking anywhere. That's all for today, I hope the article was useful to you. As you can see, replacing the gearbox seal is not difficult at all, so there is simply no point in overpaying for a service station.
Short-throw slides for "nine"
Such designs were developed exclusively for sports models, but are widely used in production ones. Advantages of the VAZ-2109 short-stroke rocker over the standard one:
- Easier gear shifting.
- The backlash of the gearshift lever is reduced, especially when using a cardan from Kalina.
- You need to either buy it or make it yourself.
- It takes a lot of force to change gears. Despite the smaller stroke, this type of backstage is more suitable for people who are not only strong in spirit.
But you don’t have to buy a VAZ-2109 rocker in stores; you can make a short-shifter from a regular one with little welding skills.
To do this, cut the old rocker in two places and weld pieces of a metal plate to lengthen the arms. The main thing is for the new drawstring to fit into place, so first carefully study the drawing, which shows the locations of the cuts.
The linkage is an important component of the VAZ 2109 gearbox. If it fails or does not work satisfactorily, the linkage can be easily replaced or repaired.
Appearance of the device
There are two types of scenes:
There is no fundamental difference between the two types of units. The advantage of a short-throw is that it provides faster gear changes for a fraction of a second.
Do not believe those who claim that a short walk has a positive effect on dynamics. There is no connection between the rocker and the dynamics of the car. But the short walk has its advantages.
Replacement kit
Pulling out the internal grenade from the gearbox. Video
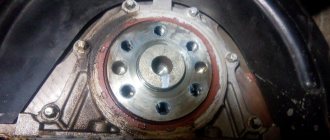
Therefore, it is better not to try to tear the grenade out of the box by pulling the brake disc, but to insert a prybar under the grenade and a tube under the prybar, try to squeeze the grenade out of the box if it was squeezed out perfectly. It happens that a grenade cannot be squeezed out, then it is knocked down with hammer blows.
Photo. Removed grenade from the gearbox.
But before squeezing out the grenade, place a container to collect the oil; it can be made from an old canister by cutting a hole. If the oil in the box is normal, then it will definitely flow out of the box.
Spare parts
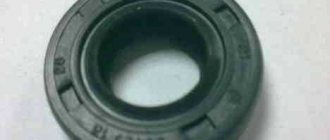
It’s a no-brainer that replacing the drive oil seal of a VAZ 2108, 2109 involves purchasing a new one, but here lies a little secret - the oil seals on the left and right sides differ from each other by oil-removal notches, which are marked on the inside of the oil seal. You ask - what is the use of them? The thing is that the oil seal holds oil inside the mechanism body not only due to the tight fit of its inner part to the rotating shaft, but also due to the effect of oil reflection from the oil seal created by these very notches. Therefore, the direction of these notches must coincide with the direction of rotation of the shaft. In order for the replacement of the drive seals of the VAZ 2108, 2109 to occur without any unpleasant surprises, the manufacturer marks the drive seals in three ways (indicated by arrows in the photo):
- Drawing arrows on the inside (on the right oil seal the arrow is directed to the left, on the left to the right);
- Numbers in the catalog number (the number of the right cuff ends with an even number, on the left with an odd number);
- In addition, the Balakovo manufacturer paints the drive cuffs in different colors: the right one is black, the left one is brown.
So, it’s time to move on to the most interesting part of this article, in which we will change the drive seals with our own hands. Although the price of the cuff is cheap, the services for replacing it are quite expensive.
- We drive our car into a pit (overpass), place wheel chocks under the rear wheels and drain the oil from the gearbox;
Advice! If you subsequently do not intend to change the oil in the gearbox, then it is not necessary to drain the entire volume; you can get by with one liter.
Advice! Since the tightening torque of the hub nut is quite significant, it must be removed before the car is jacked up and the front wheel is removed.
- We put the car on the stops and unscrew the two bolts of the ball joint securing it to the steering knuckle;
Unscrew the ball from the steering knuckle
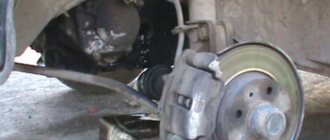
- Using a pry bar, we press out the lateral stability lever (by inserting it between the body and the lever), and pull out the drive from the wheel hub;
Removing the drive from the wheel hub
- Then, also using a pry bar, we pull out the inner CV joint from the gearbox, resting the mounting plane on the ebb in its body (at the same time, we kindly remember my advice about draining the oil);
Attention! With the drives removed, it is strictly forbidden to load the front suspension (install the car on the wheels and turn the steering wheel) as this can lead to damage to the wheel bearings.
Removing the drive oil seal
Short walker
Many people are still wondering whether it is worth changing their standard factory long-stroke linkage to a short-stroke one.
Make your decision purely on the basis of individual reflections and do not “be fooled” by statements regarding a significant increase in dynamics with the transition to a short-stroke.
The real difference between short-stroke and long-stroke is shown in the table.
Peculiarities
Draw your own conclusions from here - do you need such a drawstring or not. There is nothing complicated in terms of replacement. The only question is the purchase.
Source
What parts to choose for replacement
It is better to immediately change the boot along with the oil seal.
Before you begin repair work, you need to purchase the necessary parts for replacement.
As for the oil seal, Balakovo products are very popular. You need an oil seal with article number 2110–1701043 and 21100-1701043-00 .
Manufacturers offer two options for oil seals - simple and reinforced.
In addition, it is recommended to immediately purchase a cardan boot, as there is a high probability that it is also worn out. Even if this is not the case, it may break during the repair process. Therefore, it is better to spend a small amount on anther than to bother with disassembly again.
Recently, reinforced oil seals have appeared on sale, which are called that way. If you believe the assurances of sellers, their service life is significantly higher than that of standard products.