Front light fixtures are statistically the most fragile part of a car. If there is slight contact with third-party objects, a bumper or hood can be straightened, but the fragile glass of lighting fixtures cannot be repaired.
Also, unlike the mechanical parts responsible for the appearance of the car, light repairs cannot be postponed, so every car enthusiast faces the question of how to remove the headlight on a VAZ 2114. Firstly, the life of the driver at night depends on their serviceability, and secondly, the malfunction of lighting devices is a significant reason for a fine.
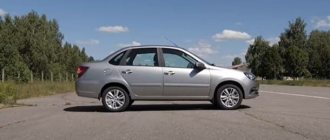
Replacing headlights for VAZ 2114
In addition to collisions, there are many everyday reasons that result in the replacement of a VAZ 2114 headlight, the most common being a poorly maintained road. Even the smallest pebbles that pass the “millstones” of the wheels of the car in front turn into “bullets”.
Moreover, the starting speed of some of them is quite comparable with real small arms. Therefore, let's figure out how to replace the entire optics, change the glass and what lighting devices to buy.
How to remove a headlight on a VAZ 2114, excluding accidental mistakes
Front light fixtures are statistically the most fragile part of a car. If there is slight contact with third-party objects, a bumper or hood can be straightened, but the fragile glass of lighting fixtures cannot be repaired.
Also, unlike the mechanical parts responsible for the appearance of the car, light repairs cannot be postponed, so every car enthusiast faces the question of how to remove the headlight on a VAZ 2114. Firstly, the life of the driver at night depends on their serviceability, and secondly, the malfunction of lighting devices is a significant reason for a fine.
In addition to collisions, there are many everyday reasons that result in the replacement of a VAZ 2114 headlight, the most common being a poorly maintained road. Even the smallest pebbles that pass the “millstones” of the wheels of the car in front turn into “bullets”.
Moreover, the starting speed of some of them is quite comparable with real small arms. Therefore, let's figure out how to replace the entire optics, change the glass and what lighting devices to buy.
TYPICAL DIFFERENCES
If you pick up two headlights for the same car, but from different manufacturers, then few people will be able to notice the difference. Only if the manufacturer is written on them in capital letters. But if it is not written, then there is always a risk of acquiring some kind of fake. However, even the originals may differ in various nuances. Here are the main differences in operation of the options we are considering today:
- The difference between the reflectors is immediately noticeable. Kirzhach has a more elongated shape, and the light beam is deliberately divided in half by a special partition; the upper casing is completely absent. The Bosch reflector is wider in shape and the beam is completely uniform.
- Since on the VAZ 2114 the turn signal and the headlight are located in a single housing, companies have taken different approaches to its mounting. In Kirzhach, the yellow segment is attached to two ties, and between them there is a special latch. While the Bosch does not have a latch, here everything is held in place by a spring tensioner. Unfortunately, this option had a bad effect on unification: replacing the turn signal from one model with another will not work.
- The texture of the glass and the material are strikingly different, despite the fact that both options are of quite high quality.
- Another difference lies in the methods of replacing the light bulb: with Kirzhach you need to unscrew the casing, since it is on screws, but with Bosch you just need to remove it, it is round.
In terms of prices, everything is quite ambiguous. A Bosch model for the VAZ 2114-13-15 series of cars costs about 3,000 rubles. While the model from Kirzhach is somewhat cheaper, about 2000 rubles, it is advisable to immediately replace the lamps with better ones and set them up correctly. Based on this, it is quite difficult to say which headlights are better for the VAZ 2114 Kirzhach or Bosch. But it’s better to adjust any headlights after installation, in general, on any car.
Replacement timing and choice of optics
In addition to the difficulties described above, which are familiar to motorists who drive long distances, there are more banal reasons related to the depreciation of the headlight itself. This mechanism does not have a specific shelf life, but the lamps “burn out” over time, and the reflector material and diffuser become unusable.
The last two elements have a shelf life directly related to the material from which they are made and the methods of car care. At the same time, even the best of them are still susceptible to the ingress of dirt associated with depressurization of the headlight structure.
IMPORTANT! If you have working headlights, but you still can’t see anything, visit a good car service center that has a light debugging stand. It may just be necessary to clean the structure and adjust it.
The choice of headlights is extremely important for the convenience of the motorist. To be more precise, it is not the manufacturer itself that is important (although it affects the characteristics of the light), but the identity of the lighting fixtures. If your car has standard headlights, but you decide to replace only one, then find the original ones. You should not take AUTO SVET or BOSCH, which are similar in appearance.
From a technical point of view, the headlights will be the same, but the manufacturing technology of the optics differs from one company to another, and as a result, you will get two distinctly different headlights. Even if you don't care about the appearance of the car, don't forget about the properties of your eyes.
Human vision and the brain have a number of characteristics, and in this case they will manifest themselves in the fact that a more powerful headlight will create a “twilight zone” instead of a dimmer light. Consequently, there will be no improvement in visibility, and the brain will perceive the “blind spot” almost the same way if it did not exist at all.
Method four - chrome plating a reflective surface at home
The last option is chrome plating. It is much simpler than the others considered. All you need to do is buy a can of spray paint. Chrome paint is sold at any auto store. This is a composition that needs to be sprayed onto the previously degreased surface of the reflector. Simple and fast, but not very durable.
“Liquid chrome” is not able to withstand temperatures above 60 degrees for a long time. The material is unstable. Easily wipes off with fingers. A more reliable option than chrome is a heat-resistant coating. It can withstand heat from 120 to 300 degrees Celsius. Virtually no wear.
Acrylic or alkyd paint with increased temperature resistance also performed well.
If desired, you can also find special paint on the market for painting headlight reflectors. It is more expensive, but will save you from headaches with the choice of material. Paints have one drawback. Once the painting is complete, you will notice that the restored headlight is not as bright as the one next to it. This is explained by the fact that the paints have low light reflectance characteristics.
On the other hand, of all the existing methods, this is the simplest. Clean, wipe with degreaser, paint with chrome from a can, and dry. Once the work is completed, the reflector will shine like new. Perhaps this is all that can be done with the headlight yourself. If you do not have experience, it is better to turn to specialists. But only to verified ones.
You can often see advertisements with a guarantee of 100% restoration of reflector glass. This is a lie. Such work requires very expensive optical coatings. This can be done using aluminum or silver. Silver, due to its high cost, is used only in laser technology.
Reference! Aluminum requires special magnetic sputtering technology in a vacuum unit.
It is clear that not all workshops have such an installation. And the cost of the work will exceed the cost of a new headlight for a vehicle such as a VAZ 2115.
Conclusion: it is more profitable to restore the reflector for a budget car yourself. We looked at how to do this using model 2115 as an example.
If you are the owner of an expensive car, do not skimp on buying a new headlight. It will shine better and last longer.
Algorithm for replacing the front headlight of a VAZ 2114
When we have decided on the timing and reasons for the replacement, and also know what to follow when choosing new optics, it’s time to move on to the question of how to change the headlight on a VAZ 2114.
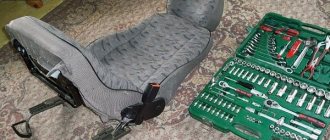
REMEMBER! The vehicle's lighting system is part of its electrical network, therefore, we must not forget about the standard safety measures required to work with this part of the car. You need to at least remove the terminal from the battery, and if you have to work with the right handicap (in the direction of travel), you will have to completely remove the battery, otherwise it will be impossible to dismantle it.
So, let's remove the headlight:
- We remove the radiator trim - to do this you need to unscrew 4 screws.
- We remove the turn signal - to remove the turn signal you will have to look into the engine compartment on its back side: a. remove the wires, they should be well fixed to each other, so disconnecting them will not be difficult. After removal, remove them and fix them on the car body so that they do not fall, because we do not need excess dirt and dust on the terminals; b. press out the spring that holds the indicator in the car body. V. We press out the plastic clamps of the turn signal and headlights with our fingers, and then pull on its front side.
- Remove the bumper mounting nuts in the headlight area. This is necessary in order to then move the bumper itself a little and get closer to the fastenings of the illuminator trim.
- Now we dismantle the headlight itself.
IMPORTANT! If for one reason or another you cannot remove the turn signal separately, do not break the latches. Later, you can dismantle the entire lighting system in one block and separate them separately. This will be less convenient, but much better than a turn signal dangling from the housing.
This is done as follows:
- disconnect the wire from the headlight itself and fix it in the engine compartment;
- We find the corrector latch and clamp it, after which we turn it counterclockwise. If everything is done correctly, it will be removed easily and without the need for physical force;
- Unscrew the fastening nuts using a spanner. There are three nuts in total and finding them is not difficult;
- Use a screwdriver to unscrew the screw connecting the headlight to the bracket;
- carefully remove the headlight through the “face” of the car.
There is another method for removing headlights, which involves removing the entire headlight unit along with the middle frame.
To do this, you must immediately disconnect the wires from the headlight and turn signal, then remove the hydraulic corrector, and then:
- Unscrew the four bolts located behind the headlight group.
- We remove the headlight together with the middle frame and unscrew its fasteners outside the car.
- After removing the fasteners, carefully remove the headlight itself.
After replacement (repair), you must assemble the car in the reverse order of the method you used. Also note that the headlight may need to be repaired and you just need to replace the glass of the VAZ 2114 headlight, which is often found in the practice of operating this car.
Principle of step-by-step action
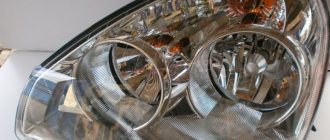
Let's start removing the lamp from the headlight unit. To do this, we need a thin screwdriver and an awl, as well as a magnet on a long handle (if possible). We unscrew the lamp protection box on the headlight unit on both sides by hand. Remove the cover. Below it you can see the three-pin headlight power connection block, as well as the spring mechanism of the lamp holder.
Replacing the low beam bulb on a VAZ 2114
Before disconnecting this unit, you need to disconnect the terminal block. Then you need to compress the lamp fastening spring and release the lighting element itself. With a slight movement of the hand, we remove the lamp from its standard mounting location and replace it in the reverse order.
Before changing the low beam bulb on a VAZ 2114, it is advisable to make sure that there is no condensation in the reflector unit. If moisture is present, this may be the main reason for the failure of this device. To eliminate it, it is important to clean the drainage channel, which is located in the area where the turning lamp is mounted (left or right).
When performing this work, you must adhere to basic safety rules. When the lights for the VAZ 2114 stop shining on the road, you don’t need to stand on the side of the road, creating an emergency situation, but try to get to the nearest gas station or service station.
Replacing the taillight of a VAZ 2114
This procedure is much simpler than that of its front brother.
Removing the rear light:
- Unscrew the fabric cover.
- Unscrew the 4 nuts with a “10” wrench.
- We remove the rear light, and if necessary, unfasten the latch and remove the lamp holder.
Everything is assembled in the reverse order, and completely replacing both taillights will take no more than 10 minutes. Everything is done easily and without physical effort, the main thing is not to drop the flashlight on the rear bumper when it is removed.
Payment via PayPal
After selecting payment via PayPal, the PayPal payment system will launch, where you need to select the payment method: bank card or PayPal account.
If you already have a PayPal account, then you need to log into it and make a payment.
If you do not have a PayPal account and you want to pay using a bank card via PayPal, you need to click on the “Create an Account” button - shown with an arrow in the picture.
PayPal will then prompt you to select your country and provide your credit card information.
After specifying the information required to make the payment, you must click on the “Pay Now” button.
Official website of the PayPal payment system https://www.paypal.com
Replacing the headlight glass
If you see that the headlight itself is working, and its cloudiness is due to glass defects, you need to know how to remove the glass from a VAZ 2114 headlight and then replace it.
The algorithm for performing the procedure is as follows:
- We dismantle the headlight using one of the methods described above.
- Take a thin flat screwdriver (spatula, knife) and pry up the corner of the glass.
- Insert the tip of a utility knife into the resulting gap and cut through the old sealant (if there is a lot of sealant left, take a hairdryer and heat the edges of the glass).
The glass is now removed, but remember that reassembly will involve applying sealant (can be replaced with a rubber seal), so be sure to get some in advance. Also, some manufacturers' headlights have headlights with clips, so don't use brute force, just look where they are and tighten them.
The second method for restoring the mirror coating is foil and glue
This method is the most reliable and durable solution. Foil and epoxy adhesive have good wear-resistant and heat-resistant characteristics. Having done the work correctly, you will get an excellent result: the lighting devices of your Lada 2114 will last for many more years.
Expert opinion
Ilya Vyacheslavovich
Consultant for body repair at krasymavto.ru
Ask a Question
The disadvantage of this method is the long drying process of the resin. After covering the surface of the reflector with a new layer, wait at least a day. Otherwise, the reflector may be damaged completely and irrevocably.
If you are willing to spend time on quality reflector repairs, be patient. The work is delicate and meticulous. But the result may exceed all your expectations.
We buy foil and epoxy glue. Before applying the coating, clean and degrease the previously disassembled headlight. Let's start preparing paper patterns. You need to be careful here. We apply the paper to the inside of the headlight of your VAZ and carefully mark the blanks before cutting. Cut out the required strips of foil according to the shape.
Useful! We coat the parts with glue, apply and level the foil. After coating, wait as long as possible before starting to assemble the headlight.
Once the resin has dried, the work of restoring the reflector is complete.
How to replace a VAZ 2114 headlight - step-by-step instructions
Headlights are constantly at risk of damage, small pebbles flying into the air from cars in front turn into something like bullets that mercilessly shoot at rear cars, causing a lot of trouble for motorists.
One of these troubles is broken headlight optics. Today I will tell you how to replace a VAZ 2114 headlight if it malfunctions, or in my case, when the headlight glass is damaged.
How to remove a VAZ headlight with your own hands - detailed photo report
1. For convenience, I recommend removing the plastic cover above the radiator.
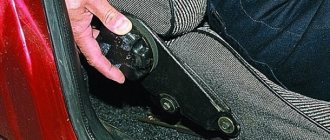
2. At the bottom of the bumper there is a screw for a Phillips screwdriver; it holds the lower eyelash of the headlight, as well as the headlight itself; the eyelash itself is attached to the headlight with two clips.
Advice! I DO NOT recommend removing the turn separately; in addition to the spring in the rear of the headlight, it is also secured with a latch from below. See photo.
3. Now, from the radiator side, unscrew the bolt; it is used to connect the headlight and the middle frame above the bumper, smoothly turning into the lower eyelashes on the sides.
4. Disconnect the connectors for the turn signal, headlight and hydraulic corrector. Removing the hydraulic corrector is relatively simple - tighten the curved clip, then turn the corrector plug down, and then remove it from the socket.
5. Take the “10” socket and use it to unscrew the four bolts located at the rear of the headlight.
6. Carefully, so as not to damage the paintwork, remove the headlight from the mounting socket, then remove the middle frame fasteners from the common mount.
7. Remove the middle frame itself and take out the headlights with the lower eyelashes.
Before replacing the VAZ 2114 headlight, make sure that it cannot be repaired; perhaps it can still be restored. After carrying out this kind of work, you definitely need to adjust the headlights of the VAZ 2114.
We recommend watching a thematic video on how to replace the headlights of a VAZ 2114 with your own hands
Causes of hydraulic corrector malfunction, repair
Most often, the corrector stops working during periods of sudden changes in external temperatures, when the rubber seals on the cylinders can crack and leak. Damage to the connecting tubes can also lead to loss of fluid from the system. Whatever the reason, the working cylinders freeze in one position and do not respond to switching.
It will not be possible to repair the hydraulic system itself, since the manufacturer does not provide such a possibility. Therefore, if an all-season fluid leaks, the hydraulic corrector assembly must be replaced with a new one. However, there may be a situation when the reflectors stop rotating due to something other than a faulty corrector. This occurs if the adjustment lever that transmits force to the headlight reflector loses contact with the working cylinder rod. The presence of such a malfunction can be suggested by the fact that one of the reflectors has stopped turning.
Adjusting the hydraulic corrector rod
In order to eliminate such a breakdown, it is necessary to restore the engagement of the working rod (there is a recess on it) with the spherical end of the adjustment lever. You should do the following:
- Tighten the bolt that regulates the position of the lever fulcrum until it stops.
- Move the reflector to its lowest position.
- Align the lever ball and the rod notch, then unscrew the adjusting bolt to the required position.
The lever ball slipping out of the stem recess is the only problem that can be corrected. If the tightness of the hydraulic system is damaged, the corrector must be changed.
Replacing the front headlight on a VAZ 2113, VAZ 2114, VAZ 2115
Headlight - if you just put light bulbs instead of headlights, then they won’t really illuminate the road, so the headlight is a very important and integral part of any car, thanks to them the light is scattered and the road is very clearly visible (Depending on how the headlights are still configured, there are just strong lamps stand and the headlight is directed downwards and thus the road is very hard to see), but the front headlights are most susceptible to deformation, since stones fly into them, breaking them, and birds also sometimes get caught (Rarely, but it happens), but without light you can’t see you travel, especially in the dark, and that’s why you have to change them for new ones.
Note! To replace the unit that illuminates the road in the dark, and even during the day the car can be seen better with the lights on, you will need to stock up on tools, namely: All kinds of keys will be needed, but it is best to use a wrench with socket heads because they are more convenient, but instead You can also use wrenches, ring wrenches, but you also need a screwdriver and gloves so as not to get dirty during replacement, but the headlight (Especially the front one) usually gets very dirty!
The first restoration method is metallized tape
Using this method, restoring the reflective abilities of the reflector is easy. The method is cheap and tested by folk craftsmen. The basis of the technology is metallized tape. Before starting work, we completely disassemble the headlight and clean it from the inside. This can be difficult. The sealant reliably fastens VAZ optics elements even after long-term use.
Expert opinion
Ilya Vyacheslavovich
Consultant for body repair at krasymavto.ru
Ask a Question
In order for the sealant to lose its properties and all the elements to easily separate, the headlight from the Lada 2114 needs to be warmed up well.
A household oven or hair dryer is suitable for this. In the first case, place the part in the oven for 15-20 minutes at a temperature of 75 degrees. After heating, the elements will be easily separated from the headlight.
The reflector itself can be carefully picked out with a screwdriver or knife. Then the headlight must be washed, cleaned and dried. The next step is to purchase mirror tape in the store. The material has the properties we need. It is resistant to temperature fluctuations, holds securely and is simply glued to the surface.
We measure out the necessary pieces of tape according to the shape of the reflector. Let's cut it off. We degrease the bottom of the headlight and glue it onto the product with our own hands. This completes the restoration of the reflector using the first method. You can assemble the part and install it in place. This reflector lasts quite a long time.
When should you change your headlight?
In fact, everyone decides for themselves the answer to this question, but we will give you some advice, firstly, we do not recommend that you drive with completely broken glass near the headlights, because the car looks ugly, and even if the bulbs remain uncovered , all the dirt and stones will fly into them, which can break them and you will be left in the dark without light, secondly, if the headlight is full of large cracks, then the light will not be as good as needed, the whole point is that the rays are emanating from the lamp will rest against these cracks and thus the headlight will scatter its light anywhere, so it is also best to replace such a headlight with a new one.
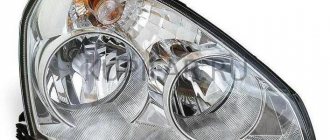
Note! When choosing a new headlight, take into account the fact that they are all different from each other and if, for example, you already have (About the second headlight we mean) a headlight from BOSCH, then change to the same one, just if you take another one (from a different company ) the first thing you will notice is that both of your headlights will be different, secondly, one headlight will shine better, and the other worse, and they will scatter the light in their own way, for clarity, just below in the photo you can see two headlights, one of which is from BOSCH (from the left in the photo), and the other is AUTO LIGHT, and from the very beginning you can already understand that although the headlights are for the same car, they are different in appearance, and each one also shines differently!
LET'S SUM IT UP
So, we figured out the pricing policy, design and modernization of headlights for VAZ 2113 cars and their series. Let's summarize so that everyone can consciously make a choice which headlights are better for the VAZ 2114:
- The components from Kirzhach are a little simpler in their technical design and are easier to modify with your own hands using any of the specified methods and actions. However, not everyone wants to do manual modifications, even if they help change the car for the better. Therefore, for some, a more expensive option will be a godsend, which you just need to install and do nothing else.
- Bosch headlights are brighter, and the light is a more saturated beam.
- In terms of prices, Kirzhach turned out to be a little cheaper with relatively good performance and can easily compete with its opponent.