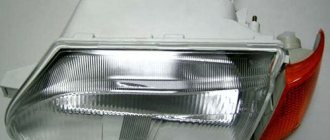
With such a sad and drooping look, she rode on the main road for 2 weeks. I was too lazy to get into the headlight, because I knew that in order to remove it I needed to remove the bumper. And if you remove the bumper, you need to immediately replace the lamps in the PTF. Therefore, I simply disconnected the right headlight from the circuit, ripping out the contact block))) But today I decided to correct the jambs of the crooked creators of either the headlight or the car as a whole. I bought some lamps. The moral principles of a xenophobe and respect for people along the way did not allow me to buy xenon. I took these lamps of Korean and Russian production:
I took apart the half of the muzzle and pulled out the headlight.
I dug out the block with wires from the old and current headlights. And after spending half an hour at the gynecologist, I installed wiring from an old headlight to replace the melted one.
Well, of course, I had to assemble everything, not forgetting about the PTF lamps. I also cleaned and wired all ground wires. The result was this:
Removal and installation of the headlight unit is carried out in case of its replacement with a new one, or for modification or tuning. The process is not complicated, but it has some features that are best familiarized with in advance so as not to break anything. Let's look at the instructions for replacing a Priora headlight with your own hands.
You will need: flat and Phillips screwdrivers, 10mm wrench. It is not necessary to completely remove the bumper; it is enough to unfasten only the part from which the headlight will be replaced.
Procedure:
- Remove the connector with the headlight wires by prying it up with a screwdriver;
- Remove the upper headlight mounting bolt;
- Remove the lower headlight mounting bolts.
Installation is carried out in reverse order. Watch also the video on how to remove a headlight on a Priora:
Have you ever had to remove the Priora headlight unit yourself? What difficulties did you have to face? Let us remind you that you can install LED DRLs in the headlights yourself, or buy tuning optics.
What tools will you need?
Headlights play an important role in the design of LADA Priora. Therefore, when removing a headlight for its subsequent replacement, it is necessary to know well the sequence of disassembly and assembly of the structure. To remove the headlight unit on a Priora, many people go to a gas station. However, this procedure is so simple that if you have certain tools, you can fix it yourself.
In this case, the following tools will be required for work:
- 8 or 10 mm wrench;
- ratchet;
- Phillips screwdriver;
- extension.
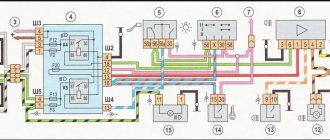
Removing and installing the front headlight of Lada Priora in pictures
Payment for goods and downloading of the book in electronic form (PDF format) is made on the website.
To do this, you need to find the book you are interested in and click on the “Buy” button. The price of the book is indicated on the button.
For convenience, the price on the website for residents of Russia, Belarus and Kazakhstan is presented in rubles.
For residents of Ukraine in hryvnias, and for all other countries - dollars.
After clicking on the “BUY” button, a payment window will open where you can select a payment system with which you can pay for the selected book using any bank card (Visa, MasterCard, MIR, etc.)
When you click on the “Pay by bank card” button, the Portmone payment system will open, which is the easiest way to make a payment.
In addition, the website offers four payment systems for payment:
- Yandex (payment from any bank cards, Yandex Money account, QIWI Wallet, terminals, etc.);
- Portmone (payment from any bank cards, Portmone account);
- PayPal (payment from any bank cards, PayPal account);
- WebMoney (payment from any bank cards, payment from WebMoney wallets).
Payment via Yandex Cashier
After selecting payment via Yandex, the Yandex Cashier payment system will launch, where you need to select a convenient payment method (bank card, QIWI, Yandex Money account, etc.)
After specifying payment details and confirming payment, payment for the goods will occur.
If you have a bank card in a currency other than the ruble, then the money will be debited from the card at the rate of the Central Bank of Russia at the time of the purchase.
This payment method is optimal for residents of Russia, Kazakhstan and Belarus.
Official website of the Yandex Kassa payment system https://kassa.yandex.ru
Payment via Portmone
After selecting payment through Portmone, the payment system will launch, where you need to select the payment method: bank card or Portmone account.
The price in the Portmone payment system is converted into dollars at the exchange rate of the Central Bank of the country where you are located.
If you have a bank card in a currency other than the dollar, then the money will be debited from the card at the rate of the Central Bank of your country at the time of the purchase.
After specifying payment details and confirming payment, payment for the goods will occur.
Official website of the Portmone payment system https://www.portmone.com
Payment via PayPal
After selecting payment via PayPal, the PayPal payment system will launch, where you need to select the payment method: bank card or PayPal account.
If you already have a PayPal account, then you need to log into it and make a payment.
If you do not have a PayPal account and you want to pay using a bank card via PayPal, you need to click on the “Create an Account” button - shown with an arrow in the picture.
PayPal will then prompt you to select your country and provide your credit card information.
After specifying the information required to make the payment, you must click on the “Pay Now” button.
Official website of the PayPal payment system https://www.paypal.com
Payment via WebMoney
After selecting payment via WebMoney, the payment system will launch, where you need to select the payment method: bank card or WebMoney wallet.
If you already have a WebMoney wallet, then you need to log into it and make a payment.
If you do not have a WebMoney wallet and you want to pay in another way, you need to select any of the methods that WebMoney offers and make the payment
After specifying payment details and confirming payment, payment for the goods will occur.
Official website of the WebMoney payment system https://www.webmoney.ru/
Downloading a book
After successfully completing the payment (by any method) and returning to the KrutilVertel store from the payment system website, you will be taken to the successful payment page:
Step by step guide
Removing a headlight on a Priora is a simple process, but it has its own characteristics, which you should familiarize yourself with in advance.
- To completely detach the headlight from the existing brackets, you must first remove the bumper. In order not to unscrew excess nuts and bolts, you can try to partially remove the bumper. After removing the bumper, you need to unscrew the mounting bolt from the top and then from the bottom.
- The third projector holder is located on the side. A Phillips screwdriver is required to remove the projector from this mount.
- After working with a screwdriver, all that remains is to unhook the clamp and the harness from the headlight unit itself. To make removal easier, you can pry the latch with a thin screwdriver.
- After all the above steps, you can easily remove the headlight; it will no longer hold anything.
Reassemble the projector in reverse order.
In addition, we recommend reading our specialist’s article on how to replace a low beam lamp.
We also recommend reading our specialist’s article, which describes in detail how to change the low beam lamp on a Priora.
You can learn how to adjust the headlights yourself from the detailed material from our specialist.
Removing the headlight from the car
The particular difficulty of removing the headlight on a Priora to replace the glass is that the lower edge of the headlight unit is covered with a bumper, and it also controls the glass, and under it there are two lower mounts for the headlight itself. Therefore, whatever one may say, for a trivial replacement, you will have to remove the entire bumper.
Removing the Priora bumper to repair or replace headlights
This action will require both effort and tools. In general, you will need the following equipment:
- Phillips screwdriver;
- flat screwdriver;
- socket wrench with a “10” head.
First you need to unscrew the lower mounting screws. They are located along the lower edge of the bumper and along the edge of the front part of the wheel arch. The Priora has 6 mounting bolts on each side: three on the bottom and three on the fender liners. Next, unscrew the 4 bolts securing the bumper to the upper front part of the body wall - the cross member, and the 2 bolts securing the headlight casing. Carefully inspect the fog lights in the bumper, if installed, for repair or replacement. Remove and set aside the bumper.
Removing the headlight to replace the glass
On top of the front light there is a plate covering it - a casing. It is secured with 3 screws to the upper cross member of the engine compartment. After removing it, you will have access to the upper mounting bolt of the Priora headlight. Since the bumper has already been removed, all that remains is to unscrew the top and 2 bottom screws. That's it, you can carefully move the headlight forward and disconnect the control wire harness from the connector. The Priora headlight has been removed. You can disassemble and replace the glass.
Useful tips
Car owners often encounter such a problem as Priora headlights fogging up. In this case, lighting technology does not provide high-quality illumination of the road. This problem must be eliminated using modern methods. The reason for this is that there are small channels in this part of the beacon assembly.
Find them and wipe them with a thin thread.
In this case, there is no need to change the headlights. It is not necessary to turn off the headlights completely even if a crack appears in the glass. In this case, it is necessary to carefully coat it with sealant.
Headlight breakdowns
There are several different typical failures of Priora headlights, such as:
- Fogging;
- Cracked protective glass;
- Damage or burnout of the reflector;
- Broken headlight mount;
- Polishing, etc.
Let's look at each of the reasons.
Fogging
Over time, almost every prior driver is faced with the problem of sweating headlights on a Priora. This is due to the fact that the tightness of the headlight is compromised due to aging of the sealant or loose sealing of the protective rubber covers on the rear side of the headlight.
This problem can be eliminated by dismantling the headlight and gluing the glass, as well as replacing the rubber covers.
Cracked protective glass
When operating a car, it is exposed to various types of influences, both mechanical and thermal, as a result of which damage to the headlights themselves is possible. For example, in the event of an accident, the protective glass of the headlight may break, or if the power of the lamps is incorrectly selected, the glass may melt.
This problem can be resolved by removing the headlight and replacing the glass with a new one. The cost of glass starts from 200 rubles per piece.
Burnout and damage to the reflector
Over time, with intensive use, the headlight reflector can lose its reflective properties or even burn out, which will worsen the luminous flux emitted by the headlight. Also, in the event of an accident, the reflector mounts may break.
The problem is eliminated by replacing the headlight or replacing the reflector, depending on the nature of the breakdown.
Broken headlight mount
This problem occurs in most cases due to traffic accidents. In this case, this problem can be eliminated by gluing the headlight mounts or replacing it with a new headlight.
Polishing
After a run of 100 thousand km. On a Priora, quite often the headlights begin to become cloudy and yellow, which leads to their unsightly appearance and ages the car. In this case, you can restore the headlights using regular polishing.
As you can see, for all reasons for headlight breakdowns, they must be dismantled.
Below are step-by-step instructions for removing a headlight from a Lada Priora car.
Conclusion
When done correctly, the process of replacing headlights is simple. When disassembling and assembling the flashlight, it is important to follow the exact sequence of actions.
Car owners in the domestic automobile industry have a unique hobby - repairing, minor modernization, and tuning their combat vehicle. Such work as: removing a headlight, replacing optics with a new one, failure of lighting fixtures - on Priora deserve a separate discussion. Prioru headlights are equipped with bulbs that burn out once per season. There is also a problem with Lada Priora cars: sometimes the headlights sweat, so they need to be removed and glued. Adjusting the headlights is not least important for traffic safety; electronic and manual correctors are provided for this. The factory headlight of the Priora car (Bosch and Kirzhach) underwent changes during the restyling, in addition there are many Chinese analogues, for example, black headlights. Tuning: It is also problematic to perform without removing them from the holder. The price of headlights varies - from 5,000 rubles for a factory headlight. Read the article to the end and find out the subtleties in this matter!
How to understand that the headlight is faulty
The headlights of the Lada Priora often fail, resulting in poor road illumination. Replacing Priora front headlights may be required if the following defects are present:
- the headlight mounting elements are broken;
- headlights constantly fog up;
- reflector malfunction;
- faulty electrical connectors.
We recommend: Correct installation of piston rings
The Lada Priora headlights have a non-separable design. Therefore, for tuning, replacement or repair, you will have to remove the headlight completely.
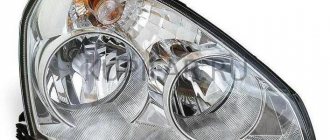
Priora car headlight: Bosch and Kirzhach - what is the difference
We report on two manufacturers (excluding shotgun copies of Chinese origin) that have a number of differences. Popularly known as Kirzhach, Bosch. There is a significant difference between them: Kirzhach is a corrugated inner surface of the well, a fused low-beam lamp reflector without a cutout, glass (plastic) is secured with fire-resistant sealant. The level indicator is located at the bottom of the reflector compartment. Two separate plugs for the rear of the optical instrument. The device from the manufacturer Bocsh (Bosch) has a smooth inner surface of the well, a low-beam reflector with a cutout, and a low-melting sealant is used to secure the glass (plastic). The marker light is located in the upper part of the compartment; a plug is used in the rear part of the lighting unit. There are minor differences in design, quality of parts, and the presence of a chrome-plated edge on the rotating element of the signal magnifier. There are many taillight design options available to the buyer.
Removing the taillight
Here you won't need to remove the bumper. As part of the preparatory work, you will need to disconnect the battery. The headlight is dismantled in the following order:
- Unfold the trunk trim near the rear light;
- We press out the clamps securing the wire block and disconnect it;
- Remove the headlight mounting bolt;
- Wing nuts are unscrewed from the fastening studs. Only 3 pieces;
- We remove the headlight.
Assembly occurs in reverse order. Sometimes, when removing, people forget to disconnect the wires. In this case, there is a high risk of tearing or damaging the tourniquet. This will subsequently lead to a short circuit.
Why film
The main reason is failure, failure to comply with the direct functions of the device. There can be many reasons for replacing a headlight. Destruction of the outer glass, loss of tightness, fogging of the lenses from the inside, wear of the reflector itself, breakage of fasteners. Replacement, repair of old contacts, installation of new types of light bulbs. To fix them, you will have to unscrew the entire module from the housing, which will make repairs and upgrades of optical devices more convenient. The block is not completely dismountable - to separate the glass from the body, it is better to heat the joint with a hair dryer until the sealant softens. Then, if possible, remove the melted sealant using improvised means. We try to separate the glass with a screwdriver, clean all the parts that have separated from the old glue, use a knife, and sandpaper. The glass is repositioned onto the sealant.
Replacing the headlight
To remove the headlight, you will need to remove the bumper. It is secured with a pair of bolts and 5 self-tapping screws. Also, before starting work, you need to disconnect the battery, this will avoid an accidental short circuit. The headlight is removed in the following order:
- We press the latch and disconnect the block of wires powering the headlight;
- Unscrew the front mounting bolt;
- We move on to the side bolt, and also unscrew it;
- Use a screwdriver (Phillips or asterisk) to unscrew the 4 screws securing the headlight housing;
Polishing headlights on Priora
As its service life increases, sand, small stones, dirty water, and road chemicals negatively affect the light transmission of the outer glass of lighting fixtures, and the overall efficiency decreases. The solution will be restoration and polishing of the glass surface. When you decide to polish glass, carefully study the technical side of the process, materials, stages of work: everything affects the result. If you are not confident in your abilities, it is better to entrust the work to professionals, otherwise the result of the work done may be worse than the original one. If you decide to polish the optics of your car, first remove the entire module, remove dirt, and protect surfaces that cannot be processed.
Used for polishing:
- Abrasives;
- Sandpaper (1000 - 4000 pcs);
- Discs: felt, fabric, foam rubber;
- Polishing pastes.
First, a rough layer of plastic is removed with a depth equal to the depth of chips and scratches. As a result, the protective paint layer applied by the manufacturer will be erased, which will need to be restored after polishing. Applying special paint is a technically complex process. Another option is to stick a protective film, otherwise the result of your work will disappear in a couple of months. Change the sandpaper to finer sandpaper every 2 - 3 minutes. We monitor the removal of traces left by the previous abrasive number. After each change of sandpaper, the surface must be thoroughly washed. The dried surface is ready for polishing.
Important: perform polishing at low speeds of the tool used to avoid overheating; the opacity of the plastic will be impossible to restore.
Using polishing wheels we bring the glass surface to the desired shine. Polishing is often carried out due to varying degrees of wear of the car's optical devices, for example, a headlight was damaged in an accident and it was replaced with a new one.
We remove the headlight on a Lada Granta with our own hands
The modern world of automotive manufacturing has stepped far forward. Thus, the development of automotive optics, which is being improved every year, does not stand still. But many manufacturers understand that the complexity of the design also means easy dismantling of the part. Removing a Lada Granta headlight is quite easy, even with your own hands. This is what domestic car owners do. But the question arises: how to remove the headlight of a Lada Grant? – the answer to which we will give in this article.
| TOP 15 most useful products for Lada Granta - OUR EXPERIENCE! |
- 1 Purpose of headlights 1.1 Reasons why headlight removal may be necessary
- 1.2 Types of headlights on Lada Granta
Purpose of headlights
A car headlight is designed to illuminate the cavity of the front and side parts of the road surface. It provides the necessary visibility and also performs road safety functions.
Lada Granta headlights, in accordance with international automotive legislation, have passed all the necessary tests and received certificates and licenses that make it possible to carry out international traffic in any country in the world.
Reasons why headlight removal may be necessary
The reasons for removing the headlight on a Lada Grant can be many factors, namely:
- Damage to the structure of the surface or body due to an accident, as well as exposure to external factors.
- Dismantling for repair of adjacent parts.
Disassembling the headlight for repair
Tuning headlights for Lada Granta
All these or other factors contribute to the need to remove the Lada Granta headlight.
Types of headlights for Lada Granta
There is an original headlight and several of its analogues, which can be used as an alternative or tuning optics. Let's look at the catalog numbers and descriptions for all:
- The original Lada Granta headlight has a catalog number - 21900-3711010-00. It is easy to remove and install, and does not require special knowledge for this.
- The closest analogue with xenon lenses from, which is not widely used, is 21901-3711010-90. This is the same original headlight, which was already initially made by the factory for the installation of xenon. The price is 15% more expensive than the original.
- Optical tuning. In order not to redo the headlight mounts, I released two analogue models. The first has integrated LED turn signals and daytime running lights. Catalog number – DM-171052. The second option has different lenses for low and high beam, and the headlight edging itself has LED backlighting in blue, green or white. Listed in the catalog under number DM-171118.
A special mention is worth mentioning such a useful modification as installing a lens in the headlight unit.
Installing a lens into a standard headlight
Thus, it can be seen that there are several options for standard headlights on the Lada Granta, which do not require alteration of the mounts for removal and installation.
Technological process of removing headlights on Grant
Many car owners are wondering: how to remove the headlight of a Lada Grant? Easier than it seems. To begin with, you will need two keys from the tool - 8 and 10. And now you can go directly to the process itself:
- To begin with, we remove the “negative terminal” from the battery so as not to accidentally short-circuit anything.
- We are dismantling the front bumper, since it is impossible to get to the lower mount otherwise.
We removed the bumper and took out the headlight (I ran a little ahead)
We remove the hydraulic corrector unit (it doesn’t work for me and the hose is cut off, you can see in the photo)
It is worth remembering that when the lower mounts are removed, the optics should be held so that the upper “ears” do not crack under load when dismantling occurs.
conclusions
As you can see, the technological process of removing a Lada Granta headlight is quite simple and almost every motorist who does not have experience and skills can dismantle this element with his own hands and without unnecessary labor.
Why do Priora headlights sweat?
The most common problem with household machine optics is moisture ingress. The headlights are sweating due to a leak in the unit. The back cover has lost its grip on the surface of the case. To fix the problem, it is best to remove it completely. Open all existing plugs and dry thoroughly in a warm, dry room. Seal the gaps between the covers and the body (use different types of gaskets, silicones, sealants). Some car enthusiasts recommend spraying a small amount of alcohol inside. After drying, assemble and install in the car.
When you may need to replace headlights
Sooner or later, every owner of a LADA Priora car faces the need to change headlights.
There can be many reasons for this:
- damage to optics in an accident;
- the need to replace internal parts: reflector or corrector;
- to eliminate a phenomenon such as fogging (in this case, sizing is required).
How to remove a taillight on a Priora and glue vinyl
Motorists often want to emphasize the uniqueness of their car on the road in every possible way. To do this, owners update Priora taillights. Change the color of the vinyl film glued on top, install additional LEDs. Further changes to the design of the light signaling system must comply with safety standards.
Removing the taillight will make the job easier. What doesn't really matter:
- it is necessary to disconnect the wiring connector going to the lamp on the trunk side;
- unscrew the three plastic wing nuts;
- remove the lantern;
- pull the wires together with the sealing rubber through the mounting hole.
That's it, the lantern is removed, you can put the lantern in the reverse order. Before disassembling, install the flashlight; it is recommended to disconnect the wire from the terminal. The process of gluing vinyl is somewhat similar to the process of tinting car windows. It is necessary to remove dirt, wash the glass of the lantern, remove greasy stains and stains with glass cleaner. Cut a piece of vinyl of the required size (with a small margin), moisten the surface of the lantern with a soap solution (without fanaticism). Glue the prepared piece of vinyl, removing the protective layer, removing air bubbles, and removing excess moisture. Any remaining vinyl around the edges of the taillight can be cut off with a sharp utility knife.
Recommendations on how to remove and disassemble a Lada Priora headlight at home
The front headlights on the VAZ Lada Priora cause a lot of inconvenience to the owners of these domestic cars. The fact is that in the event of any breakdown (the headlight glass bursts, the light bulb burns out, the headlight reflector becomes dirty), you will need to replace the entire headlight, and not just the failed part - the Lada Priora has non-separable headlights.
If necessary, and if you feel like a real craftsman, the “non-separable” headlights of the Lada Priora can still be disassembled. The following is step-by-step instructions on how to remove the headlight of a Lada Priora and how to disassemble it. Although it will take a lot of time and effort, you can save a lot on repairs. There is almost nothing in minor car repairs that, with some experience, cannot be done at home.
The first thing you need to know on the topic of “Lada Priora headlights” is that they are mainly installed in two places in Kirzhach and German. Disassembling autosfet headlights is somewhat more complicated, but the process is approximately the same. Lada Priora fog lights and taillights of Lada Priora are not so expensive that you need to spend time opening and repairing them. It's easier to go out and buy new headlights. But still, almost any headlight can be opened using the method described below.
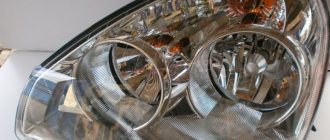
The front headlights themselves of the Lada Priora structurally consist of two parts - the body (with a light bulb and a reflector) and the headlight glass, which is attached to the body using a special sealant (glue). When disassembling the headlight, the most difficult stage is melting the glue and removing the glass cover from the headlight. A construction hair dryer is used to heat and melt the glued joint. Under the influence of high temperature, the sealant turns into a liquid state and can be separated.
To work you need:
- Phillips screwdriver and 10mm wrench;
- construction hair dryer;
- sandpaper, stationery knife;
- tape and cling film;
- new headlight parts.
The work on disassembling the headlights of the Lada Priora takes place in several stages:
- The first and one of the most difficult stages is removing the headlight of the Lada Priora. This may even require separate step-by-step instructions. First, disconnect the block with wires from the headlight. Remove all headlight mounting bolts one by one. Remove the headlight housing and remove it from its socket.
Now it's time to use a hair dryer.
Heat it to a temperature of 250 degrees and start processing the joint. Heat the glue evenly around the entire circumference of the headlight until it begins to melt. Note! Before “melting” the headlight, some “masters” recommend cutting off the plastic edge that runs along the entire circumference of the headlight with a knife. Although this greatly simplifies the process, it is not at all necessary to cut off the side; it will be enough to just bend it slightly. If the joint is well heated, opening the headlight usually takes place without complications. It's not worth damaging the headlight housing for this.
- Next, carry out the repairs for which the headlight was opened. Reassemble the headlight in reverse order.
- To glue the headlight glass back to the body, apply sealant to both halves. Press both parts of the headlight firmly.
- To ensure that the gluing is as strong as possible without any gaps, wrap both halves of the headlight with cling film. Wrap the parts with tape over the film. This is a proven way to fix both halves of the headlight for a certain time required for the sealant to polymerize. The cling film will not leave marks on the headlight after removal, as would be the case if it was simply fixed with tape.
After gluing the headlight, install it in place. Now everything will work as it should.
How to remove a headlight on a Priora without unscrewing the bumper
When carrying out all kinds of adjustments, installation, and dismantling of the main lighting fixtures, it will inevitably be necessary to remove all lighting fixtures. Before installing the front and rear lights, be sure to disconnect the wire from the terminal and the wiring leading to the light unit itself. There is no need to completely disassemble the front bumper; it will be enough to disconnect the upper part of one side from the body. This will make installation of the front optical modules easier and less time consuming. What tools do you need?
Video on replacing the headlight unit on a Lada Priora car
This procedure was clearly carried out using the example of Priora specifically for this article.
If you have any questions about this repair, you can discuss unclear points either here in the comments or directly under the video on my YouTube channel. The price of new headlights on Priora is quite high and can reach up to 5,000 rubles per one.
There are several manufacturers, such as Bosch or Križač. Of course, the headlights of these manufacturers differ not only in name, but also slightly in appearance - this is worth taking into account when purchasing.
From time to time, any parts of the machine need to be removed, disassembled, cleaned, replaced, etc. All these manipulations can be done with your own hands, given that there are a lot of articles on this topic and video instructions on the Internet.
If we talk about headlights, they are often removed for the following reasons:
In all cases, it is important to perform the operation correctly, otherwise some mechanisms may be damaged, causing the headlight to stop lighting. It’s possible to remove both the front and rear lights with your own hands if you know the technique and act consistently.
Adjusting Priora headlights using a corrector
Adjusting the light beam is extremely important for a safe and comfortable ride; if you have a suitable place and desire, you can carry out the procedure yourself at home. You will need to place the machine on a flat, horizontal surface five meters from the wall to the machine. Check the operation of the handwheel located directly on the back of the device (moving wheel). At the level of the center of the lamps, we draw a horizontal line on the wall (sheet 1), approximately 65-75 mm below we draw a line (1,2). Two vertical lines in the center of each beacon (l. A) (l. B), another vertical line strictly centered between them. There must be 1 person in the car, the tire pressure is within normal limits and the same everywhere. The low beam lights up, let's try to adjust the light. Close the projector tightly. We turn the corrector wheel until the horizontal and oblique light rays intersect at the point of intersection of straight lines A and B with line l. 2. The car's electronic adjustment should be zero.
How to disassemble the headlight of a Lada Priora? Do-it-yourself Priora headlight disassembly
I welcome you to the website dedicated to automotive optics and lighting devices - FaraInfo. Today in the “Repair” section I will tell you how to disassemble the headlight on a Lada Priora at home. Disassembling a headlight is an activity that does not require special skills or special equipment. tool. However, without knowing the various subtleties and not following a certain sequence, you can fumble for a long time or break something.
Differences between Priors 2 headlights
Prior 2 headlights differ from conventional ones mainly in the shape of the reflector and the quality of the optics used.
Replacing any of the lamps in the headlight unit of a Lada Priora is not at all difficult. Our step-by-step illustrated instructions will help you cope with this task. There are differences in the procedure for replacing lamps in the headlights of cars manufactured before and after 2013, which we will show.
LADA > Priora
Attention! Halogen high and low beam lamps. Do not touch their glass bottles as the heat will darken the fingerprints. You can remove dirt from the flask with a clean cloth moistened with alcohol.
Replacing headlight bulbs on a car manufactured after 2013
Step-by-step removal of headlights
Whatever manufacturer makes the light unit, every car owner should know exactly how to remove the headlight on a VAZ-2110 before starting work. It is carried out in stages:
- Having opened the hood, you need to disconnect the “–” terminal from the battery in order to completely cut off the power to the car;
- it is necessary to remove the protective lining from the radiator very carefully and slowly;
- lighting devices are disconnected from the block and wires;
- The fixing element of the hydraulic corrector must be pressed tightly and turned to the right at a right angle. Next, the hydraulic corrector is simply removed from the socket, and there is no need to unscrew the connecting hoses;
- using a wrench of the appropriate size, unscrew the bolts securing the headlight in order to be able to move the block to the side;
- the fixation of the upper connecting bolts that hold the car bumper is weakened;
- by pressing on the lining, you need to ensure that the flange is disconnected from the buffer so that the lining can be freely removed;
- the lower headlight clamp is unscrewed;
- The reflector must be disconnected from the block and the block can be quietly pulled out by pulling it towards you.
If the removal of headlights is carried out step by step and according to the rules, then you will not break parts, but installing new parts or repairing old ones, and maybe even making original tuning, is within the power of anyone. You can learn more about the algorithm of actions in the video, which was made by professional machine masters.
The headlight unit can be dismantled for repair, replacement with a new one, or for tuning or modification. In this article we will talk about the removal and disassembly of a VAZ headlight of the tenth family, depending on its manufacturer (Bosch or Kirzhach).
Instructions for replacing fog lamp glass
Replacing PTF glass can be done by a person who does not have special knowledge, skills and tools.
- To replace the fog lamp glass, you need to find out how the PTF is attached to the bumper or to the car body? As a rule, the headlight is attached to the bumper with screws or nuts. The most convenient way is to partially or completely remove the bumper from the car. There is nothing complicated about this; to make the process easier, use the instructions for repairing your car.
- Then disconnect the PTF terminals from the on-board network.
- Inspect the removed fog lamp, determine the integrity of the reflective surface of the headlight.
- Apply a sufficient amount of adhesive-sealant to the dry, grease-free rim of the headlight so that the layer of sealant fills the entire space between the glass and the headlight housing; you can use any water-heat-resistant adhesive-sealant that meets the operating conditions of the PTF: temperature from -45°C to +150 °C
- Press the glass firmly against the headlight body (you can use a clamp for a better result) until the sealant is completely dry. That's the whole procedure for replacing PTF glass.
- Now install the light bulb, attach the PTF to the bumper, connect the terminals and put the bumper back in the reverse order.
Instructions for removing the front headlight unit on a Priora without dismantling the bumper: step-by-step description with photos
Having prepared the necessary tools for the work, you can begin the corresponding manipulations. It’s worth noting right away that to remove the headlights on a Priora, you don’t need to dismantle the bumper, but you need to loosen its side fastenings to move it to the side, and thereby gain access to the light fastenings. The process of removing the headlight unit on a Priora looks like this:
- Disconnect the battery terminal. In fact, it is not necessary to do this at all, since the probability of closing the circuit is extremely low. However, if the left headlight is being removed, it is recommended to remove the battery in order to gain access to the plug or power supply, which is connected to the lamp to disconnect it.
- Next, use a Phillips screwdriver to unscrew the four fasteners that secure the plastic protective cover. The smallest one is a self-tapping screw, and the three largest ones are bolts with a head for a Phillips screwdriver.
- We remove the trim and move on to the process of loosening the side of the front bumper. To do this, use a Phillips screwdriver to unscrew the three screws that secure the plastic fender liner to the bumper. For ease of work, you can turn the wheels in the opposite direction.
- Using a screwdriver, unscrew the two bolts securing the upper part of the bumper.
- Use a screwdriver to unscrew the three screws at the bottom of the bumper (the photo below shows both sides).
- These are the same screws, only in an approximate form.
- After this, the bumper must be disconnected from the body part. It is very important to focus attention here in order to perform the manipulations correctly. Few sources indicate how to do this correctly, so we’ll look at it step by step.
- Many people start pulling on the bumper, which ultimately leads to damage, so there is no need to do this. To disconnect the front bumper from the body on a Priora, you will need to use a screwdriver with an extended shaft.
- With its help, you need to carefully pry the bumper (starting from the edge) in order to disconnect it (disengage it). It is fixed at three points.
- The photo below shows what the grooves in which the Priora front bumper is fixed look like.
- After disconnecting the bumper, we gain access to two headlight mounts (one on the bottom and the other on the side).
- First, don’t forget to disconnect the power supply from the headlight. This is done using a slotted screwdriver, which you need to press on the latch and then remove the plug.
- To disconnect the plug, it is important to pull it by the plastic part, but not by the wires.
- If the left light (on the driver's side) is removed, but the battery is not removed (this is not necessary), then access to the power supply will be limited. To simplify the process of disconnecting the plug, you first need to disconnect the headlight, and then, by moving it forward, disconnect the chip.
- To remove the headlight, unscrew the bottom bolt to “10” (it is located under the lamp behind the bumper when it is moved down).
- Another mounting screw for a Phillips screwdriver is located on the side.
- The remaining mounting bolt is located at the top. We unscrew it with a key to “10”, and then remove the headlight.
Next, the necessary manipulations are performed with the part, after which it is installed in the reverse order of removal. The process takes no more than half an hour.
Below is a video of how to remove a headlight on a Priora with the bumper removed.
And the process of detaching the bumper on a Priora.
In conclusion, it is worth noting that the procedure for dismantling the headlight unit is not complicated, and even a beginner can cope with this task, but only if he has the necessary tools. Take a responsible approach to preparing the necessary materials so that no difficulties arise during the manipulations.