Replacing gearbox seals on a Lada Priora
Replacing gearbox seals on a Lada Priora is a rather complex process that must be carried out strictly according to all points in our manual. You can make the replacement yourself; we recommend doing it in a well-lit garage.
To replace the seals of the internal constant velocity joints (CV joints), drain the oil from the gearbox.
Replacing gearbox seals on a Lada Priora with your own hands.
1. Disconnect the front wheel drives from the transmission.
Do not disconnect both drives at the same time, as in this case the axle gears in the differential may move and it will be impossible to install the drives without disassembling the transmission. If it is necessary to disconnect both drives, after disconnecting one of them, insert the process plug or the old inner joint housing in its place. After this, disconnect the second drive.
2. Using a screwdriver, remove the inner hinge oil seal from the box housing.
3. Press the new oil seal using a suitable mandrel until it stops with the working edge inside the box.
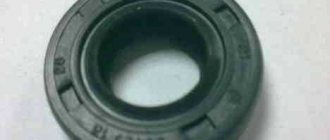
The oil drainage grooves on the seals of the right and left internal joints are directed in different directions.
For identification, arrows and part numbers are marked on the seals: on the right seal a (part number 2110–2301034–01) the arrow is directed counterclockwise, on the left seal b (part number 2110–2301035–01) – clockwise. The arrows show the direction of rotation of the wheels when the car moves forward.
4. Install all removed parts and assemblies in the reverse order of removal.
The reason for oily clutch discs may be a leak in the gearbox input shaft oil seal or the crankshaft rear oil seal. Engine oil and transmission oil have different smells. Therefore, having a certain skill, you can determine by smell which of the oil seals is defective: the input shaft oil seal or the rear crankshaft oil seal.
There is another way to determine the type of oil. Drop the oil into a thin layer of water poured into the vessel. The transmission oil will spread over the entire surface of the water in the form of a rainbow film, and the motor oil will remain in the form of a drop, similar to a lentil grain.
To replace the input shaft oil seal, you must remove the gearbox from the vehicle.
You will need: the same tools as for replacing the clutch release bearing, as well as a “10” wrench and a screwdriver.
1. Remove the clutch release bearing.
2. Remove the three bolts securing the guide bushing. Remove the guide sleeve.
3. Using a thin wire hook or a screwdriver, remove the oil seal. Press in the new oil seal using a suitable mandrel. The working edge of the oil seal must be directed inside the gearbox.
4. Install the removed parts in the reverse order of removal.
The gear shift rod oil seal can be replaced directly on the Lada Priora.
You will need: a 10mm wrench, a thin chisel, a hammer, and a mandrel for pressing the oil seal.
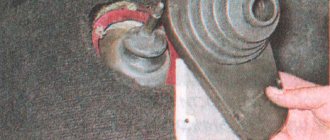
1. Remove the dirt boot from the joint and slide it over the shift rod.
2. Remove the bolt securing the hinge to the gear shift rod.
3. Then disconnect the gear selector rod along with the hinge from the rod.
. The bolt securing the hinge to the rod differs in length and color from similar bolts used in the gearbox to secure the forks and gear shift lever. This bolt is cadmium-plated (gold-colored), the rest of the bolts are phosphated (dark-colored). Do not replace this bolt with others.
Replace a bolt with a damaged taper shank or thread.
The bolt is fixed with special glue TB-1324. Before screwing in the bolt, clean it of old glue, degrease the threaded part and apply new glue. If special adhesive is not available, use a commercially available anaerobic thread locker.
4. Remove the dirt cover.
. Replace the torn or cracked dirt cover.
5. With the chisel resting on the collar of the rod seal race, use gentle hammer blows to press the race out of the gearbox housing.
6. Then remove it from the rod and seal assembly.
7. Using a suitable mandrel (you can use the socket from the tool kit), press out.
8. Now remove the oil seal from the race.
9. Press the new oil seal into the race until it stops with the working edge inside the gearbox.
10. Lubricate the working edge of the oil seal with transmission oil and, using light hammer blows, press the race along with the oil seal into the gearbox housing until it stops.
11. Install all removed parts and assemblies in the reverse order of removal.
Replacement of gearbox seals on Lada Priora has been successfully completed. Let us remind you that the previous article was about replacing the radiator of the cooling system on a Lada Priora with your own hands.
Pulling out the internal grenade from the gearbox. Video
Therefore, it is better not to try to tear the grenade out of the box by pulling the brake disc, but to insert a prybar under the grenade and a tube under the prybar, try to squeeze the grenade out of the box if it was squeezed out perfectly. It happens that a grenade cannot be squeezed out, then it is knocked down with hammer blows.
Photo. Removed grenade from the gearbox.
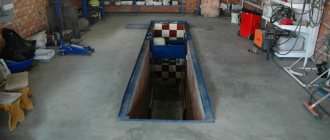
But before squeezing out the grenade, place a container to collect the oil; it can be made from an old canister by cutting a hole. If the oil in the box is normal, then it will definitely flow out of the box.
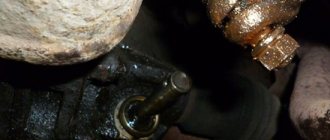
Photo. It is shown how you can use a pry bar to squeeze the oil seal out of the gearbox.
The grenade has been removed, squeeze out the old oil seal from the gearbox.
Photo. Grenade seal location.
Remove the old oil seal, wait until the oil is gone, and wipe the oil seal installation area clean with a cloth. For greater confidence, the new oil seal can be coated with sealants, and with light blows of a hammer on the oil seal circle, it can be seated in place.
Photo. Clogging of the oil seal into the gearbox.
The seal was hammered in, all that remained was to insert the grenade into place. Aim the grenade at the box and push it into place. Then assemble in reverse order.
What’s good is that when replacing the grenade oil seal this way, the alignment and camber of the wheel will not be disrupted, so you won’t have to adjust it.
Photo. The arrow shows the oil filler plug bolt into the gearbox.
All that remains is to add oil to the gearbox. To do this, you need to unscrew the bolt plug, which is good, the bolt plug is also the oil level in the gearbox, oil is poured into the gearbox until it flows from the oil filler hole, as little as it starts to flow out means this is the oil level in the gearbox.
Photo. The arrow shows a watering can with a tube for pouring oil into the box.
There are many different methods and devices for pouring oil into a gearbox. I use a simple watering can and a tube, put the watering can on the tube, and insert the tip of the tube into the oil fill hole in the gearbox. But this method is not very fast, since the oil is thick, but if there is no rush, you can wait a little while the oil fills the box. Usually a liter of oil is enough to top up.
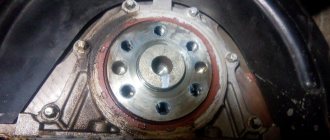
Pulley, or damper, generator drive, its purpose
The multi-belt drive of the generator and other additional units, when installed on the Priora, in addition to transmitting torque from the crankshaft, performs another important job. To understand its meaning, it is worth making a short digression into the ECM.
The principle of operation of an engine with an “injector”
Cars equipped with an ECM are radically different from conventional carburetor cars. The fact is that the ECU (Electronic Control Unit) is responsible for all the actions of the ignition and fuel supply systems. It is he who gives the signals for the formation of a spark in the cylinder chambers. And it sends signals for fuel injection by opening the fuel rail injectors. The question naturally arises, how does the computer know that it is time to issue commands to turn on the necessary nodes?
The crankshaft sensor informs him of this. It is worth considering this process in more detail. This sensor operates on the long and well-known Hall effect. That is, the signal is interrupted when a special technological clearance on the disc being read coincides with the sensor. On “injection” cars, this signal coincides with TDC (Top Dead Center) of the compression stroke of the first cylinder. So, you need to know that on Russian cars it is the pulley that does the work of the information disk.
Features of the pulley (damper)
The generator drive of the Priora, like other domestic cars, is called a damper. This is a Disk with streams, along the edge of which there is a series of teeth. In one place two teeth are missing. This is the desired position of the crankshaft, and it is from this that the computer starts counting. So, from the moment this opening enters the sensor’s coverage area, the Priora ECU sends signals to open the injectors and generate a spark in the cylinders, according to the usual scheme.
The engine operates according to tables stored in the ECU memory. From this it should be clear that the pulley not only powers the generator, but also gives the command to start the engine!
Repair or replacement
Before deciding whether repair, adjustment or replacement of the link is necessary, it will have to be disassembled.
- Remove the cover on the gear shift knob;
- The machine must be installed on a jack or on an overpass (pit);
- Remove the front console, which is bolted on;
- Remove the rocker by unscrewing 6 bolts.
During this procedure, carefully inspect all parts. You definitely need to bend the boot and inspect the condition of the support, cardan shaft, and oil seal.
It may be necessary to use a rem. kit, and perhaps a more complex repair is needed.
If the bushing is deformed, it needs replacement. If the cardan has play, as well as if the hole in the lever axis is worn, a complete replacement of the link and repair belt is necessary. the kit clearly won't help.
It happens that the rocker pad is to blame for the rattling noise when changing gears. Replacing a pillow is a simple operation, but can be beneficial.
What parts to choose for replacement
It is better to immediately change the boot along with the oil seal.
Before you begin repair work, you need to purchase the necessary parts for replacement.
As for the oil seal, Balakovo products are very popular. You need an oil seal with article number 2110–1701043 and 21100-1701043-00 .
Manufacturers offer two options for oil seals - simple and reinforced.
In addition, it is recommended to immediately purchase a cardan boot, as there is a high probability that it is also worn out. Even if this is not the case, it may break during the repair process. Therefore, it is better to spend a small amount on anther than to bother with disassembly again.
Recently, reinforced oil seals have appeared on sale, which are called that way. If you believe the assurances of sellers, their service life is significantly higher than that of standard products.
Two ways to replace the gearbox seal on a VAZ-2110
It is easier to change the oil seal with the gearbox removed.
Replacing an element that has become unusable can be done in two ways.
- The first of them is very labor-intensive, since it will be necessary to remove the gearbox. But replacing the oil seal will be much easier.
- The second method seems less time-consuming and labor-intensive, but in practice it is very difficult to carry out this procedure. Only experienced motorists who have repeatedly had to repair their cars can replace the oil seal directly on the car without removing the gearbox.
Troubleshooting
Experienced car owners know the visual reasons why they can determine the failure of the rocker seal. Naturally, for such reasons it is impossible to accurately determine the cause of the leak, but this gives a signal to carry out diagnostics, in which the cause of the oil leak can be accurately identified.
The most important sign is oil stains under the car, especially in the gearbox area.
An oily rubber boot indicates a malfunction of the rocker seal.
But these spots do not always indicate oil seal failure. It happens that this is due to the oil filter, which sometimes does not tighten properly. In any case, the driver is obliged to monitor for any oil leaks in the checkpoint area. To do this, you need to monitor the oil level. This is the only way to save the box from damage, which will certainly happen if it operates with a minimum amount of oil.
Another way that indicates the oil seal is worn out is a characteristic crunch that is heard when changing gears. But only an experienced VAZ-2110 owner can diagnose this crunch. In any case, if you hear unusual sounds when shifting into gear, it is better to diagnose the gearbox.
Set of tools required for replacement
A minimum set of tools for replacing the oil seal without removing the gearbox.
In order for the replacement of a part to take place without problems, you need to prepare the place and the necessary set of tools in advance. You will need:
- A set of keys and sockets, and for 13 you need two keys and there must be a key for 10. There must also be a socket head for 22.
- A chisel or screwdriver will be needed to knock out the oil seal.
- The hammer is small so you can get under it.
- Silicone sealant.
- Awl and hook.
Additional accessories
A regular self-tapping screw will allow you to do without a special puller.
For those who decide to replace the gearbox seal without removing it from the car, you will need additional equipment:
- Several long screws.
- A piece of pipe for pressing in a new oil seal.
It should be noted that the replacement process without removing the gearbox is much more complicated. In addition, there is a possibility of damaging the part being replaced during pressing.
How is the rod seal replaced?
First of all, the malfunction must be diagnosed. To do this, check the oil level in the gearbox. If it has become noticeably lower, drive the car onto an inspection hole or overpass. Pay attention to the junction of the rocker and the gearbox; if traces of oil are found there, the oil seal must be replaced.
First you need to purchase all the components. These include: the oil seal itself (you choose the material of manufacture yourself; there is no significant difference between them, but the difference in price is noticeable) and the boot of a small cardan. In most cases, this boot is either torn or will be damaged during dismantling. That is why it is necessary to purchase additional spare parts in advance so as not to open the hood again.
How to change the rod seal on VAZ cars
1. Get to the box stem; it is covered with a rubber boot. If the oil seal is faulty, then it will be very easy to find it by the characteristic oil stain, see photo.
2. Bend down the wide part of the boot; under it there is a cardan attached to the rod.
3. To gain access to the oil seal, you need to disconnect this universal joint from the rod and gear shift lever. To do this, use the key at “13”.
4. Unscrew the nut completely, this will loosen the connection between the cardan and the lever.
5. Remove the lever from the cardan, thereby engaging 1st or 3rd gear.
6. Disconnect the cardan from the rod using a key set to “10”; to do this, move the lever to the side.
7. Remove the cardan.
8. Next, remove the rubber boot, after which you will see the very reason for the repair - the gearbox rod oil seal. The oil seal is located in the recess - this is where the rod enters the box. It is impossible to remove the box seal without using a special tool, so take an awl and get to work. As an option, you can use a self-tapping screw, the principle is simple - you need to screw in the self-tapping screw and “uncork” the stem seal as if with a corkscrew.
9. Once the old rod seal is removed, you can begin replacement.
10. Before replacing the VAZ 2108-2109 oil seal, you need to thoroughly clean the seat from oil, sand and other dirt.
11. If everything is ready, press the new box seal into the seat.
12. Replacing the VAZ 2108 gearbox seal is easier using a plastic bottle cap. This is done as follows: the inner part of the plug is cut out and a new oil seal is installed through it. I, for example, managed without her; in short, it was the boss’s business.
13. After installing the new rod seal, begin assembly; it is done in the reverse order.
There are only two ways to change such an oil seal. The first necessarily involves the dismantling of the gearbox with further disassembly of the unit and replacement of the faulty part. And the second involves replacing the oil seal without removing the transmission. We will consider the second method, since it is less labor-intensive and takes less time.
Required tool:
- Wrenches for 10 and 13
- The most common awl
- Soda cap
- Bent slotted screwdriver. You can also use a crochet hook.
Be prepared to have to crawl under the car. It is best to use a viewing hole or overpass, but you can also raise the car using jacks. Don't forget to be safe!
- Find the gearbox rod under the front of the car and bend its boot so that you can access its transition into the gearbox.
- Unscrew the cardan mounting bolt and remove it from the rod. Do not forget to disconnect the universal joint from the rod so that it does not interfere with the further replacement procedure. Now remove the boot completely. Immediately behind it you will see the same problematic gearbox rod seal.
- Now drain the oil from the gearbox, otherwise after removing the oil seal, it will simply pour out. The oil seal itself is not easy to pull out; here you will need a special tool in the form of an awl. Many car repairmen screw the screw into the oil seal and simply pull it towards themselves. This creates a corkscrew effect.
- Wipe the seat where the oil seal is inserted from dirt and transmission oil. It is best to use a completely old unnecessary rag or dry rags for these purposes.
After this, you can insert a new oil seal. Installation can be done in any available way. For example, you can use a regular plastic stopper for this. Cut out its center and press the oil seal into its seat using light pressure. However, no one forbids using another method; the most important thing is not to damage the new part, otherwise all the work will be done in vain.
To check the oil seal, start the engine and try to drive the car. If there are no leaks after this, then you did everything correctly.
As you have already noticed, it was not difficult at all. We hope that this article helped answer the question of how to change the gearbox rod seal.
What is a gear selector rod and why is it needed?
Older cars had a classic layout, with the rear wheels driving and the gearbox located under the car's interior. The gearshift knob was brought into the cabin and made it possible to control the transmission directly. In front-wheel drive cars, there is an urgent need for a special mechanism that would allow control of the gearbox located under the hood, while sitting in the car's interior. This device is called the gear selector rod, or, as drivers are accustomed to calling it, the rocker.
This part is inserted into the gearbox and connected to the gear shift handle mechanism. Using special levers, the gearbox handle acts on the rod and changes its position, which leads to a gear change.
The rod is connected to the gearbox through an oil seal, since there is oil inside the box that is under constant pressure. To prevent pressure from squeezing the oil out, a system of seals is provided in all parts of the gearbox connecting to external mechanisms.
The oil seal is a round rubber product, inside of which there is a hole for the rod. The material used may vary. It all depends on the make and model of the car, although many manufacturers make oil seals of the same size but from different materials. They all differ in their properties, but they have the same function - to prevent oil leakage from the car transmission by increasing the tightness of the moving parts of the unit.
Backstage repair and adjustment
In this section we will describe the replacement of all consumables, as well as all the adjustments to the Priora gearbox that can be carried out on a particular transmission.
Backstage repair kit
To repair a Priora gearbox of any type, you will need:
- pit;
- overpass;
- lift;
- jack with safety stands.
In addition, you will need the following tools:
- a set of spanners and open-end wrenches;
- flat and Phillips screwdrivers;
- ratchet with extension and set of bits.
If you work from a jack, be sure to use safety stands. And after installing the car on them, shake it strongly in all directions. If it falls off the stands, it means you installed them incorrectly. But it’s better if the car falls while you’re not under it.
Repair and restoration work
Regardless of the repair, adjustment or replacement of the link, the need to disassemble this unit does not disappear.
The parsing process includes the following procedure:
- First, you need to remove the casing from the gearshift lever, or, more precisely, from its handle.
- The front of the car needs to be raised with a jack or placed on a pit.
- Unscrew the mounting bolts that hold the front console, and then remove it.
- Now you need to unscrew the six bolts that hold the rocker and also remove it.
- When dismantling, you should be extremely careful, paying attention to the condition of each part and element, so that if their condition is unsatisfactory, replace it with a working analogue.
- To gain direct access to the cardan shaft, oil seal and support, you need to bend the boot.
Now let's get back to the repair itself. In fact, depending on the condition of the components and the unit itself, several recommendations can be made:
- It is practically impossible to do without a special repair kit for repairing the backstage, fortunately it is inexpensive.
- If the bushing is deformed during the repair work, it will have to be replaced with a new one.
- If the driveshaft is loose (which needs to be verified), then the matter will not be limited to just one repair kit, since you will have to dismantle and install a new rocker.
- The hole in the lever axis must be examined in detail, checking for wear.
- The rocker pad is one of the common reasons leading to random gear shifting and the appearance of extraneous noise and vibration. Replacing it is quite simple, so even a beginner can cope with this task.
Changing the oil seal
Many owners of a VAZ 2110 can often observe a situation where, after a long period of parking the car, traces of oil are found underneath it (on the ground). The problem has two causes: wear or damage to the oil filter, or wear to the oil seal.
Interestingly, when replacing the oil seal with a new one, owners will have the opportunity to completely replace the driveshaft, boot or cushion. Very comfortably.
However, before starting repairs, you need to objectively determine the cause of the oil leak. To do this, you need to carefully inspect the oil seal and filter for damage or wear. Once you are finally convinced that the oil seal is faulty, you should begin preparation and direct repair work.
If the filter is fully operational and not damaged, then in this case, you should put the car in a pit or find another way that will make it possible to get to the bottom.
It would be wise to watch videos dedicated to this type of repair, as well as view other useful materials, including information about repairing the VAZ 2110 backstage.
After that, you can get down to the most important thing:
- The boot should be studied in detail and inspected. If oil leaks from the gearbox, then traces of it will certainly remain on the surface of the boot.
- To get to the cardan, you will have to bend the boot. Afterwards, disconnect it, thereby gaining access to the cuff.
- Dismantling the cardan should begin by disconnecting the lever, and only then freeing it from the rocker.
- Let's move on to the oil seal.
- Before removing the cuff, you need to prepare the hook and awl in advance, since it can only be removed thanks to them.
- To install a new oil seal, craftsmen often resort to using a standard plastic bottle cap. This is quite convenient in practice.
- After successful installation, we assemble in the reverse order.
Replacement of gearbox drive oil seal VAZ-2108, 2109
The main task of the drive oil seal in VAZ-2108 and VAZ-2109 models is to ensure the tightness of the gearbox housing. More precisely, the part seals the gap between the gearbox housing and the drive shaft.
Today, several types of oil seals are used in the automotive industry - packings, collars or collars. But, regardless of the type, they are put on the shaft and installed in the place where the covers are grooved, and are also mounted in the recesses of the unit body. Replacing the drive oil seal on a VAZ-2109, 2108 involves installing new radial-type side seals into the gearbox housing (see video about replacing the drive oil seal on a VAZ, below).
Where to start: diagnostics, tools and purchase of an oil seal
Before starting work, determine the location of the leak, the presence of damage and the level of wear of the seals. The easiest way to diagnose the condition of parts is by the presence of oil leaks on the gearbox housing. If nothing is done, the stains take on the appearance of greasy dirt that never dries.
Before replacing the drive oil seal on VAZ-2108 and 2109 vehicles, perform a breather diagnostic. This is due to the fact that problems with ventilation in the gearbox are usually associated with high crankcase gas pressure. The latter, in turn, squeeze oil into the side cuffs.
To change the drive seals on the “eight” and “nine”, you will have to dismantle the drive and drain the oil from the gearbox. To do this, prepare the necessary tools - a pair of keys (for “thirty” and “seventeen”) with a long knob, a device for pressing the oil seal, a screwdriver, a container for draining oil (from 3 liters) and a mounting kit. In the absence of a pressing device, the use of a mandrel and a hammer is allowed.
Some craftsmen, to press in a new oil seal, use the body of an already removed cuff. But this is very inconvenient during installation. That is why it is better to choose a mandrel suitable for the diameter and do the pressing with its help. The simplest alternative is to use a pipe of a suitable diameter.
The next step is to purchase a new part to replace the drive oil seal.
And here it is important to know the specifics of the part in question. In the case of VAZ-2108 and 2109, the oil catch grooves inside the left and right oil seals are different
Many people do not know the benefits of such details. In fact, it's simple. The oil seal's job is to keep oil inside the device. The result is achieved due to two effects - reflection of the lubricant from the oil seal (due to notches) and tight contact of the inside of the part with the rotating shaft
This is why it is so important that the direction of the notches is identical to the direction of rotation of the shaft
To avoid problems with replacing the drive oil seal, on VAZ-2109 and VAZ-2108 vehicles, the manufacturer puts special markings in three options (shown by arrows in the photo):
- Drawing arrows on the inside of the part. If the oil seal should be installed on the right, the arrow points, on the contrary, to the left.
- Designations in the catalog number. The easiest way to recognize a cuff is by the number. If the last digit is even, then the part should be installed on the left, and if odd, then on the right.
- Made in different colors (typical for the Balakovo manufacturing plant). If the oil seal is intended for installation on the right, it is made in black, and if on the left, then in brown.
practical guide
Replacement of drive seals is carried out without removing the gearbox from the vehicle.
The oil seals of the right and left drives are not interchangeable (catalog numbers: right oil seal - 21100-2301034-00 or 21100-2301034-01; left oil seal - 21100-2301035-00 or 21100-2301035-01)
Do not remove both drives at the same time or, if necessary, install a special mandrel in place of one of them to prevent the side gears from falling out of the differential box.
Execution Sequence
1. We prepare the car for work.
2. Drain the oil from the gearbox.
4. Using a large slotted screwdriver or a spatula, pry up the oil seal and remove it from the gearbox housing.
5. Lubricate the working edge of the new oil seal with transmission oil and press it in, using the old oil seal as a mandrel.
7. Replace the second wheel drive oil seal in the same way.
Add a comment Cancel reply
You must be logged in to post a comment.
How does the backstage work?
The principle of operation of any scene is the same: moving the manual transmission lever in two planes (forward - backward, left - right) through a system of levers and rigid or flexible rods leads to the movement of the corresponding forks inside the gearbox. In turn, the forks displace the clutches of one or another gear, due to which they engage with the secondary shaft, forming a full-fledged gearbox with a given transmission ratio.
Backstage on the Priora
In first gear, the ratio of the rotation speed of the secondary and primary shafts is minimal, due to which 3-4 revolutions of the primary shaft account for 1 revolution of the secondary. In direct (fourth) gear, the rotation speeds of both shafts are approximately the same. But at the highest gearbox it turns from a reduction gearbox into a step-up gearbox, because for 2 revolutions of the primary shaft there are approximately 3 revolutions of the secondary shaft.