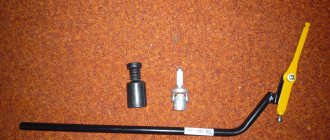
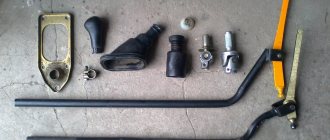
Disassembly, repair and assembly (overhaul) of the gearbox
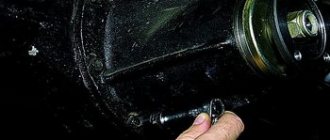
Drain the oil from the gearbox, remove the fork and clutch release bearing (see the relevant sections).
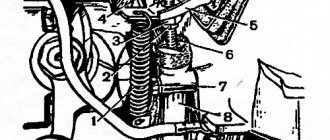
We dismantle the flange of the elastic coupling from the toe of the secondary shaft (see here)…
| ...and the reversing light switch. |
The gear selection mechanism can be removed from the vehicle without removing the gearbox. For clarity, these operations are performed with the gearbox removed.
| Remove the gear selector cuff. |
Set the gear shift lever to the neutral position.
| Using a 10mm socket, unscrew the three nuts securing the gear shift lever housing... |
| ...and remove the gear selection mechanism. |
| The connection is sealed with a gasket. |
| We use a marker to mark the relative positions of the washers and the guide plate of the mechanism. |
| Using a 10mm socket, unscrew the two nuts securing the reverse locking plate, holding the bolts with a wrench of the same size... |
| ...and remove the locking plate. |
Unscrewing another nut...
| ...remove the lower washer of the guide plate. |
Having taken out one guide bar with two springs,...
| ...remove the guide plate from the lower end of the lever. |
| Remove the upper guide plate washer. |
| Remove the gear shift lever housing. |
| We remove the rubber sealing rings of the bolts from the grooves of the housing. |
| Remove the lower ball joint housing gasket. |
| Remove the flange with the protective cover... |
| ...and the upper housing gasket. |
| Using pliers, remove the retaining ring. |
| Remove the washer and spring. |
| We remove the spherical washer... |
| ...and disconnect the lever and the ball joint housing. |
We install the gearbox with the clutch housing on the workbench.
| Using a 10mm socket, unscrew the ten nuts securing the lower gearbox cover. |
| Using a screwdriver, through the hole in the gear selection mechanism, we move down the fork rod for selecting 1st–2nd gears (this engages 2nd gear). |
| Using a 13mm wrench, unscrew the rear cover fastening nut located inside the box body. |
| Using a 13mm wrench, unscrew the five nuts securing the back cover located outside the case. |
| We tap the cover bosses with a hammer, while using a screwdriver (or a suitable piece of pipe with the secondary shaft oil seal removed) hold the rear bearing on the secondary shaft. |
| We slide the cover off the studs and remove it, turning it clockwise (looking from the side of the secondary shaft shank) to prevent the cover from touching the rods and the gear block of the 5th gear and reverse gear. |
To replace the bearing of the gear block of 5th gear and reverse...
| ...pry up the bearing rollers with a screwdriver... |
... and remove the rollers from the separator.
| By hooking the outer ring of the bearing with a hook... |
| ...remove it from the rear cover slot. |
| Remove the thrust ring of the rear bearing of the secondary shaft. |
| Remove the outer ring of the bearing with the cage and rollers. |
| Remove the inner race of the bearing. |
| Remove the spacer sleeve... |
| ...and an oil deflector washer. |
To stop the shafts from turning, it is necessary to engage two gears. 2nd gear was engaged when the rear cover was removed. Before engaging reverse or V gears, release the fork for these gears. For this…
| ...using a 10mm wrench, unscrew the bolt securing the fork to the rod. |
| Pressing the screwdriver down on the fork, engage reverse gear. |
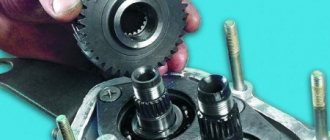
| Using a 17mm spanner (head), unscrew the bolt securing the fifth gear and reverse gear block. |
| ...and remove the gear block from the intermediate shaft splines. |
We clamp the block of gears of the 5th gear and reverse gear in a vice with soft metal jaw linings.
| Using two screwdrivers we press the inner ring of the gear block bearing... |
| ...and remove the inner ring. |
| Remove the 5th gear gear bushing... |
| ...the gear itself with the synchronizer blocking ring,... |
| ...and the synchronizer clutch. |
By turning the 5th gear and reverse fork on the rod towards the secondary shaft,...
| ...remove the reverse gear intermediate gear. |
| Using a 13mm spanner, unscrew the two bolts securing the clamp cover. |
| Remove the cover and gasket. |
| We take out the springs of the clamps (the rod spring of the 5th gear and reverse gear is longer than the other two and has a dark coating color). |
| Using a magnetized screwdriver, remove all three latches. |
| We take out the 5th gear and reverse gear shift rod with the fork. |
| Remove the plug from the rod. |
| Using a magnetized screwdriver, remove the locking block from the hole in the gearbox housing, which is located between the crankcase sockets for the rods of 5th gear, reverse gear and 3rd–4th gears. |
| Remove the reverse driven gear from the secondary shaft. |
| We remove the key from the shaft groove. |
| Using a 10mm socket, unscrew the bolt securing the 3rd–4th gear shift fork to the rod. |
A locking block is inserted into the hole of the rod...
| Using a magnetized screwdriver, remove the locking block from the hole in the gearbox housing, which is located between the crankcase sockets for the rods of 1st–2nd and 3rd and 4th gears (this block is noticeably longer than the block located between the 5th-reverse gear engagement rod and the 3rd–4th gear engagement rod) . |
| Using a 10mm socket, unscrew the bolt securing the 1st-2nd gear shift fork. |
| Using an impact screwdriver with a Phillips head, unscrew the three screws securing the locking plate of the secondary shaft intermediate bearing. |
| The screws are secured with special washers. |
| Remove the locking plate. |
| Using a 19mm wrench, unscrew the nut securing the reverse intermediate gear axle, holding the axle from turning with a 24mm wrench. |
| We take out the axis of the reverse intermediate gear. |
Having unscrewed the clutch housing mounting nuts...
| ...we separate the clutch housings and gearboxes. |
| Remove the spring washer with a conical surface from the input shaft (its smaller diameter faces the bearing). |
We clamp the splined part of the input shaft in a vice with soft metal jaw linings.
| Using a 19mm spanner, unscrew the bolt of the clamping washer of the front bearing of the intermediate shaft. |
| Remove the bearing clamp washer. |
| Using two screwdrivers, we pry the front double-row intermediate shaft bearing by the mounting ring... |
| ...and remove the bearing. |
When a bearing is removed, its rear inner race may remain on the shaft.
| Use two screwdrivers to press the rear inner race of the bearing... |
| We take out the thrust ring of the rear bearing of the intermediate shaft. |
| By inserting a screwdriver between the ends of the bearing and the first gear gear of the intermediate shaft, we move the rear bearing. |
| We take out the outer ring of the bearing with the cage and rollers. |
| Remove the inner race of the bearing from the shaft toe. |
| By moving the intermediate shaft back... |
| ...remove it from the gearbox housing. |
| Using two screwdrivers, pry the rear bearing of the input shaft by the adjusting ring... |
| ...we take out the input shaft assembly with the bearing and synchronizer blocking ring. |
| Using pliers we open the locking ring... |
| Remove the spring washer. |
We rest the end of the outer ring of the bearing on the jaws of the vice.
| Using a hammer with a plastic striker, we strike the end of the input shaft... |
| ...and press the bearing. |
| Using pliers we open the mounting ring... |
| Having moved the synchronizer locking ring, use pliers to open the locking ring... |
| Remove the locking ring... |
| ...and a synchronizer spring. |
The blocking rings of the synchronizers of other gears are removed in the same way.
| Remove the needle bearing from the front toe of the secondary shaft. |
| Remove the shift forks for 1st and 2nd, 3rd and 4th gears. |
| Using two screwdrivers, we pry the intermediate bearing of the secondary shaft by the mounting ring... |
| Having tilted it, we remove the secondary shaft assembly with gears, couplings, hubs and synchronizer blocking rings from the gearbox housing. |
| From the rear side of the shaft, remove the bushing and the 1st gear gear assembly with the blocking ring. |
| Remove the bushing from the gear. |
| Remove the synchronizer clutch for engaging 1st and 2nd gears. |
| Remove the synchronizer hub. |
| Remove the 2nd gear gear assembly with the blocking ring. |
| From the front end of the secondary shaft, remove the synchronizer clutch for 3rd and 4th gears. |
Clamping the secondary shaft in a vice with soft metal jaw linings,...
| ... use pliers to remove the retaining ring. |
| Remove the spring washer (it is installed with the convex side towards the front end of the shaft). |
| We remove the synchronizer hub for 3rd and 4th gears... |
| ...and the 3rd gear gear assembly with the synchronizer blocking ring. |
We assemble the gearbox in the reverse order. If, when removing the front double-row intermediate shaft bearing, its rear inner ring remains on the shaft, then the bearing must be assembled before installation. To do this, from the outer ring of the bearing...
| ...use a screwdriver to carefully remove the separator with balls... |
| ...and put it on the inner ring (removed from the shaft). |
| We insert the separator with balls and inner ring into the outer ring of the bearing. |
When assembling the input shaft...
| ...using a suitable piece of pipe, press the bearing onto the shaft, resting on its inner ring. |
After installing the secondary and intermediate shafts into the gearbox housing, we press in the front and rear bearings of the intermediate shaft, the intermediate bearing of the secondary shaft and the inner race of the gear block bearing. The outer ring of the bearing of the gear block of the 5th gear and reverse gear...
| ...press a tool head of a suitable size (a piece of pipe) into the socket of the rear cover. |
We insert the cage and rollers into the outer ring of the bearing. To prevent loosening of the bolt securing the fifth gear and reverse gear unit, apply thread sealant to the bolt threads. For ease of installation of the rear cover, we install the rear bearing assembly on the secondary shaft. It is advisable to lubricate all sealing gaskets with a thin layer of silicone sealant. When assembling the gear selection mechanism, apply Litol-24 lubricant to the ball joint.
Resource of transmission elements
With proper maintenance, all transmission elements have service lives that comply with the regulations. The existing stereotype about unreliability is not confirmed either documentary or practically. Until now, the Chevrolet Niva remains one of the most popular cars on the market. The owners claim that the car is taking care of its 200,000 km, which the plant lays down as a resource. This means that the transmission resource is determined by the manufacturer and cannot be less than 200,000 km.
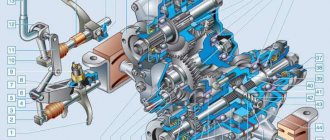
A car with honest all-wheel drive for little money is a rarity in the modern market. That is why the Chevrolet Niva is in stable demand, both new and used. The simple and reliable all-wheel drive system of this car does not cause any particular difficulties in repair and maintenance, and to eliminate any malfunctions it is enough to know the architecture, design and operating principle of the main transmission components.
VAZ 2131 gearbox repair
Is your Niva's transmission starting to fail? The situation is not pleasant: it becomes uncomfortable to drive, and safety on the road remains in great doubt. We will talk about the reasons for the failure of transmission elements another time. Now let’s try to figure out what to do in fact: change the box or repair it.
Replacing Niva Chevrolet boxes is a service that is quite in demand. There are objective reasons for this. And not necessarily caused by breakdowns of the transmission unit. For example, a gearbox is often replaced from a 4-speed to a 5-speed, and the Niva gains a significant advantage in functionality.
If we are talking about a faulty box, there are two traditional options. The first is repair (professional, high-quality, performed in a workshop). The second is replacing the transmission unit. Prices for Niva Chevrolet gearboxes vary widely. This is due to the range of offers and the type of units sold. What is more profitable: repair or replacement?
Also interesting: Gearbox VAZ-21213 Lada Niva, VAZ-21214 Lada 4x4, diagram
The cost of repairing a Niva gearbox directly depends on the specifics, quantity, location of faults, and the volume of work to be done. The same applies to the timing of order fulfillment in the workshop.
If we talk about profitability, then everything is simple: the fewer breakdowns the gearbox has, the cheaper the auto mechanic will cost. Accordingly, repairs will not hit your pocket. For example, replacing VAZ 2123 gearbox seals, the price of the service is affordable, carried out promptly, with a quality guarantee. Such a simple repair allows you to quickly return the SUV to service. Checking the level, changing the oil, tightening fasteners and other simple types of repairs are inexpensive.
If the gearbox is severely damaged (and this often occurs after accidents), has been worn out for a long time, has been operated in extreme mode, or in conditions of violation of the rules for working with the clutch, it is impossible to do without overhauling the transmission unit. Such repairs require time and serious financial costs. In this case, it will be faster and easier to replace the gearbox.
If you need a box for a VAZ 2131, the price of which is affordable, contact our workshop. Specialists will select the best option from a used assortment. You can save money and time.
It is not so rare that there are cases when replacing the gearbox is the only way to restore the functionality of the vehicle. First of all, we should note the cars that have been in an accident. If the box is severely damaged, it is hardly advisable to repair it. Replacing it allows you to get a reliable unit with standard technical characteristics and a safety margin.
If you need a gearbox for model 21213, you can buy a transmission unit in Moscow quickly and inexpensively. Our workshop offers a wide range of gearboxes. All components have been sorted out and restored by our specialists. Using our own resources (both human and technical) allows us to guarantee the quality of each unit.
It's up to you to repair a broken box damaged in an accident or replace it. In both cases, we can only recommend one thing: contact professional specialists. This will significantly save your time and money.
Failure of any vehicle component is a serious problem. Firstly, the vehicle becomes unsuitable for normal use. Secondly, the car owner should prepare for the costs. The latter may be different.
Are you looking for the best offer for the request “Chevy Niva gearbox, repair, price in Moscow”? We are waiting for you in our workshop. Car service specialists will select the optimal solution, taking into account the specifics of a particular situation and the budget allocated for repairs.
Every potential customer of repair services is concerned with the question: how much does a transmission cost on a Chevrolet Niva? Will the cost of restoration be at the same level as that of replacing the transmission unit or lower? We hasten to answer it: it all depends on the complexity of the damage to the unit. Sometimes it is more effective to replace the gearbox and not bother with the bulkhead. A used VAZ 21214 gearbox will be inexpensive; the price of the unit in this case is determined by its safety margin.
Maintenance Recommendations
The cause of the malfunction may be the exhaustion of the intended resource, but most often it lies in non-compliance with basic recommendations for operation and maintenance. Routine maintenance includes only timely replacement of transmission lubricant. It needs to be changed every 40 - 45 thousand kilometers.
Repairing a box is an expensive proposition. It often has to be carried out at a service station, so it is necessary to periodically check the oil level in the gearbox and inspect the crankcase for leaks.
Read news about the new Niva
- LADA Niva – Operating manual – Official LADA website
- Front axle. VAZ 21213, 21214 (Niva)
- Chevrolet Niva transmission repair in St. Petersburg (SPb), Primorsky district, list of car services - addresses, phone numbers and reviews
- How to bleed the clutch on a Niva? Algorithm of actions
- Replacing the drive gear oil seal of the front axle VAZ 2121 Niva 2131
- Installation and reviews of Euro handles for Niva 4x4 (VAZ 2121, 2131) » Lada.Online - all the most interesting and useful about LADA cars
- How to bleed the brakes on a Niva yourself? "
- Interior heater valve VAZ 2121 Niva 2131