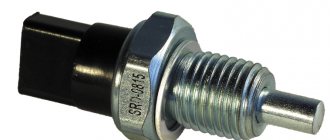
Heater valve VAZ 2110
Replacing the stove tap on a VAZ 2110
There is a possibility that most users of VAZ 2110 cars will not be able to find this tap in their car. It was installed on earlier and recently released modifications of the car, and therefore, if the model was purchased not so long ago, then this mechanism may not be in this place. Although, some craftsmen manage to install a similar mechanism on their car. The heating system is one of those that most often breaks down. This part of the car allows you to drive the vehicle in different weather conditions with increased comfort.
This stove tap is adjusted remotely. In versions of VAZ 2101 - 2110 cars, this mechanism is one of the most frequently broken. After each trip, it is necessary to constantly monitor its valves. This is necessary to eliminate leaks. As soon as leaks are discovered, the equipment must be replaced immediately.
Note. It was this fact that forced the manufacturers of the VAZ 2110 to abandon the crane. But after modernizing the crane, they began to install it again.
Replacing the faucet
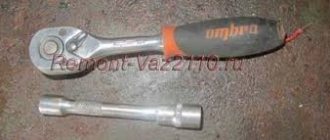
To carry out work to replace this equipment, you must have a special tool on hand. You will need:
After each tool is ready, you must immediately begin replacing it. For this purpose, you must use the following methods:
- The engine must be drained of coolant.
- The heater has two hoses. They are secured with clamps. Liquid swells from one and flows into the other. These clamps need to be slightly loosened, but not completely unscrewed.
Note: if the valve is replaced due to insufficient sealing, then, most likely, all the coolant has already managed to drain into the car interior before the repair is carried out. This problem can be detected if there is a puddle of the same liquid under the passenger seat rug. Also, if there is no coolant in the system, a constantly cold air stream will flow from the stove.
An undoubted companion to a fluid leak is the presence of a specific odor in the cabin.
- The two bolts are unscrewed with a key marked “7”.
- The rubber insulation is removed.
Note: the bolts must be unscrewed carefully, since the fastener itself is plastic and the slightest failure in the thread can lead to major complications.
- The body is removed from the box.
- The duct has a bracket nut that needs to be removed. A wrench with the number “10” is used.
Electric stove faucet
- Using a screwdriver, you need to disconnect the clamps on the heater body.
- The right air duct is disconnected first.
Note: the right air duct has a specific “body”. If necessary, you can fold it a little.
- The faucet has a fastening in the form of two nuts. They are removed using a wrench that has the number “10”. These bolts secure the faucet to the car's radiator.
Note. Some cars have a plastic reservoir. It has a fastening that is locked into cage nuts. You must always be careful here, since the lower nut has the ability to fall out.
When it becomes necessary to assemble this device, it is necessary to disconnect the two springs that secure the stove fan housing on the tap side. After completing this procedure, you need to slightly lower the body down and “tighten” the bolt nut. After which it must be clamped.
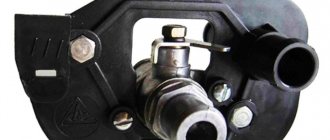
Heater valve for VAZ 2110 with outlet and inlet clamps
Assembly occurs in reverse order. It is necessary to consider the replacement of all rubber, polyurethane and other gaskets. Also, it is necessary to use a special product for better grip. Standard sealant will do.
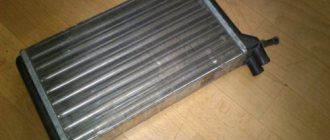
VAZ 2110 stove faucet and heater
The last step is to add coolant to the car. As soon as the liquid is poured into the car, it is necessary to start it. The temperature must be brought to 90 degrees Celsius. The tap is opened and checked for fluid leakage. If there is no leak anywhere, the replacement was successful.
The cost of such a product as a stove faucet for a VAZ 2110 is very insignificant. Even in the most remote cities of the country or small towns, you can find a similar crane without much worry. Detailed step-by-step videos and photos on replacement can be found on the Internet. The same applies to the equipment itself. If suddenly there is a need to replace the faucet, but it is not on sale in specialized stores or service stations, you can always place an order on the Internet. This crane will arrive after a few days, depending on the region. Payment can be made at the request of the customer or sales representative. It is necessary to prepare the car before starting work. To perform the work, it is necessary to place the car on a flat surface and secure it in one place. Also, the car should be completely cleaned of dirt. A sink is ideal. Care must be taken to ensure that water does not enter the engine operating systems. If you encounter even the slightest difficulty when replacing this faucet, it is better to contact specialists who will carry out this work for a small amount. As you can see, no special difficulties will arise when replacing the faucet yourself. It is advisable to do everything as required by the instructions. This way, you can avoid mistakes and save a lot of money, because the price of services from professionals is quite high.
Removing the heater radiator
Your first priority is to get rid of the antifreeze. It is better to drain the coolant into a clean container if you filled it recently and it is in good condition. This will allow you to refill it later.
- Relieve pressure by opening the expansion tank cap. Just let the car cool down before doing this.
- Next, behind the ignition module, find the plug that needs to be unscrewed.
- You should have about 4 liters of coolant coming out of the hole. Therefore, prepare a container of appropriate size.
- Or you can drain through the expansion tank. Although this option is not particularly convenient.
Let's consider both options separately.
Old stove
The radiator is removed from the engine compartment. This is done as follows:
- Remove the rubber frill seal;
- Under the brake master cylinder, locate the fasteners that hold the frill in place. Unscrew it;
- Now remove the screws that hold the right side of the frill in place. There should be four of them in total;
- Disconnect the two small clamps on the frill. They hold wires and hoses;
- The positive terminal and negative wire are disconnected from the fan;
- Move the left side of the frill forward a little, but you don’t need to remove it completely. All you need to do is unscrew a couple of fasteners;
- Remove the wind cover;
- If there is a coolant level sensor terminal, disconnect it;
- Remove the steam exhaust hose from the expansion tank.
Removing thermal insulation
Next, you need to remove some elements one by one. Proceed strictly in the specified sequence.
- Windshield washer hose.
- Wipers.
- Windshield trim. Heater housing clamps.
- Front part of the heater with fan.
- Cabin filter.
- The second part of the case is the fan.
- All hoses (steam outlet, return and supply).
- Radiator housing.
So we figured out how to remove the heater radiator on an old-style VAZ 2110. When installing a new unit or a repaired old one, make sure that the pedal of the plastic housing from the fan fits into the groove. If this is not done, the gearbox will not be able to change the position of the damper. Consequently, there will be no heat inside the cabin.
In addition, it is better to replace this plastic pedal with an aluminum one. Not expensive, easy, but reliable and durable.
New stove
If you are dealing with a new type of stove, there are some nuances regarding fixing the heater to the body.
To remove the unit, you will need to dismantle several elements. Namely:
- There are screws at the bottom of the windshield, the middle one can be unscrewed;
- Also unscrewed is a pair of nuts that you will find slightly above the intake manifold;
- The nut located to the left of the filter must be removed;
- If there is a reservoir with washer fluid for the rear window, then it and the air filter are removed.
Replacing the stove tap with your own hands
Every motorist should be able to at least to some extent be able to maintain his car. This refers to a basic set of knowledge and skills that will help you save money on auto repair shops and prevent you from getting stuck in the middle of the road with a broken down car.
VAZ-2110 owners know firsthand about the problems that often arise with the heating system of this car. The weakest point in the heating system of the VAZ-2110 is the heater valve. Replacing it is not quick, but it can be done independently.
Price and articles
Below is a table with prices for the VAZ 2110 heater radiator, both old and new.
Radiators for old-style heaters from 1996 to 2003.
| Manufacturer | vendor code | Price, (rubles) |
| OR (copper) | 2110-8101060 | 2280 |
| DAAZ | 2110-8101060 | 1115 |
Radiator for a new type heater from 2003 to 2007.
| Manufacturer | vendor code | Price, (rubles) |
| Luzar | 2111-8101060 | 930 |
| AvtoVAZ | 2111-8101060 | 1100 |
| KRAFT | 2111-8101060 | 1050 |
Installing a new faucet
The heater tap is not located on all VAZ-2110 vehicles. If your car is new, this item may not have been installed. Some cars may have a modified VAZ-2110 heater tap.
This device is regulated remotely, which cannot be said about the replacement process. Each VAZ-2110 owner must carefully monitor the condition of the valves, which will allow leaks to be identified and eliminated in a timely manner.
Basic Workflows
To replace an old tap with a new one, you will need a new element and keys for 7 and 10. Replacing the stove tap is carried out according to the following scheme:
- Drain the coolant.
- We find two hoses on the heater, which are secured with clamps. One serves for the outflow of liquid, and the other ensures its supply. There is no point in unscrewing the clamps completely; it will be enough to loosen them a little and easily dismantle them.
- The VAZ-2110 heater valve may require replacement due to depressurization. In this case, there is a high probability of coolant leaking into the passenger compartment. If this situation occurs, then there will be a puddle under the carpet near the front passenger seat, and a characteristic odor will be present in the cabin.
- We will continue to work on replacing the faucet. At this stage you need to unscrew a couple of bolts. A size 7 wrench will come in handy here. This will allow you to remove the seal. When unscrewing the bolts, care and caution will not hurt, since the fastener is made of plastic, and malfunctions may appear on the threads.
- Remove the body from the box.
- There is a bracket nut on the air duct, which must also be dismantled. At this stage you will need a 10mm wrench.
- There are clamps on the heater body; they will need to be disconnected.
- First of all, you should disconnect the right air duct, which due to its specific design can be a little complicated, which will make the work easier.
- There is a bracket with a fastening on the flexible cable, which just needs to be loosened a little.
- On the stove tap on the VAZ-2110 there are two nuts that serve as fastenings. To remove them, it is convenient to use a 10mm wrench. The valve is attached to the radiator using bolts. In some cars you can find a plastic tank, which is secured using cage nuts. The bottom nut in this design often falls out, so caution and attentiveness will not be superfluous. When assembling a device with this design, you will need to disconnect a pair of springs, due to which the fan housing is attached to the side where the faucet is located. All that remains is to lower the body a little, pressing down on it, and tighten the nut of the bolts.
- Now the tap can be easily removed and replaced with a new model.
- Assembly is carried out according to the same scheme, but in strictly reverse order. It is advisable to replace all gaskets with new ones. They are very inexpensive, but the heating of the car will annoy you less with its poor quality work. To ensure maximum adhesion, you can use special sealing agents.
- Our work is completed by pouring coolant into the system. After this, we start the car and bring the temperature to 90 degrees. Open the tap and look for possible leaks. If there are none, the replacement of the tap can be considered complete.
Now you not only know where the heater valve on the VAZ-2110 is located and how to open it, but you can also replace it with a new one yourself. When doing this work for the first time, difficulties may arise, and it will take a little more time. But in the future, you will already know how the heating system of your car is disassembled and will be able to quickly eliminate problems of a different nature.
Source
Disassembly and assembly
Replacing faulty parts in a VAZ 2110 heater is not very difficult, requires a minimum of tools, but takes a lot of time. Almost all work is carried out from the engine compartment, where the heater is mounted on the engine panel.
To gain access to it you need to dismantle:
- Engine shield insulation;
- Plastic trim under the windshield (“jabot”);
- Windshield wiper mechanism;
- Left and right heater covers.
The resistor is located on the right side (if we stand in front of the bumper and look at the engine compartment), it is secured with a screw. To get to it for replacement, you will have to remove the vacuum booster.
The cabin filter is “hidden” on the left in the opening inside the car; you can simply reach it with your hands.
The “old” and “new” non-interchangeable options were used; to replace, purchase a filter similar to the one installed.
To replace the heater and faucet on a VAZ 2110, you must first drain the coolant. To remove the stove, you need to disconnect the two pipes on the clamps and the steam exhaust hose. The stove itself is not attached and is held in place only by pressing the lid against the heater body. You can replace it with copper or aluminum, the former heat much better due to the high thermal conductivity of copper, the latter are more durable and cheaper.
At the tap, you need to disconnect two more hoses, which can be accessed from the interior by removing the glove box (“glove box”). The tap itself is attached to two 10mm nuts; before removal, the drive cable is disconnected. When replacing, new rubber seals must be installed.
Assembly is carried out in reverse order, the entire process can take more than four hours.
The need to replace the stove (heater) tap on VAZs is often caused by the fact that the tap is “dripping” or “stuck”. In both cases it needs to be replaced.
A leaking heater tap is more unpleasant, as it can lead to coolant flooding the entire interior. Such a malfunction may be indicated by wet marks or the smell of antifreeze in the cabin. To find the source of the coolant leak, you should inspect the heater valve. However, if cracks appear in the pipes or in the radiator, be aware that they can lead to an antifreeze leak.
If upon inspection it was possible to verify that the problem is in the valve of the VAZ 2114-2115 stove , it should be replaced.
To replace the VAZ 2114-2115 stove valve you need:
- a new heater tap (it is better to use a ceramic one, equipped with the necessary rubber gaskets and seals);
- penetrating fluid WD-40;
- a set of wrenches (you will need both ring and socket wrenches: “10”, “13”)
- Phillips and flat screwdrivers;
- clean coolant container;
- silicone based sealant;
- inspection pit/lift.
Where is the faucet of the VAZ 2110 stove located?
the engine to warm up faster in winter . and in the summer, get rid of the heat from the stove .
We will look at how this can be done in this article. The meaning of the idea is this: In winter, you warm up the engine without one and a half liters of antifreeze from the stove, thereby increasing the heating rate of the internal combustion engine and the engine life. In summer, hot air does not seep through the cracks in the heater dampers and does not heat the already heated interior.
Required:
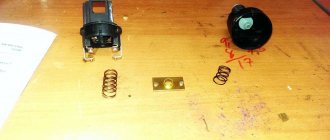
- VAZ 2108 stove faucet
- Choke cable from VAZ 2108
A faucet with a sawn-off non-closing pipe is secured with two clamps on any stove hose.
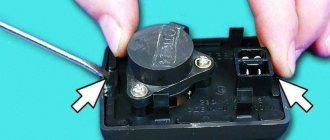
The tap is controlled by a cable that passes into the cabin through the hole for the clutch cable (indicated by the arrow)
The interior part of the drive is mounted on the dashboard below
It is attached to the torpedo with a plate cut to these dimensions.
Here's another way from SAO
- How to control this - I think with the ESP button
- Install position signal LEDs - you need to change the solenoid to a 5-wire one
blue - “cold” closed position red - “hot” - open.
Which heating radiator to choose?
The main source of heat in the car interior is the radiator, which modern manufacturers produce from two materials - copper or brass, and aluminum. Which heater radiator is better - copper or aluminum for a VAZ 2110 - 2112 remains to be seen, since not only the efficiency of the heater, but also comfortable driving in winter depends on this choice.
Advantages of an aluminum radiator
To find out which heater radiator is better to install on the seven, let’s make a comparative comparison. To do this, you need to find out all the advantages and disadvantages of the two types of stove heat exchangers. First, let's figure out what the pros and cons of aluminum units that are installed on classics from the factory.
- Cost is one of the main advantages of such devices, since it is precisely because of the low price that many choose models made of aluminum alloy. The price difference between copper (brass) and aluminum devices can be up to two times.
- Large selection - these models are more popular, despite some of their disadvantages. The reason for this popularity is their price, but you often have to make sure that it is better to buy a copper unit for the stove. Among the advantages, heat transfer should also be noted, however, practice shows that heat transfer rates are significantly inferior to brass devices.
Advantages of copper heater radiators VAZ 2110 - 2112
Now let’s find out why a copper stove radiator is better than an aluminum one. The advantages of these units include:
- Thermal conductivity - even if we take into account the fact that copper ones are only called such, since they contain much more brass than copper, they have high thermal conductivity. It is this indicator that is fundamental when choosing a heat exchanger from which you can get more heat to heat the interior.
- Easy to repair - even the slightest mechanical damage can be repaired at home. Moreover, after soldering work, the unit can last a long period of time (which also depends on the quality of the soldering). The entire radiator is made entirely of plastic without the use of plastic.
- Not only are the plates made of copper, or rather a brass alloy, but the body itself is also made of a similar material. This is a big advantage, because due to this design, operational parameters are increased.
Replacing the stove tap with your own hands
Every motorist should be able to at least to some extent be able to maintain his car. This refers to a basic set of knowledge and skills that will help you save money on auto repair shops and prevent you from getting stuck in the middle of the road with a broken down car.
VAZ-2110 owners know firsthand about the problems that often arise with the heating system of this car. The weakest point in the heating system of the VAZ-2110 is the heater valve. Replacing it is not quick, but it can be done independently.
When to change the radiator?
A heater radiator leak is an indisputable failure; it is immediately noticeable, if not by traces of antifreeze under the car, then by a drop in the liquid level in the expansion tank.
It is much more difficult when there seem to be no leaks, but at the same time, the radiator does not heat even at a high antifreeze temperature. In this case, the reason for the drop in heater temperature may be either a clogged or coked radiator, or a number of other reasons:
- air lock in the cooling system;
- non-working thermostat;
- breakdown in the hot air distribution system;
- air leakage through leaks in air ducts (this is a proprietary disease of the entire tenth family);
- low level of antifreeze in the expansion tank.
Antifreeze leaks under the radiator are a clear reason to look for a leak.
Heating system diagnostics
In short, before buying a new radiator or removing an old copper one for repair, you need to check the entire cooling system in detail so as not to throw money away.
By the way, about money and wind - at the service station they will ask for at least 2 thousand rubles to replace the heater radiator. Therefore, it is cheaper to do all the work of replacing the heater core yourself.
Installing a new faucet
The heater tap is not located on all VAZ-2110 vehicles. If your car is new, this item may not have been installed. Some cars may have a modified VAZ-2110 heater tap.
This device is regulated remotely, which cannot be said about the replacement process. Each VAZ-2110 owner must carefully monitor the condition of the valves, which will allow leaks to be identified and eliminated in a timely manner.
Basic Workflows
To replace an old tap with a new one, you will need a new element and keys for 7 and 10. Replacing the stove tap is carried out according to the following scheme:
- Drain the coolant.
- We find two hoses on the heater, which are secured with clamps. One serves for the outflow of liquid, and the other ensures its supply. There is no point in unscrewing the clamps completely; it will be enough to loosen them a little and easily dismantle them.
- The VAZ-2110 heater valve may require replacement due to depressurization. In this case, there is a high probability of coolant leaking into the passenger compartment. If this situation occurs, then there will be a puddle under the carpet near the front passenger seat, and a characteristic odor will be present in the cabin.
- We will continue to work on replacing the faucet. At this stage you need to unscrew a couple of bolts. A size 7 wrench will come in handy here. This will allow you to remove the seal. When unscrewing the bolts, care and caution will not hurt, since the fastener is made of plastic, and malfunctions may appear on the threads.
- Remove the body from the box.
- There is a bracket nut on the air duct, which must also be dismantled. At this stage you will need a 10mm wrench.
Now you not only know where the heater valve on the VAZ-2110 is located and how to open it, but you can also replace it with a new one yourself. When doing this work for the first time, difficulties may arise, and it will take a little more time. But in the future, you will already know how the heating system of your car is disassembled and will be able to quickly eliminate problems of a different nature.
Replacement process
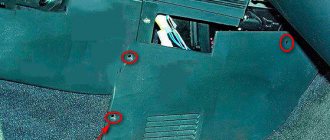
- We place the car in the pit and remove the engine protection. If it is factory, then these will be two metal aprons. They are secured with ten-point head bolts.
Before removing the valve, you need to drain the coolant from the block and radiator. Drain the coolant from the engine block. Open the expansion tank cap and unscrew the marked plug below. Don’t forget to place a basin in advance to collect the liquid. Head plug for thirteen.
We unscrew the four-blade plug by hand and drain the coolant from the radiator. Don't forget to place a container to collect liquid.
The faucet can only be removed from the interior, but its fasteners must be unscrewed in the engine compartment and in the cabin. Unscrew the two nuts securing the faucet in the engine compartment.
We release the clamps with a slotted screwdriver and pull off the two pipes suitable for the faucet.
Let's go to the salon. We dismantle the side cover of the torpedo and remove the carpet. We remove the metal wire for control from the crane rod.
Remove the spring clamp that holds the casing of the valve control wire. The latch is very tight, try not to break it when dismantling it.
Loosen the clamps securing the pipes in the cabin and dismantle the tap.
We install the valve in the reverse order, fill in the coolant and the work is completed.
The process of replacing the VAZ 2114 stove tap is clearly shown in this video:
Stove 2110, do-it-yourself installation and repair of the VAZ 2110 heating system
As a rule, car owners remember about a failed interior heater only after the arrival of cold weather. One fine cool morning you are trying to heat the car interior, but the heat is not coming out. You don’t want to freeze in your car, but going to a service station is very expensive. What to do? In this case, repairing your heating system yourself will help you save your budget. More on this later in the article.
Heating VAZ 2110, design and principle of operation of the stove
The heating system of a VAZ 2110 car consists of: an electronic control unit for the heater, operating from the passenger compartment, air ducts that extend from the stove, and a heater unit that provides heating for the interior.
The heater unit is represented by the following elements:
- An electric motor on which a fan is attached to pump hot air.
- A radiator, without which the system will not work. At the same time, unlike the old-style heater, the radiator of the new VAZ 2110 stove does not have a tap that shuts off the flow of antifreeze (antifreeze) through the radiator. As a result of this, it is always (whether in summer or winter) heated. This was done to eliminate leaks, which are often observed through this faucet, and also to heat the interior as quickly as possible, if necessary. In the summer, fresh air ventilation goes past the radiator, but some VAZ 2110 car owners add this valve to the system when repairing the stove.
- Three dampers, one of which closes/opens the heater duct, the second is responsible for air intake recirculation, and the third, most important for the interior, controls the heater.
- A resistor that regulates the blowing speed.
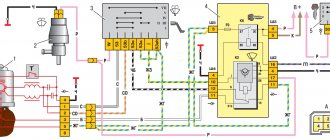
Diagram and explanations for it
Below is a diagram of the parts that make up the heater system of a VAZ 2110 car.
It is worth saying that recirculation operates in the “tens” heater system, as the diagram tells us. In simple words: air circulates inside the VAZ 2110, and is not taken from the street. The main advantage is that dust and unpleasant odors do not enter the cabin from the street. There are more disadvantages to such a stove system - the glass quickly fogs up. It is recommended to open windows more often if the outside temperature allows it. Air stagnation negatively affects the health of the driver and his companions. The heater gear motor can rarely be repaired, so it should be replaced immediately.
For VAZ 2110 owners who want to modify the heater system or carry out electrical repairs, an automatic control circuit will be useful.
Reference information from the Operating Manual: To speed up the warm-up of the cabin and prevent the entry of outside air into the cabin (when crossing gas-filled, smoke-filled, dusty sections of the road), an
air recirculation system
.
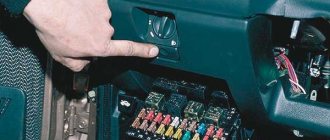
When the recirculation button is pressed down (on the instrument panel), the electro-pneumatic valve opens, and under the influence of vacuum in the intake manifold, the recirculation system flap blocks the access of outside air to the car interior.
Thus, the recirculation system can only operate when the engine is running. At the same time, if the fan is turned on, the air in the cabin continues to circulate, passing through the heater air ducts. From the very moment I got into the cabin, this very button haunted me. I think many or some (of course, those who have a VAZ2110) have it, and even if they do, it works for only a very few, and for even fewer people it has any effect on the car. Finding out which category I belonged to, I realized that I belonged to the first. This is wrong, I decided. I'll do it. As an additional information used an article from the website lada2111.rf (Installation of air recirculation VAZ 2110)
Many people before me found out at what period the air recirculation system (hereinafter referred to as ARR) on the VAZ2110 was introduced, installed completely (damper, pneumatic valve, electro-pneumatic valve, hoses, wiring, button), partially (some of the above, most often only the pneumatic valve and button), or was not mounted at all. My (our) situation was further complicated by the fact that we do not have an ordinary car. But let's not talk about that now.
The SRV of this car contained: an old-style stove, without a filter, with a damper and a pneumatic valve, a button in the cabin and a wire from it connected to the connection block with the underhood electrical wiring harness. I’ll say right away that this happened at the beginning of autumn, and I might have already forgotten something, and lied somewhere, but not much.
Air ducts VAZ 2110, structure and why they are needed
- Interior ventilation through central nozzles.
- The air distributor is responsible for supplying heat or regular air for the purpose of ventilation.
- There is a whole system for heating the feet, which consists of five nozzles.
- Two air ducts are directed to the rear of the car interior.
- Two side air ducts are responsible for heating the side windows, as well as part of the interior, which provides better heating.
- There are also 2 nozzles for ventilation.
Furnace electronic control unit
The electronic control unit includes:
- Controller handle. This device makes it possible to set the temperature in the cabin, which is produced by the stove unit. The controller handle sets the air temperature, which corresponds to that outside, and is turned on by turning the handle (up to 30 degrees Celsius). This part is usually called the ACS controller.
- The temperature sensor controls the activation of the heater when the air temperature in the cabin decreases by 2 degrees against the set one. The sensor has a microfan, and when the control knob is located in position A, a micromotor in the stove block turns on, after which the damper begins to operate, which ensures proper heating. Therefore, before repairing the heating system, you need to check the operation of this sensor. It is located near the heating lamp on the ceiling. Since its repair is not provided, if it breaks, this device must be replaced immediately.
Stove fan.
How to remove the stove
Removing the stove on new VAZ-2110 models
First of all, drain the old antifreeze. To do this, the pressure in the system is released by opening the expansion cap. Next, we find the ignition control unit: the drain plug is hidden behind it; Unscrew it and wait for the liquid to be completely removed from the device.
The radiator is held on by 4 fasteners - a screw under the front glass, two bolts on the side of the intake manifold. There is also a nut next to the cabin air filter - it also needs to be removed. The driver has the opportunity to remove the radiator almost freely. But it will be so easy only for owners of restyled tens (VAZ-21103).
We also recommend reading our expert’s article, which talks about the features of tuning the VAZ-2110.
Removing the stove on old VAZ-2110 models
With the “old ladies” 1996-2001. everything is more complicated. The driver will have to remove the wipers, as well as the washer fluid supply line. Also superfluous will be a decorative trim under the forehead, a heater housing, a cabin air filter, a fan, and flexible heat supply hoses. AvtoVAZ engineers clearly did not want anyone to repair the stove themselves. Only by removing all the described parts will the car owner gain access to the interior heater radiator.
Stove 2110, how the new stove differs from the old stove
- The main difference between the new stove and the old-style stove is in the design of the radiator. Therefore, if, when repairing the heating system, you decide to install a new radiator, you should take into account some nuances.
- In addition, the ACS controller also has certain differences. Thus, 4 and 5 position controllers produced before the fall of 2003 have already been discontinued and they are not suitable for new heater models.
- Micro gearboxes manufactured before September 2003 also differ. The main difference is the resistors, so you need to pay attention to whether the resistor in the MMR model you purchased is interchangeable.
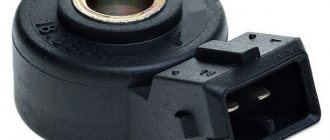
Heater resistor
How to check the heater damper micro-reducer
To test the micro gearbox, you must use an ohmmeter. On older versions of SAUO controllers, the minimum resistance should be in the range from 800 to 1,200 Ohms. In new samples this figure is 3.5–5 kOhm. Set the minimum mark on the heater control unit and wait 15 seconds. Next, simply disconnect the controller connector, measure the resistance between contacts X1.4 and X1.1.
When the temperature is set to the maximum level, the multimeter should output 3.2–5 kOhm, taking into account the fact that an old version of the controller is used. On the new one the indicator is 1.2–1.6 kOhm. If the indicators do not change, it means that the micro-gearbox shaft position sensor on the VAZ 2110 is faulty. In this case, take the car to a service center, as the replacement process requires the intervention of a professional. If you want to carry out the replacement yourself, carefully follow safety precautions.
Causes of furnace malfunction
- The oven temperature is not regulated. The reason must be sought in the control unit or in the damper.
- The ceiling sensor does not work.
- The heater does not work, only cold air enters the cabin.
- Hot air does not flow well to the side windows and/or to the feet.
- The coolant level drops, which can happen either obviously (when it flows from the pipes or radiator) or covertly.
- The stove works, but is very noisy.
Diagnosis of the problem
If the reason why the VAZ-2110 stove does not work is the damper, it is not difficult to identify it. To do this, disassemble the central deflector, turn on the ignition and rotate the temperature setting knob to its extreme positions. In a working stove, the central damper will not knock and will completely open and close the air supply channel.
If the heater damper does not move or stops in a position that does not completely block the air passage, it may be stuck. You can verify this by pushing the valve with your hand or a long rod. If after this the damper returns to its normal position, then this is the reason why it is jammed. Through the mounting hole of the deflector, you can assess the condition of the damper and its seals. If the damper is deformed, its bend is clearly visible.
If the temperature is not regulated, reasons and how to fix it
If you cannot adjust the temperature of the air that enters the cabin, the fault may lie in the temperature sensor located on the ceiling, near the ceiling light. To check it, turn the control all the way to the right, then bring your hands to the air flow that comes from the heating system. If heat flows no matter what position the regulator is in (in the red part), then the problem is not with the sensor. But, if air flows only when the regulator is located in the maximum heating position, it must be replaced (or the regulator itself needs to be replaced).
You also need to check the condition of the damper. You get to it through the engine compartment - you need to remove the central deflectors and move the flap by hand. If you have to remove it, it is better to replace the plastic one, which comes standard, with an aluminum one, since it does not freeze and deform so quickly.
Setting the temperature of the supplied air from the heater
For a clear option of the control unit, it has an adjusting screw. To check the accuracy of temperature control, close all doors and windows and place the temperature gauge next to the temperature sensor. Set the fan control knob to position A, and the temperature knob in accordance with the temperature measured by the temperature control indicator. If after 15 minutes the actual temperature in the cabin does not correspond to this, remove the controller from the socket and turn the adjusting screw clockwise. for temperature rise and against. for decreasing. After adjustment, check the operation of the control unit again. The control unit, temperature sensor with microfan, micromotor and heater damper position sensor cannot be repaired and must be replaced with new ones if they fail.
Malfunction of the interior temperature sensor and controller in VAZ 2110 2111 2112 cars
1. If the interior temperature sensor is working properly, the heater operation method should be as follows: at maximum (reddish dot). movement to open the damper; at minimum (blue dot). movement to close the damper, other positions are fixed depending on the temperature set by the interior temperature sensor. To see if the damper is moving, it is better to remove the front deflectors; they have two plastic latches on the right and left (be careful not to tear off the backlight wire when removing). After removing the deflectors, you can clearly see whether the damper is moving or not, i.e. air flows through the heater or not. In addition, you can also check the resistance of the interior temperature sensor.
The gearmotor is faulty, how to replace the gearmotor, step-by-step instructions
- We dismantle the wipers.
- We remove the frill.
- Using a short Phillips screwdriver, unscrew the three screws that secure the gearbox.
- Unfasten the wires.
- We install a new gear motor in place of the old one, for which you should ask an assistant to switch the positions of the regulator while you are installing this part.
- We install the frill and wipers back.