Diagram of the front windshield wiper and washer for VAZ-2110, 2111, 2112.
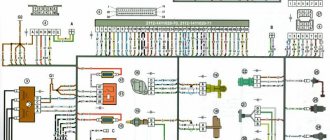
Wiring diagram for the windshield wiper and washer:
1 – windshield washer electric motor; 2 – windshield wiper electric motor; 3 – mounting block; 4 – ignition switch; 5 – ignition switch unloading relay; 6 – windshield wiper and washer switch; K3 – Windshield wiper relay; A - to power supplies; B - the order of conditional numbering of the plugs in the block of the wiper motor
Rear wiper and washer diagram for VAZ-2110, 2111, 2112.
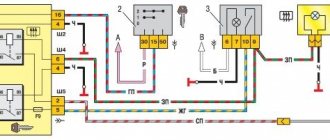
Wiring diagram for the rear window cleaner and washer:
1 – washer motor; 2 – mounting block; 3 – ignition switch; 4 – rear window cleaner and washer switch; 5 – rear window wiper gear motor; K6 – additional relay; A – to power supplies; B – the order of conditional numbering of plugs in the gear motor block
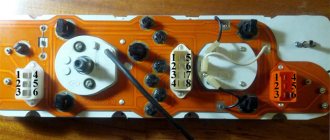
Positions of the steering column switch levers:
purple dotted lines indicate non-fixed switch positions, green and blue lines indicate fixed switch positions.
Contact closure at different positions of the windshield wiper and washer switch lever
The VAZ 2110 is equipped with a three-speed windshield wiper system. The cause of its malfunction may be a gear motor, relays, fuses, a steering column switch, and even a leaking washer reservoir on a VAZ 2110 car. The article discusses the causes of wiper malfunctions and their elimination.
Diagram of the front windshield wiper VAZ-2110, 2111, 2112.
Diagram of the front windshield wiper and washer for VAZ-2110, 2111, 2112.
Wiring diagram for the windshield wiper and washer:
1 – windshield washer electric motor; 2 – windshield wiper electric motor; 3 – mounting block; 4 – ignition switch; 5 – ignition switch unloading relay; 6 – windshield wiper and washer switch; K3 – Windshield wiper relay; A - to power supplies; B - the order of conditional numbering of the plugs in the block of the wiper motor
Rear wiper and washer diagram for VAZ-2110, 2111, 2112.
Wiring diagram for the rear window cleaner and washer:
1 – washer motor; 2 – mounting block; 3 – ignition switch; 4 – rear window cleaner and washer switch; 5 – rear window wiper gear motor; K6 – additional relay; A – to power supplies; B – the order of conditional numbering of plugs in the gear motor block
Positions of the steering column switch levers:
purple dotted lines indicate non-fixed switch positions, green and blue lines indicate fixed switch positions.
Contact closure at different positions of the windshield wiper and washer switch lever
Source
Why the wipers don't work
At some point, the car owner may notice that his wipers are not working. This may manifest itself in their complete stop or creaking operation.
Trapezoid Compatibility
First of all, look for the reason in the electric motor. But remember that mechanical problems also happen.
The most popular mechanical breakdowns of wipers:
- When the cleaners turn on, the sound of the motor is heard, but the brushes do not move or twitch slightly. Most likely, the nut securing the crank to the gearbox axle has lost its grip or has become completely unscrewed.
- Non-synchronous operation of the windshield wipers indicates a problem with the drive. Again, check the locking nut. When tightening the nut, be sure to first place the brushes in the correct position.
As for problems with the electrical component, they manifest themselves as follows:
- The wiper moves very slowly, stops, then starts working again, does not stubbornly go to the lower position. Check the limit switch. By bending the contacts, it is adjusted in this way. If such a measure does not bear fruit, replace the entire VAZ 2110 wiper motor assembly, since the gearbox is built-in;
- You have turned on the intermittent mode, but the brushes work non-stop. Here the problem lies in the relay, which needs to be replaced. If when you turn on the device you do not hear a sound from the rotation of the motor armature, then the relay is 100% to blame. If not, then check for burns and oxidation on the contacts;
- When choosing any mode, you can only hear the clicking of the thermometallic fuse. At the same time, the anchor and brushes remain in place. Check to see if the brushes are frozen because of the frost and that’s why they don’t move. Either fuse F5 has blown, or the armature has burned out;
- The electric motor does not turn on, although the fuses are good. Check the quality of contacts. This often causes a stuck brush or a burnt armature.
Diagram of the front and rear wiper VAZ-2110, 2111, 2112
Wiring diagram for the rear window cleaner and washer:
1 – washer motor; 2 – mounting block; 3 – ignition switch; 4 – rear window cleaner and washer switch; 5 – rear window wiper gear motor; K6 – additional relay; A – to power supplies; B – the order of conditional numbering of plugs in the gear motor block
Rear wiper and washer diagram for VAZ-2110, 2111, 2112
Wiring diagram for the rear window cleaner and washer:
1 – washer motor; 2 – mounting block; 3 – ignition switch; 4 – rear window cleaner and washer switch; 5 – rear window wiper gear motor; K6 – additional relay; A – to power supplies; B – the order of conditional numbering of plugs in the gear motor block
Positions of the steering column switch levers:
purple dotted lines indicate non-fixed switch positions, green and blue lines indicate fixed switch positions.
Contact closure at different positions of the windshield wiper and washer switch lever
Lever position
Numbers of closed contacts
Source
Refinement stages
Wiring
It is easy to modify or replace wipers. To do this you need to take several sequential steps:
- Disconnect the negative cable from the battery;
- Pull the wiper towards you;
- Remove the existing brushes;
- If there is a decorative trim, remove it;
- Unscrew the mounting bolt, thereby removing the old wiper;
- Compare the dimensions of the old and new cleaner;
- Ideally, the new device should not exceed the old one by more than 20 millimeters;
- Reverse the assembly procedure.
As you can see, changing windshield wipers is not difficult. But with the repair procedure, everything is somewhat different. But following the instructions, even an inexperienced VAZ 2110 owner will be able to do everything with his own hands.
Diagram of the front and rear wiper VAZ-2110, 2111, 2112
Wiring diagram for the rear window cleaner and washer:
1 – washer motor; 2 – mounting block; 3 – ignition switch; 4 – rear window cleaner and washer switch; 5 – rear window wiper gear motor; K6 – additional relay; A – to power supplies; B – the order of conditional numbering of plugs in the gear motor block
Rear wiper and washer diagram for VAZ-2110, 2111, 2112
Wiring diagram for the rear window cleaner and washer:
1 – washer motor; 2 – mounting block; 3 – ignition switch; 4 – rear window cleaner and washer switch; 5 – rear window wiper gear motor; K6 – additional relay; A – to power supplies; B – the order of conditional numbering of plugs in the gear motor block
Positions of the steering column switch levers:
purple dotted lines indicate non-fixed switch positions, green and blue lines indicate fixed switch positions.
Contact closure at different positions of the windshield wiper and washer switch lever
Lever position
Numbers of closed contacts
Source
VAZ 2110 diagram
1. block headlight; 2. front brake pad wear sensors; 3. fan motor activation sensor; 4. electric motor of the engine cooling system fan; 5. sound signal; 6. generator VAZ-2110; 7. oil level sensor; 8. carburetor solenoid valve control unit; 9. heater controller; 10. recirculation valve switch; 11. illumination lamp for heater control levers; 12. switch; 13. carburetor limit switch; 14. oil pressure warning lamp sensor; 15. spark plugs; 16. carburetor solenoid valve; 17. coolant temperature indicator sensor; 18. ignition distributor sensor; 19. ignition coil; 20. starter; 21. heater fan electric motor; 22. additional resistor for the heater electric motor; 23. speed sensor; 24. reverse light switch; 25. micromotor gearbox for heater damper drive; 26. recirculation valve; 27. brake fluid level sensor; 28. blocks for connecting the rear window washer motor; 29. battery; 30. windshield washer motor; 31. washer fluid level sensor; 32. coolant level sensor; 33. windshield wiper gearmotor; 34. mounting block: 35. blocks for connecting the warning light harness; 36. outdoor lighting switch; 37. instrument cluster; 38. rear fog light switch; 39. fog light indicator lamp; 40. indicator lamp for heated rear window; 41. VAZ-2110 watch; 42. rear window heating switch; 43. steering column switch; 44. block for switching wires when installing headlights of a different type; 45. instrument lighting regulator; 46. ignition switch; 47. connectors for connecting the headlight cleaner wiring harness; 48. socket for a portable lamp; 49. lamp for individual interior lighting; 50. brake light switch; 51. interior lamp; 52. on-board control system unit; 53. fuel level indicator sensor; 54. hazard warning switch; 55. driver's seat belt sensor; 56. cigarette lighter; 57. ashtray illumination lamp; 58. glove compartment lamp switch; 59. block for connecting the on-board computer; 60. glove box lighting lamp; 61. side direction indicators; 62. switches in the front door pillars; 63. switches in the rear door pillars; 64. parking brake warning lamp switch; 65. trunk lighting; 66. temperature sensor for the heating system; 67. external rear lights; 68. internal rear lights; 69. license plate lights; 70. rear window heating element; 71. block for connecting an additional brake light.
Where does which wire go, or just a diagram
Connecting wipers and washer
“Plus” power is supplied from the ignition switch through fuse No. 2 at 10 Amp of the mounting block. The permanent “plus” goes along the black and yellow wires to contacts “4” of the connectors of the gear motor and the steering column switch. It should not disappear even when the switch is in the “off” position. The blue wire supplies “+” 12 V power to the motor when the switch is in the “continuous mode” position. On the blue-white wire, in the “off” position there should be a “minus”, and in the “continuous mode on” position the “minus” is turned off. This is done to slow down the motor when the power to the closer is turned off.
The red wire supplies the relay with “+” 12 V from the switch when the intermittent mode is turned on. At the moment of operation, contacts “2” and “4” close, and “1” and “3” open, the motor starts working and the brushes make one or two movements. Then “+” 12 V is turned off, and contacts “1” and “3” are closed to each other and to “minus”. The motor stops for a few seconds and then the cycle repeats.
Possible causes of wiper malfunction
The causes of windshield wiper malfunction can be either mechanical or electrical. We start troubleshooting first with the fuse, and then we disassemble the rest.
Mechanical problems may include the following symptoms:
- When the windshield wiper is turned on, you can hear the wiper motor running, but the blades do not move. This may primarily be caused by a loose or loose nut that secures the crank to the gearbox axle.
- If the brushes do not work synchronously, the reason may be the driver - its fastening nut has become loose.
Windshield wiper diagram for VAZ 2110
Electrical faults have the following symptoms:
- The brushes do not occupy an extreme position, they stop anywhere and move slowly. The cause may be the ring switch. In this case, you need to bend the contacts. If this does not help, you need to replace the wiper motor assembly, as it is sold with a gearbox.
- The intermittent mode is turned on, and the brushes work continuously, then the problem is in the relay, it needs to be replaced. If the replacement does not help, then it is likely that the contacts on the limit switch have oxidized or burnt.
- If, when you turn on the windshield wiper, the windshield wipers and armature do not work, then the blades may have frozen. Another reason could be a burnt anchor.
- The electric motor does not work, but the fuses are good. In this case, it is necessary to check the contacts that the wiper drive has, as well as the motor. It is possible that the VAZ windshield wiper blades are stuck or the armature is burnt out.
Checking the operation of the windshield washer
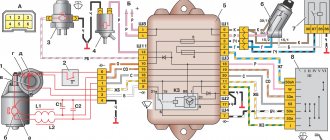
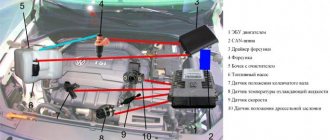
Diagram of the VAZ engine management system with BOSCH controller - ECM 21104 1.6 16V
1 – block of the ignition coil wiring harness to the ignition system harness; 2 – block of the ignition system harness to the ignition coil wiring harness; 3 – ignition coils; 4 – immobilizer warning sensor; 5 – immobilizer control unit; 6 – spark plugs; 7 – nozzles; 8 – diagnostic block; 9 – block of the ignition system harness to the ABS cabin group harness; 10 – controller; 11 – electric fuel pump; 12 – block of the ignition system harness to the fuel level sensor harness; 13 – fuel level sensor harness connector to the ignition system harness; 14 – block of the ignition system harness to the injector harness; 15 – injector harness block to the ignition system harness; 16 – block of the ignition system harness to the side door harness; 17 – speed sensor; 18 – idle speed regulator; 19 – throttle position sensor; 20 – coolant temperature sensor; 21 – mass air flow sensor; 22 – oil pressure warning lamp sensor; 23 – phase sensor; 24 – oxygen sensor; 25 – crankshaft position sensor; 26 – knock sensor; 27 – solenoid valve for purge of the adsorber; 28 – oil level sensor; 29 – coolant temperature indicator sensor; 30 – block of the ignition system harness to the instrument panel harness; 31 – instrument panel harness connector to the ignition system harness; 32 – ignition relay; 33 – ignition relay fuse; 34 – fuse for the electric fuel pump power supply circuit; 35 – electric fuel pump relay; 36 – electric fan relay; 37 – controller power supply fuse; 38 – ignition system harness block to the air conditioner connector; 39 – instrument cluster; 40 – ignition switch; 41 – electric fan of the cooling system; 42 – on-board control system unit; 43 – starter relay; 44 – contacts of the 8-terminal blocks of the instrument panel harness and the front harness; 45 – contacts of the 21-terminal blocks of the instrument panel harness and the rear harness; 46 – trip computer; 47 – diagnostic connector.
The QG16DE engine uses a phased distributed fuel injection system. This means that each cylinder uses its own fuel injector (port injection), and fuel injection is carried out by the injector only of the cylinder in which the intake valves are in the open position (phased injection). The amount of fuel injected varies depending on the duration of the electrical pulse supplied to the injector solenoid valve from the electronic engine control unit (ECU). In general, the electronic engine control system performs the following functions:
• control of the moment and duration of fuel injection; • control of energy accumulation time in ignition coils and regulation of ignition timing; • regulation and maintenance of engine idle speed; • electric fuel pump control; • control of electric radiator cooling fans; • control of the air conditioning compressor clutch; • control of the solenoid valve for purge of the adsorber of the gasoline vapor recovery system; • control of the “CHECK ENGINE” indicator lamp; • interaction with a standard car anti-theft system (ATS) or immobilizer; • generation of diagnostic trouble codes and interaction with an external diagnostic device; • generating signals for the trip computer; • integrated engine/automatic transmission control to reduce shock when changing gears by reducing engine torque; • emergency operation mode, which allows you to continue driving if individual components of the ECM fail.
Windshield wiper control unit BUS-01
BUS-01 is used on PAZ buses and is produced by the Avtokom-Radiy company. There are several types of BUS, which differ in circuitry and the microcontroller used.
First, open the BUS and look at what microcontroller it is on. Available based on ATtiny24A, ATtiny2313A, ATtiny261A. There may be others, but I haven't come across them. But in any case, the logic of operation of BUS is the same.
This article is devoted to the BUS based specifically on the ATtiny2313A .
Do-it-yourself modification and replacement of wipers
Which wipers are better is up to the car owner to decide. Those installed on the VAZ 2110, as well as on the UAZ, do their job well from the factory, but it can be modified with washers from other companies that are of higher quality. Many people are attracted to frameless brushes - this is a good option. They are compact in size and equipped with a special leash mechanism. True, they do not look very attractive on the VAZ 2110, since the fastener to the standard washer arm turns out to be massive. Therefore they need improvement.
Frameless car washers
To perform a replacement or modification, you must perform the following steps:
- First you need to disconnect the negative terminal on the battery.
- Then you need to tilt the mount towards you and remove the brush.
- If there is a decorative trim, it must be removed.
- By unscrewing the bolt, you can remove the old brush.
- Before replacing parts, be sure to check the dimensions of the new washer with the old one. It is advisable that the new one does not exceed the size of the old one by more than 2 cm.
- Installation of the new kit is carried out in the reverse order.
After upgrading, you should check the functionality of the unit: whether the brushes creak, how they work when switching modes. At high speeds of the windshield wiper motor, the wipers should work quickly, at low speeds - slowly. In addition, they must support intermittent operation.
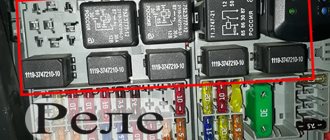
Fuses and relays VAZ 2110
F1 – 5A – License plate lamps. Instrument lighting lamps. Side light indicator lamp. Trunk light. Left side side light lamps F2 – 7.5A – Left headlight (low beam) F3 – 10A – Left headlight (high beam) F4 – 10A – Right fog lamp F5 – 30A – Door window electric motors F6 – 15A – Portable lamp F7 – 20A – Electric motor of the engine cooling system fan. Sound signal F8 – 20A – Rear window heating element. Relay (contacts) for turning on the heated rear window F9 – 20A – Recirculation valve. Windshield and headlight cleaners and washers. Relay (winding) for turning on the rear window heating F10 – 20A – Reserve F11 – 5A – Side light bulbs on the right side F12 – 7.5A – Right headlight (low beam) F13 – 10A – Right headlight (high beam). Indicator lamp for turning on the high beam. F14 – 10A – Left fog lamp F15 – 20A – Electric seat heating. Trunk lock lock F16 – 10A – Relay-breaker for direction indicators and hazard warning lights (in hazard warning mode). Hazard warning lamp F17 – 7.5A – Interior lighting lamp. Individual backlight lamp. Ignition switch illumination lamp. Brake light bulbs. Clock (or trip computer) F18 – 25A – Glove box lighting lamp. Heater controller. Cigarette lighter F19 – 10A – Door locking. Relay for monitoring the health of brake light lamps and side lights. Direction indicators with warning lamps. Reversing lamps. Generator excitation winding. On-board control system display unit. Instrument cluster. Clock (or trip computer) F20 – 7.5A – Rear fog lamps
Device and possible malfunctions
To understand the operation of the wipers, you will need an electrical diagram, which is present in the VAZ 2110 operation and maintenance manual. You also need to know what the unit consists of:
- The trapezoid is the main part through which the motor transmits movement; the trapezoid most often wears out, and as a result, repairs are needed.
- Electric motor - due to this unit, the wipers move; the motor can burn out, which will cause the failure of the entire unit.
- Pump - this element is needed to pump cleaning fluid into the wipers. If the pump breaks, then you can forget about keeping the front window clean, although the wipers will still run across the window.
- Tank - everything is obvious here, it stores window cleaning fluid.
- Windshield wiper – mounted on a trapezoid, performs a cleaning function. First of all, you need to pay attention to the size of the windshield wiper.
Repair and replacement are required when the motor is damaged, since it cannot be repaired. The trapezius also very often fails, but sometimes it can be restored. The assembly diagram is quite simple, so the owner of a VAZ 2110 will quickly discover the reason for the malfunction of the assembly.
Device design
Wiper circuit
First, let's try to understand how the windshield wiper circuit on the VAZ 2110 works and what components form a solid unit called a windshield wiper.
| Device | Characteristic |
| Electric motor | It is responsible for rotating the wipers at different intensities. The electric motor contains a gearbox, and the motor itself operates due to the DC current supply. There are three built-in blades in the armature of the engine, providing three operating modes of the windshield wiper - fast, slow and with pauses. Although it is believed that the VAZ 2110 has only two brush rotation speeds |
| Electrical components | This is a steering column switch, a wiper relay, which allows you to activate the intermittent movement of the brushes. Plus, don't forget about the switch. The entire electrical system is integrated into wires running through a bimetallic heat-resistant fuse. It is important to note that both relays and fuse F5 are located in the mounting block, and the bimetallic fuse and switch are in the motor gearbox |
| Windscreen wipers | At the same time, the size of the wipers on the VAZ 2110 may be different, which we will talk about later. They differ in shape, material of manufacture, device |
| Mechanical drive | An important component, which, alas, often breaks down at “ten” |
Alternative solutions
Most car owners of the domestic “ten” are accustomed to replacing worn out and faulty windshield wipers with similar ones.
Often this happens because they do not see alternatives and are not familiar with them.
For all VAZ 2110 models, regardless of the year of manufacture, it is possible to install windshield wipers for the driver and passenger sides of the same size - 20 inches. The length of the brush is 508 millimeters.
But this size can be increased to 530 millimeters . It is not recommended to install more, since this way the windshield wiper will not be able to work effectively, and the drive simply will not cope with the load. As a result, too long brushes cause squeaking and jerky work. Plus, don’t count on a long service life of the wiper mechanisms.
The original windshield wipers for the 10 are quite good. But there are more expensive, but also more highly efficient, high-quality devices.
Today it is fashionable to use frameless wipers, especially from Bosch. Their advantages lie in their compactness and a special, reliable leash mechanism.
But as practice shows, on the windshield of the VAZ 2110, as well as other VAZ models, they do not look very nice, because the fasteners on the leash turn out to be massive. Although if you modify them a little, you will get a very good result.
Windshield wiper repair
To repair the unit you will need the following materials and tools:
- set of sockets and keys;
- screwdrivers;
- WD-40 liquid;
- old rags;
- trapezoid repair kit in case of need for replacement or windshield wiper repair kit for VAZ 2110;
- other parts requiring replacement.
To repair the windshield wiper, you need to disassemble it:
- First you need to remove the instrument panel.
- Next, you should find the VAZ 2110 wiper relay, which is screwed to the body. If it doesn't work, it needs to be replaced.
- It is advisable to remove the frill so that it does not interfere with disassembling the unit.
- Now you need to check the fuse that is responsible for the operation of the VAZ 2110 wiper drive.
The next step is to disassemble the steering column to check the switch. If it has significant damage, it needs to be replaced (the author of the video is “In Sandro’s Garage”).
- Next, you need to dismantle the motor and check it. If replacement is necessary, replace the windshield wiper motor and gear motor assembly.
- If the windshield washer reservoir or pump is damaged, it must be replaced.
- Be sure to check the size and condition of the brushes: they must meet the standards specified in the manual. Their length is important as they must cover the entire surface of the windshield.
Repair
To repair this unit, you need a minimum of tools:
- Set of keys and sockets.
- Screwdriver Set.
- WD-40.
- Rags.
- Replacement parts.
It is quite easy to determine which parts are not working. For example, if the wipers do not move, then the motor has failed. If the trapezoid moves, but the glass remains dirty, then the pump or tank is damaged. The size will help you understand what condition the part is in - if the size has decreased too much, then the element needs to be changed. In any case, you need to make sure of the speculations; for this you should analyze:
Source
Windshield wiper repair
In practice, repairing wipers on a VAZ 2110 is not at all difficult if you have at least basic experience in working with a car and its electrical components.
Unscrew the fixing nut
First, let's figure out how to remove the wipers on a VAZ 2110. The design provides several fasteners, by unscrewing which you can easily remove the wipers themselves.
But with disassembling the windshield wiper assembly, everything is a little more complicated. It is analyzed as follows.
- Remove the dashboard.
- On the left side, find the relay that is attached to the body. If it is broken, there is no point in repairing it. Just install a new relay.
- Next, check the condition of the fuse that controls the operation of the windshield wiper drive.
- Disassemble the steering column to allow you to examine the state of the switch. If the insulation is damaged or there is other damage, replace the unit.
- Unscrew the electric motor from the body and check it in action. If the damage is not serious, it can be repaired. It's better to immediately replace it along with the relay.
- Check the drive. It is not uncommon for a pulley to break on it, which is why the device has to be replaced with a new one.
- Make sure the trapezoid is in good condition. It may be necessary to replace the windshield wiper trapezium on a VAZ 2110 if, during operation of the car, the lubrication of the device has deteriorated and all kinds of debris and water have gotten in there. If the lubrication does not work properly, the plastic bushings of the hinges wear out, causing play and increasing resistance during operation of the device. The trapezoid itself serves to transmit force from the electric motor to the windshield wiper arms.