The design of the windshield wiper on the VAZ 2110 is quite reliable and during normal operation the motor and the trapezoid itself can easily move all 300,000 km, which has been proven by the personal experience of many owners. But there are also exceptions to the rules.
It often happens that the splines are bypassed or the trapezoid structure simply breaks down. If you have such problems, the repair procedure will be discussed below.
To replace all the wiper parts, we will need the following tool:
- flat and Phillips screwdriver;
- 10 mm socket head;
- ratchet handle;
To do this job, you first need to do some preparatory steps, namely:
- Remove the windshield trim (jabot).
- Remove the insulation and seal under the hood.
- Disconnect one end of the expansion tank rubber and move it to the side.
Replacing the windshield wiper motor and trapezoid
The design of the windshield wiper on the VAZ 2110 is quite reliable and during normal operation the motor and the trapezoid itself can easily move all 300,000 km, which has been proven by the personal experience of many owners.
But there are also exceptions to the rules. It often happens that the splines are bypassed or the trapezoid structure simply breaks down. If you have such problems, the repair procedure will be discussed below.
To replace all the wiper parts, we will need the following tool:
- flat and Phillips screwdriver;
- 10 mm socket head;
- ratchet handle;
To do this job, you first need to do some preparatory steps, namely:
- Remove the windshield trim (jabot).
- Remove the insulation and seal under the hood.
- Disconnect one end of the expansion tank rubber and move it to the side.
Advice for car enthusiasts
When replacing windshield wipers with new ones, preference should be given to modern, frameless models.
They have such advantages as:
- higher reliability (compared to traditional models);
- increased service life;
- completely silent operation (there are no squeaks common for frame wipers);
- effective cleansing of contaminants.
Such wipers will not only do their job better, but will also significantly transform the appearance of the car.
Photo report on the removal and installation of the windshield wiper trapezoid on a VAZ 2110-2112
When all the preparatory steps are done, everything will look something like this. The arrows at the top show the attachment points of the two nuts:
You need to unscrew them, of course.
After this, we disconnect the clamp securing the expansion tank and, lifting it up a little, move it to the side to gain access to the third trapezoid mounting nut.
After this, the nut can be unscrewed; it is located at the very bottom:
After you have dealt with this, you can carefully turn the trapezoid and remove it from the left side, slightly bending the metal frame below the windshield to the side (the force required is very small - there is no point in talking about any real bending!)
And lift it almost all the way to take it out:
All that remains is to disconnect the power plug:
And now you can finally remove the entire structure of the trapezoid and the wiper motor from the bore. If you need to disconnect and replace one motor, then in principle there will be no difficulties with this - just unscrew it and replace it.
Installation of all removed parts occurs in the reverse order. It is worth mentioning the prices of these spare parts. The cost of a trapezoid assembly with an engine for a VAZ 2110 is about 2000-3000 rubles from the manufacturer AvtoVAZ. Chinese analogues cost about 2000 rubles.
Source
Review
Many dozens of car owners agree that the windshield wiper motor of the VAZ 2110 is quite frail - both in old and new modifications. Moreover, its operation depends on many parameters: the condition of the wiper rubber bands, wind, the amount of water pouring onto the glass, the voltage supplied to the wiper motor. Usually there are more complaints about the front window wiper, but the rear window on models 2111 and 2112 also has exactly the same gear motor.
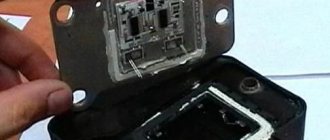
Windshield wiper motor VAZ 2110
Causes of malfunction
The weak point of this motor is that there are a fairly large number of contacts along the power circuit. This affects both the voltage and the possible causes of malfunctions: the contact on one link of the chain is lost or unstable, and stable operation of the windshield wiper is no longer possible. In this case, it is quite possible that the motor is not at fault. Therefore, before you decide that it needs to be replaced, check the contacts along the entire circuit.
- Fuse. Pay attention to the fuse, it may also be faulty;
- Performance. Next, you should check the switch itself for serviceability;
- Operating parameters. Using an ohmmeter, check the resistance in the circuit breaker between the terminals. If it shows “zero”, you need to change the breaker;
- Correct connection. Without turning on the wiper, measure the resistance between the fourth terminal and ground. It must also be zero. Otherwise, you need to properly restore the grounding;
- Voltage. Turn the windshield wiper to low speed and check the voltage at terminal five. It is equal to the battery voltage, but the gearmotor does not work? It needs to be changed.
Causes of malfunction of the VAZ 2110 windshield wiper motor
Rear wiper VAZ 2112, does not work, how to solve the problem?
Messages: 194 From: Novocheboksarsk
The wires in the corrugation of the fifth door broke, for example.
There are only two in electrics. malfunctions. Open and short circuit. I couldn’t figure out what it was for. I couldn’t find a normal, understandable diagram of the mounting block and wiring.
. Everything seems to be more or less clear. In general, contact an auto electrician. Well, if you are an auto electrician yourself. God will help you.
Messages: 3,835 From: umrudny city route 11
+1, in principle, yes, disconnect the battery, disconnect the connectors on both sides and use a jumper and a tester to find out which wire is missing.
Messages: 194 From: Novocheboksarsk
Check, there should be a plus on the yellow wire with a blue stripe when you turn on the ignition, on the white wire with a blue stripe when you turn on the wiper, if not, it wouldn’t hurt to check fuse F9. Well, there’s a break in the corrugation of the back door. If everything is there and there is also weight for the engine, then it is either repaired or trashed.
Post edited by yariy
— Sep 20 2010, 18:53
yes The tester (multimeter) turned on and checked whether there is power or not, if there is a problem in the gearbox, there are limit switch contacts there, you can take it apart and see everything, it may even be protected from overload (thermal unit, in order to avoid burning out the engine during a wedge) flew.
Source
Replacement procedure
So, you have chosen a gear motor for your VAZ - one of the first three. Let's look at how it is replaced. When performing this work, there is no need to disassemble the entire windshield wiper system. We proceed like this:
- Disconnect the negative terminal from the battery;
- Having noted the position of the brushes on the windshield, unscrew and remove the levers;
- Remove the cover from the fairing;
- Unscrew the nut securing the crank mechanism bracket to the motor axis;
- Unscrew and remove the bracket itself. It is secured to the body with 3 bolts;
- We remove the non-working or poorly functioning motor from the studs;
- Replacing the old one with a new one is done in the reverse way.
Advice for car enthusiasts
When replacing windshield wipers with new ones, preference should be given to modern, frameless models.
They have such advantages as:
- higher reliability (compared to traditional models);
- increased service life;
- completely silent operation (there are no squeaks common for frame wipers);
- effective cleansing of contaminants.
Such wipers will not only do their job better, but will also significantly transform the appearance of the car.
Rear window wiper
The rear electric motor can also be removed and a new one installed. To do this you need:
- Remove the holder and rear wiper blade;
- Remove the rear door from the upholstery;
- Remove the battery negative terminal wire;
- Disconnect the terminal block from the windshield wiper motor wiring;
- Loosen the nuts securing it to the door (there are 3 of them) and dismantle the motor;
- Install a new electric motor. Replacement is in reverse order.
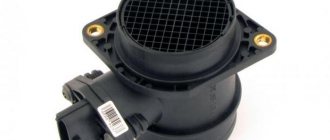
Rear wiper motor gearbox for VAZ 2112
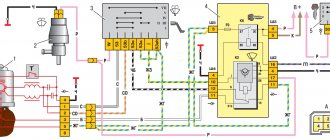
Standard version of the brake light operating diagram
Power is supplied to fuse F17 from the battery, then the current goes to limit switch contact 11, and then, if the limit switch is closed, a circuit appears with the filament of lamps 7. But pay attention: part of the circuit is relay K1, or more precisely, its contacts five and 4.
If the brake lights do not light up, on the VAZ-2112, as on all 10s, one fuse is inspected. It is called F17 and is located in the mounting block to the left of the driver.
It is important to know: there is always voltage at one of the fuse terminals. Check it out!
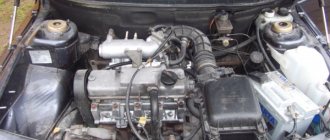
Geared motor from Volkswagen Transporter
Volkswagen's electric motor requires a little modification, but those who go this route are usually satisfied with the continued performance of the wipers and the stability of the windshield wiper.
This replacement requires minor modifications. In the 2005 “dozen”, the electric motor is connected to the trapezoid using a lever that has a large hole. Therefore, it is enough to change the lever (take a new sample), and everything will fit perfectly.
And one more point: when installing the motor on a trapezoid, you cannot place the engravers together with the bolts so that the crank does not touch them during operation.
Windshield wiper motor VAZ 2110 v10-07-0001 from Volkswagen Transporter
Such a replacement will save you from slow wipers, and even in heavy rain they will do a good job of their task - providing good visibility.
Source
Replacing the windshield wiper motor of a VAZ 2110
The design of the windshield wiper on the VAZ 2110 is quite reliable and during normal operation the motor and the trapezoid itself can easily move all 300,000 km, which has been proven by the personal experience of many owners. But there are also exceptions to the rules.
It often happens that the splines are bypassed or the trapezoid structure simply breaks down. If you have such problems, the repair procedure will be discussed below.
To replace all the wiper parts, we will need the following tool:
- screwdriver flat and Phillips
- 10 mm socket head
- ratchet handle
To do this job, you first need to do some preparatory steps, namely:
- Remove the windshield trim (jabot)
- Remove the insulation and seal under the hood
- Disconnect one end of the expansion tank rubber and move it to the side
Refinement stages
Wiring
It is easy to modify or replace wipers. To do this you need to take several sequential steps:
- Disconnect the negative cable from the battery;
- Pull the wiper towards you;
- Remove the existing brushes;
- If there is a decorative trim, remove it;
- Unscrew the mounting bolt, thereby removing the old wiper;
- Compare the dimensions of the old and new cleaner;
- Ideally, the new device should not exceed the old one by more than 20 millimeters;
- Reverse the assembly procedure.
As you can see, changing windshield wipers is not difficult. But with the repair procedure, everything is somewhat different. But following the instructions, even an inexperienced VAZ 2110 owner will be able to do everything with his own hands.
The VAZ 2110 is equipped with a three-speed windshield wiper system. The cause of its malfunction may be a gear motor, relays, fuses, a steering column switch, and even a leaking washer reservoir on a VAZ 2110 car. The article discusses the causes of wiper malfunctions and their elimination.
Photo report on the removal and installation of the windshield wiper trapezoid on a VAZ 2110-2112
When all the preparatory steps are done, everything will look something like this. The arrows at the top show the attachment points of the two nuts:
You need to unscrew them, of course.
After this, we disconnect the clamp securing the expansion tank and, lifting it up a little, move it to the side to gain access to the third trapezoid mounting nut.
After this, the nut can be unscrewed; it is located at the very bottom:
After you have dealt with this, you can carefully turn the trapezoid and remove it from the left side, slightly bending the metal frame below the windshield to the side (the force required is very small - there is no point in talking about any real bending!)
And lift it almost all the way to take it out:
All that remains is to disconnect the power plug:
And now you can finally remove the entire structure of the trapezoid and the wiper motor from the bore. If you need to disconnect and replace one motor, then in principle there will be no difficulties with this - just unscrew it and replace it.
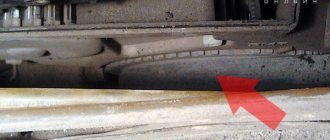
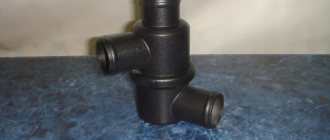
What is a windshield wiper trapezoid and what is it for?
The trapezoids are around here somewhere!
The wiper trapezium is a special unit that converts the engine impulse into forward movements of the windshield wipers.
Simply put, it is she who is responsible for their movement along the windshield or rear window of the car. Since weather conditions are often unpredictable, and the windshield must provide complete visibility, failure of this part must be quickly identified and corrected.
Principle of operation
Most often, plastic bushings wear out in trapezoids.
Although, at first glance, it seems that the movement of the brushes occurs directly, in fact, a trapezoid, which is an electromechanical unit, is responsible for it. It works on the following principle:
- The windshield wiper motor uses the finger, which drives the trapezoid itself.
- Due to the connection of the gearbox and shafts, oscillatory movements occur, causing the brushes to move along the glass, cleaning it.
It often happens that the trapezoid fails. This happens especially often after or during the winter season. Some inexperienced VAZ-2110 owners turn on the “brushes” without bothering to clear the snow from the glass . Often the wipers freeze to the glass, and an attempt to move them ends in breakage. To prevent this from happening, you should always check the brushes before turning them on in winter for freezing .
Electromechanical problems
An electric motor that shows no signs of life, no click and a blown fuse F5 - all these problems indicate faults in the gearmotor, which can be eliminated by replacing one of the components:
- dirty collector in the electric motor rotor;
- brushes that ensure continuous contact in the motor;
- burnt collector;
- broken armature winding.
There are other options: the electric motor does not want to work, but there is a click, or the fuse blows. In this case, you need to return the left lever to its base position as quickly as possible, since these problems indicate a short circuit in the electric motor. It needs to be completely changed. With the same problems, there may be minor faults: brushes frozen to the glass, or wipers touching body parts. Under such circumstances, you need to carefully separate the brushes or straighten their mounting arms.
How to determine that a trapezoid is “kirdyk”
Kirdyk is a slang word meaning an extremely bad situation.
It happens that the retaining ring of the bushing breaks and the rod simply flies out.
The slightest disturbance in the operation of the trapezoid can lead to incorrect operation of the wipers. Usually this part is replaced with a new one, although in some cases you can get by with installing a repair kit. Its cost is significantly lower than the price of the entire part, although repairs will take much more time. Here is a list of the main signs by which you can determine that a part will soon fail:
- Windshield wipers begin to do their immediate job poorly. This occurs due to the weakening of pressure.
- An unusual noise is heard during operation.
- A backlash appears, which can be determined even visually, since the glass will be difficult to clean.
- It happens that the brushes move in one direction easily, but back with difficulty, constantly slowing down.
All these problems lead to the fact that the windshield remains dirty, with streaks and smudges.
Repair kit for VAZ-2110
Most often, plastic parts are destroyed in the trapezoid. In this case, a repair kit can help.
When purchasing a repair kit, pay attention to the part number.
If metal parts are damaged, you will have to replace the entire trapezoid. As a rule, the trapezoid is destroyed as a result of an accident, or due to careless handling of the windshield wiper system.
Step by step procedure for windshield wiper repair:
2. The nut that holds the leash must be unscrewed.
3. Now remove the leash.
4. In order to remove the gearmotor from the bracket, you need to unscrew the 3 bolts that hold it in place.
5. The gearmotor is wrapped in a thin leather film; it must be removed.
6. Then you should unscrew the 2 screws that secure the black plastic cover.
7. Remove the cover and remove the next two screws.
9. Next, remove the brown gasket.
10. Remove the largest gear with the gearmotor shaft and then the plastic washer under it.
11. Next you need to remove two small gears, but before removing them, they should be marked. This is done so as not to confuse their location later. They have different tooth angles.
12. To disconnect the gearbox from the electric motor, you need to unscrew two opposite screws.
13. Remove the armature from the metal housing of the electric motor.
14. Clean all parts of the gearmotor as much as possible from accumulated dirt and old grease.
15. Use your fingers to press the three brushes into the brush holders; they should move freely without any difficulty. If some brushes are difficult to move in the brush holder, have cracks or other defects, then they must be replaced with new assemblies. If you replace the parts with new ones, then do not forget to solder the leads to the brush holder.
16. Next, we check the three springs; they should not be stretched or, even worse, broken.
17. Inspect the collector for damage (scratches) or dirt. If necessary, go over (clean) it with fine sandpaper. If the collector is very worn out and cleaning will not give the desired result, then it is necessary to replace only the armature or the entire gear motor as a set. Also pay attention to the upper part of the anchor; if there are traces of jamming (stripes), then also go over it with fine sandpaper.
18. If the gear teeth of the gearbox have gross defects (scratches), they must be replaced.
19. It is also necessary to replace the rods as a whole if the threads of the rollers of the brush levers or splines are defective.
20. We return to the plate with the limit switch contacts and, if necessary, clean them with sandpaper.
21. We inspect the leash fastening, or rather the black rubberized cushions; if they have lost their elasticity or burst, then replace them with new ones. Before removing the rubber, first remove the inner steel spacer.
22. After this, you can begin reassembling the windshield wiper, just before you start assembling the parts, lubricate everything (the armature shaft worm and gear) thoroughly with Litol-24 grease and pay attention to the two small gears you marked earlier, install them in their places.
23. Next, to install the anchor, tie the brush contacts with thread or wire so that they are folded. This is done so as not to break them during assembly.
Part of the old and new sample
Selecting a new part for a VAZ-2110 is not such a simple matter. Not everyone knows that there are old and new trapezoids.
Therefore, it is better to remove the old part and take it to an auto parts store. They are not only attached differently, but also differ in the connectors through which they are connected to the motor. If you can’t find an old-style trapezoid, and this is exactly what you have, you’ll have to redo the system or look for a used part.
- As a rule, trapezoids of a new type are available for sale from various manufacturers. One of the popular models has the article number VLT2110–5205010-Р .
If the windshield wiper motor is working properly, you can only change the trapezoid itself.
We turn on the brake lights forcibly
Relay K1 is successfully replaced with a pad with jumpers. Its diagram is shown here. If there is no similar platform, you can temporarily close contacts 4-5. First, check everything mentioned above.
A few words about the serviceability relay
The lamp health relay is called K1, and it is the largest in the mounting block. If you pull out this relay, then when you press the pedal you can dial the voltage at terminal five (but not 4). Take another look at the diagram and it will become clear what we are talking about.
Replacement process
The easiest way to get rid of problems with VAZ-2110 windshield wipers is to contact a service station. There the trapeze will be replaced in an hour or an hour and a half. But if unscrupulous repairmen notice that the owner does not understand the cause of the breakdown at all, they can repair the car for half a day, saying that the problem is very serious.
Therefore, the best option that will save money is to replace the part yourself . This process works as follows:
Device and possible malfunctions
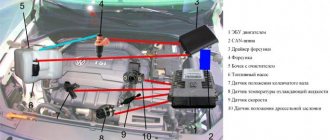
To understand the operation of the wipers, you will need an electrical diagram, which is present in the VAZ 2110 operation and maintenance manual. You also need to know what the unit consists of:
- The trapezoid is the main part through which the motor transmits movement; the trapezoid most often wears out, and as a result, repairs are needed.
- Electric motor - due to this unit, the wipers move; the motor can burn out, which will cause the failure of the entire unit.
- Pump - this element is needed to pump cleaning fluid into the wipers. If the pump breaks, then you can forget about keeping the front window clean, although the wipers will still run across the window.
- Tank - everything is obvious here, it stores window cleaning fluid.
- Windshield wiper – mounted on a trapezoid, performs a cleaning function. First of all, you need to pay attention to the size of the windshield wiper.
Repair and replacement are required when the motor is damaged, since it cannot be repaired. The trapezius also very often fails, but sometimes it can be restored. The assembly diagram is quite simple, so the owner of a VAZ 2110 will quickly discover the reason for the malfunction of the assembly.
Alternative solutions
Most car owners of the domestic “ten” are accustomed to replacing worn out and faulty windshield wipers with similar ones.
Often this happens because they do not see alternatives and are not familiar with them.
But this size can be increased to 530 millimeters . It is not recommended to install more, since this way the windshield wiper will not be able to work effectively, and the drive simply will not cope with the load. As a result, too long brushes cause squeaking and jerky work. Plus, don’t count on a long service life of the wiper mechanisms.
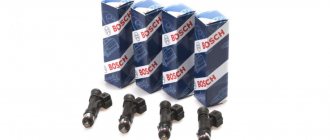
The original windshield wipers for the 10 are quite good. But there are more expensive, but also more highly efficient, high-quality devices.
Today it is fashionable to use frameless wipers, especially from Bosch. Their advantages lie in their compactness and a special, reliable leash mechanism.
But as practice shows, on the windshield of the VAZ 2110, as well as other VAZ models, they do not look very nice, because the fasteners on the leash turn out to be massive. Although if you modify them a little, you will get a very good result.
Repair
To repair this unit, you need a minimum of tools:
- Set of keys and sockets.
- Screwdriver Set.
- WD-40.
- Rags.
- Replacement parts.
It is quite easy to determine which parts are not working. For example, if the wipers do not move, then the motor has failed. If the trapezoid moves, but the glass remains dirty, then the pump or tank is damaged. The size will help you understand what condition the part is in - if the size has decreased too much, then the element needs to be changed. In any case, you need to make sure of the speculations; for this you should analyze:
- The first step is to dismantle the car's dashboard;
- Next you need to find the relay related to this mechanism. It is screwed to the body of the VAZ 2110. If the electrical elements do not work, then the relay needs to be changed; repairs will not help;
Source
Tell! VAZ 2112, rear brake lights
There was a problem with the rear brake lights on the two-wheeler. At first, from time to time the right brake light did not light up, I turned the lights and everything was fine. Now all three brake lights do not light up at all, including the additional one on the spoiler. The lamps themselves are fine, since I put this lamp where the lowest speed lights up, everything works. What could be the problem?
Are you specifically interested in the worldview of the storm?
Storm with Rose and Selena don't distract him.
All performances interest me)
baby123 wrote the day before yesterday at 4:37
Hello My love How are you? I saw your profile today at(avtomarket.ru) and feel like contacting you.I feel we may become matches.( [email protected] ) is my contact. Kindly make a contact if you are interested.so that I can give you my picture for you to know who i am. My name is Celine.I will appreciate it if you give a good responds. Thanks and remain blessed. (Remeber the distance, color or age does not matter but love matters alot in life) Celine
rosesmith wrote yesterday at 15:56
Hello, How are you dear, I'm Rose, i saw your profile and i became interested in you and will like to know you more. if you can reaply me back to my email address ( ).i will send to you my pictures and tell you more about me. hope we can move from here. i will be.waiting for your mail to my email address above. Regards,Rose
Well, what are you, like non-humans))) write on the forum ZADOLBALO or PARTY. And the best place is on the RUS CARS forum
The connections in the circuit alternate. Where the light bulb is inserted (inside the pin, pull it towards you for the best contact) There are stronger light bulbs and put weaker ones.
Clean the contacts in the sockets where the light bulbs are inserted. And look at the antennae.
I decided to write a short annotation on this dilemma!
1. Check the light bulbs and fuse F17. If they are intact, go to point 2. Replace differently and look. Are they shining? Great! No? Let's move on to Fri 2.
2. Two of them have one problem: the wiring harness goes to the trunk door. It is usually located in the right corrugation (in the left wire to the rear wiper, I believe there is the same problem, but I got the car without a wiper). This area is fairly easy to check. A multi tester or a twelve volt power supply will be useful (preferably both)
Behind the trim, on the right, where the rear right headlight with turn signal and fog lamp runs a wire along the iron, you can feel it without removing the fabric. This wire has a male-female connector. Let's disconnect it. Dad goes to the lanterns, and Mother returns the signal from the mounting block.
First, we check the male connector for short circuit (preferably with a multi tester). There are four dark minus contacts; red-stop including extra in spoiler; green reverse; snow white trunk release solenoid. Next, we check each wire for breaks. Again, using a multi tester, one contact to the wire on the male connector, the other to the corresponding wire in the headlight block (black-black, red-red, etc. one by one, check the short circuit with other wires). If everything is in order, then using a 12V power source you can light the lamps. If they don’t burn out, the reason is most likely in the circuit boards of the headlight itself, a lot has been written about this (even with all this, by the way, the spoiler stop still burns another connection there). If you get tanned, go to point 3. Connect the connector back.
In another way, we eliminate the short circuit, most likely it is in the very place where the wires run across the door, you will have to remove the trim, the side trim on the roof pillar, one ceiling cap on the last right, the trim on the trunk door itself, and stretch the harness until the inspection point appears. Be careful with the rear window heating wire; you will need to return it back. I hooked another wire to this wire and only then began to pull it out, returning the harness to its place, pulling it by the wire and pulling the contact back. I had a break in the minus and a short circuit in almost all the wires. He healed and returned the tourniquet to its place; if desired, you can change it for a new one (it was in the evening, there was nothing to ride on.). We return the wires, not forgetting to connect the connector. Let's check. Are they shining? Great! No? Let's move on to Fri 3.