Today we will talk about how you can remove the engine from a VAZ 2110 car on your own. The procedure is far from simple, but sometimes without it it is not possible to restore the machine’s functionality.
Upcoming work
It is necessary to remove the engine for various reasons:
- There is a desire or opportunity to install a new, more powerful engine as part of tuning;
- Major intervention in the power unit is required;
- A failed engine is being replaced, etc.
Tuning and repair of VAZ 2110
Consider this process step by step:
1. Disconnect the battery and remove it.
2. We remove the hood.
3. Now you need to drain all the liquids. The crankcase protection is in the way, so we remove it by unscrewing 5 nuts at the front and 2 bolts at the back.
4. Unscrew the plug to drain the oil from the engine crankcase. We also drain the antifreeze - unscrew the drain plug from the radiator and from the cylinder block. Open the cap on the expansion tank.
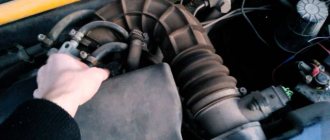
5. Now you need to remove the air filter and the intake pipe hose. We're filming.
6. Disconnect the exhaust pipe from the engine and lower it together with the bracket. So that its flange comes out from the exhaust manifold studs.
7. Pull the rod out of the remote control drive
(throttle valve), having previously turned the DZ drive sector to the end.
8. At this stage, you need to remove the remote control drive rod along with the bracket to the side; to do this, unscrew just a couple of bolts.
9. Unscrew the ground.
10. On the rear cover of the cylinder head there is a block with a wiring harness, fold it back.
11. Do the same with the block from the coolant temperature sensor wires.
12. We fold the hoses away from the thermostat, first loosening the clamps.
13. Find the coolant t indicator sensor and remove the wiring from it, together with the rubber cap.
14. From the water cooling jacket
fold back the supply hose, first loosening the clamp.
15. Remove the knock sensor, fold the wire harness away from it, unscrew the nut and remove the sensor. You can put him back on the harness and let him hang.
16. Unscrew the wiring harness from the ignition module (low-voltage terminal).
17. Now we remove the wiring harness from the generator (terminal “D”). And we unscrew the harness from the “B+” terminal of the generator by moving the rubber band and unscrewing the nut.
18. On the adsorber, fold out the wiring harness.
19. Together with the rubber band, disconnect the wire from the oil pressure sensor (control).
20. Unscrew the clamp on the receiver fitting and remove the vacuum booster hose.
21. Nearby we fold out the wire responsible for the electro-pneumatic valve.
22. Find the block from the idle speed control on the throttle pipe and fold it back.
23. Loosen the clamp on the hose that blows through the adsorber and remove it.
24. We unplug the wires from the TPS (throttle position sensor).
25. Remove the hoses for supplying and draining fuel. Unscrew them from
fuel pipes, and hold them with a second wrench so as to avoid kinking the hose. There is a paint mark on the supply hose.
26. Be careful, there are o-rings on the fuel pipes for sealing. It's better to install new ones.
27. Unscrew the heater hose from the water pump supply pipe.
28. Disconnect the injector wiring harness.
29. Remove the clamp that holds the wiring harness and the water pump supply pipe together. (It can be cut).
30. Remove the block from the oil level sensor in the crankcase near the oil filter. It is better to do this with under cars.
31. Release the crankshaft position sensor from the wire block.
32. Release the wires from the holders on the camshaft drive belt cover.
33. Remove the wires by pulling them out under the receiver.
34. Move the adsorber to the side, loosening its fasteners (clamp).
35. Remove the ring from the stud, before unscrewing the nut securing the gearbox housing.
36. Install the eye under the upper bolt of the ignition module.
37. We hook the cable to 2 eyelets and tighten it with talc or jacquet.
38. Place a board across the hood space, place a board on top, and place blankets under it.
39. And secure our engine to it with belts. Maintain tension.
40. Now we remove the gearbox.
41. Unscrew the bolts securing the power unit (front support).
42. Raise the engine and place it firmly so that its supports are the generator drive pulley and the flywheel.
43. To install the engine, we do everything in reverse order.
44. Fill in oil and antifreeze.
45. We adjust the remote control and clutch drive.
46. We start and check the engine for leaks and extraneous noise. Now you know how to remove the engine of a VAZ 2110. If you had to remove the engine, you can at the same time read the article tuning the VAZ 2110 engine with your own hands and modify your engine.
Drain the old fluid
Before changing the lubricant, warm up the engine to operating temperature, and also find a pit or overpass for work. If possible, use a lift - it will be most convenient.
To drain the oil, proceed as follows:
- We unscrew the filler plug, preventing the formation of a vacuum in the engine and better drainage of oil.
- Place the prepared container under the drain hole.
- Unscrew the drain plug using a wrench.
- Drain the old motor fluid.
- We work carefully so as not to burn our hands, as the oil is hot. If the plug falls into the container along with the used oil, don't worry - you can get it out later.
- The oil will drain for about 10 minutes - be patient and wait until the process is complete.
How to remove the engine on a VAZ 2110 (video)
Today we will talk about how you can remove the engine from a VAZ 2110 car on your own. The procedure is far from simple, but sometimes without it it is not possible to restore the machine’s functionality.
Upcoming work
It is necessary to remove the engine for various reasons:
- There is a desire or opportunity to install a new, more powerful engine as part of tuning;
- Major intervention in the power unit is required;
- A failed engine is being replaced, etc.
Consequences of untimely replacement
If the cylinder head gasket on the “Ten” is damaged or worn out, this will lead to the following malfunctions:
- The engine fluid will begin to get into the antifreeze, and the coolant, accordingly, into the oil. This problem will cause the engine to overheat and the coolant to boil.
- Steam will come out of the exhaust pipe, and the power of the power unit will be reduced to a minimum.
- The engine may stall at idle and when driving uphill, and failures may occur when you press the gas pedal.
- The coolant that gets into the lubrication system will make it difficult for the oil to work due to the fact that when mixed, the substances will lose their original characteristics.
As a result, regular use of a car with a worn gasket will reduce the service life of the car’s engine.
Knocks in the engine
It is not uncommon for even ordinary knocking sounds in the engine to become the cause of its complete failure. Therefore, be careful if you suddenly hear extraneous knocking noises coming from under the hood.
A knock in the engine almost always indicates serious problems, so it is not recommended to get to the service center on your own. Call a tow truck or cling to someone with a rope to get to a service station or garage to determine the cause of the sounds.
The knocking noise can be caused by various components of the 8-valve and 16-valve engines installed on the VAZ 2110.
Source of knocking
What you need to know
This is a dangerous type of knocking. You need to immediately stop the engine and tow it to the service station or garage. The knock is low-pitched and comes from the bottom of the crankcase. As the load increases or the speed increases, the noise increases; the knocking sound is often accompanied by a drop in oil pressure.
Cost of model 21114 with a volume of 1.6 liters
I think that there is no need to explain and talk in detail about the fact that not only 1.5 liter engines, but also 1.6 liters were installed on the VAZ 2110. Due to the increase in displacement, engine power also became slightly higher - up to 81.6 hp.
Also, the engine characteristics were affected by the increased piston stroke in the cylinder to 76.5 mm compared to 71 mm. Although, with all the improvements, this motor has a certain design feature - a bubbling sound during operation, which is due to the fact that the piston is not fully compatible with the cylinder in size.
The price of this unit is also 49,000 rubles.
Engine dismantling
To carry out repairs and modifications, in some cases you will also have to remove the engine. What can we say about the need or desire to change the power unit to a new one. There is no way to avoid this event.
To remove the engine you will need:
- Pit or overpass;
- Assistant;
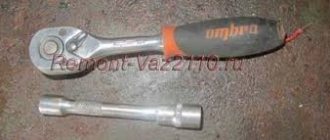
- A set of all kinds of tools;
- The lifting mechanism is a winch or hoist.
When choosing a lifting device, pay attention to its load capacity. In the case of removing the engine from a VAZ 2110, this figure should be at least 200 kilograms .
Having prepared everything you need, you can begin dismantling the engine.
- Remove the hood. Be sure to use a marker to make notes on the location of the four washers. This will make putting the hood back together much easier.
- Relieve pressure in the fuel system. To do this, turn on the starter for 15 seconds with the wiring from the fuel pump turned off. Or simply remove the fuel pump fuse.
- Remove the battery.
Dismantling the battery
- Remove the plastic cover from the motor.
- Move the air filter housing aside.
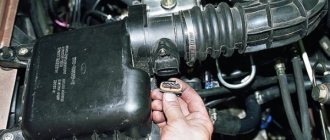
- Disconnect the throttle cable from the engine.
- Disconnect the wiring harness from the throttle position sensor.
- Disconnect the wiring harness from the idle speed control.
- Disconnect the brake booster hose from the intake receiver.
- Disconnect the wiring harness from the ignition module.
- Disconnect the block from the camshaft and crankshaft position sensor.
- Next, be sure to disconnect the wiring from the canister purge valve. Disconnect the wiring block and the injector block from each other.
- On a 1.5-liter engine, the wiring block from the oil level sensor located in the oil pan is disconnected. The wiring from the coolant temperature sensor is also disconnected.
- Disconnect the temperature sensor wiring and the knock sensor wiring. The latter are located on the intake module.
- The ground wires and the tip of the negative terminal wire of the battery are removed from the engine.
- Remove the block with wires from the emergency oil pressure sensor.
- Now the fuel lines are disconnected from the power unit.
- Don't forget to remove the generator.
- Drain the coolant from the system.
- Remove engine oil from the system.
- Drain all oil that is in the gearbox.
- Disconnect the coolant hoses coming from the thermostat.
- On 1.5-liter engines (injectors), remove the exhaust pipe, and on a 1.6-liter injection engine, remove the catalytic manifold.
Removing the collectors
- Completely remove the gearbox.
- Remove the front wheel hub bearing along with the bolts, nuts and washers.
- One bolt securing the gearbox should be screwed into the upper threaded hole of the BC on the left together with a wide washer.
- A cable from the lifting mechanism you choose is tied to the bolt.
- The second lift cable is connected to the engine through a mounting eye. It is located on the cylinder head.
- Carefully lift the engine and secure it in a suspended position.
- Remove the upper and lower engine mounts.
- The right mount will be the last mount for your motor. Unscrew the top nut and lift the engine using the mechanism, completely removing it from the engine compartment.
- Remove it carefully so that the engine does not touch or damage anything along the way. Don’t forget, the engine on a VAZ 2110 weighs about 120 kilograms, and some versions weigh more than 130 kilograms.
Let's pull and pull
Make sure in advance that the winch can withstand a lot of weight by performing a test lift of some heavy object. Otherwise, the lift may fail at the most inopportune moment.
Causes
There are several most common reasons why a car owner has to remove the engine from his car.
| Cause | Peculiarities |
| Major renovation | In the event of a serious accident or as a result of wear of key engine elements, it will not be possible to restore its functionality without a removal procedure. Therefore, they resort to dismantling the engine |
| Replacement | It’s not uncommon for VAZ 2109 owners to think about replacing the standard factory engine with a more efficient, powerful power unit. This is a serious step, where dismantling is one of the initial stages |
| Finalization | If there is no opportunity or desire to change the engine, some simply modify the existing one. Tuning can be quite complex, involving the need to completely remove the engine from the engine compartment |
Regardless of the reasons, you need to remove the engine carefully, following a clear sequence of your actions. Decide in advance whether you will dismantle the engine together with the gearbox or without removing it.
Removal and installation of the VAZ 2110 engine
Tips and step-by-step procedure with photo support for removing the engine on a VAZ 2110 car.
Following the recommendations of the manufacturer, for the necessary technical repairs, the power unit, that is, the engine with the clutch and gearbox, should be removed downwards, but in a garage it is more convenient to carry out the same process upwards with the obligatory use of a lifting device, having first removed the gearbox. All work must be performed only in the presence of an assistant.
Head milling
There are several cylinder head malfunctions that you cannot fix on your own. When the engine overheats systematically, the aluminum cylinder head becomes deformed. The perfectly flat surface of contact between the head and the engine block ceases to be so.
This leads to the gasket between the block and the head starting to leak. Replacing it with a new one does not solve the problem. In this case, grinding the adjacent surface may be the solution. Milling is performed on a special machine, which allows the work to be completed with perfect precision.
In the conditions of your garage, it is unlikely to carry out such a procedure yourself. Using a hand sander (as some garage “kulibins” advise) for this purpose means completely ruining the adjacent surface. In this case, repairing the cylinder head will lead to a complete replacement of the head - it is impossible to grind it indefinitely.
Removing a VAZ 2110 engine, step by step procedure:
1. First, you need to remove the battery from the car.
2. The next step is to remove the hood.
3. After this, remove the oil from the engine crankcase by unscrewing the drain plug, and remove the coolant from the cooling system by unscrewing the drain plugs of the cylinder block and radiator with the expansion tank cap removed.
4. Now you need to remove the air filter with the intake pipe hose, not forgetting to then close the carburetor on top with the technological cover.
5. Then we take and disconnect the exhaust pipe with the bracket from the engine, lower it slightly down so that the flange can come off the intake valve studs.
6. The next movement is enough to turn the throttle valve drive sector to the stop torque.
7. After this, you need to unscrew the two bolts securing the throttle valve drive rod bracket and move it to the side without disconnecting the rods from it, but so that it does not interfere with further work.
8. Next, having unscrewed the fastening nut, carefully remove the tip of the engine “mass” wire from the stud.
9. Finally, loosen the next two fastening nuts and remove the tips of the “mass” wires from the studs securing the rear cover of the cylinder head.
10. Carefully disconnect the block with wires from the coolant temperature sensor by slightly releasing the clamp.
11. Then gradually loosen the clamps and remove the radiator outlet hose from the thermostat and the radiator inlet hose from the cooling jacket pipe.
12. Now disconnect the wire from the coolant temperature indicator sensor.
13. Slightly loosen the clamp and remove the heater supply hose from the water cooling jacket pipe.
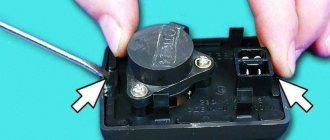
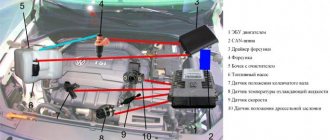
14. The next effort is to disconnect the block (No. 1 in the figure above) with the wires from the detonation sensor (No. 2 in the figure) (or remove the sensor, but to do this, unscrew the nut of its fastening and remove the sensor from the stud, but be sure to leave it on wiring harness).
15. Now it is important to disconnect the block with wires from the low-voltage terminal of the ignition module by pressing the latch holding it.
16. Then carefully disconnect the block with wires from terminal “D” of the generator, carefully move the rubber boot and unscrew the nut in order to then disconnect the wires from the contact bolt (terminal “B+”) of the generator.
18. Now you need to remove the wire from the oil pressure warning lamp sensor.
19. Finally, loosen the clamp and disconnect the vacuum booster hose from the receiver fitting.
20. The next step is to disconnect the vacuum hose of the electro-pneumatic valve from the receiver fitting.
21. By pressing the retaining latch, carefully disconnect the block with wires from the idle air control valve installed on the throttle pipe.
22. Loosen the clamp and remove the canister purge hose from the throttle pipe fitting.
23. Now simply disconnect the block with wires from the throttle position sensor by pressing the latch.
24. Unscrew the fastening nuts, using a second wrench to control the hoses from twisting, then disconnect the fuel supply hoses “1” and drain hoses “2” from the fuel pipes (the fuel supply hose is marked with paint).
25. Be sure to pay your attention to such a detail that there are o-rings in the fuel pipes and it is necessary to remove the ring after disconnecting the hose and, if necessary (it is torn or slightly stretched), replace it.
26. Now remove the heater outlet hose from the water pump inlet pipe.
27. Squeeze the retaining plastic latch and disconnect the injector harness block.
28. Try to unfasten the clamp (cut if necessary) securing the wiring harness to the water pump supply pipe.
29. From the bottom of the car, carefully disconnect the block with wires from oil level sensor 1 in the engine crankcase (next to oil filter 2).
30. Take and disconnect the block with wires from the crankshaft position sensor.
31. Having gradually unscrewed the two bolts securing the cover, we remove two holders with wires from the front cover of the camshaft drive belt.
32. The next step is to remove the wiring harness from under the receiver.
33. Having pulled out the wiring harness from under the thermostat, it is important to finally make sure that all wires and hoses are disconnected from the engine.
34. Having loosened the bolt of the adsorber fastening clamp and, having removed it from the clamp, we remove the adsorber to the side (but without disconnecting the hoses from it) so that it does not become a serious obstacle when removing the engine.
35. Loosen the nut securing the gearbox housings, under which the eye is installed, then remove it from the stud.
36. It is necessary to accurately install the eye under the upper bolt of the VAZ 2110 ignition module.
37. Next, we hang the engine by carefully hooking the cable to two eyelets and pulling it tightly with a hoist or crane.
38. If there is no tap or hoist, it is important to additionally remove the washer reservoir.
Removing and installing the engine assembly
Note. To remove the engine from the vehicle, a lifting device with a lifting capacity of at least 200 kg is required. If there is no such device, then the engine can be partially disassembled in the engine compartment, leaving only the cylinder block assembled with the connecting rod and piston group, flywheel and clutch. A partially disassembled engine can be removed by hand with assistants or using a block.
The need to remove a partially disassembled engine may arise when, during the process of repairing an engine installed in the engine compartment, it becomes necessary to bore the cylinder block.
To complete the job you will need:
- assistant;
- inspection hole or overpass;
- lifting device (hoist, hoist or winch with a lifting capacity of at least 200 kg).
Note. If the design of the lifting device does not allow the lifted engine to be moved outside the vehicle, the vehicle itself can be rolled away. To do this, you will need two bolts (M16-M20) with washers and nuts. They will need to compress the front wheel hub bearings.
conclusions
Please note that upon completion of the work, it is necessary to install a new cylinder block gasket, carry out all work in strictly the same order as removal, and also pour new coolant into the system and check all connections for leaks.
Despite the fact that this work is quite difficult due to the dismantling of numerous pipes, pads and threaded connections, it is very doable with your own hands, you just need to read our article very carefully and you can get to work without fear.
Removal
1. We prepare the car for work (see paragraphs 1, 26 and 4 “Preparing the car for maintenance and repair”).
3. Relieve the pressure in the fuel line (see “Fuel line - pressure relief”).
7. Disconnect the throttle valve drive cable from the engine (see paragraph 3-7 “Throttle valve - replacing the drive cable”).
8. Disconnect the wire connector from the throttle position sensor (see “Throttle position sensor (TPS) - check and replacement”).
9. Disconnect the wire connector from the idle air control (see paragraphs 2 and 3 “Idle air control (IAC) - check and replacement”).
11. On the VAZ 2112 (l.5i) engine, disconnect the wiring harness connector from the ignition module (see paragraph 4 “VAZ 2112 (1.5i) ignition module - check”).
On the VAZ 21124 (l.6i) engine, disconnect the wire connectors from the four ignition coils (see paragraphs 3 and 4 “VAZ 21124 (1.6i) ignition coils - check and replacement”).
12. Disconnect the wire connector from the camshaft position sensor (see paragraph 2 “Camshaft position sensor (CPS) - replacement”).
13. Disconnect the wire connector from the crankshaft position sensor (see paragraph 2 “Crankshaft position sensor (CPS) - replacement”).
14. Disconnect the wire connector from the canister purge valve (see paragraph 2 “Canister purge valve - check and replacement”).
16. On the VAZ 2112 (l.5i) engine, disconnect the wire connector from the oil level sensor in the oil pan.
17. Disconnect the wire connectors from the engine management system coolant temperature sensors and the temperature gauge.
18. Disconnect the wire connector from the knock sensor.
19. Disconnect the ends of the ground wires and the tip of the negative battery terminal wire from the engine (see paragraph 9 “Cylinder head - removal and installation”).
20. Disconnect the wire connector from the emergency oil pressure sensor (see paragraph 2 “Emergency oil pressure sensor in the engine - replacement”).
21. Disconnect the fuel lines from the engine (see paragraph 6 “VAZ 21124 (1.6i) fuel rail - replacement”, there is no fuel drain line on the VAZ 21124 engine).
23. Drain the liquid from the engine cooling system (see paragraph 3-6 “Replacing the coolant”).
24. Drain the oil from the engine (see paragraph 2-6 “Changing the oil and oil filter”) and the gearbox (see paragraph 2-5 “Gearbox - oil change”).
25. Disconnect the engine cooling system hoses from the thermostat pipes
26. On the VAZ 2112 (1.5i) engine, remove the exhaust pipe (see “Engine exhaust pipe - removal and installation”).
On the VAZ 21124 (l.6i) engine, remove the catalytic manifold (see “Catalyst manifold - removal, installation, replacement”).
28. Use M16 bolts with nuts and washers to tighten the front wheel hub bearings.
29. We screw one of the gearbox mounting bolts (with a wide washer on it) into the upper threaded hole of the cylinder block on the left side. We tie a cable to it to lift the engine.
We tie the other end of the cable to the mounting eye fixed to the cylinder head, and hang the engine on a winch.
30. Remove both power unit mounting rods.
31. Unscrew the upper nut of the right-hand support cushion bolt for the power unit (see “Power unit supports and rods - removal and installation”).
Warning. The following operation must be performed with an assistant, who will have to control the position of the engine during the lifting process and ensure that nothing is damaged in the engine compartment.
32. We winch the engine and remove it from the engine compartment.
What is this?
What exactly is this gasket?
This is a rubber element that has a certain elasticity. With use and wear, elasticity is lost. This reduces the quality and efficiency of performing the main task of the element - sealing the connection between the cylinder head and the cylinder block.
In order for the engine to work properly and without problems, the gasket must be installed efficiently and reliably. Ignoring its wear will lead to a serious reduction in engine life.
Signs of wear
If your old gasket is worn out, it won't be difficult to determine. There are several characteristic signs of loss of elasticity of a rubber element:
- White steam starts coming out of the exhaust;
- Traces of coolant or engine oil leakage appear at the cylinder head joints;
- Traces of oil appear in the coolant;
- An impressive amount of lubricant accumulates in the pan;
- Foam forms around the filler cap.