How to increase generator voltage
Many motorists have encountered the concept of low voltage in the network. The culprit of the situation was the generator, which produced an insufficient amount of current. Is there any way to increase the voltage produced by the unit? How to increase the power of the generator without damaging the circuit and the overall system.
How to increase the voltage of a VAZ-2114 generator: increasing power
As you know, additional equipment is often installed on a car, which draws additional voltage from the on-board network.
Thus, the voltage indicator on a VAZ-2114 can drop to a critical level of 11 volts. If you also install additional air conditioning or heated seats, this may result in the starter not having enough power to start the engine. How to fix the problem? Make sure that the voltage in the on-board network increases. Video about increasing the voltage in the on-board network on VAZ cars:
The video will tell you how to increase the voltage of the generator and on-board network with your own hands, and will also tell you about some of the nuances and subtleties of the process
We increase the voltage - all options for solving the problem
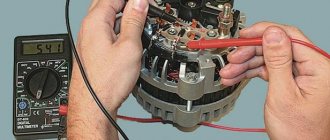
Voltage in the on-board network after modification
So, many motorists may decide that the way out of this situation is to install a high-power generator, but at the same time they will have to replace the battery with a more capacitive one. This is done in order not to “kill” the battery that is installed on the car, since a voltage overload will lead to the destruction of the internal cells. This option is not suitable because it is too expensive.
The second option is to install an additional diode from another diode bridge or marked KD202V. This is much cheaper than changing the generator and battery, but you will have to tinker a little. To begin with, it is recommended to study automobile electrical circuits and the operation of the generator, as well as the charging circuit.
Installing the KD202V diode into the generator
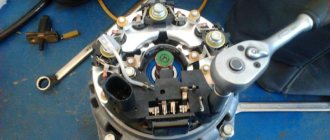
When everything is ready, we proceed directly to installing the diode in the generator to increase the voltage in the on-board network. Let's consider the sequence of actions:
- Remove the back cover of the generator.
Remove the back cover from the generator
We take pieces of wire and solder them.
Wires and diode to increase voltage
- We solder the diode and wiring. View of soldered wires and diode View of soldered diode from the other side
- We install a limiter for the male and female wires.
- We connect the diode to the voltage regulator. We connect the diode to the voltage regulator
- We mount a regulator with a diode.
Installing heat shrink for male and female wires
We install a wire limiter for the diode.
Installed heat shrink for the soldered part
We install a voltage regulator with a diode in the generator
We assemble the generator and also connect it.
We put the back cover on the generator and take out the wires
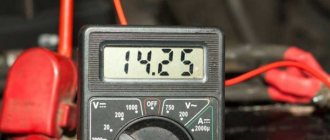
As the measurements showed, after such an improvement, the voltage in the loaded network was 12.2-12.5 volts.
Electrical diagrams and indicators
To increase the voltage even more, at least to 14 volts, it is necessary to install a diode in circuit D, the voltage regulator. Any diode with a breakdown voltage of 20V and a current of at least 5A is suitable. The voltage drop is preferably no more than 0.6-0.7V. The 2D219B diode is excellent.
Uform(V)Ipr(A)Upr(V)Iarb(mA)Housing
| 2D219A | 15 | 10 | 0.6(10A) | 20 (15V) | KD-11 |
| 2D219B | 20 | 10 | 0.6(10A) | 20 (20V) | KD-11 |
| 2D219V | 15 | 10 | 0.45(10A) | 20 (15V) | KD-11 |
| 2D219G | 20 | 10 | 0.45(10A) | 20 (20V) | KD-11 |
Let's look at the circuit diagrams of diodes:
Manufacturing and installation of a diode in a VAZ-2114 generator
Now that everything is ready, we install an additional diode, more powerful than the previous one. You will need half a meter of wire 2*0.75mm. We solder the ends to the female and male terminals No. 4. We dress them in cambric, or better yet, in heat shrink. By the way, the old one must be removed from the system. Let's take action:
- Now, solder the following circuit to the diode: mother to the cathode, folder to the anode.
Diode to increase voltage - We insulate the diode. For example, we take a film container.
Solder the wires to the diode
We insulate the diode using a plastic container - We remove the “minus terminal” from the battery.
- We unscrew the “+” wires from the generator, disconnect the “D” wire to the tidy.
- Remove the generator cover.
Remove the back cover from the generator
Through the slots in the cover, we connect the “mother” to the LV, the “father” to the standard wire.
Connect the wires going to the diode
We carry out the assembly.
We attach the diode where there is enough wire and assemble the generator
Now, everything is ready for the final check and measurements.
Final voltage measurements and results
After the installation was completed and the entire electrical circuit was working, voltage measurements were made at idle speed of the running engine. The results surpassed themselves; the voltage in the entire electrical circuit increased.
How to increase the generator charge using an additional diode
Many motorists have encountered the concept of low voltage in the network. The culprit of the situation was the generator, which produced an insufficient amount of current. Is there any way to increase the voltage produced by the unit? How to increase the power of the generator without damaging the circuit and the overall system.
Diode in the circuit
Installing a diode with a toggle switch is the easiest way to increase the voltage. There is no need to bother, look for a lot of information in books, etc. Everything is as accessible as possible, no special difficulties.
This option of increasing the voltage, despite its simplicity, gives the most reliable result. Ideally suited for domestic and VAZ car models.
The purpose of this method of increasing the voltage in the vehicle's on-board network is to deceive the regulator, which is located inside the generator. As you know, on old domestic car models (kopek, VAZ 2105, etc.) the voltage drop sometimes reaches critical values - sometimes it drops to 12.5 volts. The battery, of course, will not be charged at this voltage.
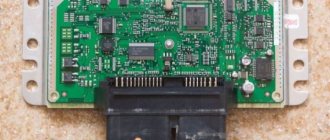
A voltage regulator is the same brushes, a tablet, a chocolate bar - there are many names, but it is the same element that is responsible for regulating the voltage in the generator. On our domestic cars, mostly older ones, the tablets are of poor quality. They do not regulate voltage well, and as mentioned above, sometimes the current value drops below the baseboard.
So, what you need to do is insert an additional diode into the circuit. By this we will achieve the following: by how much the voltage on the diode is reduced, the regulator will increase the total current in the circuit.
There are several ways to integrate a diode. One of the best - remotely. Take a simple toggle switch and install it somewhere convenient.
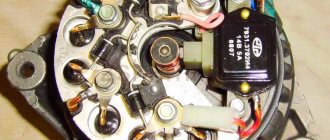
Obviously, the toggle switch should be routed through the wire to the generator. You can insert the diode into the slot in the generator bridge, in the place where the wiring runs from the excitation winding to the regulator. That is, we simply insert the diode into the wiring between the bridge and the regulator.
We connect a separate toggle switch to the diode through two wires, as shown in the photo below.
When the voltage in the on-board network is sufficient, for example, in the summer, the diode is simply installed and not used. If the current is low, just turn on the toggle switch by activating the diode. In this way, we deceive the regulator.
The following diodes can be used.
Their analogues, for example, imported ones, are also suitable. They are much more compact, made of plastic (body). Domestic - metal.
Using a diode, you can provide a voltage drop of 0.9 or 1.2 volts. Thus, if the drawdown reaches 13-13.6, then approximately 1 volt will be added by the regulator. This is normal for winter loads. The standard drawdown of the regulator should be up to 13.8 volts, not lower. At this value, the battery can still charge, but if the voltage is lower, it won’t.
A drop in voltage below standard values for modern calcium batteries is especially critical. The fact is that low drawdown kills such batteries; they deteriorate. Naturally, an increased voltage indicator is not recommended. It should be no more than 14.6 volts (more about this in the table at the end of the article).
Installing a diode in a circuit is a universal solution that gives good results. However, there are some important points to keep in mind:
- Observe polarity when connecting an additional diode. If you break this rule, the battery will not be charged.
- The diode must be selected so as to deliver a current of at least 5 A.
- It is advisable to install the diode outside the generator, as it will get very hot.
- Silicon diodes are considered more efficient. They are capable of taking voltage within 0.8-1.2. But germanium diodes are no more than 0.7 volts.
About regulators
Structurally, tablets that control the voltage in the generator are capable of increasing the current to 13.6 volts. It is known that there are two schemes for connecting the regulator: old and new.
The old circuit is a more reliable option, which does not increase the voltage too much, but also does not allow it to drop to critical values. But the new one - although it is completely copied from the old one, has many shortcomings.
Chronic undercharging of the battery is precisely the drawback of the new scheme. Starting the engine becomes problematic in the cold season. Owners have to install preheaters or come up with something else.
Poor quality regulators force the battery to absorb energy only in the summer, i.e., at above-zero temperatures. In winter, especially if you make short trips by car, the battery does not have time to warm up, at least to 0, and periodically discharges.
Experienced motorists recommend driving for at least 20-30 minutes in winter to restore the battery.
So how is the problem solved? Obviously, the best option is to increase the voltage in the on-board network, but how to do this? It is necessary to make the tablet “believe” that there is supposedly low voltage in the network. Thus, we will ensure that the gene produces the missing voltage.
Low voltage in the vehicle's on-board network can be caused by the presence of a large number of consumers. For example, if you use a powerful speaker system with a subwoofer and amplifier, voltage dips are inevitable.
Instead of a diode, you can also use special regulators that produce three voltage values, depending on the air temperature: 13.2, 13.9 and 14.5 volts. There are three modes: summer, spring/autumn and winter.
We recommend viewing the table, which shows data on the normal charge of the battery and the standard operation of the generator.
| Battery charge level | Charge the battery with a charger | Generator operation |
| 12.72 volts - 100% | If the EMF is less than 12.6 V | norm - from 13.6 V - to 14.4 V |
| 12.50 volts - 75% | Uload - less than 9 V (load fork) | less than 13.6 V – undercharge (bad) |
| 12.35 volts - 50% | Electrolyte density—less than 1.25 g/cm | more than 14.4 V – overcharge. (also bad) |
| 12.10 volts - 25% |
The effectiveness of the diode, which increases the voltage in the on-board network, is beyond doubt. Almost all experienced motorists and owners of domestic models do this. After this, the car will be easy to start not only in summer, but also in winter. High current – accurate charging.
Increasing the generator charging voltage
The topic may not be new, but it is still relevant today. There are many ways to increase the battery charging voltage described online. I don’t claim authorship, but I haven’t seen this method and I want to share my experience in remaking the generator “tablet”.
As you know, in winter, when consumers are turned on, the voltage of the on-board network drops to 12.8-13.5 V and, accordingly, undercharges the battery. I went, as I believe, along the least path of resistance, by including a voltage booster in the electronic circuit of the stabilizer (tablet).
Zener diode VD1 ensures stabilization of half the excitation voltage of the generator, so when a diode is added, an additional voltage drop occurs on it, which ensures that the generator excitation voltage is turned off at a higher voltage.
Well, now how to implement all this in practice.
Take the relay regulator, drill out the rivets and remove the cover.
Carefully remove the compadum from the board, using a screwdriver or a stiff brush. The zener diode we need (for those who are not entirely familiar with radio engineering) is a glass cone with a strip. The strip designates “Minus”. We unsolder the zener diode and solder a minus to minus diode to it. We solder the resulting assembly back.
This is what happened. Next, fill everything with sealant and close the lid. Can be duplicated with screws.
When using a 1n004 diode, the charging voltage without load is 14.8 volts. With all consumers turned on, 13.8 -14.2 V.
Author; Alexander Rodin Shchelkovo, Moscow region
As you know, additional equipment is often installed on a car, which draws additional voltage from the on-board network. Thus, the voltage indicator on a VAZ-2114 can drop to a critical level of 11 volts . If you also install additional air conditioning or heated seats, this may result in the starter not having enough power to start the engine. How to fix the problem? Make sure that the voltage in the on-board network increases.
Video about increasing the voltage in the on-board network on VAZ cars:
The video will tell you how to increase the voltage of the generator and on-board network with your own hands, and will also tell you about some of the nuances and subtleties of the process
How to increase the onboard voltage is very simple.
Where and how is a diode placed in the LV circuit on the generator in order to increase the voltage in the car network and better charge the battery? Here I propose a simple solution, raising the on-board voltage, without going anywhere in the car and its circuits. I searched in my archives and did not find the material from which I read this decision. “Structurally, voltage regulators have an upper limit of 13.6V. This is due to the “old” connection diagram, from which the new one was copied and “successfully improved”. In it, the necessary voltage from the on-board network, supplied to the regulator for comparison, passed through a chain of wires. On them it dropped to normal. According to the new scheme, we have a chronic undercharge of the battery. Which, with the arrival of winter, makes starting the engine in the cold quite problematic. But if you install a pre-heater, starting the engine will be much easier.
We increase the voltage - all options for solving the problem
Voltage in the on-board network after modification
So, many motorists may decide that the way out of this situation is to install a high-power generator, but at the same time they will have to replace the battery with a more capacitive one. This is done in order not to “kill” the battery that is installed on the car, since a voltage overload will lead to the destruction of the internal cells. This option is not suitable because it is too expensive.
The second option is to install an additional diode from another diode bridge or marked KD202V . This is much cheaper than changing the generator and battery, but you will have to tinker a little. To begin with, it is recommended to study automobile electrical circuits and the operation of the generator, as well as the charging circuit.
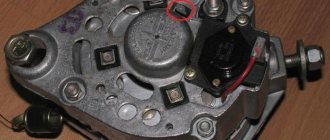
On the generator
In the second picture you can see how the diode is installed, but with such a length of wiring it is not very convenient - everything is tight. It is better to make the length of the wire about 2 cm from the diode - this way, in my opinion, it will be easier to insert into the RN connector of the generator. As far as I remember, I have a K223 diode, i.e. it's silicon. Raises the voltage by about 1.3 V.
I’ll correct myself - I checked using reference data on the Internet what the K223 diode is - I must say that I was very mistaken in indicating exactly that name. In fact, there are diodes KD223 and D223, but their housings are completely different.
However, in the photos I provided, most likely diodes D214 or D242 are wrapped in electrical tape (there may be different letters after the numbers), here is the case (M6 thread):
How to increase the voltage of a VAZ-2110 generator: increasing power
As you know, additional equipment is often installed on a car, which draws additional voltage from the on-board network. Thus, the voltage indicator on a VAZ-2110 can drop to a critical level of 11 volts. If you also install additional air conditioning or heated seats, this may result in the starter not having enough power to start the engine. How to fix the problem? Make sure that the voltage in the on-board network increases.
Video about increasing the voltage in the on-board network on VAZ cars:
conclusions
Increasing the voltage of the VAZ-2114 generator with your own hands is real and quite simple. At the same time, the cost amounted to 500 rubles. It is worth noting separately that if you do not have the necessary skills or abilities to work with automotive electronics, then you should contact a car service center, where everything will be done quickly and efficiently, and of course, at the expense of the car enthusiast.
If you find an error, please select a piece of text and press Ctrl+Enter.
Today, many car enthusiasts install various additional equipment on their cars. This can negatively affect the charging of the generator, as well as the on-board voltage of the vehicle.
The question arises: how to increase charging on the VAZ 2114 generator? This may require a lot of effort, but there is nothing overly complicated about it.
The first thing to do is determine the level of additional voltage on the on-board network. Most often, problems arise due to some additional equipment. In some cases, the voltage reading may drop to 11 V. This is extremely low.
If after this you install heated seats or install a new powerful air conditioner, then the starter will not have enough power to start the engine. In order to fix this problem, you need to somehow increase the voltage in the car's on-board network.
We increase the voltage - all options for solving the problem
So, many motorists may decide that the way out of this situation is to install a high-power generator, but at the same time they will have to replace the battery with a more capacitive one. This is done in order not to “kill” the battery that is installed on the car, since a voltage overload will lead to the destruction of the internal cells. This option is not suitable because it is too expensive.
The second option is to install an additional diode from another diode bridge or marked KD202V. This is much cheaper than changing the generator and battery, but you will have to tinker a little.
To begin with, it is recommended to study automobile electrical circuits and the operation of the generator, as well as the charging circuit.
A few words about its structure
The generator set of this car is a fairly reliable device that can withstand vibration loads and temperature changes in the engine compartment. In addition, it is not afraid of moisture and dirt when moving. Its performance should be stable at any engine speed.
Generator requirements:
- The strength of the current generated by the device must be such that the battery is not discharged, but is charged to the required level, regardless of the connected utility networks;
- Regardless of engine speed and fluctuations in current consumption, the on-board voltage must be stable.
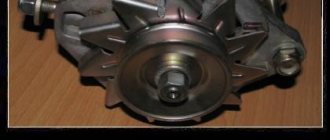
This is an electrical machine that converts the rotational motion of the motor shaft into direct voltage to charge the battery. Its body consists of two halves: front and back. The back cover is responsible for connecting the brush assembly with a relay regulator, a diode bridge and terminals for connecting consumers of the electric current generated on it.
The main element of this device is the stator, which generates electrical voltage. Installed between the body halves, front and rear. A rotor with an excitation winding rotates in a housing on bearings. Voltage to this winding is applied through the copper rings on the rotor shaft and supplied to them through a brush assembly mounted on the back cover.
Possible improvements. Today, lovers of additional consumers of electric current in a car have two ways to increase the battery charging voltage. Let's take a look at them.
Electrical diagrams and indicators
To increase the voltage even more, at least to 14 volts, it is necessary to install a diode in circuit D, the voltage regulator. Any diode with a breakdown voltage of 20V and a current of at least 5A is suitable. The voltage drop is preferably no more than 0.6-0.7V. The 2D219B diode is excellent.
| 2D219A | 15 | 10 | 0.6(10A) | 20 (15V) | KD-11 |
| 2D219B | 20 | 10 | 0.6(10A) | 20 (20V) | KD-11 |
| 2D219V | 15 | 10 | 0.45(10A) | 20 (15V) | KD-11 |
| 2D219G | 20 | 10 | 0.45(10A) | 20 (20V) | KD-11 |
Let's look at the circuit diagrams of diodes:
Manufacturing and installation of a diode in a VAZ-2114 generator
Now that everything is ready, we install an additional diode, more powerful than the previous one. You will need half a meter of wire 2*0.75mm. We solder the ends to the female and male terminals No. 4. We dress them in cambric, or better yet, in heat shrink. By the way, the old one must be removed from the system. Let's take action:
- Now, solder the following circuit to the diode: mother to the cathode, folder to the anode.
- We insulate the diode. For example, we take a film container.
- We remove the “minus terminal” from the battery.
- We unscrew the “+” wires from the generator, disconnect the “D” wire to the tidy.
- Remove the generator cover.
- Through the slots in the cover, we connect the “mother” to the LV, the “father” to the standard wire.
- We carry out the assembly.
Now, everything is ready for the final check and measurements.
Final voltage measurements and results
After the installation was completed and the entire electrical circuit was working, voltage measurements were made at idle speed of the running engine. The results surpassed themselves; the voltage in the entire electrical circuit increased.
Let's consider a table of the results of the measurements obtained:
| Load | Voltage up to | Voltage after |
| without load | 14.2 | 14.45 |
| +dimensions | 13.8 | 14.45 |
| +PTF | 13.7 | 14.4 |
| +neighbor | 13.6 | 14.35 |
| +heater | 13.5 | 14.3 |
| +Fan | 13.4 | 14.2 |
| +far | 13.2 | 14.1 |
| + heating | 13.1 | 14.0 |
| +heater max | 12.9 | 13.95 |