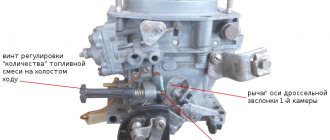
The majority of VAZ cars of the Samara family, and in particular the VAZ-2109, came off the assembly line with a carburetor power system, and only later a small series received injectors. The carburetor system has a simple design and is quite reliable, but its main component, the carburetor, requires periodic adjustment. The VAZ-2109 and other models of the family were equipped with Solex carburetors, characterized by a relatively simple adjustment technology that every car enthusiast can perform.
There are two main carburetor settings - the fuel level in the float chambers and the engine speed at idle (idle). These adjustments are carried out when the engine is unstable at idle and when certain symptoms of improper operation of the power system appear:
These problems indicate that the fuel level in the chamber is not normal.
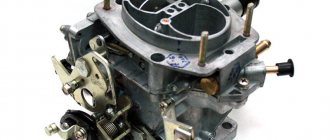
"Solex 21083"
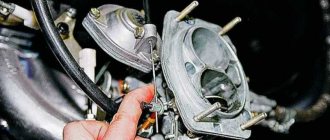
This carburetor consists of two parts. So, the first part is the main body of the device - there are diffusers, the main dosing system, a system for idling the engine, a power economizer and an accelerator pump.
The second part is the lid. It is equipped with an air damper, floats, a starting device, and a solenoid valve.
Cleaning and checking the technical condition of carburetor parts
Fuel filter
Wash the filter in gasoline and blow with compressed air.
Check the condition of the filter. If the filter or fuel supply pipe is damaged, replace it with a new one.
Float mechanism
Wash the parts in gasoline and check their condition.
The floats must not be damaged.
The sealing surface of the needle valve and its seat must not be damaged to impair the seal of the valve.
The valve should move freely in its seat and the ball should not hang up.
The weight of the floats should not be more than 6.23 g. Replace faulty parts with new ones.
Carburetor cover
Clean the cover and all holes and channels from dirt and oil.
Wash the lid in acetone or gasoline and blow with compressed air.
Inspect the sealing surfaces of the cover. If there is damage, replace the cover with a new one.
Semi-automatic starting device
In order not to disrupt the lubrication properties of bushings, axles and levers, it is forbidden to wash the device body and its parts.
Jets and emulsion tubes
Clean the jets and emulsion tubes from dirt and resinous compounds, rinse them with acetone or gasoline and blow with compressed air.
Do not clean the jets with a metal tool or wire, or wipe the jets and other carburetor parts with cotton wool, cloth or rags, as lint can clog the fuel emulsion path.
If the blockage is severe, you can clean the jets with a soft wood needle moistened with acetone.
Carburetor body
Clean the housing from dirt and oil.
Rinse its channels with acetone or gasoline and blow with compressed air.
If necessary, clean the channels and emulsion tubes with special reamers.
Inspect the sealing surfaces of the housing; if they are damaged or deformed, replace the housing with a new one.
Acceleration pump
Clean the pump parts, rinse them in gasoline and blow with compressed air.
Check the ease of movement of the ball in the sprayer and the movement of the moving elements of the pump (lever, diaphragm parts).
Jams are not allowed. the diaphragm must be intact and without damage.
Check the condition of sealing surfaces and gaskets. Replace damaged parts with new ones.
Power mode economizer
the diaphragm must be intact and without damage.
If the total length of the diaphragm pusher (including the head) is less than 6.0 mm, replace the diaphragm and pusher assembly.
Carburetor assembly
Assemble the carburetor in the reverse order of disassembly. In doing so, pay attention to the following points.
The float must rotate freely on its axis without touching the walls of the chamber.
The needle valve should slide freely in its seat, without distortion or jamming, the tightening torque of the needle valve seat should be 14.7 Nm (1.5 kgcm).
The tightening torque of the solenoid shut-off valve should be 3.68 Nm (0.4 kgcm).
To avoid mixing up the jets during assembly, pay attention to the markings of the jets.
When assembling the accelerator pump, tighten the screws securing the cover, press the drive lever all the way, tighten the screws and release the lever.
When tightening the throttle valve mounting screws, tap the screws along the contour using a special device to prevent deformation of the valve axes.
Device
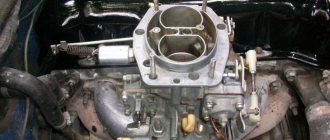
Let's take a closer look at how this carburetor works. Before you start setting up the VAZ-2109 carburetor, you need to understand what and how it works. So, “Solex 21083” is an element consisting of two cameras. Jets for supplying fuel from the main metering system are installed in the middle of the chambers, deep in the main body.
On top, the fuel jets are covered with air elements of the gas pumping station. In the design of this carburetor, the developers have provided a fuel mixture heating system. Hoses through which hot coolant passes are connected to this block. Since there are two chambers in this carburetor, there are also two throttle valves. They are mechanical, and opening and closing is carried out using cables and levers.
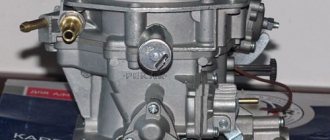
The lid has pipes for supplying fuel and returning it back to the tank. The presence of the so-called return line allows you to reduce the pressure that is formed in the fuel system of the car during operation.
What jets should be on an ozone carburetor?
— Fuel, air and emulsion jets of the Ozone carburetor econostat
Dynamic Solex carburetor from a conventional carburetor in one movement
Carburetors Ozone 1st chamber 2nd chamber
| 2140-1107010-50 | — | 1.20 – fuel 1.40 – air 1.20 – emulsion |
| 2140-1107010-70 | — | 1.20 – fuel 1.40 – air 1.20 – emulsion |
| 2141-1107010 | — | 1.20 – fuel – – air – – emulsion |
Operating principle
There is no point in examining in detail how a carburetor works, so let's study the basic principle of operation. A carburetor is a special device whose main task is to supply the engine with a fuel mixture in different operating modes.
When starting an internal combustion engine, many drivers open the air damper of the first chamber - this allows the mixture to be supplied to the cylinders as rich as possible. The engine should start. Then, as the engine warms up, the air damper is closed and the carburetor returns to its main operating mode.
The fuel mixture is supplied from the pump to the float chambers, which feed the first and second chambers. The gasoline level here is adjusted using a needle valve. Next, fuel is supplied from the chambers through special channels in the device body into the main jet and then into the first chamber. The mixture supply level is controlled by the accelerator pedal. The latter, in turn, regulates the throttle valve. The second camera will be activated if you press the gas pedal more than halfway.
When the engine is idling, the device does not use the main metering system. These carburetors have a separate idle design. Fuel and air are supplied through separate channels in the housing. XX jets are also present. Many owners have problems with setting the idle speed on VAZ-2109 carburetors.
How does Solex differ from Ozone and Weber?
The main difference between Solex carburetors and devices of previous families is the possibility of installing it on transversely located power units with the float chamber forward. This installation option made it possible to eliminate the leanness of the fuel mixture when the car enters a turn, climbs, or during sudden acceleration.
In addition, Solex has a completely different float chamber design. It has a two-section design, which allows the device to be used both on front-wheel drive cars and on classic cars.
Solex carburetors are reliable and maintainable
Common faults
A well-maintained and properly tuned carb will not cause any problems to its owner. But often this does not happen. Elements break, and there are fewer and fewer carburetor specialists. Let's look at the main problems with these devices.
Most often, malfunctions occur with the accelerator pump. Its main function is to enrich the fuel mixture. During the operation of the car, as well as due to poor-quality fuel filters, the pump becomes clogged. As a result, dips appear and the car “does not move.” The situation can be corrected by disassembling and cleaning the carburetor (in particular, the accelerator pump).
Problems with idle speed also often occur. Usually the idle jet and solenoid valve are to blame. The EPHH unit also fails. The GDS jets also become clogged.
What jets are on the VAZ 2109 carburetor
A jet is a device for precise dosing of fuel, air or their consistency (emulsion). Dosing occurs through a calibrated hole in the nozzle. On carburetors 2105, 2107 Ozone in various systems there are 13 jets. Let's look at their calibration data and placement on the carburetor. This information can be useful when checking the compliance of the jets with the nominal value, adjusting the carburetor for low fuel consumption, or, on the contrary, adjusting to increase the power characteristics of the engine by selecting jets.
READ How much oil is poured into the Niva Chevrolet engine
What are the prices (sizes)
Characteristics and calibration data of DAAZ 2107-1107010 Ozone and 2107-1107010-20 Ozone carburetors
The diameter of the narrow part of a huge diffuser
The diameter of the main fuel jet GDS
The diameter of the main air jet GDS
Idle system and transition systems
Cross section of the idle fuel jet
Diameter of the idle air jet
The diameter of the fuel nozzle of the transition system of the 2nd chamber is 0.6 mm
The diameter of the air jet of the transition system of the 2nd chamber is 0.7 mm
Productivity per 10 presses – 7.0±1.75 cm3
Pneumatic drive of the 2nd carburetor chamber
Abstract: carburetor adjustment. Malfunction of the fuel pump, the material is available at the link. The oil gets into the air filter https://vz07-up.ru/pit/vozdushnyj-filtr.html#t3.
Replacement
The main problem that sometimes appears in the operation of the VAZ 2107 carburetor is that the jets become clogged, as a result of which their throughput decreases. During maintenance, it is recommended to blow or flush them using special liquids that are used to flush the carburetor. According to the instructions for the use of the indicated liquids, the jets can be processed superficially, without disassembling the carburetor. You can do blowing in the same way.
Often these measures are enough to restore the functionality of the VAZ 2107 fuel system. But if there is significant clogging, you will still need to disassemble the carburetor and alternately unscrew and wash the jets. It is better to do this on a flat surface, covered with newspaper or a clean rag, so that the large number of small parts that make up the carburetor do not get lost or mixed up.
After cleaning and assembly, adjustment at idle and under load is recommended. For this, special adjusting screws are used. First, the idle speed is adjusted, achieving stable engine operation at a speed of 800-1000 rpm. After this, the efficiency of the engine under load is checked, the absence of failures when transitioning from idle to maximum speed. When they appear, use the quality screw to increase the amount of fuel in the mixture, while simultaneously tightening the quantity screw to set the idle speed to the previously specified value.
Dismantling
Before setting up the VAZ-2109 carburetor with your own hands, you need to blow it out and rinse it. This process begins with dismantling the device. It's very easy to do. Simply turn off the ignition and remove the air filter housing. Then remove the spring that is installed on the air damper actuator.
After this, disconnect the throttle cable. The next step is to unscrew the fastening that holds the choke cable. All that remains is to unscrew the nuts that hold the device body in place. After this, you can completely remove the device.
Removing and installing Solex
In order to repair or purge (flush) the carburetor, it must be removed. Removing the unit is quite simple; almost any motorist can do it independently. We remove the device as follows:
- turn off the ignition, first of all we remove the air filter housing;
- remove the return spring from the throttle valve actuator;
- disconnect the throttle cable;
- unscrew the fastenings of the choke cable;
- unscrew the four nuts on which the carburetor body itself is attached; dismantle the assembly.
Installation is carried out in reverse order.
There are malfunctions that are most typical for Solex carburetors:
- clogging of the fuel jet of the GDS;
- the entry of debris into the idle system; XX jet
- deformation of the lower surface of the main body due to overheating;
- failure of the accelerator pump diaphragm;
- solenoid valve defect;
- loose fit of diffusers in the housing.
If the body is deformed, air is sucked between the carburetor and the intake manifold, and the engine begins to operate intermittently, as the air-fuel mixture becomes leaner. The idle speed is difficult to adjust, and to correct the defect it is necessary to grind the surface on an emery wheel. If the surface warping is significant, grinding will no longer help; the housing must be replaced.
Over time, the accelerator pump diaphragm can crack, lose elasticity, and ruptures appear in it.
Checking the condition of the diaphragm is quite simple; it does not require removing the carburetor. To get to the diaphragm, you need to unscrew the 4 screws of the accelerator pump cover and remove the part. The condition of the diaphragm is checked by external inspection.
Didn't find the information you are looking for? on our
If you find an error, please highlight a piece of text and press Ctrl Enter.
Sources:
https://555-shop.ru/obsluzhivanie/kakie-zhiklery-stoyat-na-karbyuratore-vaz-2101.html https://vz07-up.ru/pit/zhiklery-karbyuratora.html https://avtomobil- vaz.ru/kakie-zhiklery-stoyat-karbyuratore-soleks/
Adjustment
This carburetor has several options for adjusting different parameters.
Typically, setting up a VAZ-2109 Solex carburetor includes several operations. You can adjust the fuel level in the float chamber, idle speed and idle speed itself. The quality of the fuel mixture is also adjusted.
Recommended Method
Level control technology includes a number of stages:
- We dismantle the housing of the air filter element. To do this, unscrew the fastening nut of the housing cover, unclip the latches, remove the cover, take out the filter and tighten the 4 nuts that secure the housing to the carburetor.
- Raise the body and disconnect the rubber pipes. We move the body to the side.
- Loosen the clamps securing the fuel pipes going to the carburetor and disconnect them.
- Remove the wire suitable for the idle speed solenoid valve;
- Disconnect the drive cable of the air damper (the “choke” handle);
- Unscrew the 5 screws securing the carburetor cover;
- Having removed the cover, we immediately determine the fuel level in the chambers by lowering a ruler or caliper into one of them until it stops (using its depth gauge). If the measurement shows a level of 25-26 mm, it corresponds to the norm and no adjustment is required;
If the amount of fuel in the chamber is lower or higher than normal, we perform a visual inspection and a series of measurements on the floats, and if necessary, we correct their position.
To carry out adjustment work, place the removed carburetor cover on a flat horizontal surface with the floats facing up.
First, we look at the position of the elements from above. The outer side surfaces of the floats are parallel to the special imprints on the gasket. Deviations can cause the floats to touch adjacent elements and surfaces, causing the fuel level to be incorrect. If necessary, adjust the position of the floats by bending their mounting arms. The next step is to measure the gap between the floats and the gasket. A rod with a diameter of 2 mm is useful here - this is how much the specified gap should be.
If it does not correspond, we bend the tongue of the floats, with which they act on the locking needle. After this adjustment, we check the total height of the floats, which is normally 34 mm. If this is not the case, check the gap again, adjust it if necessary and measure the height again.
The last stage of setup is determining the working stroke of the floats. To do this, place a caliper near the float, mark the distance from its lower corner to the surface of the cover, then lift the float with your hand and mark where the lower corner is.
We set the quality of the fuel mixture
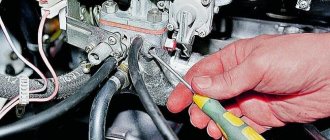
This carburetor adjustment on the VAZ-2109 can be done with your own hands and it is not necessary to visit specialists. The quality is very easy to set. To do this, the engine is thoroughly warmed up, and then using a screw to adjust the number of revolutions, the idle speed is set to about 900 per minute.
Next, the quality screw is tightened until the engine begins to operate intermittently. Then it is turned away again. It is recommended to unscrew until stable operation, namely until the speed stops increasing. In the position of the quality screw where the speed is highest, you need to stop and remove the high speed with the quantity screw.
A little history
A new carburetor was needed when the front-wheel drive VAZ project was being developed. The transverse arrangement of the engine did not make it possible to install the old OZONE carburetor, which was used for the “classic”. But the development of the French company Solex, after a little “finishing with a file,” went off without a hitch. The production of new carburetors began at the Dimitrovgrad Plant (DAAZ), where French equipment was installed and the production process was launched under a Solex license.
The design of Solex carburetors made it possible to install them on engines of different types and power, slightly changing some parameters. So, the most common was the Solex model 21083, which was installed on a 1.5 liter engine. VAZ 2108, 2109. For “classics” with a 1.45-1.6 liter engine. modification 21053 was developed, structurally similar to Solex 21073, designed for the VAZ 21213 Niva with a powerful 1.7 liter engine. And even for Moskvich with a 1.5 liter engine. Solex 21041 was installed, and for 1.8 liters. – modification 21041-10, suitable for both Volga and UAZ.
Problems when setting idle speed
One of the common problems with these carburetors is idle. Owners are faced with the fact that independently adjusting the VAZ-2109 carburetor does not lead to anything. XX cannot be adjusted. When turning or unscrewing the fuel mixture quality screw, the engine speed does not change in any way.
Everything is simple here. The reason for this operation is that the idle jet, which is installed in the solenoid valve, is clogged. It is also possible that the channel located under the quality screw is clogged. Often everything is solved by replacing a non-functioning solenoid valve.
Checking the solenoid valve is also easy. When the engine is not running, remove the wire from the valve, unscrew the valve itself, and remove the jet. Next, turn on the ignition and connect the wire to the solenoid valve. In this case, the latter should click, and the rod will sink inward. If this click does not occur, then the valve is not working. It needs to be replaced.
You should also immediately blow out and clean the idle jet. Even a small grain of sand is enough for the hole to become clogged. It may not even be visible. But this is enough for the idle speed to disappear. If the channel located under the quality screw is clogged, then it will not be possible to blow it out.
Advantages and disadvantages
Solex has certain inevitable disadvantages, but there are also positive qualities for which owners of domestic cars love them:
- High quality build. This includes everything related to materials and the precision of manufacturing of all parts. There is no need to “finish with a file” what is already well done;
- Better fuel mixing performance. Since the design of the diffusers is much better thought out than in OZONE carburetors, with proper tuning you can achieve better power output with lower fuel consumption;
- The ability to modify and adjust the carburetor, achieving optimal operating parameters;
- Maintainability and low cost of spare parts. Compared to modern injection engines, repairing a Solex carburetor is much easier and cheaper;
Well, the main drawback is sensitivity to blockages, which is inevitable for any precisely fitted device. The dirt comes from gasoline, which, as we know, is not of the highest quality. And dust can be pumped from the air bypassing the air filter if there is deformation and cracks in the housing, as well as through holes in the float chamber.
Today you can hear that carburetor cars are a thing of the past. This is partly true, because new standards, including environmental ones, and progress have long dictated a new perception of convenience and comfort. Injectors operate more economically, adapt more accurately to external conditions, and meet new requirements. But it is impossible to simply cross out the huge number of completely normal cars that operate, albeit with an obsolete, but very efficient fuel system.
How long will the Solex carburetor remain relevant? Given its reliability and convenience, cars with this fuel supply system will be in use for a long time. So far, the interest in servicing and repairing the Solex has not waned, since there are quite a lot of cars with it.
Modifications and applicability of Solex carburetors
| Modification | Applicability | Engine volume, cm3 | Notes |
| DAAZ-2108–1107010 | VAZ 2108, 2109 | 1,3 | |
| DAAZ-21081–1107010 | VAZ 21081, 21091, ZAZ 1102 | 1,1 | |
| DAAZ-21083–1107010 | VAZ 21083, 21093, 21099 | 1,5 | |
| DAAZ-21083–1107010–31 | VAZ 2108, 2109, 2110, 2111 | 1,5 | Has a semi-automatic starting device |
| DAAZ-21083–1107010–35 | VAZ 2108, 2109, 2110, 2111 | 1,5 | Has a two-level semi-automatic starting device (winter/summer) |
| DAAZ-21083–1107010–62 | VAZ 2109, 2115 | 1,5 | Has an electronic device for controlling the composition of the combustible mixture |
| DAAZ-21083–1107010–05 | VAZ 2109 | 1,5 | |
| DAAZ-21412–1107010, DAAZ-21412–1107010–30 | AZLK 2141, 2141–23 | 1,5/1,8 | |
| DAAZ-1111–1107010 | VAZ 1111, 11113 "Oka" | 0,65/0,75 | |
| DAAZ-21051–1107010 | VAZ 2103, 2105 | 1,5 | |
| DAAZ-21053–1107010 | VAZ 21074, 21061 | 1,6 | |
| DAAZ-21051–1107010–30 | VAZ 2104, 2105 | 1,3 | |
| DAAZ-21053–1107010–62 | VAZ 2107, 21072, 21074 | 1,3/1,5/1,6 | |
| DAAZ-21073–1107010 | VAZ 2121, 21213 "Niva" | 1,6/1,7 |
Table: comparison of basic calibration data for Solex 21081 and 21083 carburetors
| 21081 | 21083 | |||
| For 1st camera | For 2nd camera | For 1st camera | For 2nd camera | |
| Mixing chamber diameter, mm | 32 | 32 | ||
| Diffuser diameter, mm | 21 | 23 | 21 | 23 |
| Air jet of the main dosing system | 165 | 135 | 155 | 125 |
| Fuel jet of the main metering system | 95 | 97,5 | 95 | 97,5 |
| Idle air jet | 170 | 170 | ||
| Idle fuel jet | 39–44 | 39–44 | ||
| Air jet of the second chamber transition system | 120 | 120 | ||
| Fuel nozzle of the second chamber transition system | 50 | 50 | ||
| Economizer fuel jet | 40 | 40 | ||
| Accelerator pump cam number (size) | 4 | 7 | ||
| Throttle valve starting gap, mm | 1,0 | 1,1 | ||
| Air damper starting gap, mm | 2,7±0,2 | 2,5±0,2 | ||
| Needle valve hole diameter, mm | 1,8 | 1,8 | ||
| Vacuum regulator hole diameter, mm | 1,2 | 1,2 | ||
Setting the level in the float chamber
For stable and uninterrupted operation of the car, you need to adjust the float of the VAZ-2109 carburetor. This will ensure the correct fuel level in the float chamber. To do this, you need to remove the carburetor cover. Then, by bending the plate that holds the float, the position is adjusted.
How to exhibit? There are different opinions on this matter. Some argue that you need to achieve factory settings for the VAZ-2109 carburetor, while others prefer to configure it based on their own experience. It is better to measure the level with a caliper. The distance is determined between the top of the housing and the fuel level. It should be within 24-26 millimeters. Measurements must be taken as soon as the cover is removed. In books on Solex carburetors, there is a template that allows you to configure the floats as correctly as possible. This setting is carried out with the cover removed.
Setting the fuel level
Adjusting the amount of fuel in the chambers of Solex carburetors is a simple procedure and does not require specialized equipment. Although in the factory this adjustment is performed using a special template, which simplifies and speeds up the work. But at home you can do without this template. To carry out adjustment work yourself you need:
- screwdrivers (phillips, flat);
- ruler (preferably a caliper);
- round rod with a diameter of 2 mm (wire or drill will do).
With such equipment you can quickly complete all work.
Ignition settings
In order for the car to drive as efficiently as possible, adjustments to one carburetor are not enough. You also need to adjust the ignition. The VAZ-2109 carburetor should work well. Do you know that an incorrectly set ignition angle affects engine performance for the worse?
On front-wheel drive VAZ models, this should be taken very carefully. The ignition angle allows you to obtain normal characteristics such as power, idle speed, fuel consumption, and engine response.
Symptoms of an incorrect angle
What if the ignition setting is incorrect (the VAZ-2109 carburetor works perfectly)? In this case, you can observe high fuel consumption, a decrease in power, failures when pressing the gas pedal, problems with starting the engine, as well as detonation and overheating.
It often shoots at the muffler and carburetor. These are not all possible symptoms. But before you start ignition, you need to make sure that no valve adjustment is required. You already know how to adjust the VAZ-2109 carburetor.
How to properly clean carburetor jets from plaque and dirt
If, while cleaning the jets, the basic standards for carrying out such an operation are violated, then significant deviations in engine operation are possible due to changes in the fuel dosage. The air jets of the Solex carburetor also need to be properly freed from dust contamination. It is also important to clean the lambda probe in a timely manner.
When setting up the carburetor metering system, superficial cleaning of the jets can be carried out. This method of removing contaminants will not take much time, but its use is only possible if there are relatively minor problems with the performance of this unit.
In case of significant contamination, a thorough cleaning of the jets is required, and if the performance of the products cannot be restored, then a new part is installed.
Surface cleaning of jets
Surface cleaning of jets can be carried out using special aerosols. A can of solvent will be inexpensive and can be easily found in specialized auto parts stores. The product has a long tube for supplying the active substance, which allows for precise spraying of liquid in the most economical way. The procedure for cleaning the jets of a Solex 21083 carburetor or other similar models is carried out in the following sequence:
- The air intake or air filter housing is removed (depending on the car model).
- The air and fuel jets of the main metering system are unscrewed (you need to remember the markings of the jets in order to correctly install them in place).
- The idle speed solenoid valve is removed.
- The aerosol is fed into the holes cleared of parts.
- Air and fuel jets are installed.
- The fuel choke lever is pulled out.
- The engine starts.
- A running engine warms up at idle and medium speeds.
- The engine turns off.
- The solenoid valve and air duct or filter housing are installed.
After connecting all the elements, start the engine again and check its operation in various modes.
Thorough cleaning of jets
If superficial cleaning of the jets did not bring a positive effect or the performance of the carburetor was restored only for a short time, then more thorough work will need to be done. In order to qualitatively restore the throughput of small parts, you will need to remove the carburetor from the car. This is not difficult to do, but first you need to disconnect the following elements:
- Air duct.
- Throttle rod or cable of the gas pedal.
- Control cable for the fuel suction system.
- Fuel hose.
- Solenoid valve wire.
Next, remove the carburetor from the intake pipe. In the carburetor, unscrew all the screws holding the lower part of the product. The device is disassembled into 2 halves. All internal jets are unscrewed and washed in acetone, and also blown with compressed air. In order not to confuse parts of similar size, they can be placed in plastic containers with inscriptions. The internal channels and fuel chamber are also thoroughly washed with solvent.
When the jets are dry, they are installed in place, the carburetor is assembled and installed on the inlet pipe. After connecting the controls, air supply and power, the engine is started and its operation is checked in various modes.
How to set the ignition angle?
Many people recommend using a strobe light for these purposes. But this is true for new cars. If the motor is already worn out, this angle set by the strobe will be incorrect. It is best to rely on the hearing and behavior of the car.
So, how do you set up the ignition yourself on a VAZ-2109? By the way, we have already examined the carburetor in full. The first step is to start and warm up the engine. Then you need to loosen the nuts holding the distributor and turn it in one direction or the other until the speed begins to increase and the engine starts running stably. Next, the nuts are tightened.
After this, you need to drive the car and look at its reaction. If the car “does not drive,” then the ignition is too early. Next, you need to accelerate to 50 kilometers per hour, engage fourth gear and press the accelerator pedal. If detonation sounds occur, then the ignition is set even later. If the detonation lasted a few seconds, then everything is in order. And if it is not there at all, then the ignition is too late.
It is recommended to set it again. But in this case, the ignition distributor should be rotated in the opposite direction. Please note: the slightest inaccuracy and an error of 1 degree are fraught with detonation. After successful setup, the car will begin to pick up speed normally and consume less fuel (but not below factory settings).