Cleaning VAZ injectors
You need to clean the injectors on VAZ cars (and on other brands of cars) approximately every 30-40 thousand kilometers, or even more often, it all depends on the operating conditions of the car and the quality of the fuel.
The injectors become clogged due to various debris present in the fuel. Therefore, after cleaning the injectors, it is advisable to change the fuel filter. How do you know if the injectors are clogged and it’s time to clean them? Everything is very simple - the engine begins to run unevenly (an experienced car owner will notice this immediately), increased fuel consumption, a decrease in power are possible, and the engine begins to tune up. But first, it’s better to diagnose the engine; perhaps the reason for the malfunction is hidden in something else.
If the reason was dirty injectors, then after cleaning you will immediately understand - the engine will run smoothly, without jumps and dips, the power will be the same. And the more clogged the injectors were, the more noticeable the difference will be.
Signs of a clogged injector
To understand when to clean fuel injectors, you need to understand what the distinctive signs and indicators of a clogged injector are.
As a rule, experts recommend cleaning at least once every 30 thousand kilometers. But it is worth understanding that the condition of each car is individual, and each car owner has a different attitude towards servicing the power unit. Therefore, it is not always worth adhering to certain regulations, since cleaning the injector nozzles may be necessary much earlier. Among the main signs indicating the need to clean the injectors are the following:
Such signs indicate clogged injectors. But the symptoms cannot definitely indicate a faulty injector. Sometimes this indicates problems in other components and assemblies. To make a “verdict”, it is recommended to go for car diagnostics or conduct a visual inspection of the element that causes suspicion. As a rule, the listed symptoms do not appear immediately, but after some time. Especially if the car’s mileage is close to 100 thousand km or has exceeded this mark.
Cleaning injectors with additives
One of the methods for cleaning injectors is adding cleaning additives to gasoline. No one can say for sure whether this will be “useful” for your car. At the moment, a large number of similar additives are produced, and each of them has its own effect on the injectors and the engine as a whole. You also need to take into account the degree of contamination of the injectors, each car has its own. Therefore, even if everything turned out well for your neighbor, things may not turn out so joyfully for you. Here you already need to think for yourself.
How to clean the injector
There are various ways to bring the injectors into proper shape. Each car owner individually chooses one method or another. Factors when choosing a method may include:
Also, when choosing, it is worth considering the degree of performance of the device. There are 3 main degrees of injector contamination:
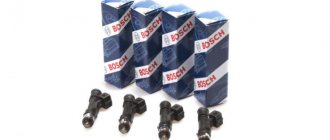
In order to clean the injectors with your own hands, you need to purchase a special injector cleaning agent that will remove all contaminants.
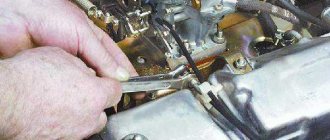
Cleaning injectors manually
To clean the injectors, they must first be dismantled. A huge advantage of this method is that we ourselves can observe the cleansing process and will be completely confident in the correctness and completeness of the work done.
Before dismantling the injectors, you can get rid of the fuel in the ramp. To do this, you need to disconnect the fuel pump from the power supply (disconnect the wires from it and that’s it), then start the engine and wait until it stalls. That's it, there should be no gasoline. You can find out how to remove the ramp together with the injectors from the instructions of your car. Each one has its own characteristics.
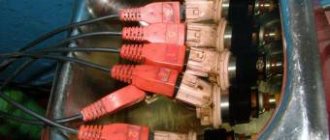
After removing the injector (each separately), you need to connect it in this way: 12V battery, light bulb, switch, injector. We connect everything in series.
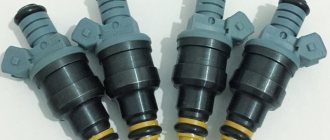
The O-rings must be removed from the injector. At the second end of the nozzle you need to attach a large syringe (20 cubic meters or more) filled with liquid for cleaning the nozzles. They can easily create the necessary pressure. We attach the syringe tightly so that it does not tear out. Now you can press the switch button, the nozzle should start spraying liquid.
This procedure must be performed with each nozzle until the liquid is sprayed evenly.
After the procedure, we replace the rubber seals with new ones and install everything back.
Method two: cleaning procedure
- This method is more advanced and also costs a little less. There is no need for injector cleaning fluid here. All you need is carburetor cleaning spray. Now you need to fill the pump hose with spray.
- Cleaning the outside should be done with a spray, which must first be applied to a clean cloth. It is with this cloth that you should wipe off carbon deposits
from the injectors.
How to remove injectors on a viburnum (fuel). Due to friction, the carbon deposits will gradually soften and wash off. How to produce on viburnum - pol-z.ru. This process can be accelerated using a screwdriver. Before putting the injectors in place, the O-rings must be lubricated with soapy water.
Removing the Kalina fuel rail
You will need : relieve pressure in the fuel system, prepare two “17” wrenches, a “10” socket, and a “5” hexagon.
Procedure:
- Disconnect the block with wires from the injector wiring harness by pressing the lock.
- Unscrew the ramp tube fitting with a 17mm wrench, holding the hose tip with the same wrench.
- Remove the rubber O-ring from the tip of the ramp tube.
- Remove the air supply hose to the throttle body.
- Unscrew the nut securing the clamping bar using a 10mm socket.
- Remove the clamping bar.
- Remove the fuel supply pipe by pressing the spring clamp on the tip.
- Unscrew the two screws securing the fuel rail to the intake pipe using a 5mm hex.
- Move the fuel rail so that all injectors come out of their seats in the intake pipe.
- Remove the Kalina fuel rail with injector assembly.
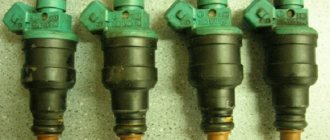
How injectors are designed and work
YouTube channel "Mikhail Nesterov"
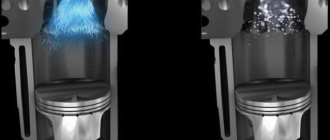
There is a solenoid needle valve located inside the fuel injector body. It is held closed by a return spring. When pulses are supplied from the electronic control unit (ECU) to the excitation winding, the valve opens. At this moment, the fuel is atomized and mixed with air, burned in the combustion chamber.
The correct proportions of the air-fuel mixture and its ignition depend on the quality of gasoline atomization. During normal operation of the injectors, the fuel is crushed into small particles, easily mixed with air and burned.
Search
There are two ways to clean nozzles
at
home
There are two ways to clean the nozzles at home
. This will be discussed in this article.
It often happens that on your next trip, when you press the accelerator pedal, you suddenly feel a breakdown or, for example, the car begins to “slip”, and in bad weather it moves very poorly. Well, all this points to the need for a quick cleaning of the injectors. How to clean injectors using viburnum? | Lada. Of course, there are many service stations these days, so you can go straight there. There, specialists will carry out ultrasonic cleaning.
Using an industrial method, you can restore 90% efficiency. Improves dispersion. This means that the fuel droplet size decreases as you cut. Productivity also increases, and fuel begins to be consumed evenly by the nozzles . And, importantly, the sprayer has been restored. This improves engine efficiency, the "response" is noticeable at low speeds, and this has a positive effect on the increase in power.
You may also like
maintenance stations, a list of services will be offered immediately. I want to know how to check the engine on the injector using. They are ready to measure CO and CH, check the engine at idle, and disassemble the fuel rail. The nozzles will be checked for tightness and performance twice (at the end of the work they will be checked) and will be cleaned with ultrasound. Specialists will also replace the fuel filter and rubber seals. nozzles
. Once the engine is installed, station personnel will adjust the CO and CH as well as the engine at idle.
But there is one problem, all the work of the maintenance
It costs money, and sometimes quite a lot.
Often, motorists love not only to drive their car, but also to “lift it themselves.” On the one hand, this is even a plus, because the costs will be much lower.
How to clean injectors at home
at your discretion?
You may also like
OWN JOB: Clean the injectors yourself
An effective way to clean the nozzle
The cleaning time for any type of equipment depends on the degree of contamination.
Dismantling of attachments on Kalin.
Take off nozzles
with viburnum. I'll notice nothing complicated. All gums remain intact after disassembly.
2 ways to clean injectors
- First, we need an injector cleaner like Vince; carburetor cleaner (homemade spray is a good option). How to remove vibration injectors (fuel). photo report on how to replace VAZ 1117, 1118 and 1119 injectors. It's also best to prepare one ring for the injector (in case you don't have to rush to the car market while working).
Cleaning procedure
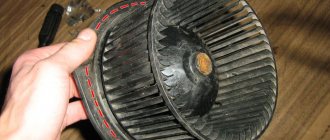
- First of all, remove the barrel with two attachments - IAK.
- Next, remove the bar from the nozzle wires by first removing the clips from the bottom. Loosen the four screws on the nozzle rod and carefully pull out the nozzle rod. How to check injectors without removing the engine. Symptoms of a faulty injector. Checking the winding resistance level on the pipes. The work should be carried out with care so as not to damage it due to negligence. Each nozzle must be removed in turn.
- Now you need to take a container and fill it with Vins cleaner. how to clean injectors. Demonstration of a faulty air flow sensor on a viburnum, a priori. The container should be convenient for washing the nozzles in it. While they are “juicing”, you need to use a MAC cleaning spray.
- Typically nozzles are coated with coke around the nozzle
.
Externally, coke looks like resin. The area is very difficult to leave, but it is quite possible to clean it. After removing the coke, be careful around the nozzle to clean the surface of the funnel. How to check the power of injectors. This check is performed if the injectors themselves are working normally, but any injector does not work when the ignition is on. You will need to use a spray from time to time to blow out any excess. After the nozzle
from the outside, it should be thoroughly washed from the inside. - To rinse the nozzle
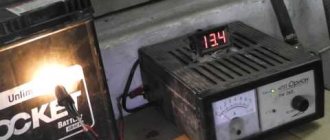
inside you will need a 3-12V power source, a foot pump with a pressure gauge.
Set of rubber nozzle rings on a button How to clean nozzles? The end of the hose is removed from the pump and the cleaner is filled there. The hose is then placed over the nozzle. After pumping about 6 atmospheres, a voltage of 3 V should be applied to the nozzle. Sometimes it happens that for the first time it is necessary to apply a voltage of 6-9 volts. This is because the nozzles
cannot "click". Voltage must be supplied in “batches” during periodic pumping. Once each injector has been cleaned, they should be replaced in the reverse order.
When is injector flushing necessary?
How do contaminants appear?
First, resins settle on the engine parts; this is not burnt fuel and its impurities. The sediment then oxidizes and becomes a hard layer on the parts. If you refuse to clean the injection, then problems in the operation of the engine will only increase: high wear of mechanisms will appear, increased formation of coke and soot, the catalyst will experience excessive load, fail, etc. Even a thin varnish layer of 0.005 mm reduces the efficiency of injectors by 20% or more. The nature of the spray torch changes: its shape and size. The nozzles lose their tightness, causing the injection control to malfunction. As a result, we observe dips at idle and increased fuel consumption.
The quality of fuel, extreme weather conditions, and long periods of sitting in traffic jams make the process of pollution formation lightning fast. You should know that there are other possible problems: fuel filter, pump, fuel intake screen. These dirty parts interfere with the normal operation of the engine.
Prevention must be carried out every 20-30 thousand km. You can clean the engine yourself. To do this, you will need special equipment and liquid for flushing injector nozzles. Choosing the right product is easy. Today, products from the Russian manufacturer LAVR and European products are popular on the market. Before choosing a drug, watch the video to see how the compositions differ.
How to wash injectors on Kalina 8 valves
I recently became the owner of a Lada Kalina with an 8-valve engine, mileage is 160 thousand, I am already the third owner of the car. So, I decided to wash everything, replace it, and, in general, bring the car back to life. Replaced the IAC, TPS, washed the throttle assembly, replaced all the pipes and clamps. I decided to wash the injectors at the same time, since, I suspect, the previous owners had never done this before. I bought an Abro carburetor cleaner for this purpose; two of the injectors were blown out perfectly, the third was worse, and the fourth was not blown out at all. I decided to replace the latter - I installed a new, original one, but it only turned out worse. Now the engine is shaking, the speed is floating. What did I do wrong? How to properly wash the injectors on Kalina?
You need to change all the injectors and buy them with the same number. check the injector winding resistance. should be within 11-15 ohms
It’s like you’re rummaging around, now that you’ve got the hang of it. And as a problem, everything is fucked up. It is necessary to diagnose, to cling to the brain.
Look at the sensors, maybe they were installed incorrectly, tightened poorly (air is sucking), check the injectors last. Start small.
Possible air leakage through the sealing rings. Change the rubber rings on the injectors.
You can properly wash the injectors only at the stand, remove them and give them to the specialists
Diagnostician Changed the injectors for the client, after checking at stand 3 they were clogged, one was leaking. He threw them into a jar of laurel wash, a week later he remembered them, put them on a stand, at first they sprayed black, then they started working normally, now he rides them himself, and threw his own into the laurel)))
If the injectors are clogged, the abro will not help. It makes sense to use Abro periodically for prevention on a new car. If there is a problem, then you need to look carefully: the wiring to the injectors, the VV wires.
Correctly, the injectors are washed with ultrasound.....and at the stand it is assessed how evenly they pour, if not evenly, then they are put back into the ultrasound......otherwise what you are doing is called either useless or harmful to the car.
If you didn’t open them by supplying power, but they were blown out without power being supplied to them, then these are the ones that don’t work, since they shouldn’t be blown out without voltage being applied to them
Yes.. of course it wasn’t worth going there if it worked... But since that’s the case, it’s worth taking a look. Here we popularly explained how you can clean the injectors at home. If the tips don’t help, write to us by email, and we’ll try to figure out what the problem is together.
Ultrasound or chemicals for cleaning the injector?
So, it was decided that the injectors and injector needed to be cleaned. Which method should I choose? Common methods are washing the injector without removing the injectors or cleaning the injector on an ultrasonic bench. The cleaning efficiency of the second method is several orders of magnitude higher, but in this case, except for the nozzles, nothing else is cleaned. For VAZ cars, sometimes cleaning is not the right solution. It is much easier and cheaper to simply replace the injectors.
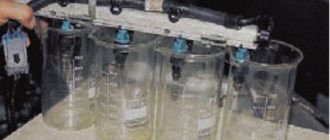
Today, simple single-circuit installations are used for washing and cleaning. These are containers in which the solvent is located. The unit is placed next to the machine. A hose is connected to the inlet of the fuel rail to inject the product into the system. The cleaner, which acts as both a cleaning agent and a fuel, is supplied to the system by a compressor.
But there is a drawback: this method does not allow the cleaning fluid to pass through the pressure regulator and shut-off valve. This is ineffective and does not flush out the fuel system. Double-circuit stands are much more efficient, since the cleaning liquid passes through all fuel systems. As for ultrasound, it began to be used back in 1985. A bath for such cleaning is a container with a cleaner. An ultrasonic emitter is installed at the bottom of this bath.
The disadvantage is that you only need to clean the injector nozzle. And modern sprayers cannot be cleaned using ultrasound. And this process is quite labor-intensive.
It is preferable to use imported solvents as a cleaner for injectors and injectors. They are of high quality. These are, for example, injector cleaning products such as the German Liqui Moly, the Belgian Winns or the American Hi-Gear. Domestic products were also tested, but neither “Toilet duckling” nor “Moidodyr” were suitable for these purposes.
Why do injectors clog?
Impurities in the fuel, short trips and difficult operating conditions lead to carbon deposits forming on the needle and internal surfaces of the injector. This plaque clogs the channels. The solenoid valve opens for a long time and more gasoline enters the combustion chamber than necessary.
All this leads to an over-enrichment of the fuel mixture, poor ignition and misfires. Unburnt gasoline enters the exhaust system and burns out inside the catalyst, which becomes clogged and melts at high temperatures. At the same time, engine power decreases, detonation appears, and fuel consumption and exhaust toxicity increase.
Method one - using carburetor cleaner
If instead of a special means for cleaning injectors you have carb cleaner lying around, then in a garage you can clean the gasoline injector yourself, even with a carburetor cleaner from a can, rather than buying liquid for the injector. Next we describe one of these methods. To work you will need:
- two pieces of clean rags;
- small-section copper insulated wire about a meter long;
- knife;
- plastic clamps (ties);
- awl;
- electric battery with a voltage of 9 V (the popular “Krona”);
- a piece of oxygen hose 4.5 cm long;
- insulating tape;
- carburetor cleaner (when choosing, pay attention to the working cap of the cylinder with a diameter that matches the inner diameter of the oxygen hose so that it can be inserted inside);
- safety glasses and gloves.
Operation of dirty injectors
If the elements are clogged, this can be felt by the reduced specific power of the car engine. Then detonation will occur at the moment of acceleration. The symptoms of dirty injectors are especially pronounced at idle speed. Engine operation becomes unstable, the starting of the power unit deteriorates, and fuel consumption increases. The exhaust becomes more toxic. It is best to diagnose the operation of injectors at a service station.
If diagnostics by specialists reveal that the main cause is the injectors, then they need to be washed. There are options when the elements are removed for cleaning. But it is also possible to wash the injectors without removing them from the engine. For those who will do it themselves, it is better to choose the second option. Naturally, if you disassemble the motor and remove the parts, the process of cleaning them is greatly facilitated. But this is not always convenient.