Checking the VAZ 2107 starter
October 30, 2011
Checking the VAZ 2107 starter consists of carrying out special work aimed at identifying faults in the operation of individual elements, as well as breakdowns in the wiring of the stator and armature windings. To check the starter, you will need a multimeter that combines a voltmeter, an ammeter and an ohmmeter to measure resistance, and you will also need two copper wires about 50cm long and with bare ends.
First of all, to carry out a quality check, it is necessary to remove the starter from the car, and it is also necessary to remove the battery for convenience.
Checking the operating parameters of the starter comes down to:
- Checking the solenoid relay.
- Checking the stator and armature windings.
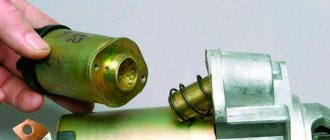
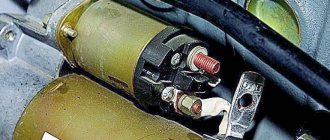
Checking the solenoid relay. Place the starter near the battery. Connect one copper wire with one end to the positive terminal of the annealed relay, and the other end to the positive terminal of the battery. We connect the end of the second wire to the negative terminal of the battery and short it to ground of the starter. If the retractor relay is working properly, it will operate with a characteristic click, which will be accompanied by the snapping of the overrunning clutch (Bendix). The click should be sharp and quick. If the retractor operates sluggishly, this may be due to either low battery charge or burning of the copper heel contacts of the retractor relay. In this case, if the relay is collapsible, then it must be disassembled and the contacts cleaned. If the relay is not removable, then you will have to replace it with a new one.
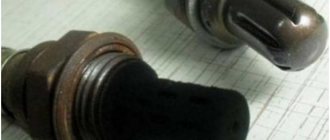
To check the short circuit of the stator windings to ground, it is necessary to remove the back cover and disconnect the brush plate. We take a multimeter and switch it to resistance measurement mode, that is, an ohmmeter. We connect one terminal of the ohmmeter to the starter ground, and with the second terminal we touch each terminal of the stator winding in turn. If there is no short circuit, the ohmmeter will show a resistance of at least 10 kOhm.
Now you need to check the stator windings for breaks. To do this, we connect each terminal of the ohmmeter to the terminals of the windings. If the resistance tends to infinity, then a break has occurred in some turn of the stator winding.
And the final step in checking the VAZ 2107 starter is to check the armature windings for a short to ground. To do this, connect one terminal of the ohmmeter to the starter ground, and connect the second one in turn to the commutator plates. If there is no short circuit, the resistance will not exceed 10 kOhm.
At this point the work is completed. Reinstall all removed parts onto the vehicle.
Most common faults
First of all, it is important to know the signs of malfunctions so that you do not have to replace the entire unit again:
- If the starter does not turn when you turn the key, and the headlights are dim, then you do not have to disassemble it and look for the problem. In this case, the car behaves incorrectly due to the low battery charge.
- After the headlights, you need to pay attention to the battery terminals and wire tips. Their oxidation can also cause the starter to malfunction. Clean them, lubricate them with Vaseline and tighten the tips well.
- The solenoid relay may also fail. It needs to be checked if the battery and wiring are normal.
- If the starter fires, but the armature spins very slowly, then most often the problem is a burnt-out commutator. It is enough to clean it to restore functionality.
- Problems may also be hidden in wear of the bearing brushes or bushings, damage to the clutch ring or flywheel gear teeth.
To understand what happened to your car, it is necessary to carry out not only an external inspection, but also remove the starter for a more thorough diagnosis.
Testing Bendix
If you are subscribers to my site, then you already know from the starter device that the bendix can only rotate in one direction. If you try to turn it the other way, it will jam. Thanks to this feature, you can check the bendix with the starter removed.
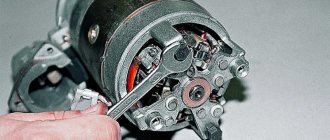
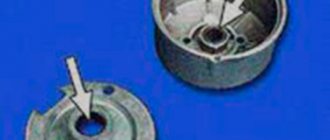
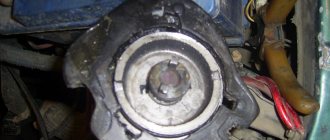
We remove it from the armature shaft and release it from the retractor relay plug. We hold the lower base with one hand and try to turn the gear in one direction. If it rotates freely in both directions, then it is faulty and needs to be replaced. Although there are craftsmen who restore its functionality.
If this test was successful and the bendix only spins in one direction, then we inspect it. Its gear must be intact, each of its teeth must not show signs of damage or deformation. If so, then the part needs to be replaced.
Video on how to check Bendix in a garage:
How to check the starter
After you have removed this part from your VAZ-2107, carry out the following steps at home:
- Clean the removed assembly from dirt.
- Carry out a test from the car battery: connect the output of the solenoid relay and the battery. In this case, make sure that the housing of the unit is connected to the negative terminal from the battery.
- Remove the back cover and brush assembly. Inspect the armature and stator windings.
- Use a multimeter to check the windings for shorts. To do this, turn it on in Ohm measurement mode. If there is no short circuit, then the minimum device will show 10 kOhm.
- Move the probes to the terminals of the windings; if the readings of the device tend to infinity, then there is a break in the coil.
- Install one probe on the body, and attach the second to the contact plates. If the armature is not shorted to ground, the multimeter readings will be above 10 kOhm
Next, you need to inspect the launcher parts for physical damage. To do this, the part is disassembled. Replace all faulty and damaged parts with new ones. After repair, assemble the starter and install it in place.
Characters without spaces – 2429
Uniqueness of ETHT – 97%
Uniqueness of Text.ru – 80.74%
Academic nausea Advego – 7.8%
Advego word frequency – 2.38%
What to do first?
Disassembling the mechanism is not a priority task, since the starter’s power supply is connected to the battery, so you need to start with it. If the car is not too old, it is unlikely that the problems will lie in the design of the starter itself. It is enough to clean the contacts of the battery or the device itself for everything to work again in the desired mode.
Difficulties begin when the machine has worked for a long time and its operation has not been delicate. If, after a complete check of the electrical equipment of your VAZ 2107, the starter still does not start or continues to work intermittently, then the reason is inside the device and it is necessary to remove and disassemble the starter. On this model, both in carburetor and injection versions, it is installed rather inconveniently. To get to it normally, you will have to drive the car onto an overpass or inspection hole.
Checking the starter for operability on a VAZ 2101-VAZ 2107
Welcome! Starter - not everyone always has the money to buy a completely new starter for a car, and that’s not even the point, many spare parts that already exist are actually not of very high quality, unlike those years when, for example, a car like the VAZ was still produced 2106. And therefore, many people simply forcibly do not buy new spare parts, but immediately go and buy old ones, but how can you understand when buying a starter whether it will work on your car or not? This is what we will analyze with you today!
Note! This article was written about what a starter is in general and what elements are included in it, and the test of the starter itself for performance was posted as a video in which all the nuances were described in detail, so if you don’t need to know what it is starter, what elements it consists of, then watch the video at the very end, which immediately shows you how to check the starter for functionality!
Why do you need a starter anyway?
Someone knows, but someone still doesn’t, so you need to open up this question so that when you read further, you no longer have questions, but still, if they arise, then ask them in the comments and we will answer them for you as soon as possible. Let's get back to the topic.
The starter is needed to spin up the car engine so that it can simply start and the starter does nothing else besides this. In general, if we delve a little deeper into this topic, the starter, firstly, begins its work only when the key is turned to the final position when the car is already starting to start, and secondly, it only works for a while while you hold the key in the extreme right position, and after releasing the key, the key itself returns automatically to a strictly vertical position in which the starter stops working.
Have you ever had this happen, you started the car and by mistake turned the key again all the way to the right and after that a clearly audible grinding noise occurs, which by the way is due to the starter, which in this case, when you turn the key with the car running, it comes into operation again work.
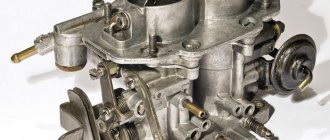
What does the starter generally look like and where are elements such as the starter solenoid relay, etc. located?
On many cars of the VAZ family, all starters are somewhat similar to each other, but mainly on classics this unit looks like this:
But so that you understand what elements the starter consists of, we have prepared for you an interesting photo in which we described everything in detail, see the photo below:
Additional video clip: This video clip, which is located just below, will show a visual check of the starter for serviceability, which must be carried out before purchasing a used starter.
Note! If you decide to buy a new starter for a classic, you will need to replace it later, so for information on how to replace this unit, see the article entitled: “Replacing a starter on a VAZ”!
Let's summarize
Using these simple methods, you can independently check the removed starter as a whole and each of its elements separately. As you can see, there is nothing complicated here, no fancy instruments are needed either, except for the E 236, but this is a last resort.
I was able to prove that with such a diagnosis, the most difficult process may be the process of removing the starter from the car? – If not, write your opinion in the comments.
Such performance testing methods are suitable not only for classic automobiles such as VAZ, but they can also be successfully used on foreign cars. In most cases, the design of starters is the same everywhere, so diagnostic methods are similar everywhere.
Thank you all for your attention. If you have any questions, ask them in the comments. I'll be happy to help you.
DIY VAZ 2107 starter repair
Not only the ability to start the engine when you turn the key in the ignition, but also the speed of its start depends on the starter on a car. This issue is most relevant in the cold seasons, when new batteries cope with their main task with great difficulty. It is not always possible to solve the problem by purchasing a new battery, since the starter is a mechanical device that tends to wear out and fail. How the VAZ 2107 starter is repaired, we will find out in this material.
Replacement
- socket wrench 10;
- socket wrench with extension 13;
- screwdriver.
Work order
- We place the car on a viewing hole or overpass and secure it with the parking brake.
- Open the hood and disconnect the ground wire from the battery.
- Using a 10mm socket, unscrew the bolt of the lower fastening of the starter heat shield.
- We dismantle the air filter housing and the warm air supply hose (for injection units, remove the fastenings of the intake pipeline).
- Using a socket wrench with a 13 mm extension, unscrew the 3 bolts securing the starter housing. It is better to unscrew the bottom bolt from the inspection hole.
- Using a 13mm wrench, unscrew the nut (on the injection engine there are two nuts) securing the starter shield. Let's take it out.
- Using a socket wrench with a 13 mm extension, unscrew the 3 bolts securing the starter housing. It is better to unscrew the bottom bolt from the inspection hole.
- Using the same tool, unscrew the nut securing the tip of the wire going to the “+” battery.
- Disconnect the start relay wire.
- We remove the starter from the rear wall of the engine compartment.
- We install a new starter in its place.
- We carry out installation work in reverse order.
vote
Article rating
Device malfunctions
One of the main types of starter malfunctions is brush wear. This is due to the fact that every time the engine starts, the brushes come into contact with the armature. Current passes through the brushes, and when the armature jams, the value of this current increases to 600 Amperes. This amount of current can cause a fire in electrical wires. The wear of the brushes can be determined by the rotation of the rotor. If the rotation speed decreases or the armature does not rotate at all, then it is necessary to check the condition of the brushes.
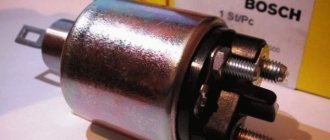
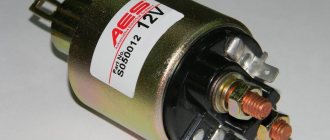
A retractor relay is attached to the starter housing, which is often the reason for the inability to start the engine. Some of the main reasons for the failure of the solenoid relay are:
- Open circuit in the relay winding.
- Destruction of any of the component parts of the device.
- Carbon accumulation or plate melting.
To troubleshoot the problem, it is necessary to determine the breakdown, but it is often easier to replace the solenoid relay with a new product. A device such as a bendix can fail. It is an overrunning clutch with a gear that meshes with the flywheel, causing it to rotate. Through the bendix, torque is transmitted from the starter to the crown of the crankshaft flywheel. The overrunning clutch, which should rotate freely in one direction and with a load in the other, can break. If the clutch fails, the starter will simply rotate idle, and a characteristic hum will be heard. In order to repair the clutch, you will need to disassemble the starter.
In rare cases, you may encounter a breakdown such as a break in the windings or plates. It is almost impossible to damage the windings, except in cases of breakdown. Most often, a malfunction with windings and plates occurs in gear starters, which is due to the unreliable design of its housing.
In order to find out the cause of the breakdown and eliminate it, you will need to disassemble the VAZ 2107 starter. First, the mechanism should be removed from the car, and then you should begin checking it. We will find out further what a mechanism check is.
How to check the starter
The simplest way to check that the mechanism is working is to connect the product directly to the battery. From the positive terminal of the battery, the wire should be connected to contact “50” on the solenoid relay, and the negative terminal should be connected to the starter housing. If a click occurs and a gear appears, then the failure is due to a fault in the supply wiring.
If the device does not function, then proceed to removing the back cover, where the brushes with brush holders are located. First you need to disassemble the starter, and then use an ohmmeter. One probe of the device is connected to the armature, and the second probe becomes alternately connected to the terminals of the windings. A working winding will show a value on the device of at least 10 kOhm.
If the test shows that the fault lies directly in the windings themselves, then further repair actions are simply useless. It is simply impossible to repair the starter winding of a VAZ 2107 with your own hands without special equipment. The problem is solved by purchasing a new engine starting mechanism.
How to repair a starter yourself
After removing the starter along with the solenoid relay from the car and checking it for functionality, you can begin repairs. It is important to remember that if the product is already quite old, then it is better to replace it. The mechanism can be repaired if one of the elements fails:
- brushes;
- solenoid relay;
- bushings;
- Bendix with fork.
Now let's look at how to repair a starter on a VAZ 2107.
- First you need to disassemble the starter by removing the back cover.
- Using a thin screwdriver, you need to remove the lock washer.
- The fastening of the brush wires must be unscrewed.
- Unscrew the mounting bolts of the solenoid relay, and then remove it.
- Using a “10” wrench, you need to unscrew the nuts from the two studs. Some starter models may have long bolts instead of studs.
- The back cover is removed.
- To remove the front cover, you will need to remove the pin along which the Bendix fork moves.
- To replace the bendix, you will need to knock out the metal ring on the rotor. In the groove behind the steel ring there is another one, which should also be opened and removed. Now you can remove the bendix and replace it with a new one.
- The plates can be cleaned with a fine scriber if necessary.
- If necessary, the bronze bushings must also be replaced. To remove the bushing you will need to use a mandrel of the appropriate diameter. The starter connection diagram is single-wire, so the “minus” is the car body and the engine block itself.
- The brushes are replaced with new ones.
- The starter assembly is performed in the reverse order of removal. After completing the assembly, you should install the starter in place and turn it on.
If the device does not function, you need to check that it is connected correctly. The design of the VAZ 2107 starter is not particularly difficult, especially for people who are familiar with electrical engineering. After the replacement, you can start your VAZ 2107 car and check the engine starting speed. Using this material, you can repair the starter on a VAZ-2107 quickly and efficiently.
avtoexperts.ru
A situation familiar to many car enthusiasts is when, after 2-3 unsuccessful attempts to start the engine, a crackling sound from the solenoid relay is heard under the hood and the starter refuses to crank the engine. This is especially true in winter, when the battery capacity drops and it quickly discharges.
In order to better understand the cause of the malfunction of the retractor relay (SR), let's briefly recall the design of the starter itself and how it works on a car.
Let us remind you
The car starter is a short-term electric motor. If the power unit does not start after three to five attempts, then you need to look for the reason and not turn it in vain, since in most cases this affects its further existence. In simple terms, you shouldn’t “rape” him.
Car starter device
The starter consists of a housing (within which the stator winding is located) and a rotor rotating on two bearings, as well as a solenoid relay.
At the end of the rotor shaft there is an overrunning clutch (bendex) equipped with a toothed gear, which, when starting, engages with the crankshaft flywheel.
The relay's job is to turn on the starter and provide a connection to the flywheel to start the engine.
Relay device
The relay consists of a housing in which the windings are located, a core, a return spring, a central contact, a cover with two power contacts, made in the form of bolts, the threads of which protrude from the cover. The cover also has a connector where power comes from the ignition switch when the engine starts.
One of the bolts receives a permanent “plus” from the battery, and the second contact is connected to the stator winding.
The relay core is connected via a plug to the bendex. The fork, in turn, works on the principle of a rocker arm. When the core is retracted, it pushes the overrunning clutch to meet the engine flywheel, and when the core is released, the bendex is retracted.
Scheme of work
When the ignition key is turned to the “start” position, power is supplied to the relay winding, a magnetic field is created in the retractor winding, which draws in the coil core, which closes the power contacts. At the same time, the core pushes the overrunning clutch through the fork to the crankshaft flywheel, causing the latter to rotate.
Structurally, the VR has two windings: retracting and holding.
The retractor winding draws in the core, which, through the central contact, connects the power connectors of the relay, transferring power from the battery to the starter motor, causing the latter to work.
All this time, the holding winding holds the core, providing power to the starter motor.
When the battery is discharged, its strength is enough to activate the retracting winding, but there is not enough voltage for the holding winding. The core moves back under the force of the return spring, and the retracting winding again tries to pull it into the coil, but the holding winding cannot hold it, and it moves back again.
VAZ 2107 starter repair
The starter is not the most complex and expensive unit to maintain. But it is one of the key components of the car.
You turn the ignition key, the lights on the dashboard are on, but the starter does not turn, the engine does not start? There are two reasons:
- faulty contact supplying current to the starter relay;
- The starter itself or the relay is faulty.
In the second case, the starter must be removed, checked, repaired and reinstalled. The repair process is quite complex and deserves a large separate article. Here we will tell you how to replace the VAZ 2107 starter (carburetor, injector) and check its performance.
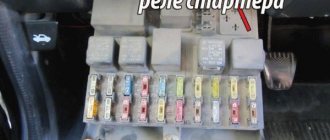
Ringing of relays and connecting wires
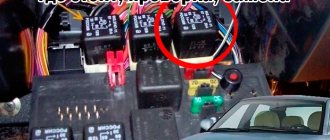
For subsequent diagnostics of the generator, you need an electrical circuit of the car and a mnemonic diagram of the relay position. The engine is started in two ways. The first is that the control current to the solenoid relay comes from the ignition switch contacts.
The second option, more modern, uses a special starter relay, which supplies the appropriate current. You can check the functionality of the relay with a multimeter in voltmeter mode. The measured voltage on the winding should be +12 V.
Then they begin to examine the generator itself. It can be located between the radiator and the engine or near the flywheel. It is necessary to ring all the conductors coming from the starter. These are two wires: one with a cross section of 25 mm 2 on the generator brush and the second that controls the retractor relay.
Removing the VAZ 2107 starter
In the "seven", as in most cars, the starter is located at the bottom of the engine near the gearbox. Work to replace the starter must be carried out on a pit or a lift in order to have free access to the mounting bolts and power supply terminals. Actually, the only problem when dismantling/installing the starter is its inconvenient location. The work does not require special tools or training.
It is necessary to remove the VAZ 2107 starter (injector, carburetor) with the battery disconnected. Otherwise, the “positive” wire running from the battery to the traction relay contact may cause a short circuit. Dismantling work is carried out in the following order:
Disconnect the battery terminals (you can remove the battery, it will be easier to work without it).
Remove the dirt shield if it is installed at the bottom of the engine compartment.
Unscrew the fastenings of the wiring harness that go to the starter.
Unscrew the nuts and disconnect the control and power wires from the traction relay.
Unscrew the two upper and one lower fastening bolts (One of the upper ones is located extremely inconveniently, so some “masters” do not put it in place after unscrewing it. This weakens the fastening and can lead to breakage under conditions of dynamic loads and vibrations on the unit) .
Remove the starter by lifting it down under the car.
After this, you can check the functionality of the starter and, if necessary, repair or replace it.
Guide to dismantling and installing the mechanism
If the VAZ 2107 does not start due to a breakdown of the starter, then it is replaced with a new unit. Depending on the model, a gear starter can be installed on a VAZ.
The replacement procedure consists of the following steps:.
- First of all, the power to the car is turned off by disconnecting the negative terminal from the battery.
- Next, on a car with an injector, you need to remove the protective shield from dirt.
- Then you should first unscrew the two bolts at the top, and then the bolt located at the bottom. When all the bolts are unscrewed, the unit is moved forward. For engines with an injector, it is necessary to remove two extensions of the intake manifold.
- For engines with a carburetor, the air intake, air filter and air duct must be removed.
- At the next stage, you need to unscrew the nut securing the tip of the wire, which connects the output of the solenoid relay to the positive of the battery, using a “13” wrench.
- Before removing the unit, you need to disconnect the wires from terminal “50”. The device should be dismantled through the top, inserting it between the clutch housing and the exhaust pipe.
- Installation is carried out in reverse order.
During repairs, either the VAZ 2107 starter or its components that have failed are replaced. To replace parts, the device must be disassembled. The disassembled starter is reassembled in the reverse order. When connecting wires, use the connection diagram.
The diagnostic procedure is simple and can be performed by any car enthusiast, which will make it possible to save on car service costs.
Checking the VAZ 2107 starter
Before checking the starter, it is necessary to thoroughly clean it of dirt. Then you should make sure that the traction relay is working. To do this, you need to apply “minus” to the starter housing and “50” to the terminal. A working retractor (traction) relay will push the starter gear forward, and a characteristic click will occur. If the relay is working properly, you need to check the starter windings using a multimeter.
To access the winding, the brush assembly must be removed. The check is carried out in two stages:
- Check for short circuit. Connect one probe to the body, and touch the winding terminals in series with the second. If the winding is not closed, the resistance must be at least 10 kOhm.
- Check for a break. Connect the probes of the device to the terminals of the windings. In case of a break, the multimeter will show “infinity”.
Next you need to check the armature winding. If the armature is not closed, the resistance between the housing and the contact plates should be above 10 kOhm.
If the VAZ 2107 starter (carburetor, injector) has shorted or broken windings, it needs to be replaced. It is practically impossible to rewind the winding in a workshop.