Often a car experiences premature wear or aging due to poor quality fuel. Refueling at uninspected gas stations with low-quality fuel can lead to quite a few troubles. The most common cause of breakdowns associated with low-quality fuel is contamination of the injectors. If the injectors become dirty, you can wash them; this article explains how to do it correctly with your own hands.
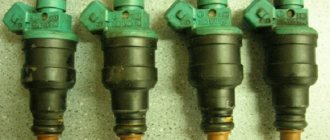
Let's figure out what injectors are and what they are needed for. Injectors are an electromagnetic mechanism designed to spray fuel into the cylinder. Their number depends on the number of cylinders in the car. The VAZ car has 4 cylinders, therefore there are also 4 injectors.
A serviceable and clean injector sprays fuel evenly without any delays or jerks.
A clogged injector may not spray fuel at all or, on the contrary, pour it in drops. As a result, the engine cannot operate normally and correctly.
Operation of dirty injectors
If the elements are clogged, this can be felt by the reduced specific power of the car engine. Then detonation will occur at the moment of acceleration. The symptoms of dirty injectors are especially pronounced at idle speed. Engine operation becomes unstable, the starting of the power unit deteriorates, and fuel consumption increases. The exhaust becomes more toxic. It is best to diagnose the operation of injectors at a service station.
If diagnostics by specialists reveal that the main cause is the injectors, then they need to be washed. There are options when the elements are removed for cleaning. But it is also possible to wash the injectors without removing them from the engine. For those who will do it themselves, it is better to choose the second option. Naturally, if you disassemble the motor and remove the parts, the process of cleaning them is greatly facilitated. But this is not always convenient.
Causes of pollution
Flushing injectors is an operation that any engine needs.
Sooner or later, the owners of all, even the most expensive cars will have to go through this. Knowing the main sources of contamination, you can delay as much as possible the moment when the problem can only be solved by washing. The main cause of blockages in injectors is low-quality fuel with a large volume of heavy elements. They are dissolved in fuel and easily pass through any filters. When the engine is stopped, all these elements settle on the injectors. And the lungs immediately evaporate.
Methods for cleaning injectors
Today there are two effective methods for cleaning elements. To choose the one that will be most effective, you will have to study both options. So, washing injectors on special stands is popular.
For this purpose, special cleaning fluids are used. This method is quite effective. But if you clean old and very dirty injectors, it will not give any results. The stand effectively cleans ceramic mechanisms. Processing with liquids is also used. In this case, it is possible to wash the injectors without removing them from the engine, or with removal. But that's not all. Below we will consider another, no less popular method.
Cleaning method using additives
It is considered the simplest. So, you just need to add a special additive with detergent properties to the gas tank.
These liquids are produced by all self-respecting manufacturers of car cosmetics. If the task is to clean the entire engine power system, then you need to purchase injector cleaning fluid. One 0.5 liter bottle is filled with 50 liters of fuel. In this way, not only the injectors are washed without removing them from the engine, but also all elements of the power system. This includes the fuel tank, pressure regulation system, fuel pump and injectors. When choosing this option, it is worth considering that the method is associated with certain risks. All dirt, deposits and other substances that have been washed out of the tank and fuel line using additives can further clog the valve in the pressure regulator.
Therefore, such treatment may only be advisable in the case of preventive measures. This is not the most effective way to flush injectors without removing them from the engine. Reviews from those who carried out this are rather negative. Another option is flushing using special systems for supplying flushing fluid. The process is carried out with the engine running, and it runs on a detergent solvent. This method can be considered quite effective. The result in most cases is assessed as positive.
Service Manual
To ensure that electrical work does not cause trouble, the car owner must at least understand the electrical circuit of the VAZ. If a malfunction occurs in the operation of a particular equipment, using a diagram you can find out what the problem is and where to look for the cause. In some cases, a problem in the operation of certain devices can be solved by reconnecting the plug (if we are talking about poor contact of the device with the electrical network).
In practice, our compatriots often encounter problems with the operation of relays - the contact legs of these components can burn out as a result of voltage surges in the electrical network. Even if the relay legs are intact, but the equipment does not work, the device must be dismantled and disassembled - perhaps the contacts are burnt inside. If necessary, they can always be cleaned with a wire brush or sandpaper.
To prevent the battery from discharging, the battery must be recharged from time to time, especially before the onset of cold weather and at the end of winter. During the cold season, batteries discharge the fastest; this happens due to frost, so with the onset of winter, car owners often face the problem of starting the engine in the morning. If you doubt the battery's performance, you can try testing it with a multimeter; to do this, connect the tester probes to the battery terminals. Ideally, with the engine running, the battery voltage should be between 13.5 and 14 volts. If the resulting value is less or more, this indicates that the battery is not operating correctly.
Cleaning without removal: preparation
Most car enthusiasts try to pour flushing fluid into the tank - this is a mistake, and there is no need to do this. During the cleaning process, the motor must be disconnected from the general power system. It is important to remember that there is pressure in the fuel rail. This injector washing (including cleaning the injectors yourself) involves dismantling the hoses. Therefore, you need to work as carefully as possible.
Next, you need to prepare a temporary engine power system. A plastic bottle is suitable for this. A pre-prepared cleaner is poured into it. For a motor with a working volume of 2.5 liters, 1 liter of the substance should be filled. You can use liquid at the rate of 100 g. per 0.5 liters of engine volume. Next, a little fuel is also added to the bottle. Fill in half of the cleaner. Then a hose is put on the neck of the bottle and tightened with a clamp. The pipe must be cut into a separate, pre-prepared fuel pump.
Cleaning process
Next, the power unit is started and warmed up. You also need to remove the main fuel pump fuse. Several launches will be required. This will relieve pressure in the fuel system. The hose that supplies fuel to the injectors is removed, and the newly assembled structure is installed in its place. They also dismantle it from the “return” (it is “jammed”). Then turn on a separate fuel pump and check the tightness of all connections. If everything is in order, then you can proceed to the main part of the process. Start the engine and let it run for about 5 minutes. After this, he should “rest” for a few minutes. During this time, the cleaner will soak away all deposits. Then the engine starts again. This time he is allowed to work for about 30 minutes.
This time is enough for all contaminants to burn out. The engine should run at idle for the entire half hour. You can sometimes raise the speed to 2.5 thousand. After the process is completed, the system is disconnected and the standard power system is connected. Now you can start the engine and leave it for 10 minutes. During this time, the remaining cleaner will burn out. At the same time, you can check the tightness of all connections. Next, turn off the engine and install new spark plugs. Reset errors of the electronic control unit, if any. You can additionally carry out diagnostics and make sure that the power unit is working as expected. Is doing-it-yourself injector cleaning effective? Yes, quite effective. Moreover, it gives results in Russian realities, when it needs to be done every 20 thousand km.
How to clean injectors without removing them from the engine?
Usually, the most common problem with TFs is their improper or untimely cleaning, as a result of which they become clogged. There are three types of cleaning:
To clean the injectors without removing them, it is usually enough to select and pour a chemical composition into the fuel tank that can normalize operation. From time to time it is recommended to accelerate the engine to high speeds and speeds of 110–140 km/h on flat sections of the road. When covering a distance of 10–25 km in this mode, the system undergoes “self-cleaning” under load.
However, such methods are effective only for minor stains. Large lesions must be removed using ultrasound or high pressure. And in order to prevent this, it is necessary to wash the fuel filter every 40–50 thousand kilometers.
You can visually familiarize yourself with the technique of checking injectors with your own hands in the video:
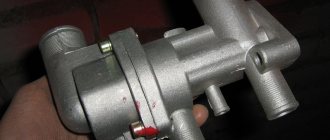
The fuel system operates on the principle of forced injection of fuel into the engine cylinders through fuel injectors. It's called an injector. Unlike a carburetor, fuel here is mixed with air in a certain proportion, forming a mixture. It is injected by injectors in measured portions into the intake manifold or directly into the cylinder.
A nozzle is a sprayer that is controlled by an electric or mechanical valve.
After 100 thousand mileage, the question arises of checking or replacing this mechanism. You can do it yourself without resorting to the help of specialists.
The full operating cycle consists of four steps, the start of which is controlled by the electronic control unit of the on-board computer:
- Pressure acts on a closed valve;
- The valve begins to open;
- Full valve opening, fuel mixture injection;
- The portion is injected, the pressure has decreased, the valve has returned to its original position.
Traditional methods
You shouldn’t stop at just these methods. Some car owners like the way additives work. Others say that they pour a little kerosene into the tank and are not aware of such problems. Still others say that using additives is a lottery, rather than washing injectors without removing them from the engine. Advice from experienced car owners confirms that the most effective method is cleaning with a bottle and a separate fuel pump.
It is important for all drivers to ensure the smooth operation of the car engine. Injection machines require special attention. Such engines should have their injectors flushed periodically. Poor quality fuel clogs the injector. And already at idle speed problems appear. To eliminate them, drivers will need a skill such as cleaning injectors without removing the injectors from the engine.
Replacing O-rings
To prevent fuel leakage, do not reuse the O-rings of the injector and injector body. They are replaced with new ones every time they are removed for any reason.
To remove the old ring, just pry it up with a screwdriver. When installing new ones, do not use hard tools; install the seals by hand. Before installing the injector, lubricate the rubber bands with engine oil.
An injection engine is not at all complicated, as owners of carburetor cars sometimes believe. Injectors are reliable parts that require only a little attention. Show it, and the engine will thank you.
Causes
The reasons for the deterioration of the injectors are deposits on them. The result is incorrect atomization of gasoline, since the injector no longer closes completely. The filter cannot retain the entire volume of harmful substances. Therefore, the injector becomes dirty gradually. And before the driver realizes the complexity of engine failures, cleaning is already necessary.
If the engine is difficult to start, and problems are already diagnosed in idle mode, then problems with the injectors are obvious. Additionally, the gas pedal may fail. The engine is not as powerful, and the car accelerates much worse.
The injectors are exposed to high temperatures. As a result, resins are formed that contaminate the injector. It should be borne in mind that any gasoline leads to a similar outcome, since heavy hydrocarbons are contained in all its brands. The only difference is that when using gasoline of poorer quality, flushing will have to be done much earlier.
There are the following stages in injector malfunctions:
- with low contamination of up to 10%, the injector performance deteriorates. And although several liters more fuel is consumed, the engine continues to operate normally.
- With average pollution, the deterioration of indicators increases to 20%. Fuel consumption continues to increase, and interruptions in engine operation are already noticeable. The car is difficult to accelerate, and there is an unpleasant smell coming from the exhaust pipe.
- If the contamination is severe, the injector works half as bad. Several cylinders stop functioning. Popping sounds appear due to problems with the air filter.
Cleaning injectors. VAZ 2108, 2109, 21099, 2113, 2114, 2115
Cleaning the electromagnetic injectors of the power system using ultrasound allows you to restore their performance by 90%, namely:
- improve dispersion (reduce the size of a fuel droplet when spraying);
- increase performance and lead to uniform fuel consumption between all engine injectors;
- restore the spray pattern.
The result: improved efficiency, “reception” at low speeds and, as a result, power.
The scope of work includes the following procedures:
- measurement of CO, CH and engine idle speed;
- dismantling the fuel rail with injectors;
- checking the performance and tightness of injectors;
- cleaning in an ultrasonic bath;
- replacing your own fuel filter and rubber injector seals;
- control check of performance and tightness;
- adjustment of CO, CH and idle speed after installation on the engine.
Cleaning injectors at home
The first method What to do, what to look for if the exhaust pipe slams at XX, there are dips when you press the gas sharply, it drives poorly and jerks when cold, and all sorts of similar things. There were no clear and specific answers. Rejoice, now it’s clear! You need to clean your injectors.
Before this, the spark plugs and wires were replaced twice, there were thoughts about replacing all the filters ahead of schedule and alternately replacing the engine temperature sensors, intake air, LZ, etc. The following is the procedure described by Frontier:
I'm tired of the stupidity and gluttony. ~10-11l/100km in all modes - city, highway, etc. It was purchased: Winn injector cleaner (70 rubles), a domestic carb cleaner (spray - 50 rubles), 1 spare ring-seal for the injector, just in case, but was not needed (46 rubles).
I removed the barrel with two pipes (IAC). I disconnected the strip with the wires from the injectors, first removing the clamps at the bottom.
I poured Winns into a jar and threw the nozzles in there to soak. In the meantime, I took the IAC and cleaned it out too with a spray.
It must be said that the injectors turned out to be covered with a kind of coke around the nozzle, a type of resin, which is difficult to pick out. I picked out all the coke cleanly, and VERY carefully, with a blunt needle, the funnel-shaped surface around the nozzle, periodically blowing off the muck with a spray. In short, first - everything that is outside.
Then I took a Chinese 3-12 volt power supply, a foot pump, removed the end from the hose from the pump, poured Winns into the hose, put it on the nozzle, pumped it up to 6 atm, and gave the nozzle 3 volts. (By the way, at first all 4 injectors needed to be given 6-9 volts briefly once; after 3 they didn’t click). It is better to give the voltage in portions, pumping it up with a pump, I think this is better.
I pumped each injector a little longer just to be sure, and put everything back in the reverse order. I started it and realized that all the problems with the engine were caused by poop, which was everywhere - remove any hose. Even XX became somehow rocky, low in tone. I drove home like that without the gas pedal, I used to stomp it to the floor. Yes, I changed the spark plugs at the same time.
I'm about to get to the fuel filter.
Second way
A slightly improved procedure with reduced costs: There is no need to buy liquid for cleaning injectors (I bought it, but it cleans very poorly), just buy a carburetor cleaning spray, it cleans much better. Accordingly, it is necessary to fill the pump hose with a spray, not a liquid, to clean the injectors.
I cleaned the carbon deposits from the top of the nozzle as follows: spray the spray onto a clean cloth and rub the nozzle with it. The carbon deposits are softened and washed off; to speed up the process, you can use a screwdriver. When installing the injectors back, it is necessary to lubricate the O-rings with soapy water. At the same time, they fit perfectly into the holes.
The result of the procedure exceeded all expectations. I didn’t even think that a car could drive like that (now I believe in the stories that were told recently about Muscovites overtaking old foreign cars). The exhaust is smooth, cold drives like hot. There are absolutely no dips, and in 2nd gear on clean asphalt, when you press the gas sharply, both front wheels slip.
The whole procedure took 2 hours and 100 rubles.
Washing methods
To flush the injector, there are two solutions for cleaning the injectors:
- ultrasound procedure on a special stand;
- use of liquid.
In the first option, ceramic, old and very dirty injectors are excluded, since there is a risk of damage. Separately, after such a procedure, it is worth replacing the microfilter and sealing rings. Such parts are not cheap.
The second option involves washing the injectors without removing them from the engine. This method helps save money.
Flushing procedure
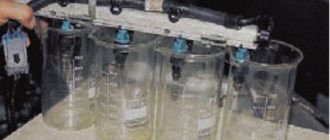
To carry out high-quality washing, you should have a second fuel pump, a container for cleaning fluid, a hose and the actual injector cleaner.
Adding rinse directly to the tank is not effective enough. Carefully remove the hoses and prepare a temporary power supply system.
Such a system, when supplying liquid to the injectors, acts as a fuel pump, but instead of gasoline it supplies the prepared solution. To create the system, a cleaner is poured into a plastic bottle. The calculation of the required quantity is related to the engine size. The template is a 2.5 liter unit, for which a liter of liquid is used. For larger volumes, the amount of solution is increased by 100 grams for every 0.5 liter of unit.
Gasoline is poured into the wash. It is taken in half the total volume of liquid. A hose is put on the bottle and secured with a clamp. The prepared fuel pump is inserted into it. The engine starts and warms up to operating condition. Next, remove the fuse from the fuel pump.
The engine is restarted. This relieves pressure from the fuel system. Then the hose is removed, through which gasoline is supplied to the injector. It is in its place that the fuel system bottle is fixed. When the fuel pump is turned on, it pumps fluid.
After running the engine for five minutes, it is allowed to rest. This time is enough to dissolve deposits on the injectors. At the next stage, the motor runs for half an hour. After disassembling the system, the engine should run for another 10 minutes. The remaining liquid burns off.
The selection of cleaning fluid should be approached very carefully. There is a demand for various brands in the market.
The optimal fluid for many types of engines is LIQUI MOLY. It is well suited for cleaning injectors without removing the engine. A soft effect has the disadvantage of leaving carbon deposits on the valves.
Wynn's can remove any carbon deposits and resin deposits. It is quite caustic and suitable for cars made in the 2000s. But to use it, it is necessary to check the characteristics for a particular car so as not to harm the injector.
Gentle and high-quality cleaning is provided by the less popular Carbon Clean brand.
But Laurel repeats Wynn's in its characteristics, but due to the high price it is used much less often, only it costs much more, so it is used less often.
Result of injector cleaning
As a result of flushing, the injection speed increases.
The liquid is capable of peeling off the resulting accumulations of resins, both from injectors and valves. In 30 minutes of uninterrupted supply of the solution through the injection system into the engine under pressure of up to four atmospheres, in addition to removing deposits from the injector and cleaning the walls of the combustion chamber, the injection system will be updated.
Next, the spark plugs are changed. It is also recommended to change the oil at the same time.
The advantages of flushing without removing the engine are the prevention of the fuel rail, carbon deposits are washed off from the intake valve seats. In addition, deposits are removed from the walls of the cylinder and piston, and the inlet-outlet capacity of the valves is increased.
The simplicity is that such washing on an injection engine can be done in a garage.
Most owners of cars with injection engines begin to worry if the car behaves suspiciously. The first alarm bells are the engine shaking strangely at idle. Popping noises are heard and the tachometer needle may jerk up and down randomly. Then you feel that when driving the car no longer accelerates so quickly, and the fuel from the tank seems to evaporate. Many continue to drive and put up with the unsatisfactory condition of the car. It’s worse when the engine shakes so much that vibrations go through the car body. Such a malfunction is difficult not to notice. But experienced motorists know that flushing the injector would quickly eliminate the problems and bring the engine into a healthy state. The cause of engine malfunctions is contamination of the fuel supply system. Dust, sand, and water that enter the tank are easily retained by the fuel filter. But after replacing it, the situation may not change. Then we can confidently diagnose contamination of the injectors and intake manifold.
Malfunctions caused by clogging of the structure
Fuel injectors for the VAZ 2114 have rather low performance. In combination with the poor quality of gasoline at domestic gas stations, problems often arise with the VAZ engine caused by clogging of the element and their nozzles. For stable and balanced operation of the engine, it is recommended to monitor the condition of the injectors.
When the accelerator is applied sharply, dips occur, the car drives poorly on a not warmed-up engine, jerks or slows down - poor-quality system operation.
Based on the following indirect signs, we can safely say that the injectors require cleaning, and in some cases, replacement:
- stopping the engine at idle;
- increased gasoline consumption;
- the motor does not produce rated power;
- low engine response;
- unstable operation of the power unit;
- failures when moving.
Cleaning the VAZ system at a service station
You can clean the injectors using ultrasound by taking your VAZ to a service center. A qualified specialist using good equipment will perform this procedure, which will have a positive effect on the dispersion of the spray and increase the productivity of the structure. Cleaning at the station helps restore spray quality, which will increase engine efficiency, throttle response and power. The list of work performed at a service station may include measuring CO, adjusting idle speed, removing the rack with injectors, and measuring productivity. Next, the main procedure is ultrasonic cleaning, as well as replacing the fuel filter and system seals.
Injectors for VAZ 2114
Removing an element
But all this pleasure costs money, and high-quality work at a good service station costs a lot. Therefore, there is an alternative - cleaning the system with your own hands
First, let's pay attention to the features of dismantling injectors
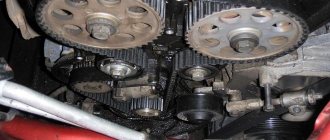
- First, remove the fuel rail.
- Unfasten the wiring block (by pressing on the bracket).
- Using a screwdriver, disconnect the injector retainer.
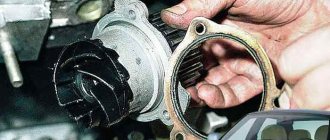
- Extracting the elements.
- We remove the O-rings, since they are squeezed out and new ones must be installed during reassembly.
During dismantling and reassembly, no damage to the nozzles or entry into the system is allowed. In order to install new injectors on the ramp, you need to do everything the same, but only in reverse order.
Do-it-yourself system cleaning
Cleaning the structure without your car visiting a VAZ service center can be done in two ways.
In the first case, you must first buy an injector and carburetor cleaner and o-rings for the system.
After removing the injectors from their regular places, we lower them into a suitable container with injector cleaner. We separately clean the IAC using a carburetor spray. A layer of resin is formed around the nozzle on the structure, which must be carefully cleaned by periodically washing it with a spray.
We carry out internal cleaning using a pump and a power source with a voltage of 3 to 12 volts. We pour cleaner into the pump hose and pump the nozzle under a pressure of 6 atmospheres, simultaneously applying voltage. The voltage can be raised to 9-12 volts until a characteristic crackling sound appears.
Next, in reverse order, we put everything back in place, connect the block and we can start the VAZ engine.
The second method is more economical, but more troublesome. We only purchase liquid for cleaning carburetors. Pour the spray into the pump hose and connect the latter to the system.
A high-quality carburetor spray can provide excellent external reading of the injector, but it will take longer to tinker and soften the coking. Next, we apply voltage to the injector in jerks until it crackles and perform internal cleaning. When installing the injectors in their original place, it is advisable to carefully lubricate the new seals with soapy water, which will increase the tightness.
Periodic maintenance and cleaning of fuel injectors will ensure stable engine operation and economical operation of a VAZ vehicle.
When is injector flushing necessary?
How do contaminants appear? First, resins settle on the engine parts; this is not burnt fuel and its impurities. The sediment then oxidizes and becomes a hard layer on the parts. If you refuse to clean the injection, then problems in the operation of the engine will only increase: high wear of mechanisms will appear, increased formation of coke and soot, the catalyst will experience excessive load, fail, etc. Even a thin varnish layer of 0.005 mm reduces the efficiency of injectors by 20% or more. The nature of the spray torch changes: its shape and size. The nozzles lose their tightness, causing the injection control to malfunction. As a result, we observe dips at idle and increased fuel consumption. The quality of fuel, extreme weather conditions, and long periods of sitting in traffic jams make the process of pollution formation lightning fast. You should know that there are other possible problems: fuel filter, pump, fuel intake screen. These dirty parts interfere with the normal operation of the engine. Prevention must be carried out every 20-30 thousand km. You can clean the engine yourself. To do this, you will need special equipment and liquid for flushing injector nozzles. Choosing the right product is easy. Today, products from the Russian manufacturer LAVR and European products are popular on the market. Before choosing a drug, watch the video to see how the compositions differ.
Interchangeability
This issue is quite relevant, especially taking into account the cost of original products from the imported automobile industry. But it’s not so simple here, let’s give an example
In the first production models of the Gorky Automobile Plant, the injection Volgas were equipped with a BOSCH air flow sensor. Somewhat later, imported sensors and controllers replaced domestic products.
A – imported filament air flow sensor manufactured by Bosh (pbt-gf30) and its domestic analogues B – JSCB “Impuls” and C – APZ
Structurally, these products were practically no different with the exception of several design features, namely:
- The diameter of the wire used in a wirewound thermistor. Bosch products have a diameter of 0.07 mm, and domestic products have a diameter of 0.10 mm.
- The method of fastening the wire differs in the type of welding. For imported sensors this is resistance welding, for domestic products it is laser welding.
- Shape of a thread thermistor. Bosh has a U-shaped geometry, APZ produces devices with a V-shaped thread, and products from JSC Impulse are distinguished by the square shape of the thread suspension.
All the sensors given as an example were interchangeable until the Gorky Automobile Plant switched to film analogues. The reasons for the transition were described above.
Film air flow sensor Siemens for GAZ 31105
It makes no sense to give a domestic analogue to the sensor shown in the figure, since outwardly it is practically no different.
It should be noted that when switching from filament devices to film devices, most likely, it will be necessary to change the entire system, namely: the sensor itself, the connecting wire from it to the ECU, and, in fact, the controller itself. In some cases, the control can be adapted (reflashed) to work with another sensor. This problem is due to the fact that most filament flowmeters send analog signals, while film flowmeters send digital signals.
It should be noted that the first production VAZ cars with an injection engine were equipped with a filament air flow sensor (made by GM) with a digital output; examples include models 2107, 2109, 2110, etc. Now they are equipped with a BOSCH 0 280 218 004 mass air flow sensor.
To select analogues, you can use information from official sources or thematic forums. As an example, below is a table of the interchangeability of mass air flow sensors for VAZ cars.
Compatibility table for mass air flow sensor for the VAZ model range
The presented table clearly shows that, for example, the MAF sensor 0-280-218-116 is compatible with VAZ 21124 and 21214 engines, but is not suitable for 2114, 2112 (including those with 16 valves). Accordingly, you can find information on other VAZ models (for example, Lada Granta, Kalina, Priora, 21099, 2115, Chevrolet Niva, etc.).
As a rule, there will be no problems with other brands of cars of domestic or joint production (UAZ Patriot ZMZ 409, Daewoo Lanos or Nexia), choosing a replacement mass air flow sensor for them will not be a problem, the same applies to products of the Chinese automobile industry (KIA Ceed, Spectra, Sportage etc.). But in this case, there is a high probability that the MAF pinout may not match; a soldering iron will help correct the situation.
The situation is much more complicated with European, American and Japanese cars. Therefore, if you have a Toyota, Volkswagen Passat, Subaru, Mercedes, Ford Focus, Nissan Premiere P12, Renault Megane or another European, American or Japanese car, before replacing the mass air flow sensor, you need to carefully weigh all the solution options.
If you are interested, you can search online for an epic about an attempt to replace the “native” air meter with an analogue on a Nissan Almera H16. One attempt resulted in excessive fuel consumption even at idle.
In some cases, searching for an analogue one will be justified, especially if you take into account the cost of the “native” VU meter (for example, the BMW E160 or Nissan X-Trail T30)
How to wash an injector with your own hands
Injector cleaning products effectively remove deposits from the system. To carry out the procedure, a special pneumatic station is required. Such equipment can be freely purchased in Russia. Today there are pneumatic stations of domestic and Chinese production. If there is no need to constantly use such equipment, the injector can be washed at car repair shops that offer the service. The price will range from 1,500 to 4,000 rubles, depending on the car and region of residence. You can try to assemble the station yourself. At the same time, you should know that washing with homemade stations is dangerous. Flushing fluids ignite more easily than fuel. Therefore, avoid liquid leakage. If the liquid gets onto the exhaust manifold of a warm engine, it will instantly ignite. Such a procedure can cost you not only your car, but your life and health.
Required injector cleaning kit:
- fuel line hose (1.5 m);
- clamps (2 pieces);
- cylinder with pressure gauge 1 l;
- hook for hanging the cylinder;
- line short-circuit hose (to plug the return line);
- adapters for connecting to the fuel rail;
- compressor;
- 1 liter of fluid per engine up to 2 liters.
When the station is connected, the system looks like a hospital IV. Cleaning injectors does not require much experience. The main thing is to strictly follow the instructions for connecting and flushing. Here is a list of steps on how to mount the station for work.
Installation of a washing station
- Turn off power to the fuel pump by removing the fuse.
- Disconnect the fuel supply line from the ramp. Be careful, there may be some minor splashing of fuel residue. If the design includes a return line, remove and plug it.
- Select a suitable adapter (fitting). Connect the adapter to the ramp, then use a clamp to secure the hose to the adapter.
- Fill the bottle with LAVR flushing fluid. Hang the can over the hood.
- Connect the hose to the cylinder, then secure it with a clamp.
- Connect the compressor to the cylinder, apply 3 atmospheres.
- Check the tightness of the assembly. To do this, open the fuel supply from the cylinder to the fuel rail. If all connections are dry, begin the procedure.
- Start the engine. Let the engine idle for 10-15 minutes. Make sure the pressure gauge shows 3 atmospheres.
- Stop the engine for 15 minutes. During this time, the deposits will dissolve.
- Start the engine. Periodically, smoothly increase the speed to 2500 rpm. Continue to monitor the cylinder pressure readings.
- Complete the procedure when the liquid runs out.
- Disconnect the station and mount the engine parts in the reverse order.
It is not necessary to change the oil and spark plugs after using LAVR injector flushing fluid. So immediately start the engine and do a test drive. In the very first kilometers of the journey, improvements in engine performance will be felt.
Features of the design and repair of modifications of the LADA KALINA car
*On some cars the 11183 engine was installed.
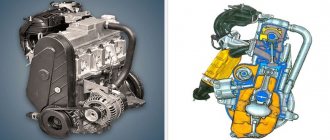
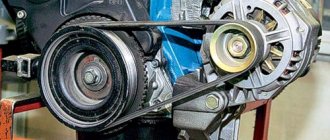
The engine compartment of a car with an 8-valve 1.6i engine : 1 — tensioning mechanism for the generator drive belt; 2 - spark plugs with high-voltage wire tips attached to them; 3 - ignition coil; 4 — knock sensor; 5 - generator Cars of the LADA KALINA family are produced in three body types: sedan, hatchback and station wagon, and are equipped with three engine models (see Table 16.1). The 11194 engine, which began to be equipped with the car from mid-2007, is discussed in detail in the sections of the chapter (see “Engine and its systems”). From the beginning of production, only eight-valve engines with a displacement of 1.6 liters were installed on the car, mainly model 21114, used on LADA cars of the “tenth” family. Some of the cars were equipped with the 11183 engine, which is used in cars of the SAMARA family. Both engines are similar in technical characteristics, but have minor design differences. Externally, these engines differ in the color of the cylinder block: the block of the 21114 engine is blue, and the block of the 11183 engine is gray. Engines are assembled on different production lines. The 11183 engine has a 21083 series connecting rod piston group with a pressed pin, and the 21114 engine has a 2110 series connecting rod with a floating pin. The 21114 engine has a clutch disc with a diameter of 200 mm, and the 11183 engine has a clutch disc with a diameter of 190 mm, but with imported linings. The engines are unified in other parts. The features of the design and repair of these engines are described below in the relevant sections. The cylinder head of an eight-valve engine is more compact (compared to a sixteen-valve engine), so all engine attachments are accessible from above. The alternator drive belt can be adjusted without removing the windshield washer reservoir. Replacing the voltage regulator and removing the generator can be done from above. The knock sensor and other elements of the engine management system are easily accessible. The camshaft position sensor is installed in the cylinder head plug. It responds to a pin pressed into the camshaft (see “1.6i engine camshaft - removal and installation”).
The ignition system of eight-valve engines uses one ignition coil. It consists of two two-terminal ignition coils, made in a single housing. Sparking occurs in two cylinders simultaneously (1-4 or 2-3). The ignition coil is connected to the spark plugs by four high-voltage wires with permanent tips.
Elements of the ignition system of the 8-valve 1.61 engine : 1 - ignition coil; 2 - set of high-voltage wires. Engines use A17DVRM spark plugs, where: A - thread Ml4×1.25; 17 - heat number; D - length of the threaded part is 19 mm, with a flat seating surface; B - protrusion of the thermal cone of the insulator beyond the end of the threaded part of the housing; R - built-in resistor; M - bimetallic central electrode. You can install spark plugs of a similar type from other manufacturers on the engine: - WR7DCX (BOSCH); — LR15YC (BRISK “SUPER”).
Spark plug for 8-valve 1.6i engine : 1 - side electrode; 2 — central electrode (in the thermal cone of the insulator); 3 - threaded part of the body; 4 - sealing ring; 5 — hexagonal part of the turnkey housing; 6 — insulator (spark plug markings are applied to it); 7 — contact tip (removable, mounted on a thread) Features of repairing the ignition system are shown below (see the relevant sections). On eight-valve engines, the 1118 series fuel rail is used, which differs from the 11194 engine rail in the shape and design of the injector mounting. You can remove the fuel rail from the engine without dismantling the intake pipe and receiver (see “Fuel rail of the 1.6i engine - removal, disassembly, assembly and installation”).