In the Lada Kalina model, as in any other car, with an 8-valve and 16-valve engine, the pump operating in the cooling circuit of the power unit has its own resource. It is advisable to replace it together with the same procedure regarding the timing belt. For this purpose, the manufacturer regulated an interval equal to 60 thousand km of the distance traveled. This kind of approach will allow the owner to avoid the need for additional disassembly of the timing belt assembly in order to replace a cooling circuit pump that has become unusable. Replacing the pump yourself is not a difficult task, so the owner can safely take on the task even with little experience. The main thing is to decide which pump is better.
Characteristics of the device, symptoms of failure
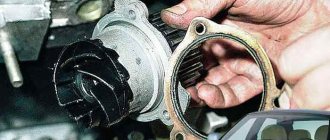
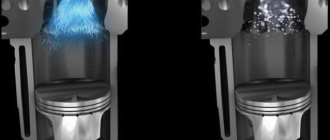
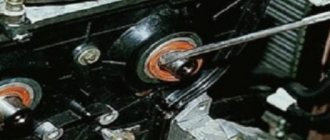
This is what the pump for Kalina looks like
The pump works together with the engine. It ensures uninterrupted operation of the fuel supply and cooling systems. The first carries out the transfer of fuel from the tank to the engine, the second - forced pumping of antifreeze or antifreeze.
The water pump-impeller, located on the shaft, is covered by a housing. The shaft has ball bearings at both ends and rotates due to torque by means of a belt attached to the engine.
Symptoms of a broken water pump:
- the red section of the tachometer indicates the overheating temperature of the car engine, this is confirmed by the readings of the device;
- in the cabin of the Kalina car there is a persistent smell from the evaporation of antifreeze;
- a sound similar to a whistle is heard quite clearly - repair or replacement of the pump is necessary;
- Drops of liquid may be found under the car (to identify the problem, leave a sheet of white paper under the car overnight).
To restore the functioning of the pump, experience and special tools are required. It is advisable to entrust the work to specialists at a service station, and replace the pump with a new one.
Why do you need a pump in a car?
The pump (or water pump) on the Lada Kalina is a device that circulates coolant. The pump starts working together with the power unit, that is, after the moment of ignition, the pump also starts working.
The circulation of antifreeze/antifreeze in the system is ensured by the rotation of the pump shaft on which the impeller is located . The impeller blades create the necessary fluid pressure, due to which the motor is cooled uninterruptedly. However, if there are any defects in the pump, antifreeze stops being supplied to the cylinder blocks, so the engine can “boil” and fail. Therefore, for high-quality and timely cooling of the engine, it is necessary to monitor the condition of the pump.
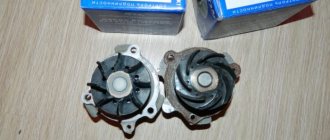
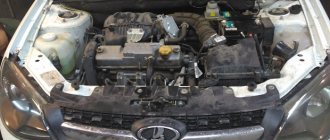
Original pump, which is installed on the Lada Kalina
Fuel pump: design features
Carburetor cars had mechanical pumps. The drive or dam pushed the diaphragm, in the process a vacuum was created and fuel entered the carburetor. Nowadays, almost all cars have an injection engine and an electric pump. It delivers hot food at high speed and maintains stable pressure in the system. The electric motor, together with the working rotor, pushes the fuel. The pump is located in the gasoline tank itself. During operation, fuel becomes coolant and lubricant. There are car models that have two pumps: the main one is under the hood, the worker is located in the fuel tank.
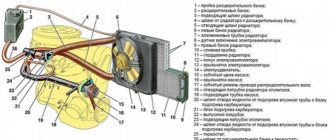
- ODS is the main way to protect a machine. This is a closed-type forced circulation liquid. If the interior heating device supplies cold air, but the Kalina engine overheats, it means that there is a malfunction in the operation of the car. Components of the system:
- special motor shell;
- heat exchanger with electric fan;
- device for maintaining a constant temperature;
- suction device;
- expansion tank;
- contact tubes.
By looking into the plastic expansion tank, you can visually check the amount of antifreeze and antifreeze. There are special marks for high and low levels of liquids in the tank. Outside the tank, there is a pipe at the top for connecting to the heat exchanger sleeve, at the bottom - to the filling tube.
- Expansion cap with breathers. The device includes inlet and outlet breathers. They are capable of providing systemic impermeability. The intake valve maintains elevated pressure in the hot engine. As the temperature rises, steam leakage decreases. The reduced pressure promotes the opening of the released breather as the car engine gradually cools.
- The pump pumping antifreeze is a blade of rapid discharge. The crankshaft wheel drives the pump through a toothed belt on the timing rod. Its body consists of aluminum. The shaft rotates in a double-row ball bearing, which contains enough fuel oil for the entire warranty period. The outer ring is tightened with a self-tapping screw. The gear is pressed in at the front, the impeller, retaining ring, and oil seal are at the rear. Antifreeze or antifreeze leakage is monitored through a hole in the pump shell. This method will help identify unit malfunctions. If the pump cannot be repaired, it is replaced with an identical assembly device. The coolant corrects the redistribution of antifreeze. System cooling of paired cycles occurs as follows:
- in a larger circulation circle, antifreeze penetrates through the engine shell to the radiator battery;
- when moving in a small circle, antifreeze or antifreeze passes only through the cooling shell, without getting into the heat sink.
- Thermostat. The thermal unit and two breathers are components. There is a redistribution of the flow of antifreeze or antifreeze. When the engine is cold, the node valve redistributes the direction of fluid movement. It begins to circulate over a smaller radius, without entering the radiator. High temperatures of 85°C allow the valves to open and allow fluid to flow into the radiator. At temperatures above 100° C, the main valve is fully open, the spare valve closes. Liquid circulation occurs over a large radius.
- Antifreeze or antifreeze temperature meter. This device is screwed into the cylinder head for automatic control of coolant. The sensor is connected to the temperature indicator on the instrument panel of the car. This information is sent to the controller.
- Heating heat sink. Built into the engine cooling system, it heats the vehicle interior by circulating hot coolant.
- The radiator consists of 2 plastic tanks in a vertical position. One of them has a partition. There are 2 more rows of rounded aluminum tubes, aligned horizontally, that pass through the cooling plates. The pipes are connected to the tanks through a rubber key. Antifreeze enters through the upper pipe and exits through the lower pipe. The inlet pipe is located next to a thin steam exhaust hose. The radiator has a casing with an electric motor. Drain plug at the bottom.
- The fan maintains the temperature inside the car. As soon as the controller receives the signal, the fan is turned on via a relay.
The cooling system consists of a radiator battery and a throttle heating unit. The circulation of antifreeze or antifreeze here occurs continuously, regardless of the location of the coolant valve.
How to check the serviceability of the pump on a car
Timely diagnostics of the pump allows you to avoid costly repairs or problems with constant overheating of the engine. To answer the question of how to check the pump’s performance yourself, let’s consider diagnostic methods using the example of domestic VAZ cars (model 2109, 2110).
Let's start with the fact that the pump is a kind of “consumable”, which on cars with a pump driven by a timing belt is recommended to be changed every 60 thousand kilometers traveled or 48 months, whichever comes first. These are the regulatory requirements of many automakers.
In simple words, a good pump lasts as long as two timing belts last. It is also worth adding that using spare parts or low-quality antifreeze, mixing different types of coolant, etc. can lead to pump failure ahead of schedule. For this reason, it is advisable to check the pump regularly.
How to check the pump's operation
You should check the water pump on your car using a common method. For diagnostics on a VAZ and a large number of other cars, the engine should be warmed up until it reaches operating temperatures.
- After warming up, you need to hand pinch the upper pipe coming from the radiator. If the pump is working properly, then the coolant pressure created by the pump will be felt. This is the main answer to the question of how to check whether the pump is working or not without removing the pump from the car. During such a check, care must be taken, since the coolant in the system gets very hot. If the fluid pulsation is weak or absent, then you should proceed to a detailed inspection.
- To check, you need to remove the protective casing of the gas distribution mechanism, which will allow for a visual inspection. If the rubber seal (pump seal) in the area of the seat begins to leak, then drips of antifreeze or antifreeze will be visible. Also, leakage and problems with the pump will be indicated by deposits around the seat, which may have a reddish-brown or grayish color. If they are present, you need to drain the antifreeze and remove the pump for troubleshooting and replacement.
- If engine operation is accompanied by a characteristic “howling” sound, then the problem may be in the pump bearing. In this case, the pump is checked for play in the shaft area. To check by hand, you can rock the pump drive gear. In some cases, you can replace the worn bearing or immediately install a new pump.
Symptoms of a damaged water pump
- Motor overheating - the pump is faulty, the drive belt is not working, the impeller is damaged.
- The temperature arrow indicator is located closer to the middle. You need to stop to check the radiator. In case of inoperability, the unit and pump drive will heat up.
- Noisy, smell of antifreeze in the cabin.
- Low circulation of antifreeze is the result of pump destruction. Diagnosis is carried out with the engine idling; at the same time, you need to clamp and lower the outer radiator hose. During normal operation of the pump, a push of antifreeze in the hose will be felt.
- Large play in the ball bearing of the pump - damage to the ball bearings.
It is necessary to change the water pump if the car's mileage is 90 thousand km.
Replacing the pump on LADA cars with a VAZ 16 valve engine
The water pump (pump) must be replaced when signs of its malfunction appear: leakage of coolant, extraneous sounds, the smell of antifreeze in the cabin.
The instructions tell you how to change the pump on LADA cars with a VAZ 16 cl engine. with your own hands. The pump replacement process is shown using the example of a VAZ 21129 engine (installed on Lada Vesta, XRAY, Largus). On other 16-valve engines (VAZ 21126, VAZ 21127 - Lada Granta, Kalina, Priora) all actions are performed similarly.
To gain access to the water pump mounting bolts, remove the rear timing cover.
:
- Unscrew the pulley mounting bolt, holding the camshaft pulley from turning (insert a large screwdriver into the pulley hubs and rest it against the head of the rear drive cover mounting bolt).
- Remove the pulley by prying it off with two screwdrivers.
- Similarly, remove the second shaft pulley.
- Unscrew the four bolts securing the bracket for the right power unit support and remove it.
- Remove the rear timing cover by removing the four mounting bolts.
- Remove the three pump mounting bolts.
- Remove the water pump by prying it with a screwdriver on the special protrusion.
- Clean the mating surface of the cylinder block from the remains of the old gasket.
- Apply a thin layer of waterproof sealant to the new gasket on both sides. Install the gasket onto the pump housing.
- Install the pump so that the drainage hole on the pump housing is directed downwards.
- Reassemble in reverse order.
The process of replacing the pump on a 16-valve VAZ engine is also shown in the video:
You will find out when LADA owners change their pump from the surveys after the article.
Let us remember that we previously told you when and how to flush the engine cooling system.
Source
Replacing antifreeze or antifreeze
Coolant reservoir
To perform fluid replacement work, you need to have special tools on hand to remove nuts and bolts. The Kalina car must be installed on a horizontal, level surface. If this is not possible, you should try to position the car so that its front parts are clearly visible. Work is performed in a certain sequence.
- Remove the engine splash guard.
- Reset the negative terminal of the battery.
- Unscrew the plug from the expansion tank.
- Remove the drain plug located on the cylinder block. Place a container under the drain.
- Remove the ignition module along with the holder, because it interferes with access to the drain.
- Remove the drain plug from the radiator battery and wait for the coolant to drain.
- Tighten the drain plugs of the radiator and cylinder block.
- Remove the hose from the throttle heating fitting to drain the fluid by loosening the clamps.
- Pour antifreeze or antifreeze into the conservator until liquid flows from the removed hose. Now you can put the hose in place. After this, continue to fill the system with antifreeze or antifreeze. The liquid should fill the expander so that its level is a maximum of 3 cm below the specified level. Tighten the expander lock.
You need to start the engine and warm it up until the electric fan is in normal operating condition. After turning off the car engine, add coolant to the top line.
Pumps on Kalina
If antifreeze begins to leave the expander, it means that the pump needs to be replaced. We carry out all operations according to the following plan.
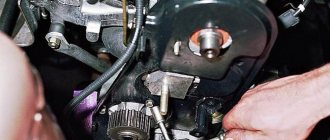
- The timing belt protection shell is removed, using a screwdriver, three bolts are pulled out: the left one in the center, two in the back.
- The Kalina engine has eight valves. The protection that presses the pump needs to be removed, but first you need to remove the camshaft gear.
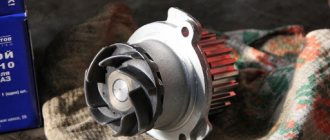
Pump replacement completed
- Unscrew the fastening screws, thereby loosening the strap. The crankshaft and timing gears are aligned according to marks, so you need to try to ensure that the loose belt does not jump several teeth on both gears.
- The timing gears are removed, then the fastening protection bolts - two middle, three lower. The bottom bolts hold the pump.
- The protection is dismantled and the pump is pulled out using a screwdriver. The fastening joints are cleaned of dirt and rust.
- Installation of the pump is carried out in the reverse order, the gasket is lubricated with sealant.
Return to contents
Changing the pump on a 16-valve Priora
Of course, if we are working on removing the pump, then first of all we disconnect the terminal from the battery. This is necessary in order to drain the antifreeze normally, without consequences.
Next, remove the crankcase protection. To do this, unscrew the nuts 10 mm under the lower edge of the bumper, then unscrew the two bolts near the levers, and then the Torx screws along the edges. At the same time we remove the plastic shield of the right fender liner.
Now, if you are not afraid, you can drain the antifreeze from the block, and for those who are afraid, unscrew the three bolts securing the starter, and then move it to the side, since there are enough wires to put it on the lever. Drain the antifreeze.
After that, we remove the plastic cover on top; it simply pulls up and sits on stiletto heels. Well, now we have a view of the timing belt casing. In order to unscrew it, you need a Torx 30, but the problem is that you won’t be able to get under the two bolts with a ratchet; you’ll have to unscrew them using a corner. The casing is divided into two parts, each of which can be removed without any difficulty.
Next, you need to set the piston of the first cylinder to TDC on the compression stroke. There is a mark in the form of a dot on the timing belt timing belt pulley on the crankshaft. It must be aligned with the ebb mark on the oil pump housing. There are also marks on the camshafts; they must be aligned with the marks on the plastic belt cover. As for whether the Priora engine bends 16 valves - 21126 and 21127 definitely bend the valves. You can turn the crankshaft either using the pulley bolt, or you can hang up one front wheel, engage fifth gear and turn it.
When the marks are set, you can begin to remove the timing belt; to do this, loosen the tension roller, remove the belt, and at the same time check all the rollers, because they also need to be removed. Next, you need to remove the inner part of the plastic timing belt casing; it is held on by five 10-point bolts. You need to remove the cast-iron casting in advance, it is on three 1-point bolts, otherwise you won’t be able to remove the casing.
Actually, now we are starting to replace the pump on the Priora 16 valves. For this we need a hexagon. We unscrew the three bolts, then carefully loosen the pump and remove it. It is advisable to coat the joints and gasket with sealant on both sides.
Recommendations for choosing a pump
When the time comes to replace the pump on Kalina, car enthusiasts do not know which pump to buy so as not to throw money away. When purchasing, you need to refer to car catalogs and read reviews from other car owners about the quality of the pumps they have chosen. The magazine "Behind the Wheel" provides truthful information about spare parts for the Lada Kalina. You can get acquainted with tests and inspection results, opinions about manufacturing companies.
When purchasing, pay attention to the packaging. It must be of high quality, with a warranty card and an indication of the date of manufacture. Seals and gaskets to protect against damage must also be present. All products have holographic stickers. They must be glued neatly, without scuffs. The attached instructions should contain general information about the spare part and briefly describe how to install a particular unit.
A defective item will last approximately 10 thousand km. If there are no problems with the pump after covering 100 thousand km, we can say that the quality of the purchased product is excellent. The manufacturer installs a TZA pump on the Lada Kalina; it has a long service life.
Drive 16kl. Kalina is like riding a powder keg, you never know when it will explode! I'm talking about the meeting of valves and pistons...
Causes of pump malfunction on Priora 16 valves
There are several reasons why the pump on a Priora 16 valve needs to be replaced. In general, on engines 21126 and 21127 this is a very unreliable part that requires close attention. The manufacturer claims that it is replaced after 60 thousand; in fact, there are cases of wear even after 30 thousand.
So, the main malfunctions of the pump on a VAZ 2170 Priora with a 16-valve engine:
- Leakage. Everything is clear here. It just starts to flow. This is quite easy to determine, because there is a special hole at the bottom.
- Bearing wear. The pump begins to make a loud noise, but it is quite difficult to determine that it is it without having the skills and dexterity. Then, after the pump has been replaced, you can twist it, usually it will be something like a squeaking sound when twisting.
- The impeller of the pump on the Priora cut off 16 valves. This is also not uncommon, because it is made of plastic. Here either the blades fly off completely, or the impeller simply begins to spin on the axis.
- The pump is jammed. This is also a fairly common reason for replacement. And you will be lucky if the valves are not bent, because with almost 100 percent probability the timing belt will break, even a new one.
Determining the performance of a part
In some ways, the water pump is a pretty tricky part. Without disassembling the timing belt assembly, it is not so easy to determine its performance.
But there are some signs of a pump malfunction that require you to pay close attention to it:
- At an early stage of wear, bearing noise appears. Not every auto mechanic, let alone an ordinary car enthusiast, will be able to distinguish it. But if you managed to catch this noise, then there is a reason to look under the plastic cover of the gas distribution mechanism.
- Wet marks under the timing cover and a belt shiny with moisture indicate that antifreeze is gradually penetrating into the compartment. Naturally, through the pump.
- The belt is not in the center of the camshaft gear, but is shifted to the very edge. This happens when, due to play in the pump bearing, the gear warps and the belt slides to the side.
- The coolant in the expansion tank of the Lada Kalina gradually decreases, and wet spots are constantly observed under the car directly under the timing mechanism.
How to check the water pump on a car without removing the water pump
The water pump (water pump) of the engine cooling system is an important component that ensures constant circulation of coolant through the channels of the cooling jacket, pipes, lines, cooling radiator, etc. Even a slight decrease in the performance of a car pump can cause the engine to overheat, especially in the warm season.
Another reason to check whether the pump is working or not is possible extraneous noise in the water pump drive. In this case, the specified pump requires increased attention on some car models. The fact is that the pump can be driven by the timing belt. If the water pump jams, then the timing belt breaks, resulting in valve bending on most engines. Next, we will look at the available methods that allow you to check the water pump yourself.
Preparatory activities
Before changing the pump on Kalina, you will have to partially empty the cooling system. Antifreeze should only be drained from the cylinder block; there is no need to touch the radiator. Unless you notice fluid leaking on the pipes, then you can change the hoses at the same time. The procedure is performed according to the following algorithm:
- Remove the mudguard that protects the engine from below from dirt. It is held on by bolts with 10 mm socket heads.
- Disconnect the positive terminal from the battery and the high-voltage wires from the ignition coil. Unscrew the coil mount with a 5 mm hexagon and move it to the side, freeing access to the drain plug.
- Empty the cylinder block by placing a special container and unscrewing the drain plug with a 13 mm wrench. In this case, it is necessary to open the cap of the expansion tank.
- If you need to empty the radiator, you should move the container under its drain neck and also unscrew the plug.
To carry out work on replacing the pump, no special pullers or devices are required. It is enough to have a set of regular and ring wrenches, a screwdriver and thin pliers. It is also quite possible to do without an inspection ditch by placing the car on a flat area and securing it with anti-roll bars.
Replacement of pump, timing belt, rollers, antifreeze
So, hello again to everyone, gentlemen!
I decided to write a small addition and throw out some useful information, as well as my little thoughts about the car after replacing the pump on the car.
It all started with the fact that after about half a year, something clicked in the engine, the sound is not clear, but it felt like some kind of bearing. Since the valves on my engine are bent, and it’s no joke, after half a year I decided to find the reason. Well, it’s getting warmer after all.
I decided to start small, what if it’s a generator? I decided to take off the alternator belt and listen without it. Having removed the belt from the rollers, the first bewilderment came. The belt is positioned so that the engine support is located inside it. That is, if the belt breaks, you will have to remove the support and at least jack up the engine. For example, in the nine, everything is much simpler; you can change it in an open field in 5 minutes. Taking the belt to the side, I started the engine, listened, no, something was still knocking. I was glad that the charging indicator light was working and the belt was in perfect condition. The mileage is currently 72 thousand, it is like new. And he never even pulled him up. Tensioning with a roller is of course more convenient than using an assembly tool like, for example, 9, but I think it’s a misunderstanding about the engine support.
The next day, I decided to check the timing belt rollers, and at the same time change the timing belt and rollers. According to the service book, the timing belt should last 200 thousand km, the engine is considered maintenance-free, but somehow I’m not going to throw it away after 200 thousand. I decided that if these were rollers, then it was time to change them. After shopping around, I didn’t find that it specifically said viburnum 1.4. Some sellers said that the belt and rollers fit with the Priora. Although in one store they wanted to give me a figure eight belt. As a result, my 1.4 has the same timing drive as on the prioromotor, which is a 1.6 16 valve. I didn’t save money, I bought Inov’s rollers and a German belt, the pleasure resulted in 4250 money. Plus 150 rubles for a special key for tensioning the roller. So, after that, think about whether it’s easier to buy a piston with a groove for the valves and take the cheapest rollers and belts, and sleep peacefully.
Since I haven’t changed the belt yet, I naturally messed up the marks. I think it jumped 3-4 teeth. At the same time, I made sure that the valves were bent, I tried to completely rotate the camshaft 360 degrees, it rests against the valve piston, of course. I set it up with errors, the engine has a vibration that is even transmitted to the body, and the knocking does not go away. I drove it a little, the traction dropped, I gave up on everything, put it in the garage, and my father drove it home. We agreed on what we would go do in the morning. I studied the information on setting the labels correctly. I dug through a lot of information. In the end I found what I needed. I will post photos that will be useful to everyone and will be understandable to anyone. At the same time I bought a pump for 1250, it’s kind of good. And antifreeze 10 liters for 980 rubles. The replacement of antifreeze should be at 75 thousand, well, since such a moment, I’ll change it to 72.
Arriving at the garage in the morning with fresh energy and a clear head, he slowly, confidently and with pleasure began to work. The draining of antifreeze from the radiator again caused my bewilderment. There is not a tap or a thumbscrew, but a screw for a screwdriver! Moreover, so five centimeters and air conditioning. And it is not located along a wide edge like in people, but at an angle from the end! I couldn't even get the ratchet with the screwdriver bit under it. I only got around somehow with a screwdriver, which goes like a flexible hose. I'll give you a little advice on draining. Start draining the block with the expansion tank cap closed. Then open the lid. When the unit has drained, close the expander cover, and only then unscrew the screw from the radiator.
I replaced the pump, by the way, there was a slight play on the pump, changed the antifreeze, set it according to the marks, as in the photographs, and everything worked like clockwork. No extraneous noise. Another confusion was about the hatch on the box to see the mark on the flywheel. I somehow unscrewed the plug, but I won’t be able to see it unless I remove the hoses and wires. I had to adjust the crankshaft according to the low tide of the oil pump, the 20th tooth, caries and the mark on the casing.
To summarize, I’ll say that they asked 1,500 rubles to replace the pump with a hundred. However, I firmly decided to do it myself to figure it out. The pump replacement schedule is 90 thousand. My pump was changed by the previous owner at 13 thousand mileage under warranty, now it’s 72, that is, the pump only lasted 60. The removed belt turned out to be in perfect condition, the rollers are in good condition. I left them in reserve, as they say. About the ease of repair, AvtoVAZ engineers probably think that my arm is broken in 4 places in order to get to all these nodes)). This concerns the alternator belt, which was thrown on the engine support, the radiator drain screw (by the way, later the idea came that I should have gone shopping to look for something like a lamb), the hatch on the box (I had to remove the battery and the air filter box, but I still need to remove the corrugation of wires and cooling hoses (however, I did without this mark). Although I read somewhere that in order to change the light bulbs on some cars you need to remove the bumper, so I wasn’t too angry with the engineers_)). To unscrew the crankshaft I used 3 extension cords from different sets, and no matter how hard I tried, I couldn’t unscrew it by hand, although I think I have enough strength. A 1.5 meter pipe solved the problem)) everything was unscrewed very easily)). Well, of course you need an assistant to engage fifth and apply the brakes.
I’ll take my leave here, I hope my experience will help someone. If you have anything, write in the comments, how I can help.