30.11.2021
| (No votes) |
Issues discussed in the material:
- Types of Lada-Grant gearboxes.
- The main malfunctions of the Lada-Grant gearbox.
- Step-by-step instructions for replacing the Lada-Grant automatic transmission.
- Approximate prices for replacing a Lada-Grant gearbox.
- Transmission problems on the Lada-Granta and methods for eliminating them, so as not to bring the matter to a replacement.
- Feedback from drivers about replacing the gearbox on a Lada Granta.
Did you know that the average recommended period of operation of a gearbox, especially an automatic one, is from 180 to 200 thousand kilometers. But some drivers need to replace the gearbox earlier; the Lada Granta is a perfect example of this. By the way, the second interesting fact: since 2011, the automatic transmission for this car has been assembled by the Japanese company Jatko.
How does the removal and installation of a new unit take place? Is it possible to make the replacement yourself and, if so, what is needed for this? Detailed instructions and practical recommendations are already waiting for you further.
Removing and installing the gearbox
We remove the gearbox to repair or replace it, as well as when dismantling the engine. We carry out the work with an assistant on an inspection ditch or overpass. Disconnect the wire terminal from the negative terminal of the battery. Remove the air filter (see “Removing the air filter and air intake”). We remove the starter (see “Removing and checking the starter”). Remove the left and middle mudguards of the power unit (see “Removing the mudguards of the engine compartment”). We disconnect the wire blocks from the reverse light switch (see “Removing the reverse light switch”) and the speed sensor (see “Removing the vehicle speed sensor”). Drain the oil from the gearbox (see “Changing the oil in the gearbox”). Remove the air filter (see “Removing the air filter and air intake”). We disconnect the clutch release cable from the clutch release fork lever and the bracket on the gearbox (see “Replacing the clutch release cable”). We disconnect the gearbox control rod from the shaft of the gear selector rod hinge (see “Removing and disassembling the gearbox control mechanism”). Remove the left front suspension brace (see “Removing the brace”).
Using a 10mm wrench, unscrew the three bolts securing the lower cover of the clutch housing...
...and remove it.
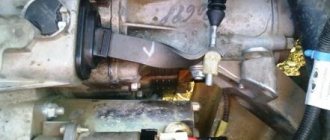
Using a 19mm wrench, unscrew the nuts of the two bolts securing the clutch housing to the gearbox housing (which also secure the torque arm), holding the bolts from turning with a head of the same size.
We remove the reaction rod with the bracket from the gearbox. Remove the front wheel drives (see “Removing the front wheel drives”).
Using a 19" socket with an extension, we loosen the two bolts of the upper fastening of the gearbox to the cylinder block, which simultaneously secure the mounting bracket for the wiring harness holders.
Using a 13mm socket, unscrew the bolt securing the ignition coil bracket to the clutch housing...
...and remove the bolt and washer from the hole in the clutch housing.
Using a 19mm socket with a long extension, loosen the nut of the lower rear mounting of the gearbox to the cylinder block.
Use a 19mm socket to loosen the bolt of the lower front fastening of the gearbox to the cylinder block.
We install adjustable stops through wooden blocks under the engine oil pan and gearbox housing.
Using the E‑14 head, unscrew the two screws securing the front left support of the power unit to the support.
Using a 15mm socket, unscrew the three nuts securing the bracket for the left support of the power unit to the gearbox...
...and remove the bracket. Completely unscrew the bolts and nut securing the gearbox.
We move the gearbox away from the engine by removing the input shaft from the clutch driven disc hub.
When removing and installing the gearbox, do not rest the gearbox input shaft on the clutch diaphragm spring petals to avoid damaging them. Before installing the gearbox, apply a thin layer of CV joint-4 lubricant to the splined end of the input shaft. To facilitate the operation of installing the gearbox, we screw in a guide pin M12×1.25 mm (with a sawn slot for a screwdriver...
...into the front lower threaded hole of the cylinder block. We insert the input shaft of the gearbox into the splines of the driven clutch disk and, orienting the gearbox so that the guide pin fits into the corresponding hole in the clutch housing, and the standard pin of the clutch housing into the hole in the cylinder block, we send the gearbox all the way into the engine cylinder block. Using a screwdriver, unscrew the guide pin from the hole in the cylinder block. We carry out further assembly operations in reverse order. Filling the gearbox with oil
How to remove a VAZ-2107 gearbox yourself
Before you begin dismantling the gearbox, you should prepare the tools and materials that may be required during the work, and also decide on the location for disassembly.
You can remove it (it’s even easier for one person - no one gets in the way), put a board across the hole, and drag the box onto this board. But it’s probably very difficult to stick one in, the problem is not even the weight of the gearbox, but putting the gearbox on the shaft so that the box “sits”
[x]
https://www.lada-forum.ru/index.php?showtopic=49447
What tools will you need?
To remove and replace the VAZ-2107 gearbox you will need:
- a set of open-end and ring wrenches, among which there must be keys for 10, 13, 19;
- a set of sockets of the same size as the keys, as well as cardan joints with an extension;
- pliers, screwdrivers, tweezers;
- funnel and container for oil;
- jack and wooden beams;
- rags.
Change frequency and types of oil used
According to the manufacturer's instructions, transmission oil in old Grants should be changed approximately every 70,000 kilometers, or once every five years (whichever comes first). In the case of gearbox 2181, the oil will have to be changed almost three times less often - once every 200,000 kilometers. Another important aspect regarding gearbox maintenance is checking the oil level and its consistency. For older boxes, a period of 15,000 kilometers between checks is set, and they have a special dipstick for checking the level. Box 2181 does not provide for oil level control, so there is no dipstick in the design.
In addition, in boxes 2181 and 2190 the volume of the transmission oil sump is significantly different - in old boxes it is 3.3 liters, in new ones it is 2.2. Be sure to remember this when changing the oil - an insufficient oil level (as well as an excessive one) will definitely not benefit the gearbox.
As a rule, the factory oil that is poured into Grant boxes is semi-synthetic and belongs to the GL-4 class. Below is information about the types of factory oil being poured (this does not mean that this is what you should fill in - there are better options on the market, but this information may be useful if you decide to add oil rather than make a complete replacement):
— For box 2190: LukOil TM-4 and ROSNEFT KINETIC 80W85 (these brands of oils were used for a short time, for several months from the start of production of the Lada Grant), TATNEFT TRANSLUX markings TM-4-12, 75W85 (used since 2012);
— For box 2181: TATNEFT TRANSLUX and ROSNEFT KINETIC marking 75W85.
Transmission malfunctions on the Lada Granta and methods for eliminating them
First, we need to note the disadvantages of a manual transmission as a cheaper and more popular transmission option on these cars. The problems and their solutions are clearly presented in the table.
| Fault type | Solution |
| Noises during transmission operation | |
| Gear teeth are worn. | Replacing gears. |
| Severe bearing wear. | Replacing bearings. |
| The oil level is below the permissible level. | Add oil and repair leaks, if any. |
| Difficult to change gears | |
| The clutch does not disengage completely | Fix clutch problem. |
| The gear shift drive rod is damaged. | Eliminate deformation of rods. |
| The fastenings of the mechanisms have been loosened. | Tighten the fasteners. |
| Drive not adjusted. | Adjust the drive. |
| The plastic drive elements are broken. | Replacement of worn parts. |
| Transmissions turn off on their own | |
| Wear of synchronizer teeth on the gear. | Replace worn elements. |
| Damage and wear of engine mounts. | Install new supports. |
| The gear shift mechanism drive is not adjusted. | Adjust the drive. |
| Extraneous noise when shifting gears | |
| The clutch does not disengage. | Adjust the clutch and eliminate faults. |
| The ring blocking the synchronizer is worn. | Replace the ring. |
| Oil leak | |
| Wear of seals. | Check all oil seals in the gearbox and replace worn ones. |
| The crankcase, gearbox cover, and drain plug are loose. | Tighten loose elements and replace sealant if necessary. |
Transmission malfunctions are often closely related to a faulty clutch. Characteristic signs may indicate many breakdowns. Detailed and more objective diagnostics are carried out only after dismantling the gearbox and completely disassembling it to identify problems.
It is not recommended for beginners and those who have no idea about the technical structure of this unit to carry out repairs. The fact is that the gearbox is a complex mechanism with many parts. With inept repairs, there is a high probability of getting even bigger problems, up to and including complete failure of the unit.
When contacting a car service center, you should take into account that not every mechanic has the appropriate qualifications, and repairing a Lada Granta gearbox with a cable drive can cost a lot of money.
For example, replacing oil seals involves a complete disassembly of the gearbox and is estimated on average at least 6,000 rubles. You can carry out repair work yourself. Yes, this will save money, but it will take up a lot of free time, and you will also need an assistant. Alternatively, in case of serious problems, motorists simply change the gearbox assembly. In some cases this is the only rational solution.
Automatic transmission malfunctions
To independently identify automatic transmission problems, you should drive the car. Characteristic signs of gearbox malfunction:
- gears are not included;
- strong jerks when moving;
- flashing of the corresponding indicators;
- transmission oil leak.
The presence of these problems indicates the need for urgent repair of the gearbox. And automatic transmission malfunctions also affect the robotic transmission. The robot is a kind of middle option between an automatic transmission and a manual transmission, and therefore it can be affected by breakdowns of both transmissions.
It is not possible to repair an automatic transmission at home. The design of the machine and the robot in particular is too complex and cannot be done independently. Moreover, not even all service centers do this. An experienced car owner will be able to eliminate the simplest faults, such as oil leaks and problems with spontaneous gear shifting. Moreover, in the latter case we are talking about cleaning contacts.
Most often, owners of a Lada Granta with an automatic transmission may encounter problems typical for this transmission.
Features of repair and maintenance
The car should look good not only from the outside, but also from the inside. In order for the box to please its owner, it must be serviced in a timely manner. Of course, it’s time to fill up the oil, but there are a number of problems that the driver will have to constantly struggle with. And for this you need to know the main “diseases” of the transmission.
All types of mechanics
The manual transmission is reliable, but has a number of significant disadvantages. Gear shifting is not very precise, unlike foreign cars. Also, since the time of the ninth models, the problem of “gearbox rattling” when the second one is turned on has not yet been eliminated.
On the third, the box begins to hum, the rocker is subject to rapid wear, especially on liftback cars.
Robot
The robot uses an electromechanical drive, which quickly wears out when the vehicle is used harshly. Due to the strong pressure on the gas pedal from first gear, the robot, instead of switching to second, jumps to third. Due to such use, the box begins to act up and kick. The robot prefers quiet movement. But if the box starts to kick, you can switch it to manual mode.
Hydraulic automatic
If you service this box on time, it can travel up to 200 thousand km. The fluid needs to be replaced once every 60 thousand km. The hydraulic automatic is very reliable, although many owners complain about it.
Hydraulic automatic transmission
The opinion has been established that automatic machines do not pick up speed well, but they “eat” gasoline well. Most of the troubles with a machine gun are the driver's boorish attitude towards his car. The automatic transmission loves a quiet ride, and when moving “gas to the floor,” the seals may begin to leak. Also, due to careless driving, drivers often puncture the automatic transmission pan, adding work to the service station.
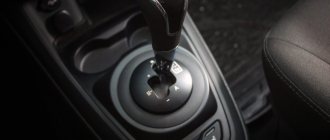
Where is the dipstick located?
To fill the oil, you need to check the contents, but first you need to understand where the dipstick is located. On a manual Lada Granta there is no gearbox dipstick; on an automatic it is located behind the air filter.
Checking the oil level
The oil level in the box can be checked using a dipstick, focusing on the maximum and minimum marks. If the dipstick is missing, then you need to use the overflow tube.
Initially, you need to start the car and warm up the gearbox, and with the engine running, unscrew the cap of the overflow pipe.
If the oil does not flow out, then you need to add it through the filler hole until the oil flows out of the overflow tube.
How to remove extraneous noise
Even after purchasing a new Granta Liftback car, a hum may form in the box. When contacting a service station under warranty, the technicians say that this is a natural sound. Repairing a box under warranty is a complicated matter, but it can be repaired in a non-specialized center. To do this, remove the clutch cable from the mount and replace the insert with a rubberized washer. The rubber on the washer should be softer and then the vibration will subside.
Interesting Facts
Let's look at the interesting facts that we managed to learn about the new Lada Granta gearbox:
- The VAZ-2181 gearbox will not be installed on the Priora, since the designers considered that it would not be cost-effective to redo the entire design of the power units.
- The cost of Lada Grant and Kalina 2 increased by 5000-7000 rubles. with the introduction of a new gearbox into the car.
- According to reviews from car owners, the first copies of cable-driven gearboxes were not entirely successful and had quite a lot of flaws: vibration became audible after 70-80 thousand mileage, howling of the gearbox, increased wear of parts, etc. Based on this, the manufacturer made adjustments to the design and improved the characteristics, but many car owners had a negative impression of the VAZ-2181 cable-driven gearbox.
- The AVTOVAZ plant continues to develop and modernize a new gearbox, which will become the second generation of cable gearboxes. It is planned to install it on the 2nd generation Lada Granta, which is currently under development. The designers promise to take into account the experience gained during the development of the first generation and not allow such an oversight a second time.
Automatic transmission
Methods for adjusting the clutch on a Lada Granta with a cable box
“Automatic” was installed on the car of the Tolyatti Automobile Plant from July 2012 to March 2022 - this is 4 speed. Automatic transmission from Japanese manufacturer Jatco.
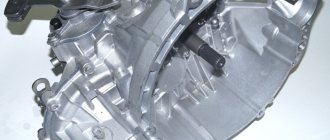
Grant's four-speed automatic transmission - model JF414E, classic type, with a torque converter; similar units are equipped in Nissan, Mitsubishi, and Suzuki passenger cars.
This type of transmission on Granta is paired only with the 98-horsepower VAZ-21126 power unit.
The gearbox is highly reliable; with careful operation and timely maintenance, it can run up to 200 thousand km.
It is necessary to replace the transmission fluid every 60 thousand km; the manufacturer recommends filling with Nissan branded ATF EJ-1 or Matic-S oil.
The quality of the Lada Granta automatic transmission does not cause any major complaints; if the transmission requires repair, it is mainly due to the fault of the driver:
- as a result of slipping, the clutches burn out;
- after overheating, gaskets and seals begin to leak;
- When you hit an obstacle, the automatic transmission pan breaks through, and then a thorough repair is definitely required.
Car owners have more complaints about the performance characteristics of an automatic transmission - increased fuel consumption, sluggish acceleration of the car, jerking during gear changes during dynamic driving.
Regulations for changing gearbox oil from AvtoVAZ
It is necessary to change the oil in the gearbox-2181 in one case - if the mileage exceeds 200,000 km.
In theory, the entire service life of the car is indicated here, and the numbers are taken from the regulations.
The first two dismantling steps
The thin clamp that secures the expansion tank hose is also removed (see photo).
The video shows how to change the oil
do it yourself in the gearbox
with cable drive
LADA Granta
Liftbek.
Changing the gearbox oil on a Lada Granta
Change of oil
with your own hands.
Disconnect a couple of connectors: the mass air flow sensor and the adsorber valve connector. The first of them is oval (photo below). And the second one is turned off like this: tighten the tongue, remove the terminal block.
Down with all terminal blocks!
The filter housing can be moved to the side in the final step. There is no need to disconnect it from the corrugation.
Rubber fasteners can be defeated this way: the rubber band is held with pliers, and the body is pulled back (to the left, forward). Start with the right front support.
Reconnaissance in force
We are trying to remove the reverse switch. We look for a plastic connector on the crankcase (see photo) and immediately disconnect it.
View of the gearbox housing from under the hood
Using a 22mm round wrench, try to unscrew the switch housing. Cancel the replacement if nothing can be done - neither unscrew the “top” plug, nor remove the switch.
When the switch is returned to its place, the threads are treated with sealant. The tightening torque should be 28-45 Nm.
Detailed algorithm for changing the oil in a CABLE gearbox
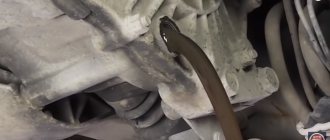
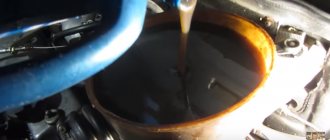
The oil from the Lada Granta gearbox is drained through the “bottom” plug. It is unscrewed with a 17 key.
The simplest thing is to drain the oil
You need to unscrew the cap like this: make 1-2 turns with the key, then substitute the container. And then unscrew the plug by hand.
When the liquid flows out, wipe the surface of the crankcase. We tighten the plug back (torque – 29-46 Nm). Getting ready to refuel.
Hose and funnel are ready for use
Features of the gearbox device
So, if you don’t want to deal with a scheduled transmission oil change, then you should purchase the Granta “Lux” package and get a Jatco automatic transmission made in Japan. It has its own resource - only 5 years, but during this period the manufacturer guarantees that work on the box will only be necessary in the event of a breakdown. The automatic transmission is already filled with a special fluid, and it will not need to be replaced during the entire period of use. Adding oil is also not necessary.
A cable manual transmission requires more attention in terms of maintenance, but it can last much longer. As such, it does not have a service life - you can, if necessary, update its parts and change the lubricant, thereby increasing the duration of its uninterrupted operation.
Replacing the timing belt on an 8 valve Lada Granta
This gearbox is based on the model first installed on the VAZ-2108. It has been slightly changed and modernized. Weaknesses in the previous version:
- large lever stroke;
- fuzzy switching scheme;
- high vibration;
- Difficulty shifting gears.
The manufacturer has tried to correct this situation. And on the Lada Granta, the cable drive made it possible to make gear shifting clearer. In addition, the shift mechanism in the new gearbox has changed, which is no longer bathed in transmission oil, but is installed last as a separate module. It is easier to repair and assemble during production. It also embodies German technology, and a three-dimensional plate has appeared in the gearbox, which sets the force when shifting gears.
The cable drive has replaced the old rods, which are no longer used by any manufacturer when assembling boxes. The rationality of its use was also, like all innovations, calculated using a computer program.
This is interesting: Which spark plugs are best for Lada Largus 16 valves?
What transmission fluid to buy
Stores may offer you different options for transmission fluid, but not every one is suitable for the updated manual transmission of the Lada Granta. At the factory, Tatneft Translux with a viscosity of 75-85 is poured into it. We recommend that you choose oils with a viscosity of 75 to 90, as this is the best option for our climate.
In the store, it is important for you to find original oil of one of the brands:
- Trans KP from TNK (you can purchase something similar, but marked Super);
- Konenic;
- Shell Transaxle Oil;
- Rosneft;
- Lukoil TN4;
- Novoil Trans KP;
- Trans KP2 from TNK.
How to change the timing belt on a Lada Granta 16 valves
Experts recommend first of all paying attention to transmission fluids from TNK, for example, Trans KP Super is ideal for those recommended for our area. It has already been tested by many car enthusiasts and is marked as one of the best for cable boxes
Noise insulation of gearbox
Car owners of Lada Granta, as well as other VAZ models, often complain about noise from the gearbox. Most often this is the fault of the manual transmission. There are many reasons, the problem may be hidden in design defects or wear. Another insignificant detail may be to blame for everything. Often the source of transmission noise is the clutch cable, which transmits vibration from the gear shift fork. To eliminate this problem, you will need to soundproof the gearbox, which involves installing a gasket between the cable and the gearbox.
The procedure is as follows.
- Remove the cable end from the fork.
- Unscrew the tip.
- Remove the boot and rubber stop from the cable.
- Instead of the insert, install a rubber washer with a diameter of 35 mm.
- Glue a piece of porous rubber to the plastic cable stop and additionally secure it with electrical tape for several turns. Reassemble everything in reverse order.
After everything is assembled, you need to place a rubber gasket 2-3 mm thick under the tip of the clutch cable and the gearshift fork. Then all that remains is to adjust the clutch pedal. After such a kind of sound insulation, extraneous sounds during operation virtually disappear.
But in winter, some vibrations may be observed. This is due to the fact that when the air temperature drops, the rubber gaskets harden and cannot function normally. There are no other soundproofing methods for the Lada Granta gearbox. There are some methods, but they are ineffective. You can soundproof the floor, but vibration will still make itself felt.
A cable-driven gearbox does not require sound insulation.
Replacing the cable
How to set the clock on the device on the Lada Granta
To change the cable, you need to carry out a number of simple operations:
in the car interior (under the panel), the nut that secures the cable to the pedal assembly is unscrewed;
the braid stopper is removed from the pin;
- use pliers to remove the locking bracket;
- the pedal axle is removed;
- the pedal bracket spring is also dismantled;
- use pliers to pull it towards you and remove the tip stop;
- the pedal is released from the cable end;
- the cable sheath seal is removed (in the engine compartment);
- the tip of the cable connected to the plug must be pulled forward towards you and pulled out of the groove;
- dismantle the tip driver;
- remove the guide bushing;
- pull the Lada Granta clutch cable through the hole between the engine compartment and the car interior.
Before installing a new cable, it must be lubricated. To do this, a little machine oil is poured between it and its shell. Install the new cable in reverse order
It is impossible not to pay attention to the imperfection of the cable tension mechanism. The reason for its squeaking may be:
- plastic bushing on the pedal;
- plastic leash;
- cable (cable and its sheath);
- gearbox input shaft.
Most of the reasons can be eliminated very simply - you need to lubricate the rubbing parts, for example, with lithol. The same applies to the input shaft - creaking occurs due to lack of bearing lubrication. To lubricate it, you need to get to the fork boot and, pulling it back, generously pump graphite lubricant inside.
The clutch of the Lada Grant remains the same as before. Exactly the same single-disk mechanisms were installed on previous models - Priora, first-generation Kalina, VAZ 2110, 2109, 2108. The plant only partially modified the design, providing it with higher quality parts. Additionally, an automatic cable tensioner has appeared, which in itself is an additional source of malfunctions. This is a fairly old development, and during its use no measures have been taken to eliminate the most common problems. On the contrary, engineers complicated the design by adding additional elements. On the other hand, the Lada Granta clutch is inexpensive to maintain, and you can buy all the necessary spare parts in every car store. Any car owner can replace the Lada Granta clutch with his own hands. Availability and simplicity of design remain AvtoVAZ’s priorities, although quality is not in first place.
Lada Granta equipped with different gearboxes
Manual transmission is gradually becoming a thing of the past, which is why even Lada cars have long had new gearboxes. Specifically, the Lada Granta Restyle from 2022 is equipped with three types of transmission - mechanical, automatic and robotic. The boxes are not bad and have few flaws. If owners complain about something, the problem is promptly corrected.
Mechanics
The plant did not reinvent the wheel and decided to follow the old tradition - to modernize the old transmission, which first appeared on the VAZ-2109.
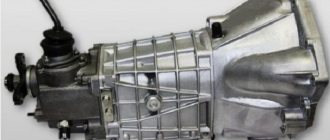
Checkpoint "Lada Granta"
First, the modernized box received the index 2180 and was a modified version with rods from the “nine”. After this, the manufacturer decided to keep up with the times and make a cable box, which received the index 2181. The box turned out to be good, despite the unsuccessful start. All shortcomings of this version of the transmission were promptly corrected. Some argue that the new gearbox on the Grant is an old one, given over to be torn to pieces by Renault, but this is far from the case.
It’s clear that when the cable gearbox came out, the price of the car went up a little. However, AvtoVAZ claims that this type of transmission is the future.
They're right, but the new box had flaws. The first revision turned out to be extremely unsuccessful, and the owners bombarded the company with negative reviews - they noted increased noise levels and lower reliability. All problems were promptly eliminated, but many people were left with an unpleasant aftertaste.
Pros:
- transition to cables;
- reduction of vibrations of the gearshift knob and extraneous sounds;
- good clarity of gear shifting;
- reducing the volume of oil poured.
The box has acquired a certain reliability due to the cables.
The downside is that the manufacturer tries to save on everything. Therefore, the metal of the gears does not differ in quality, and they lick off. There is a risk of failure of the cable drive, but it is small. Despite the absence of vibrations in the handle, the Grant's gearbox began to howl. The howling occurs precisely because of the low precision of gear processing and there is no way to constructively eliminate the defect. The plant equipment does not allow processing with the required accuracy.
Machine
A Jatco four-speed automatic transmission is offered as an automatic transmission on the Granta sedan and liftback. This transmission model, unlike the manual transmission and the “robot”, is unremarkable. The same transmission model is supplied to the Datsun foreign car.
Automatic transmission "Lada Granta"
One of the advantages is that it is an automatic on a Lada. Good acceleration dynamics, confident shifting, durability, simplicity of design. Oil can be poured and is inexpensive.
Of the minuses - 4 gears are clearly not enough, increased fuel consumption. In Drive mode, there are increased vibrations at idle.
Robot
As in the case of mechanics, the robotic gearbox on the Grant was modernized, the new version is called AMT-2.0. The owners speak very warmly about this type of transmission and the 5 AMT gearbox on the Grant is the best.
Among its advantages are its price, fast and predictable shifts, the presence of engine braking, fuel economy, and crawling mode.
The creeping mode saves a lot of energy in a traffic jam. When the brake is released, the car moves smoothly at a speed of 5-10 km/h, allowing you to operate only with this pedal. It is definitely worth the overpayment of 25 thousand rubles.
Of the minuses, it is worth noting the resource, like most cheap robots. Subjectively, some people do not like the basic mode of the robot - they have to constantly drive in “sport” mode. Also, when starting up a hill in reverse, the car will roll forward a little. The speed sensor shows slightly low values.
==Disassembly of differential ==
We clamp the driven gear of the main gear in a vice with soft metal jaw linings.
Using a 17mm socket, unscrew the eight bolts securing the gear to the differential box. Leaning the driven gear of the main gear onto the jaws of a vice (with jaw linings made of soft metal)…
...using a hammer with a plastic tip (or a soft metal tip) we knock the differential box out of the driven gear.
By inserting a blunt chisel into the gap between the end of the inner bearing ring and the differential box, we strike the chisel, increasing the gap.
Then, installing two mounting blades into the resulting gap...
...press the bearing with them.
Remove the speed sensor reference ring.
During subsequent assembly, the tabs of the drive ring must be installed in deeper grooves at the end of the differential box.
By turning, we remove the wheel drive gears from the differential box.
Using circlip pliers, remove the circlip from the pinion axis.
We take out the pinion axle and pinion gears from the differential box.
Payment via PayPal
After selecting payment via PayPal, the PayPal payment system will launch, where you need to select the payment method: bank card or PayPal account.
If you already have a PayPal account, then you need to log into it and make a payment.
If you do not have a PayPal account and you want to pay using a bank card via PayPal, you need to click on the “Create an Account” button - shown with an arrow in the picture.
PayPal will then prompt you to select your country and provide your credit card information.
After specifying the information required to make the payment, you must click on the “Pay Now” button.
== Disassembly and assembly of the synchronizer ==
Synchronizers of 1st–2nd, 3rd–4th and 5th gears are disassembled and assembled in the same way. We show the disassembly and assembly of a synchronizer using the example of a 5th gear synchronizer. Before disassembling, we mark the blocking rings and their position relative to the synchronizer clutch. Remove the blocking rings. We mark the position of the hub relative to the coupling and the position of the crackers relative to the grooves of the hub, so that during subsequent assembly they will be installed in their original places. To disassemble the synchronizer...
...carefully slide the coupling along the hub, holding the balls with your hand to prevent them from “shooting out”.
5th gear synchronizer parts:
1 – coupling; 2 – ball; 3 – cracker; 4 – spring; 5 – hub. Before assembly, we inspect the synchronizer parts. Nicks and chips on the splines of the hub and coupling, the gear rims of the locking rings and the coupling are unacceptable. We replace defective parts with new ones. If there is significant wear on the working conical surface of the blocking ring (the minimum permissible axial clearance between the ends of the gear rims of the gear and the blocking ring is 0.6 mm), it must be replaced. For ease of assembly of the synchronizer, generously lubricate the springs, crackers and balls with grease. Putting the hub on the workbench...
...insert springs into the hub sockets, and crackers into the grooves - in accordance with the previously applied marks. We insert the assembled hub into the coupling, orienting it so that when the ball is subsequently installed...
...it would be located exactly in the middle part of the coupling groove - in its deepest place.
Place balls in the holes of the crackers...
...and, pressing each ball in turn with a screwdriver... ...we push the hub along the splines of the coupling.
When installing the synchronizer on the shaft, the grooves on the coupling and hub must face: – for the 1st–2nd gear synchronizer – towards the 1st gear gear; – for the 3rd–4th gear synchronizer – to the 3rd gear gear; – for the 5th gear synchronizer – to the thrust plate of the shaft bearings.
Grooves on the clutch and synchronizer hub.
Advantages and disadvantages of cable gearboxes
Advantages:
- The first advantage of the cable transmission in the Grant is the switching mechanism. Now it is not immersed in oil, so it is easier to use in severe frost.
- The overall reliability of gearbox components has increased, since the gearbox has become more compact.
- Improved grip on the Grant with a cable gearbox. Due to the increased diameter, the torque also increased.
- Overall comfort has increased. The gears fit in more pleasantly, there are much fewer knocks, howls and vibrations.
The main disadvantage of the manual transmission 2181 is its manufacturing technology. The metal on the gears is bad, it gets licked off quickly. The cable drive fails. The good news is that recently the box has been improved and it has become more reliable.
Grants box shift mechanism
Many important elements of the old manual transmission were located at the bottom and were bathed in an oil bath - the shift mechanism, the rod clamps and reverse forks, the gear set seal, the reverse light switch. All of these elements were potential sources of leakage. Many people solved the problem with sealant, but moving the elements upstairs solved the problem once and for all.
The new gear shift module on Grant is a separate mechanism that, if necessary, can be removed without disassembling the box. The mechanism has a selector grille that clearly follows the gear shift pattern and prevents accidental engagement of reverse gear.
The center detent now rides on the center plate and transfers force to the lever without sliding bearings. This solution made it possible to eliminate all mechanical losses and increase the information content of switching.
Which transmission is better?
AvtoVAZ has really done a huge amount of work in order to provide motorists with a popular model with various types of transmission. Both mechanics, automatic machines, and robots have their advantages and disadvantages. The manual transmission model has become widespread partly because it is the most affordable. Despite the occasional hum and noise, a car with a 5-speed manual remains a good choice. But for residents of big cities, a car with an automatic transmission is best.
An automatic transmission with a torque converter will ensure comfortable control of the car and will not cause serious trouble. The version of the model with AMT is considered technologically advanced, modern, but at the same time the most problematic. There is a possibility that in the future the manufacturer will abandon the robot, giving preference to a CVT variator, as was done in the Lada Vesta. A sedan with a robot can be bought either new or second-hand on the secondary market. The second option is the most dangerous and unpredictable: often on manual transmissions, even before 100 thousand kilometers, the servomechanisms fail and the clutch wears out. It is extremely expensive to maintain and repair such a unit.
Lada Granta
Lada Granta
Interior of Lada Granta with automatic transmission Jatco JF414E
Interior of Lada Granta with robotic transmission
Which is easier to manage and maintain?
Each type of transmission has the right to exist within the framework of the chosen driving concept and the individual characteristics of the driver. You can decide what is best for a Lada Granta car - an automatic or a robot, or maybe a manual - only by highlighting the priority factors for operating the car.
A manual transmission with a rocker drive is the simplest. If the gearbox is in good working order, adjusting the drive is not a problem, but operating the switch unit in an oil bath is fraught with problems at low temperatures.
A manual transmission cable drive is much more comfortable to operate, but more expensive to maintain.
An automatic transmission is an excellent option for a comfortable ride in a variety of styles that does not exceed the load capacity. However, it is demanding in terms of composition, maintenance of the level and timely renewal of transmission fluid. This requires higher costs compared to mechanics and robots.
The robot is economical to maintain, has lower fuel consumption, is cheaper than an automatic machine, and is easy to configure even on your own using available software. But he prefers an established, leisurely driving style.
Design and differences of a cable-driven gearbox
Unlike a conventional gearbox, the cable-driven gearbox has received some improvements and upgrades.
In order to understand how everything works, let’s compare a standard gearbox labeled VAZ-2180 and the new VAZ-2181:
- To reduce the vibration generated by the traction drive gearbox, cables from the manufacturer Atsumitec were installed.
- To reduce the effort for shifting 1st and 2nd gears, the manufacturer installed multi-cone synchronizers.
- The clutch size has increased to 215 mm.
- Due to changes in the transmission design, the starter had to be positioned along the engine rather than the gearbox.
- To facilitate gear shifting, it was necessary to reduce the bevel angle of the synchronizer teeth from 125 degrees to 100.
- To eliminate oil leaks, the designers moved the gear selection mechanism to the top. But this nuance gave impetus to the development of a new switching scheme and design changes.
- The volume of lubricant poured has decreased from 3.3 liters to 2.2 liters.
- A selector plate is installed, which allows you to change gears more clearly.
- The transition from mineral oil to semi-synthetic oil has been completed.
- To prevent accidental reverse gear, a special lock was developed.
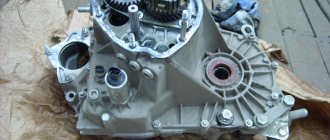
The main elements and components that go into the design of the new gearbox can be seen in the figures below:
- main drive drive gear;
- secondary shaft;
- input shaft;
- fifth gear shift fork;
- third and fourth gear shift fork;
- reverse light switch;
- clutch housing;
- gear shift mechanism;
- central lock.
1 – first gear gear; 2 – intermediate rings; 3 – blocking ring; 4 – synchronizer clutch; 5 – synchronizer clutch hub; 6 – clamp; 7 – second gear gear.
1 – gear selector levers; 2 – selector grid pin; 3 – selector grid; 4 – reverse locking mechanism; 5 – central three-dimensional plate.
Thus, the manufacturer decided to improve and modernize the gearbox, which was unreliable and had a lot of problems. Due to the new improved system, vibration in the body and gear knob has been reduced. The gears switched on, started more clearly, and the huge backlashes disappeared.
Catalog numbers and production
As you know, analogues of gearboxes are rarely produced, and even more so for domestic cars.
Therefore, for the Lada Granta cable-driven gearbox there is one catalog number - 21810-1700012-00.
Operational and design features
Among the main innovations of such a development as a cable-driven gearbox is a reduction in the volume of oil used in the box. Previously, the manufacturer assumed the use of mineral fluid in a volume of 3 liters, but now the unit requires semi-synthetic fluid with the amount reduced to 2.2 liters.
Many Lada Granta owners are concerned about the question that has arisen: what type of oil should they choose when replacing a progressive gearbox to ensure its normal functionality? The manufacturer continually recommends using fluids with a viscosity parameter of “75W-85” in accordance with the “GL-4” specification.
A distinctive feature of the new cable-driven gearbox from its ancestor (VAZ-2108) is the modernized switching circuit. This confirms the fact that the fifth speed is not located to the left of the first stage, but opposite the 5th gear. This design has managed to acquire serious popularity among Grant owners. It also allows you to eliminate the moment of accidental engagement of reverse gear when moving forward.
Also among the advantages of the new transmission of the Lada Grant are the following points:
- the ability to operate in severe frost (down to minus 42 degrees) while ensuring free manipulation of the lever;
- availability of the procedure for removing the switching unit without completely dismantling the transmission unit;
- quick gear changes with a minimum of effort;
- increased reliability and protection of 1st and 2nd gears due to the use of cone synchronizers;
- the fact that the intermediate segments of the synchronizers were coated with a special composition, which made it possible to improve the quality performance of the unit.
The use of a set of improvements allowed the new cable box to get rid of some previously pressing problems and acquire the ability to function stably in any conditions and modes.
The reliability and enviable functionality of the box was ensured as a result of the designers using a progressive approach to building the unit, based on computer modeling. The maximum loads exerted on the vulnerable components of the unit were correctly determined, which made it possible to improve their design and provide them with sufficient strength.
Step-by-step replacement instructions
Let's assume that we will change the oil in the VAZ 2181 gearbox in an ordinary garage, which does not have a pit or a lift.
- Using a knife, cut out the side surface of the canister.
Canister with cut side surface
- Before starting work, we properly warm up the VAZ 2181 gearbox. That is, you must first warm up the engine, and then drive ten kilometers so that the gears have time to disperse the oil throughout the entire transmission.
- We raise the right side of the VAZ 2181 car using a jack. We put a stand or some reliable and durable block and then lower the car. Under no circumstances should you work under a car that is supported by only one jack.
Car raised with a jack
- If the floor is cold, you can put a sheet of plywood under the car.
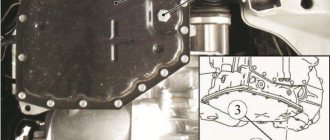
- If crankcase protection is provided, then it must have a cutout under the oil plug. The plug is located on the left flange of the gearbox from the bottom; if it is missing, you will need to remove the engine protection. Clean the cork with a metal brush. Wipe the surface around it with a rag. Using the “17” key, unscrew it, after placing the canister under it. The liquid that drains should be warm, not hot. We wait approximately 10-15 minutes for complete drainage, and then tighten the plug.
Location of the plug on the gearbox flange
- Using a knife, cut out the bottom of a plastic bottle.
Plastic bottle with the bottom cut off
- The air filter must be removed along with the intake pipe. To do this you need to remove the terminal from the air flow sensor.
Removing the air flow sensor terminal
- Unscrew the clamps at the throttle body and pipe and remove the intake unit completely.
- Remove the oil dipstick from the gearbox. It is located at the top.
Probe location
- We place the neck of a 1.5 liter plastic bottle to the hole for the cork. Using the bottle as a funnel, fill it in (a little less than 3 liters). Let's see if oil is leaking from the plug under the car. To do this you need to wait about ten minutes.
Use of a plastic bottle for filling liquid
- Having made sure of the tightness, we install the engine protection (if it had to be removed), and lower the car from the stand. Next, you need to top up to the “MAX” level using the dipstick. In total, the box should contain 3.2 liters.
Unscrewed dipstick
- We install the inlet pipe with filter.
It is necessary to check the oil in the gearbox of a VAZ 2181 every 15,000 km. The level is checked only when the gearbox has cooled down, with the engine turned off, and the vehicle position must be strictly horizontal.
To make it easier, you may have to remove the engine air filter. In order to find out how much fluid is needed in the VAZ 2181 gearbox:
- take the dipstick;
- wipe it with a rag and then insert it into the crankcase hole;
- Pull out the dipstick again and check the level.
It is imperative that the fluid level in the gearbox must be between o and “MAX”.