Today on the menu is replacing brake pads on a VAZ 2112
Gentlemen, motorists, I have a question for you. Tell me, how much do you value life - yours and your loved ones? Well, certainly not 300-400 rubles! So, in order not to say goodbye to life, you need to change the front brake pads on your VAZ 2112 on time! This article will help you do this job yourself! There are instructions for choosing high-quality pads, visual photos, as well as many useful tips to simplify this important process.
- Signs of Brake Pad Wear
- Choosing new pads for VAZ 2112
- What types of pads are there?
- Manufacturer's choice
- Tools for work
- Replacing pads for VAZ 2112
- Removing old brake pads
- Brief diagnostics of the brake system
- Installing new pads
When it is necessary?
As a rule, if all brake components are in good working order and the brake fluid paths are sealed, then they do not require any bleeding. But if a fuel fluid leak occurs due to damage to the “overpasses” and a drop in its level, both brake repair and mandatory bleeding will be required.
This is a vitally necessary procedure, because airiness in the system can lead to the fact that at the very moment when everything is decided by seconds, the brakes will not work. And there will be nothing left to pump, and no one...
Therefore, let’s take care of this right away, if we find that the brake pedal has increased travel, it has begun to “go limp,” as car enthusiasts say—the brakes are “wobbly.”
In addition, there are other reasons why pumping is necessary:
- You had to interfere with the operation of the system;
- There were cracks in the hoses, leaks of fuel fluid;
- The brake fluid turned out to be of poor quality and needs to be completely changed;
- Have you changed the brake discs (sooner or later this needs to be done);
- The water content in the fuel fluid has increased (it is hygroscopic, i.e. it absorbs and accumulates water), so it sometimes has to be changed.
Dismantling
Before installing disc brakes, you need to dismantle the old rear brake mechanisms of the VAZ 2110.
This is done like this:
- Remove the wheel;
- Remove the brake drum;
- Remove the pads;
- Remove the hub from the wheel, having first unscrewed the brake pipe.
You should prepare for the fact that dismantling will not be easy. Not only do the brakes have the unpleasant tendency to stick during operation, but the bolts are also “welded” by corrosion. Therefore, it is advisable to treat the nuts and bolts themselves with a special agent (for example WD 40) so as not to tear off their edges.
It is important to plug the removed pipe with something so that brake fluid does not leak out and air is not sucked into the system. After that - knock down the hub
This works best if you attach a board or lath to the back of the support disk and hit it with a hammer, moving the blows: one from below, the other from above. This will prevent you from causing serious damage to the disk.
Replacing front brake pads on a VAZ-2112
Brake disc assembly with caliper
The replacement process itself can take about an hour for the first time, and then it’s like clockwork. First of all, it is worth taking safety measures - remove the negative terminal from the battery (if the car has a wear sensor), fix the car on a level area and place wheel chocks under the diagonally opposite rear wheel.
After this, you can tear off the fasteners, hang the body on a jack and remove the wheel. It’s better to play it safe and install a stand, it’s more reliable.
Go!
- The wheel has been removed and placed under the ball, now you can remove the brake hose from the bracket and disconnect the wear sensor terminal.
- You can release the pads, but before doing this it would be a good idea to look at the brake fluid reservoir. If it is full, then the liquid will spill out when the pads are unclenched, so it is better to pump out the liquid so that the level is 10-15 mm below the maximum.
- Use a powerful screwdriver to open the pads, carefully resting on the brake disc.
- The block is fixed with a screw with a stopper, which will need to be bent with a screwdriver. And if you want to wash the caliper, then you don’t need to do this with gasoline, diesel fuel, or any solvents. There is a danger that all rubber products (boots, hoses, plugs) can be corroded by chemicals.
- Unscrew the lower caliper mounting bolt. This can be difficult to do, so it is better to pre-wet the threaded connections with brake fluid.
- We fold back the caliper and remove the old pads. We remember on which side the block with the sensor was located, if one is provided.
- We assess the condition of the caliper, clean it from dust and dirt, and make sure that nothing is leaking or dripping anywhere. And don’t even think about letting someone press the brake pedal at this moment.
Installation of brake pads
We press the brake piston using a lever
- You won’t be able to install new pads just like that, the piston of the working cylinder will not release. Therefore, it needs to be drowned, and for this you can use any lever (if you have experience), a clamp or a special puller, although almost everyone gets by with a simple clamp.
- When the new kit is installed and the bolts are tightened, you must remember to roll the stopper.
- After this, before installing the wheel, you need to depress the brake pedal several times and make sure that the system assembly is working.
We select brands and look at prices
The native tenth pads are not spoken of very flatteringly. They are only enough for a break-in, after which the braking efficiency drops noticeably and they begin to creak and vibrate. These are pads from the domestic TIIR plant with catalog number 2108 35010 80. Their only advantage is that they are available free of charge (along with the new car), so it’s not a shame to throw them away.
Budget brake pads FERODO TAR527B.
Lucas/TRW can hardly be called budget, they cost about 800 rubles. Catalog number GDB1446. They practically do not wear out the brake disc and last quite a long time. The best option for urban conditions. Good ATE pads and German Girling pads will cost about the same amount; they are supplied to Bavarian conveyors.
For 1,500 rubles you can buy Ferodo Premier series pads. Excellent quality, premium series of famous pads. In all indicators and characteristics they are ahead of the first two groups. Durable, low noise with a high coefficient of friction, which is not lost at temperatures of about 500 degrees.
Ferodo Premier premium pads.
There is a choice, the most important thing is to determine in what conditions and how intensively the car is used. Then the pads will not disappoint with their quality and will not upset you with the high price. Strong brakes and smooth roads to everyone!
Video review of brake pads in the mid-price segment
| The service life of the front brake pads of VAZ 2110, 2111 and 2112 is 30-50 thousand km, or when the thickness of the friction linings reaches 1.5 mm. Do you know how to replace brake pads yourself? |
Required
: remove the wheel, prepare pliers, a key “13”, “17” and a set of front brake pads VAZ 2110 (catalog number: 21100-3501080-00, approximate cost 350 rub.) To remove the brake pads you should:
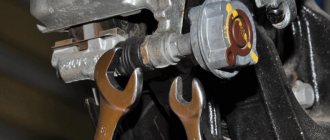
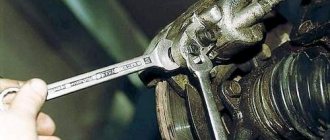
- Bend the edge of the locking plate of the lower wheel cylinder bolt using pliers.
- Unscrew the bottom bolt with a 13mm wrench, holding the guide pin with a 17mm open end wrench.
- Pull out the bolt along with the plate.
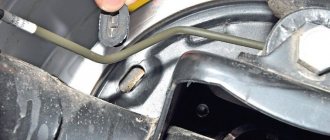
We lift the caliper with the cylinder up, prying it with a screwdriver, and then remove the brake pads from the guide.
Installation of brake pads
done in reverse order. Before installation, the seats should be cleaned of dirt. You can use pliers to press the piston inside the cylinder. Or install the inner pad and lower the bracket into the working position, and then move the bracket with a screwdriver, leaning on the brake disc, retracting the piston (insert the screwdriver through the caliper hole).
After replacing the brake pads, you need to press the brake pedal several times until the pistons are in the working position. We check the brake fluid level. It is worth noting that the brake pads can only be replaced as a set, otherwise the car may pull to the side when braking. You can also watch the replacement process in the video:
By the way, do you know which set of front brake pads is better to choose?
Replace the front brake pads on the VAZ. Keywords:
Close Window.
This may take a second or two.
This is interesting: How to replace the cabin filter of Skoda Octavia A7
Removing and replacing the front shock absorber strut VAZ 2110, 2111, 2112
Various problems with the suspension are the most common reason for calling the service for diagnostics and repairs. Alas, Russian roads in some places of our Motherland are more like a tank training ground, or something that remains of a road in the usual sense of the word. In any case, you have to drive on any roads, which results in a number of suspension problems that any car owner faces.
In this article we will analyze in detail the removal and replacement of the front shock absorber strut on a VAZ 2110, 2111, 2112 with our own hands. The instructions include a step-by-step guide for repairing this suspension unit.
Typically, struts are changed at a mileage of 50-60 thousand km. but from experience we can say that these figures may not correspond to the realities in which the car is used. It’s one thing if the owner constantly drives on high-quality asphalt to and from work. And it’s a completely different matter when the car is used on different roads, most of which cannot be called roads. In the latter case, the suspension elements, including the front shock absorber strut of the VAZ 2110, 2111, 2112, become unusable after 30 thousand kilometers or earlier. Therefore, everything is individual. Carry out diagnostics periodically if you notice a deterioration in handling and overall suspension performance.
Do-it-yourself removal and replacement of the Lada Priora alternator belt
In addition, you need to decide on the type of shock absorbers:
- Gas is an expensive option. The car becomes very rigid and, as a result, maneuverable, with sharp steering. They are usually used on sports, tuned cars.
- Oil ones are also not cheap. The opposite of the previous ones. Soft, the car even feels like it's too rough. The unevenness of the Russian road is almost completely hidden.
- Ordinary shock absorbers. We will talk about this unpretentious and most affordable type of shock absorber strut in the article.
You will need: keys for 13#8243;, 19#8243;, a key for holding the rod.
So, instructions for replacing the front shock absorber strut of VAZ 2110, 2111, 2112.
Using a wrench to hold the stem
Loosen the nut using wrenches.
Tighten these 3 nuts
Next, remove the hub, steering rod with ends, and finally the shock absorber strut.
Mark the position of the adjusting bolt
Next, unscrew the top and bottom nuts.
We release the shock absorber strut by moving the fist to the side.
Unscrew the remaining upper bolts and remove the rack completely
We begin to assemble the ties for the springs
Disassembled suspension strut for VAZ 2110, 2111, 2112. We replace the necessary components. We collect.
Required spare parts
Just 10 years ago, old pads were not replaced; they were glued on, linings were changed, or they were riveted. Today on the market you can easily purchase the entire mechanism. To replace, you need to prepare new pads. Experts believe that it is better to install replacement factory parts, article number 2110-3501080-60 (TIIR-260), 21100350180082 or 2110-3501080. There are other opinions. Some motorists believe that pads from well-known brands provide the best braking parameters on the VAZ 2110, 2111, 2112. These are parts from brands such as Brembo, ABS, Ferodo, TRW, Bosch, Optimal or Delphi.
Replacing the Brake Master Cylinder on a VAZ 2108
The brake master cylinder (MBC) is located under the hood of the car on the right side. The task of the GTZ is to evenly distribute the braking force by creating the same pressure of the brake fluid (BF) on all circuits.
Typically, the GTZ is removed to repair its mechanisms or completely replace it. Most often, pistons and cuffs fail, and to replace them it is necessary to remove and disassemble the master brake cylinder. As practice shows, usually the question of how to remove and disassemble the GTZ is a problem for most motorists.
In this article you will learn how to properly remove and disassemble the GTZ to save time, money and your own efforts. So, if you are ready, you can begin.
INSTRUCTIONS FOR REMOVAL OF VAZ 2108 GTZ WITH YOUR OWN HANDS
1. Unscrew the cap of the brake fluid reservoir together with the brake fluid reservoir, then remove the brake fluid reservoir, carefully pry it with something wooden and remove it from the seat.
2. Place a rag under the gas turbine engine to prevent the fuel fluid from getting on the electrical wiring and other components, then disconnect the pipes using a special key, which eliminates the possibility of “licking” the edges.
Attention! Be careful, the liquid is toxic and can stain clothing, plastic and rubber products. I recommend marking the tubes with paint or a marker so that nothing gets mixed up during assembly.. 3
The main brake cylinder of the VAZ 2108 is attached to the vacuum booster using two nuts.
3. The VAZ 2108 master brake cylinder is attached to the vacuum booster using two nuts.
4. Unscrew the fastening nuts and remove the cylinder from the studs.
We disassemble the Brake Master Cylinder with our own hands
Once the brake master cylinder is removed, disassembly can begin. Provided that you are not going to completely change the GTZ, but only want to change worn out elements (rubber seals, cuffs and brake pistons). Check the condition of the parts and, if necessary, replace faulty parts. The pistons are removed simply by hand or by supplying compressed air to the nozzle of the second chamber; the openings of the tank must be closed. Before assembly, make sure there are no burrs or scratches on the surfaces of the cylinders; if there are any, you will have to completely replace the VAZ 2108 GTZ.
If repairing the VAZ 2108 GTZ is impractical and you are going to completely change the master brake cylinder, then put the brake reservoir on it and put everything in place. Further details on how to install a new GTZ on a VAZ 2108.
Do we install the MAIN BRAKE CYLINDER ON A VAZ 2108 with our own hands?
1. Place the GTZ in place, then pour TJ into the tank.
2. Take the tubes and place them in such a way that they correspond to their place according to the markings you made during disassembly.
3. Use your fingers to close the holes for the pipes on the GTZ and ask someone to slowly press the brake pedal.
4. When you press the pedal, brake fluid will flow out of the first injectors of the master cylinder; it is at this moment that you need to tighten the brake pipes. The assistant does not release the brake pedal.
Now we can say that everything is ready. All that remains is to assemble everything and check the performance of the brakes.
The principle of operation of the braking system
We consider the operating principle using the example of our hydraulic system with drum brakes:
- By pressing the brake pedal, we transfer the load to the booster, this booster creates additional force through the master cylinder
- In this case, the piston of the master cylinder forces (pumps) fluid through pipelines (pipes and brake hoses) to the wheel cylinders
- This increases the brake fluid pressure in the brake drive.
- From this, the pistons of the wheel cylinders move (press) the brake pads to the drums (or discs, if the brakes are disc)
- Further pressing of the pedal increases fluid pressure and triggers the brakes.
- The mechanisms lead to a slowdown in wheel rotation and the formation of braking forces when the tires come into contact with the road
- The more force we apply to the brake pedal, the more effective the braking is.
- When braking, the brake fluid pressure reaches 10-15 Megapascals
- When braking is completed (and the brake pedal is released), it is moved by the return spring to its initial position
- The piston of the brake master cylinder also returns to its initial position.
- Spring mechanisms (elements) pull back the drum (disc) pads
- In this case, the brake fluid from the wheel cylinders through hoses and pipelines is forced into the reservoir of the master brake cylinder
- Pressure drops in the brake system
Tools
Replacing the rear pads of a VAZ 2112 cannot be done without the necessary tools:
- Two screwdrivers, flat (slotted) and Phillips
- Jack
- Balloon wrench
- Pliers and needle nose pliers (pliers with thin and long jaws)
- Deep head 7 with extension and wrench or ratchet
- A 30 head with a strong wrench may come in handy (if you suddenly fail to remove the brake drum)
- Wire brush
Varieties of SS20
SS20 support diagram
Usually cars are equipped with standard medium hardness, but some people want more comfortable ones or, on the contrary, harder ones.
The SS20 offers three options.
- Racing. A sports modification of racks that have a shortened stem and body. The car is slightly lowered, rolls become softer, and stability is higher. The car feels better in turns, maneuvers well at high speeds, and improves handling quality.
- Master. This series of racks is suitable for those who want to reduce noise while increasing flexibility. It is much easier to operate a car with them.
- Queen. The load is distributed evenly due to the design of the products. The racks dampen noise and demonstrate high reliability. The warranty period for these racks is 3 years.
Choosing the best pads
After all, brakes are about safety. The market offers about two dozen different pads, differing in price, country of production and brand status. True, the difference in prices is not so great, as can be judged from the list of the most popular kits:
- The most inexpensive pads can be bought for 480–500 rubles a set. They are produced by the domestic company ARTEX. The catalog number of all ten rear pads is 2108–3502090. The pads are not remarkable for anything except that they are afraid of overheating - they lose about 40% of their friction properties at 150 degrees.
- The VAZINTERSERVICE kit, at a price of about 580–600 rubles, showed itself to be worthy. The only negative is their low resource and they also don’t like high temperatures.
- Some of the most expensive are FERODO kits. They ask for at least 1,200 rubles, but the quality is always stable, they are not afraid of cold or overheating, they are wear-resistant and practically do not make noise.
- Slightly cheaper, but not much worse than ALLIED NIPPON pads marked ABS 1701. They will cost 800 rubles, but at the same time they have stable characteristics, good frictional qualities, and minimal pressure in the brake circuit to create optimal braking force.
- The most expensive pads are LUCAS from the manufacturer TRW Automotive. Catalog number: GS8210. The price is about 1600 rubles. Despite impeccable compliance with all parameters, their only drawback is the high price.
Good luck to everyone, stable brakes and sunny roads!
How to replace the rear struts of a VAZ-2112 with your own hands
If a VAZ-2112 car needs to replace the rear struts, then this process can be carried out independently, if, of course, the owner of the car has a little knowledge of car repairs.
What tool do you need to prepare?
In order to replace the rear struts for a VAZ-2112 car correctly, and to simplify the work process, you should prepare the following tools:
- spatula for installation work;
- special tools called ratchet and wrench;
- keys for 19, 17, as well as open-end and ring types of keys;
- machine lubricant;
- key for fixing the rack rod.
What reasons will indicate that the rear struts need to be replaced?
Replacement of rear shock absorbers should be carried out in the following cases:
- If traces of oil are visible in the area of the racks.
- If damage is visible on the outside of the shock absorbers.
- Corrosion begins on the piston rod.
If the car struts are faulty, the brake system and chassis of the car may soon fail. The wheels of the car will begin to wear out very quickly, and driving a vehicle will become quite difficult, since the coordination of the car’s movement will be completely disrupted.
How to replace rear struts step by step
As mentioned earlier, replacing rear struts is not a very complicated process when it comes to repairing a VAZ-2112; the main thing is to carry out all operations step by step, taking into account the recommendations of professionals:
Before installing the machine on an overpass or pit for repair and inspection, you should slightly unscrew the locking element that secures the rear rack. To remove it, you can be inside the car or reach the mount from the trunk. When unscrewing is carried out, the rod related to the stand must be stationary. You can fix it in this state using a 6 key or a special installation device.
Using a special mechanism (jack), the car is raised to the desired level and the wheel is removed.
Using a 19mm wrench, unscrew the fasteners securing the rear shock absorbers. In this case, you should unscrew the nut and hold the bolt firmly so that it cannot turn. The unscrewed fasteners are removed from the inside. To easily remove fasteners, it is advisable to use a hammer or punch
The bolt must be removed very carefully, as the threads can easily be damaged.
Once the fasteners are removed, it is necessary to pry off the lower part of the rear pillars to eliminate the snagging of the parts.
Next, unscrew the upper fasteners of the rear pillars using a special tool or two keys (open-end and 6).
After this, you can easily get the completely assembled rear suspension of the VAZ-2112, replacing all elements will be quick and easy.
Since the rear suspension module no longer fixes anything, the spring can be removed quite easily. To remove the rear strut boot, you just need to pull this element up, and remove the special bumper or buffer from the rod with one movement of your hand. All removable parts of the VAZ-2112 are carefully checked; if damage is found, they are replaced with a new element.
Additional recommendations
Before you begin assembling all the components of the VAZ-2112, you should perform several additional manipulations:
- treat all insert elements with kerosene;
- Before direct installation, carefully inspect each element, even a new one, to ensure its integrity and quality;
- The final fixation of the mounting bolts should be carried out after the jack has been removed;
- After assembling all components, it is recommended to carry out a special wheel alignment check.
If for some reason a car enthusiast has difficulty replacing the rear struts in a VAZ-2112, then you can get additional information from the video tutorial at any time. On the site, recommendations are given by professionals in their field; all work is presented step by step with photos.
Source
https://remontysvoimirukami.ru/remont-podveski-svoimi-rukami/remont-podveski-vaz-2112-svoimi-rukami.html
Let's start replacing
To replace the rear pads on a VAZ 2112, you need to place your car on a level surface, place “shoes” or other supports under the front wheels, and engage first gear. Then:
- Loosen the rear wheel bolts
- Using a jack, we hang up the rear part of the car body, and instead of a jack we use special supports (chocks or sawhorses, if available)
- Then we finally unscrew the bolts securing the rear wheels and remove the wheels
- Before disassembling the rear brake mechanism, it is necessary to wash it with water and a special detergent, then dry the mechanism thoroughly
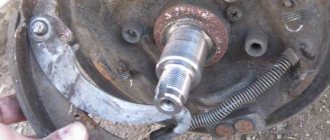
Unscrew the pins from the brake drum
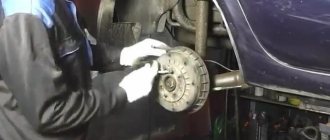
- Using a brush, clean the seating surface of the drum, then screw special bolts into the service holes of the drum.
- Screw in the bolts one turn at a time to remove the drum.
- From many years of practice, we know that the drum often sticks tightly to the hub due to the peculiarities of the operating mode
- In this case, it can be removed by tapping it through a wooden block with a hammer (in this case, the blows should be applied alternately and preferably from opposite sides)
- You can try to remove the drum using a flat screwdriver (insert the screwdriver between the edge of the drum and the casing and squeeze it out)
- At the same time, do not forget that the drum is made of aluminum alloy; if handled roughly, it can simply burst; the cost of careless and rough handling will be unexpected
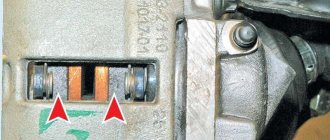
- Having removed the drum, take a ruler or a caliper and measure the thickness of the linings on the brake pads
- The permissible thickness of the overlays is 1.5 millimeters
- When the thickness is slightly more than the maximum permissible thickness, operation of the machine is allowed, but you should not be deluded by this fact
- Just a couple of hundred kilometers of driving on our Russian roads and then the prospect of dismantling the rear brake mechanisms is again on the horizon
- Therefore, if the thickness of the linings approaches the maximum permissible value, it is better to replace them immediately and forget about problems with them for a long time
Use a screwdriver to remove the pressure spring
Then, use pliers (nose-nose pliers) to disconnect the lower return spring
Disconnect the lower brake spring using needle nose pliers
- Now, using a screwdriver, remove the pressure spring from the rear brake pad
- Unscrew the lower part of the brake pad upwards, move it up and disconnect the upper return spring
Disconnect the upper return spring
- Using needle-nose pliers, disconnect the parking (hand) brake cable from the operating lever
- Then remove both pad assemblies from the brake shield
- We disconnect the spacer bar from the pads, then remove the cotter pin and take out the axial pin and washer together
- Remove the parking (hand) brake lever from the brake pad
We take out the cotter pin, shown in the figure with a red arrow, take out the pin and remove the hand brake lever
- When installing new brake pads, it is necessary to recess the pistons of the working brake cylinders
- Now is the time to remember the warnings at the beginning of the article that the liquid may overflow. Check the level, pump out if necessary
- Don't forget to hook the end of the handbrake cable to the lever attached to the block!
- We install the rear pads on a VAZ 2112 in strictly reverse order.
- Considering the fact that after assembling and placing the car on wheels, you should press the brake pedal all the way down several times to return the pads to their working position
- Put on the brake drum, then install the wheel
- Carry out the same actions on the other side, do not lower the wheels to the ground
- Then press the brake pedal several times
- We go down under the car and adjust (pull) the handbrake cable
- By tightening the nut on the cable equalizer, check the tension
- Inside, we lift the handle of our parking brake, count the clicks, if there are more than eight clicks, then tighten the nut a little and check again
- The optimal number of clicks is considered to be from two to seven
- The main thing is to check that when the parking brake lever is raised, the wheels are locked (our wheels are not lowered, so we try to turn them by hand)
- When the handbrake is removed, the wheels should rotate freely, without jamming or friction of the pads. Otherwise, when the car is moving, the drum may jam when heated
That's it, the process is completed, everything seems to have been taken into account, all that remains is to watch the video if something is still not clear.
Replacing the front brake pads of a VAZ-2110
To replace the brake pads, we need to remove the bracket covering the pads. To do this, we completely unscrew the upper bolt and loosen the lower bolt; we do not need to completely unscrew the lower one, since we just need to fold back the bracket and not remove it. The bolts are secured with metal plates, which must be pressed out with a flat-head screwdriver.
Do not use open-end wrenches; they can only lick off the edges, which will then make it difficult to unscrew the bolt. Use only spanners or hex sockets.
When everything is already unscrewed, remove the brake hose from its seat by pulling it. This will allow the bracket to move normally.
When we move the caliper away, we will see two pads. In this photo, the pads are quite a decent size, with almost no wear. The reason for the replacement was that the pads squeaked terribly.
Now we take out the pads one at a time, simply pulling them up, the caliper will not interfere.
Before installing new pads on a VAZ 2110, you need to clean the guides into which the new pads will be installed. This can be done with a simple screwdriver, metal brush, sandpaper or other convenient method that will remove all dirt and rust. After this, lubricate the guides with some grease so that the pads move normally and do not sour.
Now we install new front pads; in this case, Ferodo pads were chosen. Take products from leading manufacturers so you don’t have to change them later. Before this, there were pads from an unknown manufacturer, which immediately began to creak unpleasantly when braking, so I had to throw them away and still buy brake pads from a normal manufacturer.
Now you need to press in the caliper, since the thickness of the new pads is slightly greater than the old ones. You can use a clamp or a special caliper presser.
Then we screw the caliper back and fix the bolts with lock washers, fix the brake hose.
Replacing brake pads VAZ-2110 video instructions
Tool needed for work
Before you repair your car, you need to prepare the following tools:
- jack;
- pliers;
- hammer;
- long screwdriver or awl;
- a set of keys;
- wire cutters;
- heads for 7 and 30.
The work is also accessible to a beginner if he knows how to handle the tool. This way you can save time on a trip to a car service, and money. The average price for this type of work as of January 19, 2019 is 600 rubles. How to replace the rear brake pads of a VAZ 2110, 2111 or 2112 yourself will be discussed below.
Article number and approximate cost for original rear pads of VAZ 2110
The original rear drum pads have article number 21083502090. Their cost is higher than that of the front ones and amounts to 400-770 rubles. During braking, they perform only an auxiliary role, since most of the force falls on the front axle. This has a good effect on the resource. Also, there is less wear on the rear consumables due to the design of the drum. Debris and abrasive particles do not reach the friction surface of the pads.
Checking the remaining life of drum pads
The service life of rear axle consumables is also not standardized by the automaker. The average value for maintaining the performance of the pads is a mileage of 60 to 120 thousand km. In this case, the manual recommends monitoring the remainder of the friction linings, which should not be less than 1.5 mm.
When do you need to replace the pads and how to determine the degree of their wear?
The service life of the pads on VAZ-2110 cars and its derivative modifications is, on average, 15–20 thousand kilometers for the front ones, and 40–50 thousand for the rear ones. However, their wear directly depends on a number of factors. Thus, during city driving, the degree of wear is higher, as well as when operating on dusty roads, when there is a high risk of mechanical particles getting on the working surfaces.
The main sign of a malfunction is the appearance of a characteristic whistle during braking. This is due to the fact that the pad design contains signal indicator strips, and when the working surface of the pad wears down to a critical minimum, the strips are exposed and create this sound.
Along with this, problems can be expressed in the form of a metallic grinding sound in the event of destruction of the friction layer and exposure of the metal structure of the pad. In this case, during the braking stage, vibrations and knocks may appear, as well as a characteristic creaking sound in the area of the front wheel (or the rear wheel if the rear pads become unusable). In other words, the pads whistle, rattle or knock, indicating a malfunction.
Difference in thickness of old and new pads
Which ones to choose for replacement?
The quality of braking and comfort when slowing down the car (no whistling or grinding noise) also depend on the quality of the brake pads. It is also necessary to consider the following when choosing a consumable:
- Poor quality pad material can be the main cause of squeaking, as well as accelerated pad failure;
- When purchasing, choose front brake pads with manufacturer catalog number 21100-3501080-00;
- The same brake pads can behave differently with different brake discs, which significantly complicates the choice;
- To make the right choice when buying brake pads, you need to read reviews in magazines about cars, directly at points of sale, among friends.
Recently, Ferodo, ATE, Allied Nippon and Lucas brake discs have become very popular for the VAZ 2110.
Troubleshooting possible replacement problems
There are relatively few difficulties when replacing brake pads. As a rule, they are associated with souring of bolts due to rust. The drum elements most susceptible to corrosion are the mounting pins. In case of possible difficulties, the drum is removed along with the rear wheel hub, and when unscrewing the studs, it is allowed to use a penetrating lubricant such as WD-40. However, when working with brake mechanisms, lubricants should be used extremely carefully, avoiding their contact with the working surface of the pads or disc (in the case of the front wheels). Otherwise, the efficiency of the brakes can be significantly reduced, up to severe slipping between the working surfaces of the pad and the drum linings or the disc.
To summarize, we can note the ease of replacing brake pads on a VAZ-2110. The procedure does not require special skills or tools; it can be done in an ordinary garage without any particular difficulties. Knowing the order of operations when replacing allows you to complete this procedure quickly and efficiently.
Parsing order
It is better to carry out the repair operation on an overpass (you can use an inspection hole), or just a flat area with a hard surface, because you will have to remove the rear wheels, naturally, first jacking up the car.
So:
- Remove the wheel and disk;
- We unscrew the guide bolts, of which there are 2, and remove the drum;
- A common problem is the drum sticking, so sometimes it is not so easy to remove it. The problem has long been solved by tapping a drum with a hammer (through a board);
- Using pliers, remove the tension spring;
- After this, a fixing guide spring holding the block;
- We remove the block from the support bar that is not connected to the handbrake rod. To do this, pull its free edge to the side and along the shield;
- Loosen the upper spring. To do this, you need to turn the block to the side until you can disconnect the spring;
- We do the same with the spring of the second pad;
- Remove the spacer bar;
- Disconnect the handbrake rod from the cable;
- We note to ourselves or sketch how the connection to the rod is made;
- Unhook the spring, remove the cotter pin, and disconnect the brake pad.
Thus, the disassembly process is completed.
How to remove the pads
In order to remove defective rear pads from a VAZ-2110, you need to prepare the following arsenal of a car mechanic:
- a jack is needed to raise the rear of the car
- key 12, it will become the main tool in our business
- pliers are useful for removing parts
- hammer, yes, you will have to make physical efforts to knock out old parts
- a screwdriver, a good helper in removing old pads
- the block is an excellent stand.
Work begins
- The very first thing you need to do is put the car on a jack.
- Remove the rear wheel and disc. We can see the drum ( 6 ), which is attached to the entire structure with two bolts (cotter pins ( 7 )). These need to be removed. Here you will need a 12mm wrench (you can also use a 12mm wrench , it is just suitable for working with tens pads.
- Remove the brake drum ( 6 ). This is probably the most difficult thing in the process of replacing the rear pads, because over the years of the car’s service the drum “sticks” almost tightly, and in order to remove it without damaging it, you will have to work hard. A hammer will help here by tapping the drum, but before doing this, it is important to place a previously prepared block to prevent deformation of the drum, otherwise it won’t take long and break into pieces, which we, of course, don’t need.
- Carefully and slowly remove the spring securing the rear pads of the car. The spring is removed using pliers or a simple screwdriver( 9).
- Now you should disconnect the spring ( 8 ) fixing the block on the shield ( 1 ).
- Loosen the upper spring ( 3 ), which secures the unit. In order to weaken the spring, you need to turn the block a little to the side, about 50-60 degrees .
- To remove the unit, carefully remove the part from the support and brake cylinder ( 2 )). To do this, you need to grab the block ( 4 ), which is not connected to the handbrake (a sorcerer in common parlance). We pull the part as if we are trying to move the pads apart from each other. You will have to loosen the part several times until it is disconnected and pulled out.
- In order to remove the second block, we disconnect the handbrake rod (sorcerer) from the cable. Now the block is easy to pull out
The process of removing the units is completed, now you can begin replacing the old pads with new ones.
Select the part of the VAZ 2112 car you are interested in:
Materials for repairing the VAZ 2112 interior. Video of DIY repair manual. In this section you will find all the necessary information on repair and maintenance of the VAZ 2112 interior. Replacing the interior trim, repairing the glove compartment, adjusting the deflectors, replacing the car interior lighting. We will tell you how to remodel the interior of a VAZ 2112 with your own hands.
Brake system VAZ 2112
Materials for repairing VAZ 2112 brakes. Video of DIY repair manual. In this section you will find all the necessary information on the repair and maintenance of the brake system of the VAZ 2112. Replacing front and rear pads. Installing disc brakes on a VAZ 2112. We will show you how to properly bleed the brakes on a VAZ 2112.
Materials for repair and maintenance of VAZ 2112. Video of DIY repair manual. In this section you will find the necessary literature on repairing the VAZ 2112. Books on maintenance and repair of the VAZ 2112. You can download the books you need for free. Any necessary literature on repairing a VAZ Dvenashka car.
The VAZ-2112 is a wonderful five-door hatchback that has received good reviews and is considered a comfortable and easy car to drive. This car originates from the Volzhsky Auto Plant.
The release date of the first VAZ-2112 car is considered to be 1999. This car was almost similar to the VAZ-2110, but it was slightly modified. This car has become less long, thanks to which the handling of this car has improved (the car has become clearer when turning the steering wheel). This car is generally considered more sporty compared to its predecessors. He put all their advantages together. A little from the VAZ-2110, and the back seat was taken from the Lada-2111. But most of all, this car took its good qualities from the VAZ-2110. Despite the rather short length of the trunk, thanks to the folding of the rear seat, the body of the VAZ-2112 car becomes quite roomy. This car is perfect for both long trips with the family and for transporting small loads around the city.
VAZ-2112 has quite good modifications. VAZ-21120 (1.5 l; 16 cells), VAZ-21121 (1.6 l; 8 cells), VAZ-21122 (1.5 l; 8 cells), VAZ-21124 (1.6 l; 8 cells). 16 class), VAZ-21128 (1.8 l; 16 class). Each of them deserves respect and recognition. But the most popular and favorite car was the VAZ-21123 (or Lada 112 Couple). This car was modified quite often and for a long time. It was a three-door car with a hatchback body. The displacement of this car was 1.6 liters, as well as a 16-valve engine. This car was another luxury version of similar models.
This car was produced from 1999 to 2008, as this model was replaced by the next one - the more popular Lada Priora. For some reason, Auto did not undertake to continue the production of this car, since, for example, its predecessors - Lada-2110 and Lada-2111, which are still successfully produced from the plant's assembly lines.
VAZ-2112 is a good car both for daily trips around the city and for longer trips outside the city. And also, a wonderful machine for transporting small-sized cargo.
Installation
Installation is always carried out in the reverse order of dismantling. But in order not to get confused in this work, we will discuss this issue in more detail.
- To begin with, we need to push the piston of the brake system cylinder all the way inside.
- It is necessary to attach the handbrake rod to the new rear block. This must be done in exactly the same way as was the case with the old node, and in no other way.
- We put the cotter pin in place.
- How much we suffered before we pulled out the guide spring. Now it's time to bring her back. We attach it to the block.
- The cable is connected to the handbrake rod.
- The previously removed upper spring is now attached to the pads at one end and the other.
- Now get ready to perform the most important stage of the work: we place the block on the brake cylinder, in the place where it should be. We tighten it a little from below so that the spring stretches and makes it possible to place a spacer bar in the niche. We insert the bar. After this, we put the second block in place, but only so that it does not fit into the hole of the strip.
- Armed with pliers, we engage another spring with the assembly. But here, keep in mind one important nuance: in no case should the cable touch the parts of the drum that come into motion, otherwise it can lead to serious consequences.
- We are approaching the end of the work process. We install the drum in place, fasten it with bolts, and install the wheel.
The work is completed. For the first time, it is better to put detailed instructions in front of your eyes, so as not to get confused and make a mistake, it would be good to also watch video materials on installing brake pads.
The second time, this work will be performed automatically and will take no more than half an hour. The main thing is not to delay replacement: brake pads are a serious matter that cannot be tolerated, because they ensure the safety of the vehicle.
Causes of malfunction
There may be several reasons why the lighting does not work. Each malfunction requires an individual approach and implies its own troubleshooting methods. Causes of the malfunction and methods for eliminating them (if some lamps of flashlights and headlights do not work):
- burnt fuses - replace them (see VAZ 2110: how to replace fuses);
- lamp filaments are burnt out - change the lamps;
- contacts on relays or switches have oxidized - clean them;
- the wires are damaged, their tips are oxidized or the connections are loose - replace the faulty wires, clean the tips;
- The contact jumpers at the location of the lamp control relay have oxidized - clean them.
Sometimes the headlight lens fogs up a lot. What are the reasons and what to do in this case:
- leaky adhesion of the lens to the body - immerse the headlight unit in water, if liquid penetrates, replace the headlight;
- moisture enters in the direction from the engine compartment during the process of washing the car - eliminate the liquid from the headlight unit.
Front
Before starting work on replacing the front brake pads on a VAZ 2110, be sure to arm yourself with a set of tools, which includes:
- Hammer with short handle;
- A small sharp chisel;
- Two wrenches - socket and socket 13;
- Open-end wrench 17;
- Pliers;
- Small crowbar;
- Jack;
- Balloon wrench;
- New pads.
When everything is ready to go, you can begin the replacement process.
Park the car in such a way that it cannot roll away. It is best to put some kind of stoppers under the wheels. It is advisable to use special devices rather than simple bricks. Loosen the bolts on the front wheels and lift the car to one side using a jack. Completely remove the wheel mounting bolts, remove it and place it under a raised part of the machine. This is a simple safety measure in case the jack accidentally comes off. Now we determine the location of the front brake pads on the VAZ 2110. The calipers are located in front of the brake disc, so to easily replace the left pad, turn the steering wheel all the way to the left, and vice versa. To make it easier for you to access the part, arm yourself with a thin chisel and a hammer. These tools will unlock the top bolt. Unscrew it with a 13mm spanner, holding it on the other side of the caliper with a 17mm wrench. It is not worth removing the pad yet, since the caliper is now in its extreme position. That is, the new part will not fit into place. Do not completely unscrew the bolt; use a crowbar and insert it between the body and the pad, pressing the caliper all the way. Once this is done, unscrew the top bolt all the way. This will move part of the caliper to the side, thereby providing access to the pad itself. Remove the old pads and put new ones in their place. During assembly, simply follow the reverse order of dismantling.
Just remember the importance of bolt countering. The washer must be bent onto the edge of the fastener
At this point the replacement can be considered complete.
Rear elements
If disc brakes are installed on the rear wheels, then everything happens the same as replacing the front pads of a VAZ 2110. But you need to take into account small features: in some designs you will have to remove the disc and calipers completely. Everything else happens in the same way, even the brake pads are installed the same. But if you have drum mechanisms installed, you need to use the following tools.
- Jack and wheel wrench.
- Open-end, box and socket wrenches for 12, 13, 17.
- Pliers and screwdriver.
- Hammer and sharp chisel.
First, remove the wheel, first placing it under the front stops. After this, unscrew the guides with a 12mm wrench. The guide cones are necessary for attaching to the drum axle shaft. If the drum does not move well from its place, it will have to be helped: lightly tap on its inside. It is not advisable to use a metal hammer, as it can break the mechanism. It is better to place a wooden plank under it.
If the drum does not give in, then treat the place where it comes into contact with the hub with penetrating lubricant. After removal, take pliers and remove two springs - in the upper and lower parts of the VAZ 2110 brake pads. After this, you need to get rid of the pad guide spring located in front. Now you can remove the block itself. After removing the bar, remove the rear brake pad spring.
That's it, you can remove both halves. Just when removing the rear one, do not forget about the hook coming from the handbrake cable. When installing new brake pads, everything happens exactly the opposite. You just need to remove the bushing from the drive arm to make installation easier. The top of the brake pads must fit into the grooves on the cylinder rods. If the output on the old ones was significant, then it won’t be possible to simply install a drum.
It is necessary to use two pry bars to compress both pads so that they are as close as possible. This completes the replacement of VAZ pads. But if you need to bleed the system, remember that you must adhere to a certain pattern - from the far wheel to the near one (in relation to the master cylinder).
Other malfunctions affecting the illumination of the rear lights
The reversing lights may not light due to a faulty switch. To troubleshoot, you need to do the following:
- disconnect the connector;
- unscrew the switch with a 21 key;
- remove the switch and replace it with a new one.
Note. The operation should be carried out quickly so that there is no large leakage of engine oil from the gearbox.
A malfunction of the car's lights may be caused by problems with the hydraulic corrector. With its help, you can change the angle at which the headlights are tilted (this is due to the different load levels of the car). The hydraulic corrector consists of a master cylinder, which is mounted on the dashboard, actuator cylinders of the headlights and connection tubes. It cannot be disassembled and cannot be repaired. The assembly part should be replaced. Removal and installation of the main cylinder of the headlight hydraulic corrector occurs in stages:
- remove the handle and cylinder lining by prying it off with a screwdriver;
- unscrew the nut with a 22" head;
- remove the hydraulic corrector.
The trunk light may also need replacing. In this case you need:
- Disconnect the cable and terminal of the negative battery;
- disconnect the rear light from the block with wires by opening the trunk lid;
- press the fastener parts and remove the holder with lamps from the flashlight body;
- unfasten the lamp by unscrewing two nuts;
- loosen the three nuts that secure the decorative trim of the luggage lid and unscrew the nut closest to the lamp;
- lift the cover and remove the lamp;
- The new lamp is installed in the opposite order to that described above.
Note. When installing the flashlight, first place the flange of its body under the decorative trim, and then tighten the nuts securing the trim.
Many cars of the VAZ family, including the VAZ 2110, have a problem that affects safety and also causes a lot of trouble for drivers. The rear light board is a thin strip with conductive tracks. You have to change this tape quite often, and with it the burnt out light bulbs. You can use the option of inserting iron cartridges from the VAZ 2101. So, to do this, you need to:
- remove and disassemble the rear lights, removing the board and the tape from them;
- buy single cartridges for stops and dimensions;
- purchase copper wire with a cross-section of 2.5 mm, connectors, M3 bolts;
- mark the places for the cartridges and drill them, finishing the holes with a file;
- to modify the cartridges for clearance and brake lights, turn the tip terminals 180 degrees;
- completely cut out the cartridges from the turn signals;
- secure the cartridges to the plastic with bolts and nuts;
- connect all the cartridges, laying the pluses on the turn signal, stops and dimensions;
- extend the connector block and install everything on the car.
Note. Before installation, you should check everything to ensure there is no short circuit.
Installation
Now we take a set of new friction linings out of the box and put them in place. We will need to install the cotter pin and drive arm pin support washer. The upper ends of the pads must fit exactly into the grooves of the piston. The slightest distortions are excluded. To bring the pads together, you need to move the piston to the center of the cylinder. To do this, you can use a mount. To finally bring the pads to the drum, press the brake pedal two or three times. Further assembly is carried out in reverse order. If the pads are difficult to get in, your handbrake cable may be too tight. It needs to be loosened and then adjusted. How to do it? We will talk about this below.
Working with the puller
If you still don’t want to damage the bearing, then you can replace it without knocking it out of the hub. In order to remove it from there, you can use a special puller. Removal is much easier with this device.
To do this, you need to carefully insert the puller's paws into the grooves on the hub and remove the ring. Sometimes this requires some effort; the ring must be pryed with a screwdriver and removed. Using the device, the part is removed and the nicks on the component are smoothed out.
Then, using a puller, you can also press the new part into the steering knuckle. This tool allows you to press the hub with high quality. Working with a tool of this type greatly simplifies the entire process, and the technician will need less time for all removal and installation. But operating the unit requires some skill and great care.
As you can see from this article, even such a simple repair job as replacing a wheel bearing can have many nuances.
Sources
- https://mylada.net/remont/zamena-podshipnika-generatora-na-vaz-2110-2112.html
- https://remont2110.ru/kak-zamenit-podshipniki-vala-rulevogo-upravleniya-na-vaz-2110.html
- https://vazweb.ru/desyatka/hodovaya/zamena-stupichnogo-podshipnika.html
Repair of a manual transmission on a VAZ 21101 in Moscow was completed in a short time and at a high quality level
Manual transmissions are installed on many car models of all brands. Prompt repair of a manual transmission on a VAZ 21101 in Moscow makes it possible to eliminate damage in a minimum period of time and prevent failure of all components of the transmission. To repair manual transmissions. It may be necessary to dismantle such products, however, some types of faults can be repaired without removing the manual transmission. The performance of the entire transmission system will also depend on whether the clutch has been replaced. crankshaft oil seal and so on. The time frame for repairing the breakdown, as well as the price for repairing the VAZ 21101 gearbox in Moscow. primarily due to the complexity of the malfunction itself, however, the time it takes to complete the work will also depend on the qualifications of the car mechanics.
Article number and cost of good front brake pads for VAZ 2110 from third-party manufacturers
The front axle of the car experiences the greatest load on the pads when braking. Therefore, the efficiency of stopping the car and the safety of the driver directly depend on them.
Original consumables have mediocre characteristics. They are enough for moderate driving without intensive stops and prolonged braking on descents. There are many third party products that are better than the originals. Experienced car owners recommend installing analogues of the original pads shown in the table below.
Table - Good analogues of the original front pads
| Manufacturer | vendor code | Approximate cost, ruble |
| Ferodo | TAR527B | 550-700 |
| Road House | 222102 | 820-970 |
| TRW | GDB1446 | 1000-1200 |
| ATE | 13046029652 | 930-1100 |
| Profit | 50001325 | 480-600 |