Repair / From Vladimir
- Signs that replacement is needed
- Required Tools
- Replacing the rear brake pads of a VAZ 2109
Tips for working on video
- How experienced car owners do it (video)
The braking system is your safety on the road. If the engine breaks down, then you simply won’t go any further, but if the brakes break down, on the contrary, you won’t be able to stop and the consequences can be different (hardly good). The cost of the pads is low and anyone can replace them, so you should not save on the vital “organs” of the car when replacing pads on a VAZ 2109 and other similar car models.
How to change the rear pads on a Kalina
The brake systems of different variations of the LADA Kalina are distinguished by the absence or presence of an anti-lock braking system. Changing the rear brake pads of a Kalina with or without ABS is equally simple. The only difference is that in the first case, before dismantling the pads, you must disconnect the wires from the sensors so as not to damage them. To prevent brake fluid from spilling out of the reservoir and getting on the paintwork or rubber parts of the Kalina when replacing the pads, it is necessary to take some of the fluid from the reservoir into a prepared container. This operation should be carried out only when the brake fluid level in the reservoir is close to the maximum level. Replacement of the rear pads is carried out one by one: first from the left, then from the right side (or vice versa, the order is not important here). Some operations, for example, loosening the tension of the handbrake cable or adjusting it, are more convenient to carry out from the inspection pit or using a lift. Therefore, the work must be performed in an equipped garage.
Replacement of rear brake pads of LADA “Kalina” is carried out as follows:
- install wheel chocks under the front wheels;
- lower the handbrake lever all the way down to reduce the tension on the Kalina handbrake cable as much as possible;
- by rotating the adjusting bolt under the bottom of the car, loosen the handbrake cable;
- use a wheel wrench to loosen the wheel bolts;
- jack up the wheel;
- Unscrew the wheel bolts with a wheel wrench;
- remove the rear wheel;
- unscrew the pins that simultaneously serve as fastening of the brake drum and guides for installing the wheel;
- Use a wire brush to clean the rear wheel hub where the drum fits;
- treat the place where the drum fits on the hub with WD-40, wait according to the instructions; tap the drum with a rubber hammer to “break” it out of place;
- evenly screw the M8 bolts into the mounting holes of the drum, pulling the latter off the hub;
Attention: if you press the brake pedal with the drum removed, the piston of the brake cylinder may fall out, which will lead to depressurization of the circuit, the need to bleed the brakes or even replace the brake cylinder
- check the condition of the brake drum: it should not have chips, uneven wear, cracks or marks;
- if necessary, replace the brake drum with a new one;
- bring together the rear Kalina pads using pry bars (mounting blades);
- pry the end of the upper spring, which tightens the pads, with a slotted screwdriver and remove it from engagement with the pad;
- remove the upper spring from the second block, put it aside;
- remove the lower tension spring using a screwdriver or pliers;
- remove the “front” block located closer to the front of the car;
- remove the spacer bar installed between the pads;
- remove the end of the parking brake cable from the hook of the rear shoe spacer lever;
- using pliers, disengage the spring holding the second block;;
- remove the block located closer to the rear of the car;
- undo the pin securing the spacer lever;
- remove the spacer lever;
- clean the brake mechanism parts from dirt;
- secure the spacer lever to the new block;
- pin the finger;
- install the “front” brake pad;
- put the spacer bar in place;
- install the “rear” block by putting the lower tension spring on it;
- put the end of the handbrake cable on the spacer lever of the block;
- Using a screwdriver or pliers, hook the lower and upper tension spring onto the pads;
- reinstall the brake drum;
- tighten the guide pins holding the drum;
- secure the wheel with wheel bolts;
- lower the jack so that the wheel is on the ground;
- Use a wheel wrench to tighten the wheel bolts.
Then the same operations must be done on the second wheel. Now you know how to change the rear pads on a Kalina.
Remember: after replacing the rear pads, you need to adjust the handbrake of the LADA Kalina.
Rear TC
The algorithm for replacing rear TCs on a VAZ 2109 is as follows.
- Place the car on a flat surface and loosen the tension on the wheel bolts.
- Unlock the pads by fully lowering the parking brake handle.
- Raise the rear of the car with a jack and remove the wheels.
- Place wheel chocks under the front wheels to prevent the vehicle from moving.
- Unscrew the brake drum studs from the rear wheel.
- Using a wooden block and a hammer, knock the drum off the TK.
- Clean the surfaces using the dry method and compressed air.
- We begin full dismantling work.
- Remove the upper garter spring. For this you will need pliers.
- The lower spring is removed in the same way.
- Remove the front TC guide spring.
- Remove the expansion bar.
- Next, the guide spring of the rear TC is dismantled and moved to the side.
- Remove the end of the parking brake cable from the lever.
- Remove the hand brake drive. To do this, you will need to remove the cotter pin from the finger, and then remove the finger itself.
- The dismantling work has been completed, so now everything should be reassembled in the reverse order, only with a new rear TC.
- Before installing the drum, be sure to compress the cylinder pistons so that the outer diameter of the shoes is smaller than the inner diameter of the drum.
- Assemble the unit, steps in reverse order.
- Lower the car to the ground, press the brake pedal several times, which will allow the pads to fully take their place.
Perform the procedure on both wheels. The principle of replacing rear TCs is the same. Just don’t forget to bleed the brake system after completing the work.
Replacing the rear brake pads of a VAZ 2109
This article will discuss step-by-step instructions for replacing brake pads on a VAZ 2109 car.
- To replace the pads on the rear wheel, you must first loosen the bolts on the wheel in question. It will be enough to simply move them and make one revolution.
- The car must be placed on a jack, raised so that the wheel comes off the ground, and supports must be placed, since the jack itself does not provide stability for the car hanging on it.
- Completely unscrew the bolts and remove the wheel.
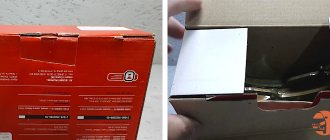
- Using a metal brush, clean the area shown in the screenshot. This is done so that it does not “stick” to the hub and can be removed without problems. After cleaning, this place should be sprayed with any available oil, trying to get into the gap between the hub and the drum. All you have to do is wait a little while for the oil to take effect.
- Now you need to release the handbrake cable. This can be done by climbing under the car. The handbrake adjustment is located behind the resonator. There you will find a bolt that needs to be cleaned with a brush and lubricated with oil, just like the drum.
- Now directly loosen the cable. First you need to loosen the outermost – “locking” – nut, and after that, slightly unscrew the next one. After this, the outer nut is screwed to the level of the next one.
- It's time to remove the wheel drum bolts. To do this, you need to tear them off the bolts from the threads, try to unscrew them, and then lubricate them with oil and screw them back evenly, but not completely.
- Now remove the drum itself. To do this, you need to take a wooden block and, placing it on different parts of the inside of the drum, hit it with a hammer, gradually removing the part.
- After this, you can begin to directly remove the pads. Using any thin object with a hook at the end (a piece of wire or a knitting needle), you need to tighten the springs on both sides inside the drum, and then remove the pads themselves.
- You need to put the handbrake cable back in place by tightening the inner and outer nuts until they stop.
- Now one new block is taken, a cotter pin is pulled out of it and clings to the end of the handbrake cable, which is located inside the wheel. Then the fixing bar is attached to the top of the block and together with it one block is pressed against the inside of the wheel. A pressing spring is attached, after which a second block is placed on the whole thing from the opposite edge. After this, the side springs are attached using a knitting needle or wire, and at the end - the lower spring.
- After this, you need to install a new drum (or an old one, if it is still usable) and fasten it with bolts lubricated with protective lubricant. If it does not fit on the wheel, then use two pry bars to press the edges of the pads to the center. Screw the bolts evenly to avoid distortion.
Design and features of the pads
On VAZ-2109 cars, as on most budget models, drum brakes are installed at the rear.
Their design is not very complicated; in total, several components can be distinguished:
- Metal base.
- Friction lining. It is connected to the base using an adhesive composition. Sometimes rivets are used.
Rear pad features:
- In total, two pairs of pads are installed on the rear axle.
- Metal elements are coated with an anti-corrosion layer.
- The friction lining is fixed to the base with glue. This is done at a temperature of 100 degrees.
- Due to additional processing, the surface is given the necessary roughness. Thanks to this, the grinding in of elements is accelerated.
- Please note that the force acting in the system is very large. So, when braking from a speed of 80 km/h, the following indicators are relevant: force on the pads - 320 N*m; pressure in the brake system is 40 bar. The pads may move from the base surface. To do this, they need to be exposed to a force of 210 N/cm 2 .
It is imperative to promptly replace the rear brake pads on the VAZ-2109. You can do all the work quite quickly with your own hands, but you will have to take some points into account. The main thing is to be consistent.
How to change the front brake pads of a VAZ 2108-09, etc.
I’ll explain how to change the front brake pads on a VAZ 2109 yourself, but since the brake system design in front-wheel drive VAZs is the same, this option is suitable for other VAZs, but on the classic VAZ 2101-07, the system for replacing pads is slightly different. Replacing the front brake pads does not require special tools, so anyone can easily do this operation at home.
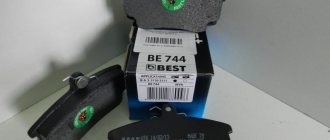
Photo. VAZ front brake pads.
How to determine brake pad wear
The question always arises of when to change the front brake pads; careless drivers begin to change them when they have worn down to metal, thereby creating a metallic squeak when braking.
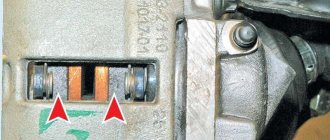
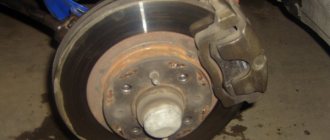
And a good driver can easily determine the wear of the front brake pads by looking into the hole in the wheel disc, as shown in the photo below; if the pads are very worn, then the metal part of the brake pad will be very close to the brake disc, this is a sign that the brake pads need to be changed.
Photo. Visual inspection of the brake pads without removing the wheel.
Replacing front brake pads
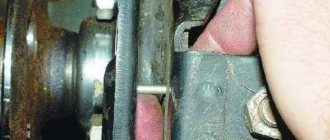
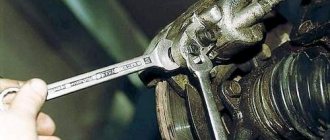
To replace the front pads, you need to jack up the wheel and remove it. But inexperienced drivers often face the problem of unscrewing the wheel bolts after lifting the wheel on a jack. Therefore, first remove the bolts from their place without lifting the wheel as shown in the photo below.
Photo. Loosening wheel bolts.
After you remove the wheel, you will see the brake caliper; the photo below shows with arrows which bolts need to be tightened to remove the brake pads.
Photo. The arrows indicate the bolts holding the brake caliper.
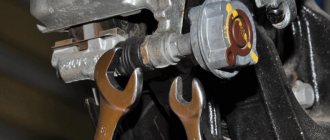
To unscrew the caliper bolts, you will need a 13mm and 17mm wrench, the photo below shows how to insert the keys, hold the 17mm wrench, and unscrew the bolt with the 13mm wrench.
Photo. Shows how to unscrew the brake caliper.
The bolts have been unscrewed, now you need to press the brake cylinder into the caliper; if this is not done, it will not fit on the new brake pads. You can press it in like this: remove one old pad, put on the caliper, insert a thick screwdriver as shown in the photo below, press the caliper away from the brake disc with a screwdriver, press the cylinder. But don’t try to press the cylinder in with blows, you’ll ruin everything.
Photo. Pressing the brake cylinder into the caliper.
Now you can install new brake pads, as shown in the photo below. The photo also shows the pressed-in brake cylinder with an arrow. All that remains is to put the caliper in place and tighten the bolts and wheel. The brake pads have been changed.
Photo. Installed brake pads.
Warning
After replacing the brake pads, be sure to press the brake pedal several times until you feel the brakes appear, since the pressed brake cylinder in the caliper should come out and rest against the pads.
I saw a case, a guy changed the pads, but did not bleed the brake pedal, accelerated the car to check the brakes, crashed into a tree, breaking the front of the car.
How to bleed the front brakes if the fitting does not turn on a VAZ?
Of course, this is not very good, but it is possible, remove the brake pads, press the brake pedal several times so that the brake cylinder comes out a little (but be careful, you can push it out completely), then press the brake cylinder back into the caliper. This will remove air from the brake system. That's it, we bled the brakes in the caliper where the fitting does not spin.
Replacement of VAZ front brake pads. Video.
Signs of wear
There are several main signs that indicate the need to replace the pads at the front and rear in the very near future.
| Sign | Peculiarities |
| Long service life | With a significant mileage, the probability of brake pad wear gradually reaches 100%. Therefore, it is purely a matter of time. But there’s no need to delay |
| Doesn't hold the handbrake | If the handbrake does not work properly, although everything is in order with the manual braking mechanism itself, the pads are simply worn out |
| Extraneous sounds from brakes | If the discs or drums begin to knock, squeak, or grind, this means there is a problem in the braking system. One of the most likely options is pad wear. |
| Low brake fluid level | When the pads wear out, the brake fluid in the reservoir is used up faster because consumption increases due to ineffective operation of the brake system |
| Small thickness of the friction layer | If the thickness of the friction layer on the pads has reached less than 1.5 millimeters, this indicates serious wear of the elements and the need to replace them |
These are the main signs of pad wear that any car owner can detect without disassembling the structure.
Additional recommendations
If you cannot depress the brake cylinders, open the cap of the brake fluid reservoir to reduce the pressure. If the pads wear unevenly, pay attention to the caliper. Most likely it will need repairs. When replacing rear pads, replace all springs as well.
They are inexpensive, but they will protect you from possible failures until the next replacement. The front caliper guides can be lubricated with graphite grease for smoother operation.
Replacing the pads on the front axle will not cause problems even for “dummies” of automotive repair. But from the back it’s not so simple. Assess your strengths and capabilities in advance: can you reach the handbrake cable and cope with a stuck brake drum? If yes, then everything will definitely work out.
After a mileage of 40 thousand km, it’s time to seriously think about changing the front brake pads on a VAZ-2109 car. The maximum service life of parts reaches 45 thousand km, although complete wear may occur after 20 thousand km, depending on the quality of the products. The procedure is so simple that only car enthusiasts who are very limited in time turn to a car service center to carry it out. Usually, replacing front pads does not create any special problems and can be easily done on your own.
When and why to change
Why, of course, is a rhetorical question. No motorist wants to be left without brakes. Possible complications will only lead to higher repair costs:
- one of the wheels will jam while driving;
- due to extreme wear, brake fluid will leak;
- the caliper will break.
Rear wheel brake mechanism: 1 - brake shield, 2 - wheel cylinder, 3 - upper tension spring of the pads, 4 - brake pad, 5 - pad lining, 6 - brake drum, 7 - dowel pin, 8 - guide spring, 9 - lower tension spring
The question of “when” is directly affected by driving style and the quality of the pads. There are average indicators: for the front axle - 15-20 thousand km, for the rear axle (drum) - up to 100 thousand km. But this does not exempt you from regular checks.
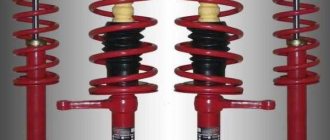
Front wheel brake mechanism: 1 - brake disc, 2 - pad guide, 3 - caliper, 4 - brake pads, 5 - cylinder, 6 - piston, 7 - pad wear indicator (inspection window), 8 - o-ring, 9 - protective guide pin cover, 10 - guide pin, 11 - protective cover
Replacement of VUT
First, remember that repairing the vacuum booster is impossible. This unit is removed and replaced with a new one. In theory and in practice, some do. But at your own responsibility.
Now about the replacement itself.
- Disconnect the brake pedal from the booster rod. The units are connected to each other by a pin. Dismantling is carried out in the area of the pedal assembly and here you will need a simple flat-head screwdriver.
- Let's go and open the hood.
- Disconnect the power supply to the brake fluid level sensor.
- Remove the bracket that holds the hydraulic lines to the frame. A 10mm socket is useful, which is used to unscrew the nut.
- Disconnect the brake master cylinder. To do this, unscrew the 2 nuts holding it to the vacuum unit. Assess the condition of the GTZ. If necessary, replace it too.
- It is not necessary to disconnect the hydraulic lines from the brake cylinder (master). The pipes are quite long, so they can easily be moved to the side so that they do not interfere with the work process.
- Disconnect the pipe that connects the vacuum chamber to the intake manifold.
- Remove the spacer from the front struts.
- Unscrew the 4 nuts that hold the vacuum housing to the car body studs.
- Remove the unit from the studs and pull it out through the engine compartment.
- On the drive fork side, there is a seal with a bracket on the return of the amplifier. He secures the assembly to the frame with 4 studs. They need to be removed. To do this, use a 17mm head to remove 2 nuts, after which the iron structure is removed. Just pull it towards you. Be sure to pull the boot off the stem.
- Install the mounting bracket and a new rubber seal onto the new vacuum booster. Now you can begin full reverse assembly.
Reassembly
If you decide to dismantle and reassemble yourself, be sure to follow several recommendations when installing a new VUT:
- The vacuum rod and the brake pedal are connected to each other immediately after the device is seated on the mounting studs. That is, before they started tightening the nuts.;
- Experienced VAZ 2109 owners recommend applying sealant between the vacuum brake booster and the brake cylinder. This is due to imperfect design;
- The vacuum rod, which acts on the main brake cylinder, may move during transportation of the part. Also, displacement often occurs during the installation process. Therefore, be sure to check this fact and install it correctly if necessary. To do this, press the rod all the way.
If the stem is not installed correctly during assembly, the brakes simply will not operate properly. The consequences are hardly worth talking about.
Replacing brake pads VAZ 2114
Replacing brake pads is a periodic necessity, which is carried out every 20-30 thousand kilometers. It should be noted that each owner of this car can independently carry out such work on a VAZ 2114.
The note! If you have never replaced brake parts before, contact a service station where they can help you with this procedure.
When is it time to change the pads on your car?
Wear of parts depends on the following factors:
- driving style;
- quality of material;
- technical condition of the car.
Thus, without the help of specialists, it is almost impossible to determine exactly when it is worth changing system parts. That is why it is periodically necessary to contact service station specialists, where they will help diagnose and replace any parts. If such operations at a service station are beyond your means, you can learn how to determine their wear yourself!
Front brake pads
Signs of an imminent replacement:
- 1. Residual thickness less than 1.5 mm;
- 2. Presence of scratches and chips;
- 3. Characteristic sound (creaking) when braking;
- 4. Curvature of the discs and a decrease in their thickness;
- 5. Presence of oil on the surface of the pad and disc;
- 6. Lack of contact between the pads and the base.
In order to find out about all the defects, first we remove the wheels and carry out an inspection.
The note! Replacement and maintenance of the brake system is necessary: every 10-15 thousand km - for the front pair of wheels and 50-70 thousand km - for the rear pair. That is why, if you hear a squeak, do not rush to buy new brake pads; perhaps you just need to clean the discs from any remaining debris.
Stages of replacing brake pads on a VAZ 2114 car
Replacing rear and front pads is done differently. In order to learn this procedure, you need to understand all the intricacies.
Replacing front pads on a VAZ 2114:
- 1. Loosen the bolts on the wheel.
The note! You need to start unscrewing the bolts from the lock washer. It is necessary to loosen this washer gradually, so you can prevent possible damage to it.
- 2. Using a jack, lift the wheel on which the replacement will be made;
- 3. Remove the wheel and turn the car’s steering wheel in the direction on which you are replacing;
- 4. Find a bolt with a counter key, bend it and remove the bolt;
- 5. Next, check the brake fluid level in the reservoir.
To replace the caliper piston must be pushed in
The note! If the fluid level remains low, there are leaks in the system.
- 1. Push the caliper piston deep into the cylinder, remove the fasteners from the brake hose.;
- 2. Remove the caliper, brackets and pads;
- 3. Install the new pads tightly into the grooves.
The note! Before installing new parts on the VAZ 2114, it is necessary to clean the guides from dirt and reaction products. This can be done using regular sandpaper or a metal brush.
- 4. Install the caliper in place.
- 5. Return all parts back to their place.
Advice! If you drained the brake fluid, be sure to add it back.
Replacing rear pads:
- 1. Remove the wheel;
- 2. Near the cable tensioner there is a nut that secures it. Loosen this nut. To do this, it is recommended to use key number 13;
- 3. Having loosened the rear wheel mounting bolts, lift it using a jack;
- 4. Remove the wheel and unscrew the bolts on the brake drum;
- 5. Remove the drum;
- 6. After this, you must first remove the spring, and then the remaining parts along with the lever;
- 7. Start cleaning the grooves where the old pads stood;
- 8. Finally, install new pads and reassemble the entire structure in reverse order.
It is worth remembering that if you have not performed this procedure yourself before, enlist the help of experienced mechanics or contact a service station!
Front TC
When starting to replace the front TCs, remember that they are changed only in pairs. Buy new pads rather than old ones that have not yet served their useful life just because they are cheaper. Don't skimp on your own safety.
Front TC
- Place wheel chocks under the rear wheels. The machine must be stationary. If you have a working handbrake, apply it.
- Disconnect the negative terminal from the battery by de-energizing your VAZ 2109.
- Check the current level of fuel fluid in the expansion tank. If the fluid is at or near the MAX mark, part of the brake fluid should be drained. Otherwise, when the pistons are compressed, the fuel fluid will begin to pour out.
- Loosen the tension on the wheel bolts, raise the car, and then remove the first wheel you start with. Next, following the same instructions, change the TC on the second wheel.
- Thoroughly clean the surface of the brake disc and caliper from accumulated dirt. No mineral solvents. Dry clean only.
- Remove the rubber seal (also known as the brake hose holder) from the bracket located on the rack.
- Bend the antennae of the lock washer of the bolt responsible for fixing the guide pin.
- Unscrew the bolts and remove the housing.
- You have freed up access to the front fuel tanks, so nothing prevents you from dismantling them.
- If you need to remove the TC, but you are not going to change them, be sure to put marks on them. If you mix them up during assembly, the consequences may not be the most pleasant.
- Measure the thickness of the friction layer on the TC. If it is less than 1.5 millimeters, the pads must be replaced. Replacement is also required if there are clearly visible chips, scratches, or defects on the surface of the pads.
- Before installing new brake brakes, carefully remove all dirt from the brake mechanism.
- Using a mounting spatula and one of the old TCs installed in its socket, press the piston into the cylinder, thereby fully preparing the site for reassembly with a new block.
- Assembly is performed in the reverse order of disassembly.
Front TC replacement process
When driving on the roads, you are not only responsible for yourself. Therefore, your car should always be in good condition.
If you change your brake pads in a timely manner, you guarantee the safety of yourself, your passengers and other road users.
How to know when it's time to change your brake pads
The need to replace the pads arises, first of all, when the thickness of the linings (friction) becomes less than one and a half millimeters. The second case is mechanical damage to the friction linings. It manifests itself in the form of cracks, deep chips, and other types of deformation.
The friction lining moving away from the pad body and traces of oil appearing on it are cases when the pads need to be changed immediately. To understand the condition of the brake pads, just look into the oblong hole located on the caliper bracket of the wheel you are interested in.
Lada 2109 Vedrover › Logbook › How to change brake pads 2109
A little background. It’s an ordinary day, I’m driving home, when suddenly I hear a nasty scraping of metal-on-metal, from the sound sensations the front left wheel, well, I think it ran into a wire, wound somewhere around a CV joint or on a lever, I planned to drive home to unhook it. I arrive, park, get out and begin to inspect the car. During the initial examination, I didn’t find anything foreign, I’m standing there thinking... well, I heard it, the front left... or a glitch? I decided that the pads had fallen into the drums as usual and were making such sounds! Ah-ha-haa-ha I wasn’t smart enough to hang up the wheel and spin it! With such a lizard spontaneous diagnosis, I’m going to a specialist. shop. Not in Gucci and not in St. Petersburg! While driving I realized for sure that the sound was coming from the front left wheel! I freaked out and motivated myself by the fact that I had changed the front brake pads a year ago, if not more. A stupid engineering idea flashed through, change the pads all around! IT CAN'T GET WORSE! Purchased:
For the front I bought AvtoVAZ ones, a set of 4 pieces. = 520 rub.
For the back I bought LAVS, Russia, set of 4 pieces. =550 rub.
There was a car service not far from the store, let me go in and check. What if the guys actually want to install pads out of pure enthusiasm!)))
The following is an example dialogue:
Me: How much does it cost to change pads? STO: 1000 rub. Me: With your material or with mine? ))) STO: With yours! Me: Price for replacement all around or just one axle?)) Service station: Front ones only! Me: How much will it cost around? STO: You'll charge another 900 for the rear ones!
Yes, go to hell*(?*%:?here with such prices! I have 1070 pads!)))) With such thoughts I went home squatting in the yard to change the pads myself!)
Methods for selecting new parts
When you plan to install new VAZ-2109 brake pads, you need to buy and replace a complete set, 4 pcs.
Partial replacement will lead to uneven braking of the front part of the car, which will cause the car to drift away from a straight path on a dry road, and will lead to a skid on a wet road.
Below is a list of recommendations on which brake linings should be chosen in a store during a visual inspection of the products:
- With a flat plane adjacent to the working part of the disk. Small indentations and chips at the ends are allowed, the size of which does not exceed 1% of the area of the entire working surface.
- Products with a uniform surface, without obvious foreign impurities.
- No friction material cracks.
- The material should not peel off from the base.
- Products in high-quality packaging, accompanied by instructions for use.
It is quite difficult to figure out which pads are better by manufacturer due to the large number of the latter.
But there are brands whose products have been tested by VAZ-2109 users and can be recommended for use:
- ATE from the manufacturer Continental Teves;
- FERODO TARGET;
- NOBEL;
- "EZATI LUX" (Russia);
- products of NPO “Nachalo” (Russia);
- "KA-2" (Tolyatti).
Replacing the rear brake pads of a VAZ 2109
There can be many reasons for replacing brake pads on the rear wheels of a VAZ 2109, but most often this is caused by wear of the friction linings. The work process is not complicated, but requires care, since the car will be hung on a jack if you do not have the opportunity to lift it on a lift.
When to change brake pads on the rear wheels
There are no clear regulations for replacing brake pads on the rear wheels of a VAZ 2109, because the frequency of their replacement depends on many factors:
- quality of friction linings;
- driving style;
- operating conditions;
- the material from which the pads are made.
First of all, brake pad wear appears during active braking, when the car stops maintaining its trajectory. This indicates rather a problem in the brake system, but the possibility of uneven wear of the pads on the right and left wheels cannot be ruled out.
Preparatory work
Replacing the rear brake pads of a VAZ 2109 begins with placing the car on a level surface. Since you will have to jack up the car, you should carefully secure the car. The situation is further complicated by the fact that you will have to release the handbrake. Therefore, it is necessary to place wheel chocks, or simply wooden blocks, under the front wheels and put the car in first gear. You need to take this seriously, because many operations will have to be performed under the machine.
For the work, we will prepare the necessary tool, which should be at hand during the process:
- wheel wrench;
- pliers;
- standard set of keys;
- wooden block;
- set of heads with extensions.
Removing the rear pads
The operation of replacing the pads begins with removing the wheel, so before putting the car on a jack, you need to remove the wheel bolts with a wheel wrench. Only after this can you put the car on a jack and remove the wheel.
- Using a socket or a 12-mm open-end wrench, remove the two guide pins from the hub.
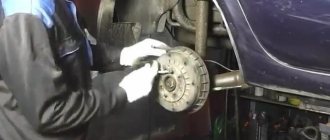
- The brake drum should come off easily, but there are times when it sticks to the hub, in which case it should be helped with a wooden block. To avoid damaging the brake drum, it is not recommended to use a hammer. The drum may crack or become deformed. If this does not help, then take the guide pins and screw them into the other two threaded holes. Thus, the pin will rest against the hub and press out the drum. The pins must be tightened evenly to avoid distortion.
- After this operation, you can gain direct access to the brake pads.
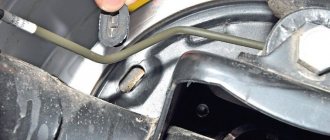
- Loosen the handbrake cable. We can only gain access to the compensator by removing the resonator. In order not to disassemble the muffler, you need to assemble an extension from a set of heads of sufficient length so that you can unscrew it with a 13mm head and a wrench. It is better to use a wrench with a ratcheting mechanism, this will simplify work in tight spaces.
- We unscrew the locknut with a 13mm wrench, and then with the assembled extension we release the handbrake tension cable as much as possible.
- To remove the pads, you must disconnect the handbrake drive. We remove the cotter pin from the fixing pin and press the pin so that it does not interfere with the removal of the mechanism.
- Carefully remove the spring from below using pliers, then remove the limit spring from the front block.
- Remove the upper spring with pliers and remove the front pad.
- Remove the spacer bar.
- We take out the lever that sets the pads in motion, freeing it from the cable.
- Remove the rear block, freeing it from the lateral movement limiter.
Installing new pads
To install new brake pads, you need to connect them with the upper tension spring and install a spacer bar. Install the pads on the caliper, and then reassemble in reverse order.
After assembling the unit and installing the wheel, do not forget to tighten the handbrake cable. In the normal position of the body, when it is not loaded, the handbrake should lock the rear wheels in 3-4 clicks.
After completing this simple operation, we will put the rear brake circuit in order and at the same time adjust the parking brake. Watch your brakes and good luck on the road!
Required Tools
You will need radically different tool sets for the front and rear axles. Let's start with something simple. To replace the front disc brake pads you will need:
- flat screwdriver;
- open-end wrenches for 13 and 17;
- metal brush.
If you don't have WD-40, you can use kerosene.
Spray it from a disposable spray bottle The following list for replacing the rear linings of a VAZ 2109 (21099) may not be all you need, but you need to be prepared for difficulties. Full recommended list:
- hammer (preferably a larger one);
- pliers;
- flat screwdriver and metal brush;
- WD-40 lubricant;
- wooden block or board;
- two open-end wrenches for 13;
- 13mm head with extensions.
We put on gloves and get to work.
Replacing front brake pads on a VAZ 2108 (2109, 21099)
The service life of front brake pads on VAZ 2108, 2109, 21099 vehicles and their modifications is within 30,000 - 40,000 km.
Brake pads will have to be changed if they are worn out (the total thickness of the lining and pad is less than 6 mm), separation of the lining from the pad, uneven wear, oiling, replacement of the brake disc, vibration and beating, or extraneous noise during braking.
The front brake pads on VAZ 2108, 2109, 21099 vehicles must be changed on both front wheels at once to prevent skidding from uneven braking.
Necessary tools, devices, spare parts
— Open-end wrench at “17”
— Socket wrench or socket “13”
— Thick slotted screwdriver
— Two sets of front brake pads
Preparatory work
— If there is an increased level of brake fluid in the reservoir on the master brake cylinder, pump out the excess using a syringe or bulb to avoid overflowing after installing new pads and strongly recessing the pistons into the brake caliper cylinders
— Jack up the car and remove one of the front wheels
— Clean the front wheel brake mechanism from dirt
— Remove the brake hose from the bracket on the rack
The procedure for replacing the front brake pads on a VAZ 2108, 2109, 21099 car
- Unscrew the lower bolt of the guide pin
First, use a slotted screwdriver to bend the edges of the bolt locking plate. We use an open-end wrench set to “17” to hold the guide pin and a spanner set to “13” to unscrew the bolt. See photo above.
- Raise the floating caliper bracket up
If it is difficult to lift the bracket, you need to move it left and right and try again. Or use a screwdriver to pry it under the caliper and use it as a lever to lift the bracket.
- Remove the front brake pad from the guide
We leave the rear brake pad in the guide; it will be useful when recessing the cylinder piston.
- We recess the piston of the brake cylinder into its body
To do this, we lower the floating caliper back down, and, using a large slotted screwdriver or pry bar as a lever (inserting it between the brake disc and the caliper), moving it outward, we recess the piston.
- Removing the second brake pad
Lift the bracket up and remove the brake pad.
- Cleaning the front brake pad guides from dirt
We use a metal brush.
- Inserting new brake pads
With the caliper piston recessed, the pads should fit without difficulty.
- Lower the floating bracket and secure it with a bolt
We make sure that when lowering the metal tendrils of the pads do not become spaced and bend. Bolt tightening torque 3.1 – 3.8 kgf.m. We bend back the antennae of the bolt locking plate.
- Return the brake hose to the bracket on the rack and install the wheel
We similarly replace the front brake pads on the other wheel.
After replacing the front brake pads (when the car is already on its wheels), press the brake pedal several times to set the gaps between the pads and discs.
Notes and additions
— If there is a wear sensor on the inner brake pad, then it must be replaced with a new one and use brake pads with a hole for this sensor. Or simply don’t install it and use standard pads.
— Before installing new brake pads, you should inspect the condition of the guide pins, their boots and brake cylinder boots. Remove the finger from the guide and clean it of dirt. Lubricate with a small amount of grease (lithol, CV joint lubricant, etc.) and insert it back. Damaged or worn pin and cylinder boots should be replaced.
— The period of grinding in new brake pads to the brake disc is 100-200 km.
Care must be taken during this period as the braking distance of the vehicle increases. It is also necessary to avoid sudden braking, since you can “burn” the new pad linings and there can be no talk of any effective braking with such pads in the future
More articles on the braking system of VAZ 2108, 2109, 21099 cars
VAZ 21099 | Replacing front brake pads
Be sure to replace all pads on one axle of your vehicle, even if only one pad is worn. If the brake pads will be reinstalled, mark them before removing them.
When brake pads work, brake dust is generated, which contains asbestos, which is harmful to health, so when cleaning brake pads, do not use compressed air or inhale the dust.
To clean brake mechanisms, use only special brake cleaner.
Remove the cap of the brake system compensation tank.
Apply the parking brake and block the rear wheels with chocks.
Loosen the front wheel nuts. Raise the front of the car and place it on stands. Remove the front wheel.
Check the brake rotor for cracks, especially around the wheel bolt holes, and for excessive wear or mechanical damage. If it is necessary to replace at least one of the disks, replace both disks on the axle.
Rice. 11.13. Using a clamp to press the piston into the caliper
Using a clamp, press the piston into the caliper (Fig. 11.13). When the piston is retracted, brake fluid is forced out of the brake cylinder into the compensation tank, so constantly monitor the fluid level in the tank, and if necessary, pump out excess fluid from the tank.
Rice. 11.14. Unscrewing the lower bolt of the front brake caliper: A – lower bolt; B – top bolt; C – hollow bolt for fastening the brake hose
Unscrew the lower caliper mounting bolt, while holding the guide pin from turning with the second key, and lift the caliper up, turning it around the upper guide pin. Use soft wire to tie the caliper to the front strut (Fig. 11.14). Do not remove the upper caliper bolt and the hollow brake hose bolt.
Remove the outer noise pad, retaining spacer, and outer brake pad from the caliper bracket.
Rice. 11.15. Removing the inner brake pad
Remove the internal noise-absorbing pad, retaining pad and internal brake pad from the caliper bracket (Fig. 11.15).
Retaining spacers can be reused if they are sufficiently resilient, not deformed, and are free of cracks, wear, or corrosion.
If the pads are suitable for further use, clean them with a wire brush and a rag.
Rice. 11.16. Removing the brake shoe guide
Remove the four brake pad guides, check their condition and install them in place (Fig. 11.16).
Rice. 11.17. Installing a brake pad wear indicator
If available, remove the wear indicator from the old brake pad and install it on a new one (Fig. 11.17). If the indicator is worn or bent, replace it.
Do not press the brake pedal with the brake pads removed.
Apply special disc brake lubricant to both sides of the inner noise-absorbing pad. Install the inner brake pad with wear indicator, retaining spacer and inner noise-absorbing spacer.
Install the outer brake pad, retaining spacer and outer sound absorbing spacer.
Remove the lower guide pin from the caliper bracket and check its condition. To remove the upper guide pin from the caliper, move the caliper away from the bracket. Apply a thin coat of high temperature grease to the guide pins and install them into the caliper bracket.
Rice. 11.18. Using a clamp to press the piston into the caliper before installing the brake pads
Reinstall the caliper and screw in the lower caliper mounting bolt. If the caliper is not installed on new pads, use a clamp to press the piston into the caliper (Fig. 11.18).
Replace the brake pads on the second front wheel in a similar manner.
Install the wheels and lower the car to the ground.
Press the brake pedal several times until the brake pads are in their working position.
How to repair a handbrake lever
Repairing the device consists of replacing the worn mechanism with a new one after removing it from the VAZ 2109 car. Damage can be: wear of the locking teeth, jamming or breakage of the lever, failure of the locking mechanism. So:
- The battery is turned off.
- Under the car, the nuts securing the equalizer to the drive cable are unscrewed, first the lock nut is unscrewed, then the adjusting nut.
- The equalizer is removed from the handbrake lever rod.
- In the car interior, all decorative trim between the front seats is removed. The plastic cover of the tunnel is removed, before this the cover is removed from the handle for shifting gears. The hatch into the tunnel is removed.
- The carpet is moved to the side.
- The retaining ring and drive rod are removed from the axle.
Repair of handbrake drive lever
- If necessary, the handle is unscrewed and removed, and the tension spring is changed.
- Assembly of the mechanism is performed in reverse order.
Removing the pads
After all the above operations, it is possible to gain direct access to the pads. Before you remove them:
- loosen the handbrake drive cables;
- dismantle the resonator to get to the compensator;
- disassemble the muffler or use an extension with a 13 mm socket (use a ratcheting wrench - if there is not enough space, it is easier for them to work);
- Having unscrewed the lock nut, loosen the tension cable at the handbrake as much as possible.
Now it's time to completely remove the handbrake drive.
To do this, use pliers to pull out the cotter pin from the pin holding it and recess the latter, after which the above-mentioned element is disconnected. The middle spring coupler is unhooked with pliers, and behind it the lower limiting spiral is removed from the front block.
- dismantle the spacer bar and pull out the lever that drives the brake device, freeing it from the cable;
- We disconnect the rear block, freeing it from the limiter that prevents it from moving in the transverse direction.
Assembly is carried out in reverse order.