August 23, 2021 Lada.Online 3 875 2
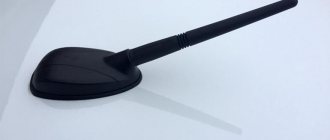
On Lada Vesta, Grant and Niva cars, a combined antenna is used, which is located in the front of the roof. During repairs, it may be necessary to remove the antenna. The dismantling procedure is described in the factory's technological instructions.
Granta 2022 FL, what are the connection points?
Soon the car will come to me to install an alarm system with auto start. Lada Granta 2022 FL, the one with the Vesta-style face. Manual transmission Motor 8 cells.
The equipment is as I estimated Classic Ie. regular keys, abs esp buttons, electric power steering, central locking, 2 electric windows, etc.
Is there any information on the connection points in it? Is the immobilizer activated in this configuration? What are some pitfalls?
The car is a friend’s, but he literally comes for a day off; work in another city obliges him, however. I would like to be ready for installation, so that I can immediately install it carefully and have everything working, without falling asleep or glitching as happens in grantokalinas with a kan and a comfort block.
Which brand of car antenna should I choose?
The electronics market is filled with many products that operate with radio waves. Its manufacturers are well-known companies, among which a number of leaders can be identified:
The Italian brand Calearo is distinguished by a large range of similar products that have proven themselves to be of impeccable quality and reliability. There are both very economical models on sale, as well as multifunctional and expensive ones.
"Triad" is a domestic company that has been operating since 1998 and has more than 700 types of products sold, including: car chargers, converters, signal amplifiers, antennas of all ranges and shapes, including decorative ones. The company has a good reputation in Russia and abroad and has affordable prices.
Phantom, although it has a name in English, represents a Russian brand that is part of the international holding Stopol Gruop. The concern has existed since 1994 and specializes in car TVs, players, and various car accessories. American engineers regularly supply their colleagues with new developments in order to cover the needs of the majority of drivers with their equipment.
Lemm was founded in Italy and has been a world leader for over 30 years. Its products are used by many truckers, travelers and taxi drivers. Technology development is focused on improving performance.
Removing the standard radio in Grant Lux
The difference between grants of the luxury configuration: the MMS (multimedia system) installed from the factory. This is a 2 din device.
To remove standard acoustic grants:
- take a knife or plastic spatula to dismantle the acoustics and disconnect the decorative trims to the right and left of the radio. It is not necessary to take pictures;
- in the gap between the cover and the panel we find the head unit lock. There are two of them on both sides. Press it out with a screwdriver;
- we take out the GU on ourselves.
Everything is described in detail in the video:
Replacing the standard MMC in Grant
The process - after removing the acoustics, we install a new system.
Difficulties: you may have to finish the fastenings of the new system for VAZ ones. Plus you need the right frame. The factory MMC frame may not fit.
Installation of 1 din radio in Grantu standard and norm
What is needed to install a radio in a VAZ 2190:
- The radio itself is also the head unit;
- flat screwdriver;
- Straight arms.
Abbreviations and symbols in the text:
- GU – head unit;
- MMS – multimedia system;
- DIN (din) – installation size for acoustics in a car.
Step-by-step instructions for installing the head unit
- a narrow flat screwdriver or plastic spatula for installing acoustics;
- 1-din radio with frame.
Step 1. Using a flat-head screwdriver, remove the plastic plug for the radio. To do this, carefully pry it around the edges and pull it towards you.
Step 2. On the back of the plug there is a mount for ISO connectors. There are two connectors: music power and wires for the speakers.
Step 3. If necessary, connect an adapter for your radio to the ISO. Usually it comes included.
If an adapter is not needed, proceed to step 4.
Step 4. Remove the glove compartment. Holding the glove compartment clamps in the upper position, forcefully lower the glove compartment down.
Overcoming resistance, we pull the lid towards ourselves - the glove compartment is removed.
Step 5. Using a flashlight, we climb under the panel in the area of the front right passenger's feet. Behind the felt on top we find a thick black wire - at its end there is a plug for the factory antenna.
We extend the plug to the installation location of the radio.
Step 6. Install the metal slides for the radio. Use a screwdriver to bend the fastenings of the slide at the top and bottom to ensure secure fastening.
Step 7. Connect the power connectors, speakers, antennas to the radio. We insert it into the slide all the way. We attach a decorative plastic frame.
What to do if the length of the wires and antenna is not enough
To get by without extending the wires, you will have to suffer:
- We put our hand under the panel in the glove compartment area;
- We put the radio in the slide and connect it to the plugs;
- We blindly connect the power, the connector for the speakers, the wires for the amplifier, and the antenna.
Disadvantages of the method: we spend a lot of time, the process is dreary and inconvenient. We'll probably rip off your wrist.
Plus: there is no need to build up wires, which will then interfere with the installation of the PG, resting against the back wall.
If the radio tape recorder dangles in the slide and rattles
It happens that the acoustics hold weakly in the sled, although they sit firmly. Solving the problem:
- Using the keys for dismantling (included with the control unit), remove the radio;
- We take a small piece of vibroplast (resin-based foil) and glue it onto the slide from the inside, top or bottom - this way we will ensure that the tape recorder is completely pressed against the slide without unnecessary vibrations;
- Once again, use a screwdriver to press down all the fastenings of the slide: some might have been under-tightened;
- We put the acoustics back and check - all unnecessary vibrations during shaking should disappear.
Step-by-step instructions for installation inside the cabin
Installation depends on the configuration of the selected model, but the general principles are practically no different. All features will be additionally indicated by the manufacturer.
- Degrease the antenna installation area with an alcohol wipe or other product.
- We place the triangle included with the device at the installation site, which facilitates correct positioning of the antenna.
- In the phases of the triangle, install the mounting disk and remove the triangle.
- Glue orientation strips that will help you correctly position the receiving parts of the antenna.
- The signal receiving antennae are installed on the pin of the mounting disk by gradually peeling off the film and fixing it in accordance with the reference stripes, after which they can be immediately removed.
- To lay the cable, remove the side trim of the car.
- We secure the wires using zip ties to the car's standard wiring or to the glass washer hose.
- For the convenience of further installation, it is necessary to dismantle the glove compartment of the car.
- We remove the radio from the socket to gain access to the connectors and wires.
- The blue power wire from the ISO connector connects to the power wire of the antenna amplifier.
- We connect the wire responsible for sending the signal to the corresponding connector on the rear panel of the head unit.
- The quality of work performed and signal reception are checked.
- All wires are neatly placed in the landing window of the radio.
- The radio is installed in place and fixed.
- The glove compartment and the removed lining are mounted back.
Questions and answers
Exact characteristics, dimensions, how to install, where it is used, whether it will fit... We'll tell you about everything!
Any questions from those. consultations to assistance with placing an order.
Warranty on all products
Warranty for goods from 6 months to 3 years. If there is a defect, we will replace the product without any questions asked.
Secure payment methods
Pay by credit card, PayPal, bank transfer or cash upon delivery.
Delivery throughout Russia
You can choose delivery by courier, Russian Post or at a pick-up point.
We will pack it well, send it for delivery and monitor the order until delivery.
Dear customers, in order to avoid mistakes when sending a standard VAZ antenna to the roof with a wire, indicate your car model and year of manufacture in the “Comment” line.
Most modern cars are equipped with many systems that provide driver comfort, one of which is a standard car radio antenna with a wire. It looks attractive, modern, not only fits beautifully into the car, but is also very easy to use.
The antenna is designed to extract the energy of an existing electromagnetic field (receiving) or to convert the energy of an RF generator into electromagnetic waves by radiation (transmitting). According to the reciprocity theorem, the same antenna can be used as a receiving and transmitting antenna; their characteristic properties and parameters remain the same in both cases, which is used in practice in most cases.
Standard roof antenna with wire for LADA Granta / Kalina 2, Datsun is installed in a special standard socket on the roof. The length of the wire is approximately 2.5 m. The branded wire has high-quality insulation.
The antenna allows you to confidently receive radio signals over a wide range, both in the city and in the region. For FM frequencies, this zone is limited by the line of sight between the transmitter antenna and the receiver antenna. Radio waves of these frequencies cannot bend around the earth's surface or be reflected from the ionosphere.
Other article numbers of the product and its analogues in the catalogues: 11170790302010, 11170790302012.
VAZ 2190, Kalina 2, Datsun.
Any breakdown is not the end of the world, but a completely solvable problem!
How to independently install a standard antenna with a wire on the roof of a Lada Granta car.
With the online store Discounter AvtoAzbuka, repair costs will be minimal.
Just COMPARE and BE SURE.
Don't forget to share the information you find with your friends and acquaintances, because they may also need it - just click one of the social networking buttons located above.
The Granta in Standard and Norma configurations comes from the factory without a radio. AvtoVAZ did everything to simplify the installation process: it ran the power and acoustic wires, installed the antenna and threw the wire into the cabin. All that remains is to plug in the speakers and head unit. Let's look at how the Lada Granta radio is installed.
Basic faults
The most common cause of failure is mechanical damage. The standard external antenna installed on the roof of the Lada Priora is of the passive type. The simplicity of its design determines the reliability of the part. But the location on the roof makes it vulnerable. This element can easily be broken when washing a car, carelessly loading things onto the roof rack, or entering a garage or parking lot with a low gate. This part may also be damaged by hooligans. It is non-separable, so if it breaks, it can be replaced as an assembly.
Sometimes the roof seal loses its tightness, and water begins to penetrate into the interior. Low-quality spare parts suffer from this. The problem can be solved by using a sealant or installing a new part from a reliable manufacturer.
Lada Granta Liftback Mamomobil AS › Logbook › Installing a LENTEL radio is an economical option.
Today we finally got around to installing a budget radio in a budget car. Now we are in a time when for some owners the cost of acoustics, often by multiples, exceeds the cost of the car. However, this is not the case here. The car in this configuration was purchased for reasons of economy, first of all, and the music will be in the same style.
To install music in the “Norma” type package, you don’t need anything other than a radio and speakers. We remove the plug, install the radio, connecting it to two standard ISO chips, the antenna must be pulled from the front passenger's feet. There was about 5 minutes of work here.
Then heavy artillery was used, it is necessary to remove the door card, install 13 speakers in the prepared places and cut holes in the door card for the mesh. Some asshole at the factory decided that a screen in the door was not needed. Well, okay, according to the pattern that came with the speakers, I cut out two circles with a stationery knife. And I put a net on the screws. Everything looks like fire.
I turned on the radio and cried... I haven’t heard such a flat and wooden sound since distant 2004-2005, when after school we listened to KiSha’s music on the phone and drank “Arsenal” from a 1.5 liter bottle in a padik, kindergarten or at a construction site. However, it’s not for nothing that I studied music in my youth, after playing with the settings, I turned on tone compensation, set the bass to 0, highs to 4 and the equalizer to rock. And to my surprise, the music played no worse than the standard music in any budget, for example, the music of the Nexia, with its 10 in the panel and the farting 16 in the rear shelf. In general, listening to radio and MP3 from a flash drive is possible, and not even that bad. The radio tape recorder produces its 25 watt rating. For those who don’t have money, I recommend it!
PS:
Judging by the quality of the doors, I can say –
bad
!
On Xray - everything is much better, 100 times better! For those interested - clickable! All the bolts securing the door card were tightened extremely loosely, no noise at all. The bolt under the plug at the driver's door was simply lying in its “channel”, not even inserted, let alone tightened
, just lying there.
Anticorrosive protection in the doors, after additional treatment, is enough. There are no unpainted parts.
Vibra is glued to the ground, not to bare metal, finally in 2022. source
Best Interior Car Antennas
For those drivers who do not want to make holes in the car body, internal antennas that can be mounted on the windshield or rear window are suitable. For fixation, use a suction cup or adhesive tape supplied in the kit.
Some models have a magnet, which allows you to attach it to a metal stand inside the cabin. The signal reception capabilities of each antenna are different, so below is the best equipment according to user reviews, with a description of its performance.
Triad 55 Turbo - Radio Only
This Russian model operates in the VHF and FM bands. The device is suitable for any radio and is designed to detect and retain radio waves at a distance of 150 km from the repeater. The antenna is equipped with a 30 dB signal amplifier and has a built-in filter, activated in urban mode, which filters out the inclusion of associated frequencies from mobile operator towers, electric vehicles and other radio signal sources.
The device is made in the form of a small rectangle with two antennae, and is attached with Velcro under the rearview mirror. The second installation option is on the right side of the windshield, where fixing the equipment will minimally block the driver’s view. The kit includes a cable and a power connection in a single winding. The wire length is 2.5 meters, which is convenient for powering and neatly masking the cable under the casing.
Advantages:
Flaws:
Automania Digital TV/FM – you can also watch TV
With this compact antenna model that is mounted on the windshield, you can not only listen to radio stations, but even watch TV in the car. This will be convenient for drivers of minibuses and intracity buses. The device has a small oval body and two “wings” with coil-shaped wire laying to increase reception. The design has a built-in 20 dB amplifier, which improves the quality of a weak signal.
Advantages:
Flaws:
Bosch Autofun - everything a radio amateur needs
This compact model will appeal to any driver who is used to traveling with music. German developers have provided it with minimal dimensions so that it does not block the driver’s view. The round case made of durable plastic is equipped with a red activity diode and an input plug through which 12 V power is supplied. Two antennae extend from the block - steel signal capture cables, which must be separated at 90 degrees.
The optimal position for the antenna will be the top corner of the glass on the right, and the antennae will stretch along the counter and the top edge of the window. The case thickness is only 15 mm. The antenna works in active mode, seeks and maintains a clear signal, thanks to compensation and distribution of the received data.
Advantages:
Flaws:
Phantom TV Impulse – discreet and functional
Such an antenna is capable of capturing radio waves and television signals, including digital ones. The device has a triangular body with a status indicator and the company logo. All wires are concentrated on one side. The antenna antennae stretch along the glass and have a built-in mount with double-sided tape at the tips and in the middle. This allows you to catch VHF-L CH 1-5, UHF 13-69, VHF-H 6-12.
The power cable is combined with the TV output. The latter has a 3.5 mm mono jack connector. This will fit all modern TVs. The power has a free end and can be connected directly to the battery through the terminals. The length of this cable is 4 m. The resistance of the device is 75 Ohms. The device already contains an amplifier, and the antenna type is active.
Advantages:
Flaws:
Choosing a location
Active antennas have a compact design and are attached using a special adhesive mounting pad or double-sided tape. Therefore, you can choose any installation location inside the cabin. Most often, preference is given to the windshield near the front passenger seat. This is due to its location near the radio and convenient installation of cables into the car's trim.
Placing on the roof has an advantage in signal reception, but is more difficult. Oxidation of metal parts and deterioration in reception quality are also possible.
When choosing a place where the antenna will be installed, you should adhere to the following rules:
- Cables should not be routed near sources of interference.
- They must be carefully hidden under the car's skin so as not to create discomfort during driving or breakage due to negligence.
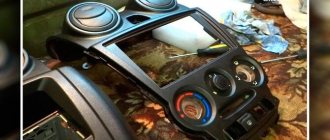
How to install 2 din in grant norm or standard
Everything is more complicated here. Need to:
- dismantle the center console trim - unclip the fastenings, move it forward and disconnect the buttons and heater handles;
- cut out a vertical plastic partition that will not allow you to install a 2 din device;
- cut down the plastic casing of the central air duct;
- try on a new acoustic unit, adjust the fastenings if necessary;
- install adapters from the delivery kit on the wiring (if required);
- install the device;
- if we leave the old center console trim: we cut out the partition, try it on, put it in place with the buttons and handles connected, adjust the decorative frame of the control unit, install it;
- if we install a new trim on the console under a 2 din device: we transfer the heater control unit and buttons from the old trim, install them in place, and put a decorative frame on the control unit.
Instead of a total
- If we install a simple radio, the size should be no more than 178 * 50 mm. Installation requires plastic spatulas or a screwdriver. Adapters and slides are included .
- To install 2 din, you need a new overlay on the console, a decorative frame on the GU itself, wire cutters and a metal blade to adjust the installation location.
- Are we replacing the standard speakers with another of the same size? Still need a new decorative frame . Otherwise, gaps in the panel will be visible.
More articles about Granta here.
Product code: IC-LAGA
Shipping and payment
We will ship in three days
receive 28. 28 Aug, price from 365 rub.
- Bank transfer or cash on delivery.
- Visa
- MasterCard
- PayPal
Pay by bank transfer, card, PayPal or upon receipt by courier or post office.
- Adapter for connecting a standard Lada Granta, Vesta video camera to a new radio
- 26 Jun
- 141
experts
Call6
Tell us about the product
Tell us about the product, it will help other buyers.
Subscribe to our channel
Installation of an audio system on Granta of different configurations
In the “standard” configuration in Grant, power wiring harnesses are already pre-installed, which are located in the console opening. The wires are connected exclusively to the car radio, so don’t be surprised if you can’t find them in the doorways.
In the Lada Granta Norma, the power wires coming from the console are already connected to the doorways. You just need to connect the sound system in full accordance with the assembly diagram. It often happens that the pre-installed door wiring does not match with some speaker connectors. Here we get out of the situation by purchasing additional suitable wires.
During assembly, the Lada Granta “luxury” is equipped with a special touchscreen multimedia system and already installed speakers. The improved radio is complemented by a Bluetooth system and a 5-inch display with a linear output.
Among other things, the built-in car radio allows you to connect a memory medium – a USB 2.0 flash card, through which you can listen to recorded music.
Installation of 1 din radio in Grantu standard and norm
What is needed to install a radio in a VAZ 2190:
- The radio itself is also the head unit;
- flat screwdriver;
- Straight arms.
In the article we consider only the installation of the GI. Read how to install speakers here.
Abbreviations and symbols in the text:
- GU – head unit;
- MMS – multimedia system;
- DIN (din) – installation size for acoustics in a car.
Step-by-step instructions for installing the head unit
Required:
- a narrow flat screwdriver or plastic spatula for installing acoustics;
- 1-din radio with frame.
The seat in Grant is designed for 1 din. To work with large 2-din sizes, you will need to cut out the partition and install a decorative frame. Step 1. Using a flat-head screwdriver, remove the plastic plug for the radio. To do this, carefully pry it around the edges and pull it towards you.
The placeholder for the radio is installed from the factory.
Step 2. On the back of the plug there is a mount for ISO connectors. There are two connectors: music power and wires for the speakers.
When connecting the pads, you can’t confuse them - they have fastenings of different shapes. 8 wires at the speaker terminal. The second power connector.
Step 3. If necessary, connect an adapter for your radio to the ISO. Usually it comes included.
If an adapter is not needed, proceed to step 4.
If an adapter is needed for acoustics, it is included in the kit. Example in the picture.
Step 4. Remove the glove compartment. Holding the glove compartment clamps in the upper position, forcefully lower the glove compartment down.
Overcoming resistance, we pull the lid towards ourselves - the glove compartment is removed.
Removing the glove box on a Grant is easy when you know where its latches are located.
Step 5. Using a flashlight, we climb under the panel in the area of the front right passenger's feet. Behind the felt on top we find a thick black wire - at its end there is a plug for the factory antenna.
We extend the plug to the installation location of the radio.
Here we are looking for the antenna wire.
Step 6. Install the metal slides for the radio. Use a screwdriver to bend the fastenings of the slide at the top and bottom to ensure secure fastening.
These fasteners secure the slide into the panel opening.
Step 7. Connect the power connectors, speakers, antennas to the radio. We insert it into the slide all the way. We attach a decorative plastic frame.
If you plan to install an amplifier, you must first stretch the wires under the panel and bring them to the installation site of the power unit.
What to do if the length of the wires and antenna is not enough
To get by without extending the wires, you will have to suffer:
- We put our hand under the panel in the glove compartment area;
- We put the radio in the slide and connect it to the plugs;
- We blindly connect the power, the connector for the speakers, the wires for the amplifier, and the antenna.
Disadvantages of the method: we spend a lot of time, the process is dreary and inconvenient. We'll probably rip off your wrist.
Plus: there is no need to build up wires, which will then interfere with the installation of the PG, resting against the back wall.
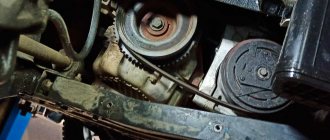
If, after installing the acoustics, the alternator belt begins to whistle, the solution to the problem is here.
As you can see, immediately behind the GU in Grant there is a vertical partition, which greatly interferes with blind installation.
If the radio tape recorder dangles in the slide and rattles
It happens that the acoustics hold weakly in the sled, although they sit firmly. Solving the problem:
- Using the keys for dismantling (included with the control unit), remove the radio;
- We take a small piece of vibroplast (resin-based foil) and glue it onto the slide from the inside, top or bottom - this way we will ensure that the tape recorder is completely pressed against the slide without unnecessary vibrations;
- Once again, use a screwdriver to press down all the fastenings of the slide: some might have been under-tightened;
- We put the acoustics back and check - all unnecessary vibrations during shaking should disappear.
Vibroplast helps not only with soundproofing a car.
Settings
For adjustment, an indicator device is used that measures the ratio of received and reflected signals. The work is performed in specialized centers that have such equipment at their disposal. Self-adjustment is allowed, taking into account the recommendations contained in the operating instructions for the indicator device.
After an audio system is installed on a car, the question of installing an antenna for it suddenly arises.
In fact, having a radio in your car is of little use if you don't have a good quality antenna.
Antenna length. When talking about improving the quality of reception, we mean the degree of sensitivity of the receiver itself. What is sensitivity? In fact, it is the minimum signal level, which is measured in volts and produced by a transmitter located on the antenna. This is a signal, upon acceptance of which it becomes possible to reproduce the appropriate quality. The longer the antenna is, the higher its emf will be, the lower the sensitivity of the electric receiver should become. But even here there is a reasonable limit at which good playback quality cannot be achieved. Another condition is the type of waves that you plan to catch.
The first condition, which is optimal, is reproduction at nominal characteristics - it is difficult to find a better option. The second option is to increase the interference on the antenna simultaneously with the level of the useful signal. The length of the antenna does not matter here, since as it increases, the E.M.F. will also increase, and therefore the level of interference. The greatest importance here is the “selectivity” of the receiver, that is, its ability to catch a signal carrying useful information.
Most often, reception confidence depends on the equipment manufacturer. For well-known brands, the sensitivity is 5 microvolts, which will be quite enough to receive a signal at a distance of 40 to 50 kilometers from the transmission station. Long waves propagate better because they have the ability to diffraction - bending around obstacles, when colliding with which short waves change their direction.
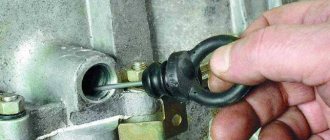
Connecting an active antenna. The first point that you need to decide on first is the place where the antenna will be located. Most often, this is the front windshield on the passenger side. It must be installed using double-sided mounting tape. The antenna has two wires for connecting power, and one connector for connecting to the radio.
A black wire, or with no insulation, must be connected to the car body immediately after installation and as close as possible to the antenna itself. In fact, it will represent a negative contact. The second wire, red or blue, must be connected to the radio. This option for connecting an active antenna is the most optimal and popular. The only point that is not taken into account here is the connection of the coaxial cable that conducts the signal from the antenna to the radio.
Sometimes there are also connectors for which suitable adapters should be selected on modern radios. The fact is that many radio manufacturers are looking for the possibility of using their own plugs, but leaving options for connecting them with standard versions. This means that in order to connect the antenna to the radio socket you may need to purchase additional adapters.
In a car, antennas are used to operate the radio and television, as well as for the GPS navigator. To ensure stable signal reception, it is necessary to correctly and securely connect the antenna to the radio.
How to connect the Volga signal
Standard sound signals of LADA cars consume no more than 5A, and Volga horns consume 7A each. In this regard, to connect them it is necessary to use a 4-pin relay. The Volga signal connection diagram is universal for all cars:
Before starting work, it is recommended to disconnect the negative terminal from the battery. All wires are laid in corrugation. We place the relay in a place protected from moisture and dirt. The whole process is also shown in the video:
About the guarantee. If you independently modify the car in terms of electrical components, there is a possibility of refusing warranty service for the car. Therefore, the installation of signals from Volga should be carried out at a service center, where after connection they will be ready to provide a document confirming the quality of work. You can also contact an authorized dealer for such modifications.
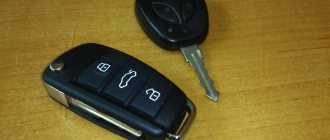
Are you satisfied with the operation of the standard sound signal on the LADA model? Are you ready to install a Volga horn? Let us remind you that we previously looked at other methods that can make operating a car more comfortable. For example, installing a gas tank cap bracket or how to make a flip-flop ignition key.
1. Remove the front bumper grille
2. Disconnect the wiring harness connector from the horn.
3. Using a 13 mm spanner, turn the nut securing the sound signal.
There is an adjusting screw on the inside of the horn. You can apply voltage from the battery to the audio signal terminals and use a slotted screwdriver with a thin blade to adjust the sound of the signal. If the sound is hoarse and weak, and it is not possible to achieve an acceptable sound by turning the adjusting screw, the horn must be replaced.
Antenna amplifier power supply
Modern models are connected via the receiver connector directly to the car radio. With this connection, a radio signal is supplied from the active antenna. In the reverse order, the required voltage of 12 volts is supplied to the amplifier through the other pair.
On models where such a connection is not provided, the antenna amplifier must be connected to the power supply independently in two versions:
- Power connection via fuse box.
- Independent connection to power via the car radio.
Which brand of car antenna should I choose?
The electronics market is filled with many products that operate with radio waves. Its manufacturers are well-known companies, among which a number of leaders can be identified:
The Italian brand Calearo is distinguished by a large range of similar products that have proven themselves to be of impeccable quality and reliability. There are both very economical models on sale, as well as multifunctional and expensive ones.
"Triad" is a domestic company that has been operating since 1998 and has more than 700 types of products sold, including: car chargers, converters, signal amplifiers, antennas of all ranges and shapes, including decorative ones. The company has a good reputation in Russia and abroad and has affordable prices.
Phantom, although it has a name in English, represents a Russian brand that is part of the international holding Stopol Gruop. The concern has existed since 1994 and specializes in car TVs, players, and various car accessories. American engineers regularly supply their colleagues with new developments in order to cover the needs of the majority of drivers with their equipment.
Lemm was founded in Italy and has been a world leader for over 30 years. Its products are used by many truckers, travelers and taxi drivers. Technology development is focused on improving performance.
READ How to install the plugin on myarena minecraft
Refinement and repair of Lada Vesta antenna mounts
One of the improvements concerns changes in the quality of signal reception. In this case, the RAV4 receiving unit board is installed in the Lada Vesta combined antenna. According to reviews from car enthusiasts, this significantly changes the purity of the sound.
But the board from RAV 4 is not the only thing they do with antennas on Vesta. Car enthusiasts also repair mounts that break due to the plastic being too brittle. This is relevant for cars manufactured before September 2016, when an unreliable seal design was used.
To repair the fastener, you need to use hot plastic, if you have a soldering tool, or hot glue. Wooden toothpicks or lists are inserted into the holes, and then melted material is poured in so as to restore the “well” for fastening.
Replacing and repairing the antenna on a Lada Vesta is a simple procedure if you have instructions or experience.
About cars, repairs, tuning - accessible, free, honest
Site search
RSS subscription
Categories
Recent comments
- Sergey on File with extension .h264, how to open an h264 file or convert to avi
- Svetlana on How to restore laminate flooring after exposure to acid or electrolyte
- Nikolay on File with .h264 extension, how to open an h264 file or convert to avi
- Valery on the post The timing belt is slipping. Causes and solutions
- Anonymous on the post All sorts of things