August 23, 2021 Lada.Online 3 878 2
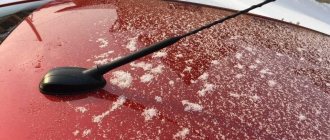
On Lada Vesta, Grant and Niva cars, a combined antenna is used, which is located in the front of the roof. During repairs, it may be necessary to remove the antenna. The dismantling procedure is described in the factory's technological instructions.
Why does the antenna on Lada Vesta fail?
There are several reasons for antenna failures:
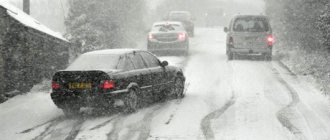
- Mechanical damage. When clearing snow from the roof in winter, a car owner in a hurry may accidentally “knock off” the antenna from the roof. Adding to the negativity is the fact that in the cold the antenna becomes stiffer, increasing the chances of failure. Another option is to leave the box or garage when the antenna touches the top of the opening. The outcome is the same - breakdown. The third option is that the antenna has fallen off. This is explained by the low quality of the antenna itself.
- Electrical faults. This could be anything from a poor signal to complete antenna failure. Electrical faults occur due to many factors that must be considered separately.
Breaking
One morning, when he was clearing snow from his car, he accidentally hit Vesta’s antenna with a scraper, which simply broke off. Moreover, as Shorkin notes, he hooked the antenna rather weakly, since he cleaned the snow very carefully. However, it broke off at the very base.
Upon closer examination, it turned out that it is secured with four small screws. But the fact is that the plastic from which the antenna base is made is very fragile, and this, coupled with small tides for fixation, leads to the bracket breaking easily.
And the reason may not only be low temperature and icing - antennas often break at car washes, while cleaning the car from snow, and even just while driving. The radio, if it breaks down, will still work, but not very well. And the situation is aggravated by the fact that the antenna is responsible for the functioning of the ERA-GLONASS system.
What malfunctions can occur in the Vesta antenna
Types of faults:
- Interference and noise. Can be caused by various devices connected to the cigarette lighter. It could be a low-quality video recorder or radar detector. In addition, spark plugs can also cause interference if they are chosen incorrectly. Only original spare parts and accessories should be used.
- Poor soldering of contacts. Unfortunately, the quality of spare parts and components leaves much to be desired, so an accidentally unsoldered wire or oxidation of the entire board is a normal phenomenon. Fortunately, the dealer is loyal to his customers and is ready to replace these items under warranty.
Before repairing or replacing the antenna yourself, it is recommended to first verify that the antenna is not working.
How to check the antenna's performance
The only way to make sure it's working is to turn on the radio and evaluate the sound quality:
- Switch the radio to tuner mode.
- Search for radio stations. A working antenna should find several stations in the city and 1-2 on the highway.
- The stations found in the city in open areas should sound without interference or extraneous noise. Interference is allowed outside the city, in tunnels and underground parking lots.
If the antenna does not find the necessary radio stations, and those found sound with a huge amount of interference and are inaudible, then the antenna can be considered inoperable.
For native roads
The chassis settings of the Vesta SW station wagon differ from those of the sedan. According to Maxim Sarzhin, after testing the prototypes, to compensate for the heavier rear, it was decided to equip the five-door with stiff rear springs and shock absorbers. As for the Vesta SW Cross modification, it has completely original chassis settings - stiffer springs and shock absorbers with an extended rod “all around”, as well as 17-inch wheels instead of 16-inch ones on the standard five-door.
We also recommend test drives of competing cars
Renault Symbol (sedan)
FAW Besturn B50 (4-door sedan)
Nissan Almera Classic (sedan)
As a result, Vesta with a five-door body stands confidently on a high-speed straight line, enters turns with abandon and smoothes out medium- and large-sized bumps. On concrete and asphalt of poor quality, a micro-profile is transmitted into the cabin, but such accompaniment is not annoying; rather, it provides additional information about the road surface. The Vesta Cross SW chassis, among other things, has a significant reserve of energy intensity: in order to force the shock absorbers to work all the way, you need to try very, very hard. At the same time, the suspension masterfully absorbs bumps of any caliber. It’s a paradox, but I liked the car with stiffer elastic elements primarily because of its smooth ride. It was no less surprising that such a car does not allow any noticeable rolls, despite the impressive 203 mm ground clearance.
How to choose an antenna for the head unit on a Lada Vesta
It is recommended to buy only the original instead of the standard device. Article – 8450007952, price – from 1500 to 3000 rubles. But instead of the antenna itself, you can use longer analogues.
Many car owners practice installing a “shark fin” instead of an antenna. It is worth noting that its efficiency is no worse, but the “fin” is used in the rear of the car.
However, devices used on the roof are not a panacea. There is another universal option - a dipole on glass. This antenna has many advantages:
- ease of installation;
- security;
- efficiency.
Where can I buy?
You can buy an antenna for Lada Vesta via the Internet. You need to search for the product by article number 8450007952, but before purchasing it is strongly recommended to analyze different sites and compare prices, as they can differ dramatically. The table below shows different resources where you can make a purchase, with prices.
| Online store | vendor code | Price, rub.) |
| avtoshop.pro | 8450007952 | 2541-3623 |
| rem.ru | 8450007952 | 5831 |
| renault46.ru | 8450007952 | 2500 |
| gisauto.ru | 8450007952 | 2447-7606 |
| avtovaz-niva.ru | 8450007952 | 1512 |
| ladatorg.ru | 8450007952 | 1900 |
These are not all resources, so you need to look through as many as possible and find the most profitable option. In addition, you can buy a component from Lada Priora, which will cost less.
To save money, you can buy a kit from Priora.
Save on service: do-it-yourself Vesta antenna replacement
The antenna is replaced in cases where repair is impossible. For example, if the device has received mechanical damage, then it will no longer be possible to repair it. In this case, it would be advisable to make a replacement.
Replacement is carried out as follows:
- Remove the right door pillar trim.
- Disconnect the antenna electrical connector.
- Remove the front courtesy lamp.
- Under the lampshade there is a nut for securing the antenna. It needs to be unscrewed.
- Bend the tabs directly under the device itself and pull it out of the car roof.
- Before pulling out the cord, it is recommended to tie a piece of wire to it in order to pull the cable of the new device using this wire.
Installation of a new antenna is carried out in the following order:
- Before installation, wipe the installation area with a damp cloth and degrease.
- Insert the cord and install the device on the roof. Tighten the nut.
- Tie the cable to the wire that was previously stretched during dismantling.
- Pull the new cable and connect the connector.
- Assemble the lampshade and the rack trim.
How to repair mechanical damage to an antenna
Failures can be divided into two types:
- The dipole came off along with the body.
- The elongated part broke in two.
In the first case, you can repair it with sealant. Along the perimeter of the device you need to coat it with special glue, preferably aquarium glue, and then install the housing with the dipole.
In the second case, independent repair is impossible. You can only temporarily repair the broken part. To do this, fix it the way it should stand. Then wrap the joint tightly with electrical tape.
Common main cable tap location:
As for electrical faults, in most cases it is impossible to fix them. If the damage was caused by oxidation of the board, then cleaning and soldering the contacts, as well as replacing rotten elements will only be a temporary option.
Make a beacon yourself
If you are confident in your abilities, then you should try to make the part yourself. In fact, the creation process is very simple. At the preparatory stage, you need to study the following information: • The car is constantly in motion, and this is important when designing a beacon. Ordinary ground beacons will not work. Therefore, a special approach is required in assembling the structure. • Is frame construction a suitable option? How it should be routed under the rear window seal. • How to design a part that is tapered at the top. There is a capacitor in the center; it adjusts the frequency on the channels. There are only two receiving frequencies - 27 and 65 MHz or 28.2 and 68.
Materials
It is necessary to have the following elements: wire MGTF 0.5; capacitor; two cables, 45 cm long; soldering iron
Manufacturing process
On the rear perimeter of the glass, lay out a trapezoid with MGTF 0.5 wire (top border 56.5 + 56.5 cm, bottom – 66.5 + 66.5 cm, side – 22.5 + 22.5);
- Place the pluses where the matching capacitor wires are added, remove the signal with cable RK - 50;
- Draw two wires in the middle of the glass, where they are fixed along the axis of a tuned capacitor (5 - 25 pF).
- Fold the wires in a zigzag;
- Solder the cable from the cut side.
- There should be no gap on the opposite side;
- Connect the device through the connector used by the communication equipment.
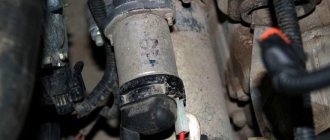
How to connect a new device to Lada Vesta
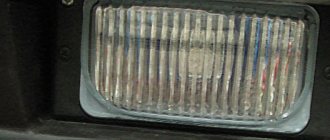
The radio antenna is connected to the standard radio using the following connector:
Lada Vesta received this technology from Renault cars, according to whose technology it was built. Any standard head unit will have this connector and there will be no problems connecting it. It also connects to GPS devices.
However, if there is a need to connect non-standard head units, then such a connector will not work. To bring it to standard form, you need a special antenna adapter of the following type:
The green part connects to the car wiring, and the round part connects to the control unit. For the most part, this applies to Chinese Android-based radios.
If, when installing a non-standard GU, interference appears in the operation of the tuner, then it makes sense to install an additional amplifier. It helps well even in cases where there is no radio signal outside the city.
Repair
If you haven’t decided to buy an antenna for Vesta, you can repair this device yourself. As practice shows, the optimal solution is epoxy glue or sealant. Before gluing, the surface will need to be cleaned of dust and moisture, and then degreased with anti-silicone.
As you can see, the problem is far from isolated and can cause some trouble. However, to AvtoVAZ’s credit, it is worth noting that the Russian auto company recognized the problem and took measures to combat it. So, from June 2016, a new design of seal began to be used during assembly, and in September of the same year, the housing fastening components were replaced with more durable ones.