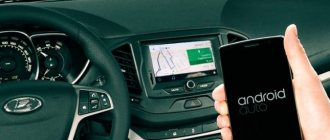
How to connect the antenna to the radio on the Lada Vesta
In order to connect the second end of the wire to the music system, you need to find the location of the plug, then:
- Remove the instrument rim, or rather the plastic panel.
- Plastic panel of the music system. To do this, you need a special tool to pick up the panel.
- Remove the air ducts using a Torx (asterisk).
- Pull out the radio seat.
- Insert the plug with adapter. The beacon cord is located behind the instrument panel. The GPS plug is also attached there. They should be moved to the right inside, to the music system compartment.
Why does the antenna on Lada Vesta fail?
There are several reasons for antenna failures:
- Mechanical damage. When clearing snow from the roof in winter, a car owner in a hurry may accidentally “knock off” the antenna from the roof. Adding to the negativity is the fact that in the cold the antenna becomes stiffer, increasing the chances of failure. Another option is to leave the box or garage when the antenna touches the top of the opening. The outcome is the same - breakdown. The third option is that the antenna has fallen off. This is explained by the low quality of the antenna itself.
- Electrical faults. This could be anything from a poor signal to complete antenna failure. Electrical faults occur due to many factors that must be considered separately.
Antenna Top Mount
Next, use the following algorithm of actions:
- At the very beginning, you need to remove the lampshade behind which you will see the mount;
- Then remove the front passenger handrail;
- Remove the sun visor and the plastic panel on the right pillar;
- Next, loosen the inner headliner and insert the wire;
- It is important not to use a screwdriver or other metal tools. To avoid scratches and other consequences. It is better to use a plastic card.
When the device plug is connected, it is necessary to reassemble in reverse order.
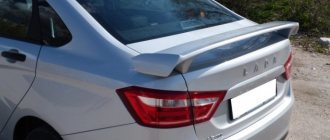
Antenna article number Lada Vesta
If the dealer refused the warranty, then you have three options: 1. Purchase a new device (original article number: 8450007952, or shark fin). 2. Repair the broken part yourself. Please note that the fin device fits on Vesta after reconstruction of the previous mount. Remember that a shark fin is just a replacement for the top of the antenna, not a replacement for other systems (navigation, etc.). 3. Make a new device with your own hands. Having studied all the nuances of signal transmission on a machine.
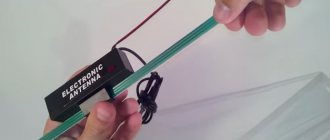
Manufacturing process
On the rear perimeter of the glass, lay out a trapezoid with MGTF 0.5 wire (border 56.5 56.5 cm on top, 66.5 66.5 cm on the bottom, 22.5 22.5 on the side);
- Place the pluses where the matching capacitor wires are added, remove the signal with cable RK - 50;
- Draw two wires in the middle of the glass, where they are fixed along the axis of a tuned capacitor (5 - 25 pF).
- Fold the wires in a zigzag;
- Solder the cable from the cut side.
- There should be no gap on the opposite side;
- Connect the device through the connector used by the communication equipment.
New Lada: What tires and wheels are suitable for the Lada Vesta?
What malfunctions can occur in the Vesta antenna
Types of faults:
- Interference and noise. Can be caused by various devices connected to the cigarette lighter. It could be a low-quality video recorder or radar detector. In addition, spark plugs can also cause interference if they are chosen incorrectly. Only original spare parts and accessories should be used.
- Poor soldering of contacts. Unfortunately, the quality of spare parts and components leaves much to be desired, so an accidentally unsoldered wire or oxidation of the entire board is a normal phenomenon. Fortunately, the dealer is loyal to his customers and is ready to replace these items under warranty.
Before repairing or replacing the antenna yourself, it is recommended to first verify that the antenna is not working.
Make a beacon yourself
If you are confident in your abilities, then you should try to make the part yourself. In fact, the creation process is very simple. At the preparatory stage, you need to study the following information: • The machine is constantly in motion, and this is important when designing a beacon. Ordinary ground beacons will not work.
Therefore, a special approach is required in assembling the structure.• Is a frame structure a suitable option? How it should be laid under the rear window seal.• How to design a part that is narrowed at the top. There is a capacitor in the center; it adjusts the frequency on the channels. There are only two receiving frequencies - 27 and 65 MHz or 28.2 and 68.
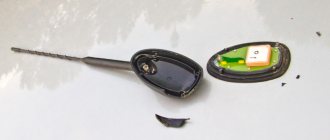
Lada vesta antenna has fallen off, searching for solutions
Owners of domestic cars often encounter such breakdowns. If you want to fix the antenna yourself, then you need to have epoxy cream or sealant.
- First you need to clean the surfaces of the part from dust and moisture.
- Then degrease with anti-silicone.
- Apply silicone sealant along the entire internal border of the broken part. Stick to the car along with the electronics on the roof of the car.
- Use masking tape (time until the sealant dries: 24 hours). Keep in mind that work on attaching the antenna must be done at air temperatures above +5 degrees.
AvtoVAZ has long recognized the problem of fastening failure. And since 2016, the assembly of machines uses fastening bodies with a compacted structure.
Control elements for the standard Lada Vesta radio
In the usual place for everyone - in the upper left corner of the radio there is a button to turn the radio on and off.
To the right of it there is a microphone for communication when the Hands free function is turned on, as well as a Reset button to reset the device settings. Even further to the right is a monochrome display that serves to display various information – track name, radio station and its frequency, time, etc. In general, here is everything that we are used to seeing and expecting from the radio display.
To the right of the radio there is an SD card slot and a DISP clock display key.
In the bottom row we can see the buttons:
MUTE – mute the sound Green and red tubes – accept and reject calls, SCAN – multifunction key.
A little lower we see the RADIO and AUDIO keys, which perform the functions of switching playback modes - either radio or audio from a storage medium.
In the very center of the radio there is a puck for scrolling through various functions, but most often it is used to increase or decrease the volume.
Below are keys with numbers from 1 to 6. These are used to quickly navigate to saved radio stations. In addition, in audio mode they can be used for other purposes. So, for example, key 1 can scroll through folders on a flash card.
Tuning modification Lada Vesta Cross SW
Vesta Cross is the most interesting option from the entire line. Tuning will improve ride quality, comfort, appearance and generally remake the car to suit you, making it truly unique
But it is important to remember that during modifications the machine may suffer a little, the warranty will be voided and reliability will be lost. For example, when chipping an engine, up to 10% of its service life can be lost
And the work itself can cost up to 150 thousand rubles.
In the “cross” version it is possible to increase the ground clearance. If 203 mm of ground clearance is not enough for you, then you need to make some minor modifications. You can install special spacers – metal plates – under the racks. This will give you a few extra centimeters. It should be noted that different spacers are used for the front and rear struts. You can also reduce the ground clearance using a shortened suspension, in which shock absorbers and springs have been developed. But you won’t be able to cut the springs yourself, since a different suspension design is used.
One of the most popular types of tuning is the development of the “brains” and the engine. Often, reflashing is resorted to due to many shortcomings in the program, however, in more recent models, many of them have been eliminated by the manufacturer. But even after reprogramming such cars, they drive completely differently. Replacing the manifold also helps improve performance. Instead of the standard one, a “spider” is installed, but the Euro compliance indicators drop from the fifth level to the second. In addition, ringing often occurs due to the thin metal of the part, so it is wrapped with thermal tape, but this does not completely solve the problem. As a result, the car starts easier, performs better and becomes more dynamic.
Refinement of Vesta's standard limiters
To modify the factory elements, they must first be removed by disassembling the doors in the manner indicated above.
When the components are removed, they need to be disassembled and the metal hemispheres replaced with balls. To do this, first of all, the metal plate is removed - it is picked up with a screwdriver and a nail, and removed. You can use pliers. In this case, it is worth pressing the limiter itself from the side so that the spring does not shoot out. When the plate is removed, all that remains is to remove the plastic cover from the side of the Vesta limiter and remove the spring, on the edge of which a metal hemisphere is attached.
The hemisphere needs to be removed. Its base goes directly into the spring, so it should be pryed out with a screwdriver. Next, all that remains is to lubricate the ball itself with lithol, place it in the hole in the limiter and insert the spring there. You can also apply lubricant to it. Next, the previously removed metal plate is installed back.
It is also recommended to replace the second hemisphere - on the reverse side of the limiter. The remaining three parts are completed in a similar way.
In total you will need 8 balls. Regarding work, the owners of Lada Vesta note that you can do everything yourself, but it is more convenient to work either with a partner or in the garage if there is a vice there.
The replacement process is clearly demonstrated in two videos.
And this story shows a comparison of the left rear door, which has already been modified, and the right rear door, where there is a native limiter with a factory hemisphere.
As you can see, the replacement process has variability, which is already very good. However, most owners of the Russian sedan still prefer installing balls to buying limiters from Focus 3, because it is several times cheaper.
Solution options
In fact, there are several of them.
Contacting the dealership
In the event of a visit to the dealer, there is, as a rule, no clear solution to the issue of knocking from under the hood of the Lada Vesta. It all depends on the specific salon. Some centers simply refuse to replace them, citing the fact that this is not a warranty case. Others sent information about the defect directly to AvtoVAZ, but this is a rather lengthy procedure, and therefore not everyone agrees to wait that long. And the answer is not always positive.
Many dealers refuse to replace the airbag under warranty.
But even if the dealer agrees to make a replacement, things don’t always go smoothly. The fact is that often a part is replaced with a similar one, although managers in the salon assure that it is already from a different batch. The result is the same - literally after a few thousand kilometers the sound returns.
However, some owners note that they had reinforced supports installed, after which the problem disappeared.
Do-it-yourself Lada Vesta engine mount replacement
Some car owners who have encountered a knocking noise from under the hood of their Lada Vesta decide to replace the support themselves, so as not to waste time traveling to the dealer and waiting for AvtoVAZ’s decision.
Sometimes you have to change the support yourself
The process itself is not too complicated and we will look at it in a separate article. However, in this case it all depends on the part purchased.
Sometimes the source of knocking under the hood of a Lada Vesta is not the support itself, but the bolt that secures it. Moreover, according to some owners, if you simply tighten it, the knock will soon be heard again. In this case, you have to add a grower.
How to check the antenna's performance
The only way to make sure it's working is to turn on the radio and evaluate the sound quality:
- Switch the radio to tuner mode.
- Search for radio stations. A working antenna should find several stations in the city and 1-2 on the highway.
- The stations found in the city in open areas should sound without interference or extraneous noise. Interference is allowed outside the city, in tunnels and underground parking lots.
If the antenna does not find the necessary radio stations, and those found sound with a huge amount of interference and are inaudible, then the antenna can be considered inoperable.
Control elements for the standard Lada Vesta radio
In the usual place for everyone - in the upper left corner of the radio there is a button to turn the radio on and off.
To the right of it there is a microphone for communication when the Hands free function is turned on, as well as a Reset button to reset the device settings. Even further to the right is a monochrome display that serves to display various information – track name, radio station and its frequency, time, etc. In general, here is everything that we are used to seeing and expecting from the radio display.
To the right of the radio there is an SD card slot and a DISP clock display key.
In the bottom row we can see the buttons:
MUTE – mute the sound Green and red tubes – accept and reject calls, SCAN – multifunction key.
A little lower we see the RADIO and AUDIO keys, which perform the functions of switching playback modes - either radio or audio from a storage medium.
In the very center of the radio there is a puck for scrolling through various functions, but most often it is used to increase or decrease the volume.
Below are keys with numbers from 1 to 6. These are used to quickly navigate to saved radio stations. In addition, in audio mode they can be used for other purposes. So, for example, key 1 can scroll through folders on a flash card.