January 11, 2016 Lada.Online 85 232 24
The manufacturer equips the Lada Vesta with a central lock, which differs in its functions from the central locking system (central locking) of other Lada cars. For example, the ability to automatically lock the doors when starting to move has been added. Let's talk about this and other functions of this system.
Central locking/unlocking of Vesta door locks is intended for:
- locking/unlocking side doors from inside the car using a button on the instrument panel;
- unlocking side door locks when manually opening the front door;
- automatic locking/unlocking of side door locks based on vehicle speed;
- automatic unlocking of side door locks in case of an accident.
Now about each function in more detail.
Execution Sequence
3. Remove the internal door handle in the same way as the internal front door handle (see “Internal door handle - removal and installation”).
4. Press the latch and disconnect the wiring harness block from the lock.
5. Remove the outer door handle with bracket (see “Outer door handle - replacement”). Disconnect the lock drive cable from the bracket.
7. Using a TORX T30 wrench, unscrew the three fastening screws and remove the lock.
Recommendation. Lubricate the lock mechanism with grease and apply thread locking agent to the lock mounting screws.
8. Install the parts in reverse order.
Recommendation. After installing the lock, check that the door closes easily and tightly. Adjust the lock if necessary.
9. Mark the position of the lock latch so that you can return to the original setting.
10. Using a T40 TORX wrench, loosen the two bolts securing the lock retainer.
11. By moving the latch back and forth and left and right, we achieve easy and tight closing of the door.
12. Upon completion of the adjustment, tighten the screws securing the lock retainer to the prescribed torque of 22 Nm.
Source
Rear right door lock 8450007866 for VAZ Vesta
Dear customers, in order to avoid errors when sending the rear lock 8450007866 of the right door for the Lada Vesta car, in the “Comment” line, indicate the left or right side, the front or rear door, the model of your car, the year of manufacture.
Doors are an integral part of the car body that gradually interacts with you, and therefore its malfunction can occur much faster than other parts.
The AvtoVAZ company has developed a new lock for LADA Vesta / LADA Vesta, which has a door lock function that is activated automatically when you start driving. When the ignition is turned off, the locks will again unlock on their own.
1. Left rear door lock (8450007867), 2. right rear door lock (8450007866), 3. door lock latch (8825702715R), 4. door lock retainer (8825702715R), 5.screw M6x13.5 with flange (7703006361), 6.screw M6x13.5 with flange (7703006361), 7.screw M8x1.25x25 (7703004172), 8.screw M8x1.25x25 (7703 004172) .
A special button has also appeared on the control panel, with which you can unlock or lock all the locks.
In the event of an accident, the protection system is activated - the airbags open. The same happens with door locks, which allows the driver to easily get out of the vehicle.
If parts such as lock 8450007866, its mechanism or window lifters break down, it is necessary to initially dismantle the door trim, and only then carry out repairs or replacement.
1 - plug; 2 — lock fastening screws; 3 — rear right door lock 8450007866; 4 — drive cable for the lock of the outer door handle; 5 — outer handle cable clip holder; 6 — lock lever; 7 — tip of the cable of the outer handle
— disconnect the door wiring harness block from the lock;
— unscrew the screws 2 securing the lock 3 to the door, remove the lock from the door cavity (replaceable Torx T30 head, knob);
— disconnect the holder 5 of the clip 4, and then the tip 7 of the cable of the outer door handle from the lock, remove the lock assembly with the cable of the inner handle of the lock drive;
— disconnect the inner handle cable from the lock (flat-head screwdriver).
Other article numbers of the product and its analogues in catalogues: 8450007866.
Lada Vesta / Lada Vesta.
Any breakdown is not the end of the world, but a completely solvable problem!
How to independently replace the right rear door lock in a Lada Vesta family car.
With the AvtoAzbuka online store, repair costs will be minimal.
Just COMPARE and BE SURE!!!
Don’t forget to share the information you find with your friends and acquaintances, as they may also need it - just click one of the social networking buttons located above
How much will it cost to replace Lada Vesta door handles?
Many Vesta car owners prefer to completely replace them instead of repairing them. Sets of new parts are sold in car dealerships everywhere, and purchasing the required color is not a problem. You can order the necessary spare parts on the Internet, for which you need to know their article number.
Marking and cost of Lada Vesta door handles:
| Number | Installation location | Price |
| 8450007739 | Front outer (right) | from 940 rub. up to 1451 rub. |
| 8450007873 | Front outer (left) | from 940 rub. up to 1451 rub. |
| 8450007872 | Rear outer (left) | from 800 rub. |
| 8450007739 | Rear outer (right) | from 800 rub. |
The cost of a set for four doors is approximately 2500-2700 thousand rubles, depending on their color and point of sale. Craftsmen charge an average of 500 rubles for installing door handles, but knowing how to remove a Lada Vesta handle, you can make the replacement yourself.
How to close the doors?
If the battery is discharged, the central locking, of course, will not work. Therefore, it is necessary to know how to lock the machine.
Everything is done simply. The locks of all doors, except the driver's, are equipped with a special groove with a closing button. You need to insert the Vesta ignition key into this groove and press down. The button will go down, after which the door must be slammed and it will remain closed. This procedure must be done with three doors, and then close the driver's door with the key.
Knowing this information, you can always close or open the Lada Vesta, regardless of whether your battery is charged or whether the key fob is working.
It is also worth remembering to be careful. Due to the fact that the lock cylinder is closed with a plastic plug, you need to be careful when washing, as the jet from the Karcher sometimes knocks it off. In addition, if you had to remove it in winter, be very careful, because in the cold the plastic becomes brittle and can break.
Removing the door handle on a Lada Vesta car
We will consider the process of removing the external handles, which must be done in case of any type of breakdown, in stages.
- Looking at the handle from the outside, it seems that it does not have any fastening elements and it is completely unclear how to dismantle it. In fact, access to the fasteners is located under a rubber plug at the end of the door.
This plug must be carefully pryed with a hard object and pulled out.
- There is a bolt inside under the plug. It needs to be unscrewed using a T15 key. There is no need to completely unscrew the screw; you can simply loosen it a few turns - this will be enough.
- Next, you need to carefully pull out the plastic stopper.
It should come out easily, without any extra effort.
The plastic here is quite fragile, so you need to act carefully. If the element does not slide out, you can spray a little liquid lubricant, such as VD-40, into the gap and try again
- After the corner is removed, the door handle must be moved slightly back and towards you. First the back part is released, and then the front. You also need to act carefully, with smooth movements.
The process described concerns the passenger handle. If you need to remove the driver's, then first you need to disconnect it from the lock that is located in it. To do this, the door cards are removed to open access to the door rods, and the fastenings are carefully disconnected.
Central locking control from the interior
To lock/unlock the locks of all Vesta doors from the interior, press the corresponding button on the instrument panel, and the indicator on the button will light up for a while and then go out. If the hood, trunk or one of the doors is open, then pressing the button will unlock the doors again. If you need to forcefully close the doors and arm the car (if any door is open), then you should press the button and hold it for a while.
Typical problems with Lada Vesta door handles
- Most often, door handles on Vesta jam or do not return to their original position. This is especially true for the driver's door, which is used more intensively. This problem sometimes occurs immediately after purchasing a new car. The manufacturer knows about this defect and replaces these parts in the warranty service without problems, so if such a malfunction occurs, you can simply contact the service center, where they will fix it for you. But you can cope with this problem yourself.
- In addition to jamming, many drivers are worried about such a nuisance as the constant squeaking of internal door handles. This intrusive sound can be eliminated by installing additional insulating material or sealant from the inside, which will require dismantling and disassembling the internal element.
- Another common problem is damage to the paintwork near the outer trim. To prevent them from scratching the paint, it is necessary to fix the gasket between the moving element and the body, which can sometimes not be held securely. In order to do this, you need to glue the gasket under the rubbing parts using double-sided tape.
Automatic door locking at speed
At speeds above 7 km/h, all doors are automatically locked (if the ignition is on and the driver's door has not been previously locked). Automatic opening of the doors occurs when the ignition is turned off (if the locking was done automatically by speed and the driver's door lock was not unlocked).
To activate the automatic closing of doors on Vesta when driving, press the central locking button and hold it for 5 seconds. To disable this function, repeat the procedure again:
Removing the rear door card on Lada Vesta
In the rear of the car, everything is a little simpler, since manual windows are most often installed here, and there is also no mirror control unit. Up to and total number of fastenings is significantly less. This allows you to spend half as much time on doing the same work. However, you will have to be careful, otherwise you may damage one of the elements and incur additional costs. It is best to also use a plastic interior disassembly kit to avoid scratching or damaging anything.
The instructions will be somewhat shorter than for the front door:
- First you need to remove the window handle or button if you have an electric control option. To do this, use a plastic spatula to pry up the retaining ring and then pull it out with your hands. The rest of the device can be easily removed by hand.
- The door handle trim is also secured with latches. It is enough to snap them off using the same spatula and then remove them with your hands.
- Here you will need a socket wrench of 10, since two mounting bolts are waiting for you under the handle lining. Unscrew them first so as not to violate the card removal technology.
- At the bottom of the card there is a hole with a fastening screw for a Torx 20 - asterisk. This fastener is easy to unscrew; you just need to choose the right tool.
- Next, you just have to snap off the clips one by one, starting from the bottom. It's very simple and don't be afraid to break them, this is a normal process. Then you need to buy and replace them with original fasteners.
The process of removing the Lada Vesta rear door card is quite simple, it will take about 15 minutes. All four car cards can be removed in 1 hour, even if you do not have much experience in doing this work. However, a car service center will charge you a lot of money for such work, so it makes sense to do the work yourself and save your budget. Whatever the purpose of disassembling this element, it makes sense to perform additional sound insulation of the doors. To do this, buy the necessary materials in advance.
Source
Replacing headlight glass on Lada Vesta
- After dismantling, we begin disassembly, warming up the junction of the headlight unit with the base with a hairdryer.
- Carefully pry up the layer of sealant around the perimeter and separate the plastic from the glass.
- We replace damaged elements, usually a polymer case or glass.
- We clean the contact area from dust, glue residues, rubber
- We press the structure tightly and leave it in a motionless position for several hours. It is better to leave it overnight so that the structure becomes stiffer and the consistency hardens as much as possible.
Door trim for LADA Vesta
If parts such as a lock or window regulators break down, it is necessary to initially remove the door trim, and only then carry out repairs or replacement.
To remove the front door trim, follow these instructions:
- To remove the plastic triangle of the side mirror, use a flat-head screwdriver to pry up the part and disconnect the retainer.
- Afterwards we disconnect the lampshade. At the bottom you will also see three fastening screws - we also remove them.
- We remove the plug from the end of the door and unscrew the fastening screw.
- In the inner central part of the door, unscrew the screw, which is located inside the handle.
- Then we remove the lock and the BUS (window control unit).
- Then unscrew the last fastening screw and begin to remove the trim using a flat-head screwdriver, starting from the bottom.
You can remove the trim on the rear doors using a similar procedure.
Advice! For those who want to improve the sound of music in their car, they should install improved sound insulation under the standard door trim.
How does the Lada Vesta central door lock work?
The manufacturer equips the Lada Vesta with a central lock, which differs in its functions from the central locking system (central locking) of other Lada cars. For example, the ability to automatically lock the doors when starting to move has been added. Let's talk about this and other functions of this system.
Central locking/unlocking of Vesta door locks is intended for:
- locking/unlocking side doors from inside the car using a button on the instrument panel;
- unlocking side door locks when manually opening the front door;
- automatic locking/unlocking of side door locks based on vehicle speed;
- automatic unlocking of side door locks in case of an accident.
Now about each function in more detail.
Removing the coarse filter
To remove the Lada Vesta coarse fuel filter, made in the form of a fine mesh, the fuel level sensor is first removed.
First of all, using a screwdriver, disconnect the drain tube from the intake chamber.
Then the guide covers should be removed from the intake chamber, but first you need to mark the guide with the spring.
Next, by disengaging 3 latches, the fuel pump housing, which comes complete with a coarse filter, is removed from the intake chamber.
The filter element itself is held in place by a spring (retaining spring). You need to pry it up and remove the mesh.
What is the problem?
Problems of this kind rarely arise, but almost all of us have found ourselves in a situation where we urgently need to get into the car or lock it, but this cannot be done due to a dead battery or battery in the key itself. This situation is a mere trifle if everything happened at home or near an electronics store where you can quickly buy a new battery. However, fate is not always so favorable.
This key may be lost. And the battery has to be changed from time to time.
That is why it is important to know some design features of the Lada Vesta door lock. If you are aware of these subtleties, then even in such a situation you will easily find a way out.
Door handle on a LADA Vesta car
At the AvtoVAZ plant, the manufacturer already equips LADA Vesta doors with external handles of the European standard. They should be replaced due to breakdown or partial inoperability.
It just so happens that dismantling and installing the outer handle is a rather lengthy procedure. For everything to go smoothly, it is important to adhere to the following scheme:
- We dismantle the door trim of the doors we are interested in.
- Afterwards, it is important to disconnect the lock drive rod from the cylinder, which is located inside the door.
- You will see a cover on the cylinder – this should also be removed using a flat-head screwdriver.
- There is a plug at the end of the door - remove it using keys.
- We dismantle the larva itself by unscrewing the screw securing it.
- Now you can remove the handle itself by simply pulling it slightly back.
- Then remove the outer handle gasket.
- The last step is to dismantle the handle mechanism. And for this we take a drill and a 5 mm drill bit. Use it to drill out the rivet under the gasket.
As for removing the handle on the passenger door, you don’t even need to dismantle the trim at first, since they don’t have a lock drive rod.
Automatic unlocking of locks in case of accident
On the Lada Vesta, in the event of an accident, if the airbags are deployed, the locks of all side doors are automatically unlocked. In addition, a message will be automatically sent through the ERA-GLONASS system.
It is worth noting that Vesta’s central locking system has overheating protection. If the door locks are closed or opened repeatedly within a short period of time, the system stops responding to pressing the button on the instrument panel, as well as to pressing the buttons on the key. The performance of the central locking system will be fully restored after some time automatically.
Let us remind you that other operating instructions for Vesta can be found in this category or by content.
Categories of products that may be of interest to you based on the article “How does the Lada Vesta central door lock work”:
We disassemble the headlight on Lada Vesta
Step by step guide to remove the headlight:
- We place the car within the perimeter of the repair area, on a flat platform, inspection channel. A roadside overpass and a hydraulic lifting mechanism are ineffective in this case.
- Open the hood and remove the terminals from the battery to prevent a short circuit.
- We dismantle the bumper: unclip the sides, unscrew the fastening screws at the front, bottom, top.
Replacement of LADA Vesta door limiters
To secure the door of any car, so-called limiters are used. If the standard clamps on your LADA Vesta do not cope with their duties, they should be replaced - you can install clamps from a foreign car.
The procedure for removing the clamps is as follows:
- First, remove the door trim.
- We turn out the limiter screw No. 4 towards the body pillar.
- We unscrew nuts No. 5 towards the door panel, after which we easily remove the stopper.
- Now you can install a new latch - use the standard one or an alternative one.
After completing the third point of the plan, you can also remove the LADA Vesta doors, for example, for repair or replacement, and only then carry out assembly in the reverse order.
( 1 ratings, average: 5.00 out of 5)
- home
- Information
- Doors Lada Vesta
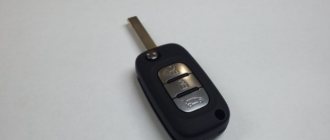
How to open doors manually
The Vesta key has buttons that allow you to open or close the car doors remotely. What to do if the battery is dead, the battery in the key is dead or it is faulty? To open the doors with a key, you must first remove the lock cylinder plug and then unlock it in the usual way.
More details about how to close and open doors manually are described here.